centos6.5安装自动化工具ansible和图形化工具tower
2017-01-03 23:59
489 查看
一、安装ansible并测试
1、查看系统版本:
[root@ansible-server etc]# lsb_release -a
LSB Version: :base-4.0-amd64:base-4.0-noarch:core-4.0-amd64:core-4.0-noarch:graphics-4.0-amd64:graphics-4.0-noarch:printing-4.0-amd64:printing-4.0-noarch
Distributor ID: CentOS
Description: CentOS release 6.5 (Final)
Release: 6.5
Codename: Final
2、安装ansible配置yum配置
163源
[root@ansible-server yum.repos.d]# vi CentOS-Base.repo
[163base]
name=CentOS-$releasever - Base - 163.com
baseurl=http://mirrors.163.com/centos/$releasever/os/$basearch/
#mirrorlist=http://mirrorlist.centos.org/?release=$releasever&arch=$basearch&repo=os
gpgcheck=1
gpgkey=http://mirror.centos.org/centos/RPM-GPG-KEY-CentOS-6
#released updates
[163updates]
name=CentOS-$releasever - Updates - 163.com
baseurl=http://mirrors.163.com/centos/$releasever/updates/$basearch/
#mirrorlist=http://mirrorlist.centos.org/?release=$releasever&arch=$basearch&repo=updates
gpgcheck=1
gpgkey=http://mirror.centos.org/centos/RPM-GPG-KEY-CentOS-6
#additional packages that may be useful
[163extras]
name=CentOS-$releasever - Extras - 163.com
baseurl=http://mirrors.163.com/centos/$releasever/extras/$basearch/
#mirrorlist=http://mirrorlist.centos.org/?release=$releasever&arch=$basearch&repo=extras
gpgcheck=1
gpgkey=http://mirror.centos.org/centos/RPM-GPG-KEY-CentOS-6
epel源
[root@ansible-server yum.repos.d]# cat epel.repo
[epel]
name=CentOS-$releasever - epel
baseurl=https://mirrors.tuna.tsinghua.edu.cn/epel/6/x86_64/
#mirrorlist=http://mirrorlist.centos.org/?release=$releasever&arch=$basearch&repo=os
gpgcheck=0
3、安装ansible
[root@ansible-server ~]# yum install ansible
4、ansible安装后测试
测试机器作为被控制端为suse11的虚拟机
查看配置文件
[root@ansible-server ~]# cd /etc/ansible/
[root@ansible-server ansible]# ls
ansible.cfg hosts roles
配置ansible hosts文件
[root@ansible-server ansible]# vi hosts
[slave]
192.168.1.210 ansible_ssh_user=root ansible_ssh_port=22 ansible_ssh_pass=suse
说明:
上面分别是被控制端IP地址、登陆用户名、ssh协议端口以及登陆密码
PING测试:
[root@ansible-server ansible]# ansible slave -m ping
paramiko: The authenticity of host '192.168.1.210' can't be established.
The ssh-rsa key fingerprint is 3eddc40386a9465452b12910a61a3c65.
Are you sure you want to continue connecting (yes/no)?
yes
192.168.1.210 | SUCCESS => {
"changed": false,
"ping": "pong"
第一次登陆还需要手动输入“yes”添加信任,如果避免这一步的话也可以,需要配置ansible的配置文件ansible.cfg
hosts文件再添加一台机器
[root@ansible-server ansible]# vi hosts
[slave]
192.168.1.210 ansible_ssh_user=root ansible_ssh_port=22 ansible_ssh_pass=suse
192.168.1.211 ansible_ssh_user=root ansible_ssh_port=22 ansible_ssh_pass=suse
修改配置文件,打开host_key_checking这一行的注释
[root@ansible-server ansible]# vi ansible.cfg
#host_key_checking = False
host_key_checking = False
测试如下所示
[root@ansible-server ansible]# ansible 192.168.1.211 -m ping
192.168.1.211 | SUCCESS => {
"changed": false,
"ping": "pong"
第一次登陆不需要手动输入
二、安装tower
1、资源下载
https://www.ansible.com/license
此链接下载免费控制10个机器的授权,需要填写邮箱等信息,授权文件会发到你的邮箱,安装tower后登陆到web界面添加授权文件就可以开始你的tower之旅了
https://www.ansible.com/tower-trial 此链接是下载免费测试的tower安装引导文件,叫做安装引导文件是我自己想出的名字,因为安装tower是由一大堆的ansible-playbook文件组合到一块去取网络资源安装的
2、解压缩tower引导文件
[root@ansible-server ~]# cd /home/ansible/
[root@ansible-server ansible]# ls
ansible-tower-setup-latest.tar.gz
[root@ansible-server ansible]# tar zxf ansible-tower-setup-latest.tar.gz
[root@ansible-server ansible]# cd ansible-tower-setup-3.0.3/
[root@ansible-server ansible-tower-setup-3.0.3]# ls
ansible.cfg group_vars inventory README.md roles
backup.yml install.yml licenses restore.yml setup.sh
3、配置安装tower的yum源
以centos系统默认的yum源替代163的yum源
[root@ansible-server yum.repos.d]# vi CentOS-Base.repo
[base]
name=CentOS-$releasever - Base
mirrorlist=http://mirrorlist.centos.org/?release=$releasever&arch=$basearch&repo=os
#baseurl=http://mirror.centos.org/centos/$releasever/os/$basearch/
gpgcheck=1
gpgkey=file:///etc/pki/rpm-gpg/RPM-GPG-KEY-CentOS-6
#released updates
[updates]
name=CentOS-$releasever - Updates
mirrorlist=http://mirrorlist.centos.org/?release=$releasever&arch=$basearch&repo=updates
#baseurl=http://mirror.centos.org/centos/$releasever/updates/$basearch/
gpgcheck=1
gpgkey=file:///etc/pki/rpm-gpg/RPM-GPG-KEY-CentOS-6
#additional packages that may be useful
[extras]
name=CentOS-$releasever - Extras
mirrorlist=http://mirrorlist.centos.org/?release=$releasever&arch=$basearch&repo=extras
#baseurl=http://mirror.centos.org/centos/$releasever/extras/$basearch/
gpgcheck=1
gpgkey=file:///etc/pki/rpm-gpg/RPM-GPG-KEY-CentOS-6
epel源不变
4、部署tower
解压缩软件包
tar -zxf ansible-tower-setup-latest.tar.gz
设置主机信息
[root@ansible-server ansible]# cd ansible-tower-setup-3.0.3/
[root@ansible-server ansible-tower-setup-3.0.3]# ll
total 64
-rw-rw-r--. 1 1004 1004 203 Oct 31 21:58 ansible.cfg
-rw-rw-r--. 1 1004 1004 128 Oct 31 21:58 backup.yml
drwxrwxr-x. 2 1004 1004 4096 Oct 31 21:58 group_vars
-rw-rw-r--. 1 1004 1004 4781 Oct 31 21:58 install.yml
-rw-rw-r--. 1 1004 1004 194 Oct 31 21:58 inventory
-rw-r--r--. 1 root root 194 Dec 26 21:24 inventory.bak
drwxrwxr-x. 2 1004 1004 12288 Oct 31 21:58 licenses
-rw-rw-r--. 1 1004 1004 2510 Oct 31 21:58 README.md
-rw-rw-r--. 1 1004 1004 233 Oct 31 21:58 restore.yml
drwxrwxr-x. 18 1004 1004 4096 Oct 31 21:58 roles
-rwxrwxr-x. 1 1004 1004 9461 Oct 31 21:58 setup.sh
[root@ansible-server ansible-tower-setup-3.0.3]# sed -i "s#password=''#password='admin'#g" inventory
[root@ansible-server ansible-tower-setup-3.0.3]# sed -i "s#host=''#host='127.0.0.1'#g" inventory
[root@ansible-server ansible-tower-setup-3.0.3]# sed -i "s#port=''#port='5432'#g" inventory
配置软件源
[root@ansible-serveransible-tower-setup-3.0.3]# sed -i 's#dl.fedoraproject.org/pub#mirrors.ustc.edu.cn#g' roles/packages_el/defaults/main.yml[root@ansible-server ansible-tower-setup-3.0.3]# sed -i 's/#baseurl=/baseurl=/g' roles/packages_el/files/epel-6.repo
[root@ansible-server ansible-tower-setup-3.0.3]# sed -i 's/mirrorlist=/#mirrorlist=/g' roles/packages_el/files/epel-6.repo
[root@ansible-server ansible-tower-setup-3.0.3]# sed -i 's#download.fedoraproject.org/pub#mirrors.ustc.edu.cn#g' roles/packages_el/files/epel-6.repo
[root@ansible-server ansible-tower-setup-3.0.3]# yum -y install centos-release-scl-rh centos-release-scl
[root@ansible-server ansible-tower-setup-3.0.3]# sed -i 's#mirror.centos.org#centos.ustc.edu.cn#g' /etc/yum.repos.d/CentOS-SCLo-scl.repo
[root@ansible-server ansible-tower-setup-3.0.3]# sed -i 's#mirror.centos.org#centos.ustc.edu.cn#g' /etc/yum.repos.d/CentOS-SCLo-scl-rh.repo
[root@ansible-server ansible-tower-setup-3.0.3]# yum -y install supervisor
安装tower
为了防止出现内存过小的报错,修改preflight的tasks文件
[root@ansible-server ansible-tower-setup-3.0.3]# vi roles/preflight/tasks/main.yml
修改下面一行
minimum_var_space: 10000000000
把参数修改到尽量小
minimum_var_space: 100000000
default目录下也是同理
[root@ansible-server ansible-tower-setup-3.0.3]# vi roles/preflight/defaults/main.yml修改下面一行minimum_var_space: 10000000000把参数修改到尽量小minimum_var_space: 100000000
安装tower
[root@ansible-server ansible-tower-setup-3.0.3]#./setup.sh
如果出现preflight安装的错误,删除roles/preflight/tasks/main.yml文件再尝试
当然也可能因为网络的原因出现timeout的错误,不过没关系再次尝试
如果网络没有问题的话还回出现类似于下面所示的报错:
TASK [awx_install : Migrate the Tower database schema (may take awhile when upgrading).] ***
提示数据库连接不上,解决办法:
启动postgresql
# service postgresql-9.4 initdb
# service postgresql-9.4 start
# chkconfig postgresql-9.4 on
创建用户
# su - postgres
-bash-4.1$ psql
psql (8.4.20)
Type "help" for help.
postgres=# \password postgres;
Enter new password:
Enter it again:
postgres=# CREATE ROLE awx CREATEDB PASSWORD 'admin' LOGIN;
CREATE ROLE
postgres-# \q
[root@ansible-server ~]# sed -i 's#peer#md5#g' /var/lib/pgsql/data/pg_hba.conf
[root@ansible-server ~]# sed -i 's#ident#md5#g' /var/lib/pgsql/data/pg_hba.conf
[root@ansible-server ~]# service postgresql-9.4 restart
Stopping postgresql service: [ OK ]
Starting postgresql service: [ OK ]
测试awx用户连接,输入密码连接,并创建数据库
[root@ansible-server pgsql]# psql -U awx -d postgres -h 127.0.0.1
Password for user awx:
psql (8.4.20)
Type "help" for help.
postgres=> create database awx;
CREATE DATABASE
postgres=> \q
再次执行安装过程
[root@ansible-server ansible-tower-setup-3.0.3]# ./setup.sh
最后出现安装成功的提示说明tower安装完成
三、导入licenses
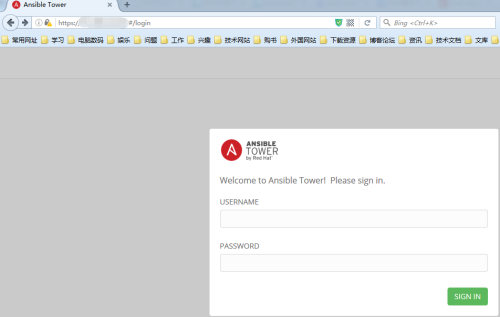
安装完成后就可以通过https://IP/#来访问你的tower界面了,这里的IP是安装tower的服务器IP
访问如下图所示:
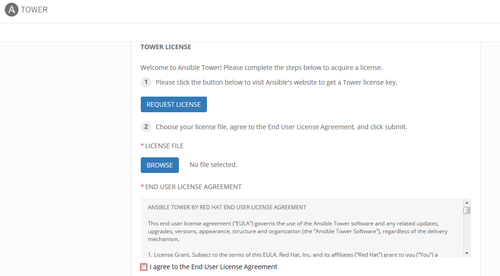
接下来导入我们申请的license
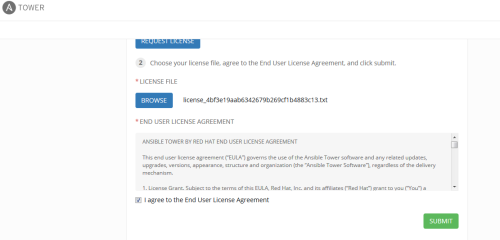
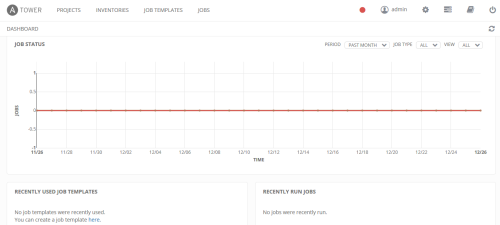
提交后就可以进入tower的管理页面了
参考文档:
http://www.jianshu.com/p/1c6aa6ceeca6
1、查看系统版本:
[root@ansible-server etc]# lsb_release -a
LSB Version: :base-4.0-amd64:base-4.0-noarch:core-4.0-amd64:core-4.0-noarch:graphics-4.0-amd64:graphics-4.0-noarch:printing-4.0-amd64:printing-4.0-noarch
Distributor ID: CentOS
Description: CentOS release 6.5 (Final)
Release: 6.5
Codename: Final
2、安装ansible配置yum配置
163源
[root@ansible-server yum.repos.d]# vi CentOS-Base.repo
[163base]
name=CentOS-$releasever - Base - 163.com
baseurl=http://mirrors.163.com/centos/$releasever/os/$basearch/
#mirrorlist=http://mirrorlist.centos.org/?release=$releasever&arch=$basearch&repo=os
gpgcheck=1
gpgkey=http://mirror.centos.org/centos/RPM-GPG-KEY-CentOS-6
#released updates
[163updates]
name=CentOS-$releasever - Updates - 163.com
baseurl=http://mirrors.163.com/centos/$releasever/updates/$basearch/
#mirrorlist=http://mirrorlist.centos.org/?release=$releasever&arch=$basearch&repo=updates
gpgcheck=1
gpgkey=http://mirror.centos.org/centos/RPM-GPG-KEY-CentOS-6
#additional packages that may be useful
[163extras]
name=CentOS-$releasever - Extras - 163.com
baseurl=http://mirrors.163.com/centos/$releasever/extras/$basearch/
#mirrorlist=http://mirrorlist.centos.org/?release=$releasever&arch=$basearch&repo=extras
gpgcheck=1
gpgkey=http://mirror.centos.org/centos/RPM-GPG-KEY-CentOS-6
epel源
[root@ansible-server yum.repos.d]# cat epel.repo
[epel]
name=CentOS-$releasever - epel
baseurl=https://mirrors.tuna.tsinghua.edu.cn/epel/6/x86_64/
#mirrorlist=http://mirrorlist.centos.org/?release=$releasever&arch=$basearch&repo=os
gpgcheck=0
3、安装ansible
[root@ansible-server ~]# yum install ansible
4、ansible安装后测试
测试机器作为被控制端为suse11的虚拟机
查看配置文件
[root@ansible-server ~]# cd /etc/ansible/
[root@ansible-server ansible]# ls
ansible.cfg hosts roles
配置ansible hosts文件
[root@ansible-server ansible]# vi hosts
[slave]
192.168.1.210 ansible_ssh_user=root ansible_ssh_port=22 ansible_ssh_pass=suse
说明:
上面分别是被控制端IP地址、登陆用户名、ssh协议端口以及登陆密码
PING测试:
[root@ansible-server ansible]# ansible slave -m ping
paramiko: The authenticity of host '192.168.1.210' can't be established.
The ssh-rsa key fingerprint is 3eddc40386a9465452b12910a61a3c65.
Are you sure you want to continue connecting (yes/no)?
yes
192.168.1.210 | SUCCESS => {
"changed": false,
"ping": "pong"
第一次登陆还需要手动输入“yes”添加信任,如果避免这一步的话也可以,需要配置ansible的配置文件ansible.cfg
hosts文件再添加一台机器
[root@ansible-server ansible]# vi hosts
[slave]
192.168.1.210 ansible_ssh_user=root ansible_ssh_port=22 ansible_ssh_pass=suse
192.168.1.211 ansible_ssh_user=root ansible_ssh_port=22 ansible_ssh_pass=suse
修改配置文件,打开host_key_checking这一行的注释
[root@ansible-server ansible]# vi ansible.cfg
#host_key_checking = False
host_key_checking = False
测试如下所示
[root@ansible-server ansible]# ansible 192.168.1.211 -m ping
192.168.1.211 | SUCCESS => {
"changed": false,
"ping": "pong"
第一次登陆不需要手动输入
二、安装tower
1、资源下载
https://www.ansible.com/license
此链接下载免费控制10个机器的授权,需要填写邮箱等信息,授权文件会发到你的邮箱,安装tower后登陆到web界面添加授权文件就可以开始你的tower之旅了
https://www.ansible.com/tower-trial 此链接是下载免费测试的tower安装引导文件,叫做安装引导文件是我自己想出的名字,因为安装tower是由一大堆的ansible-playbook文件组合到一块去取网络资源安装的
2、解压缩tower引导文件
[root@ansible-server ~]# cd /home/ansible/
[root@ansible-server ansible]# ls
ansible-tower-setup-latest.tar.gz
[root@ansible-server ansible]# tar zxf ansible-tower-setup-latest.tar.gz
[root@ansible-server ansible]# cd ansible-tower-setup-3.0.3/
[root@ansible-server ansible-tower-setup-3.0.3]# ls
ansible.cfg group_vars inventory README.md roles
backup.yml install.yml licenses restore.yml setup.sh
3、配置安装tower的yum源
以centos系统默认的yum源替代163的yum源
[root@ansible-server yum.repos.d]# vi CentOS-Base.repo
[base]
name=CentOS-$releasever - Base
mirrorlist=http://mirrorlist.centos.org/?release=$releasever&arch=$basearch&repo=os
#baseurl=http://mirror.centos.org/centos/$releasever/os/$basearch/
gpgcheck=1
gpgkey=file:///etc/pki/rpm-gpg/RPM-GPG-KEY-CentOS-6
#released updates
[updates]
name=CentOS-$releasever - Updates
mirrorlist=http://mirrorlist.centos.org/?release=$releasever&arch=$basearch&repo=updates
#baseurl=http://mirror.centos.org/centos/$releasever/updates/$basearch/
gpgcheck=1
gpgkey=file:///etc/pki/rpm-gpg/RPM-GPG-KEY-CentOS-6
#additional packages that may be useful
[extras]
name=CentOS-$releasever - Extras
mirrorlist=http://mirrorlist.centos.org/?release=$releasever&arch=$basearch&repo=extras
#baseurl=http://mirror.centos.org/centos/$releasever/extras/$basearch/
gpgcheck=1
gpgkey=file:///etc/pki/rpm-gpg/RPM-GPG-KEY-CentOS-6
epel源不变
4、部署tower
解压缩软件包
tar -zxf ansible-tower-setup-latest.tar.gz
设置主机信息
[root@ansible-server ansible]# cd ansible-tower-setup-3.0.3/
[root@ansible-server ansible-tower-setup-3.0.3]# ll
total 64
-rw-rw-r--. 1 1004 1004 203 Oct 31 21:58 ansible.cfg
-rw-rw-r--. 1 1004 1004 128 Oct 31 21:58 backup.yml
drwxrwxr-x. 2 1004 1004 4096 Oct 31 21:58 group_vars
-rw-rw-r--. 1 1004 1004 4781 Oct 31 21:58 install.yml
-rw-rw-r--. 1 1004 1004 194 Oct 31 21:58 inventory
-rw-r--r--. 1 root root 194 Dec 26 21:24 inventory.bak
drwxrwxr-x. 2 1004 1004 12288 Oct 31 21:58 licenses
-rw-rw-r--. 1 1004 1004 2510 Oct 31 21:58 README.md
-rw-rw-r--. 1 1004 1004 233 Oct 31 21:58 restore.yml
drwxrwxr-x. 18 1004 1004 4096 Oct 31 21:58 roles
-rwxrwxr-x. 1 1004 1004 9461 Oct 31 21:58 setup.sh
[root@ansible-server ansible-tower-setup-3.0.3]# sed -i "s#password=''#password='admin'#g" inventory
[root@ansible-server ansible-tower-setup-3.0.3]# sed -i "s#host=''#host='127.0.0.1'#g" inventory
[root@ansible-server ansible-tower-setup-3.0.3]# sed -i "s#port=''#port='5432'#g" inventory
配置软件源
[root@ansible-serveransible-tower-setup-3.0.3]# sed -i 's#dl.fedoraproject.org/pub#mirrors.ustc.edu.cn#g' roles/packages_el/defaults/main.yml[root@ansible-server ansible-tower-setup-3.0.3]# sed -i 's/#baseurl=/baseurl=/g' roles/packages_el/files/epel-6.repo
[root@ansible-server ansible-tower-setup-3.0.3]# sed -i 's/mirrorlist=/#mirrorlist=/g' roles/packages_el/files/epel-6.repo
[root@ansible-server ansible-tower-setup-3.0.3]# sed -i 's#download.fedoraproject.org/pub#mirrors.ustc.edu.cn#g' roles/packages_el/files/epel-6.repo
[root@ansible-server ansible-tower-setup-3.0.3]# yum -y install centos-release-scl-rh centos-release-scl
[root@ansible-server ansible-tower-setup-3.0.3]# sed -i 's#mirror.centos.org#centos.ustc.edu.cn#g' /etc/yum.repos.d/CentOS-SCLo-scl.repo
[root@ansible-server ansible-tower-setup-3.0.3]# sed -i 's#mirror.centos.org#centos.ustc.edu.cn#g' /etc/yum.repos.d/CentOS-SCLo-scl-rh.repo
[root@ansible-server ansible-tower-setup-3.0.3]# yum -y install supervisor
安装tower
为了防止出现内存过小的报错,修改preflight的tasks文件
[root@ansible-server ansible-tower-setup-3.0.3]# vi roles/preflight/tasks/main.yml
修改下面一行
minimum_var_space: 10000000000
把参数修改到尽量小
minimum_var_space: 100000000
default目录下也是同理
[root@ansible-server ansible-tower-setup-3.0.3]# vi roles/preflight/defaults/main.yml修改下面一行minimum_var_space: 10000000000把参数修改到尽量小minimum_var_space: 100000000
安装tower
[root@ansible-server ansible-tower-setup-3.0.3]#./setup.sh
如果出现preflight安装的错误,删除roles/preflight/tasks/main.yml文件再尝试
当然也可能因为网络的原因出现timeout的错误,不过没关系再次尝试
如果网络没有问题的话还回出现类似于下面所示的报错:
TASK [awx_install : Migrate the Tower database schema (may take awhile when upgrading).] ***
提示数据库连接不上,解决办法:
启动postgresql
# service postgresql-9.4 initdb
# service postgresql-9.4 start
# chkconfig postgresql-9.4 on
创建用户
# su - postgres
-bash-4.1$ psql
psql (8.4.20)
Type "help" for help.
postgres=# \password postgres;
Enter new password:
Enter it again:
postgres=# CREATE ROLE awx CREATEDB PASSWORD 'admin' LOGIN;
CREATE ROLE
postgres-# \q
[root@ansible-server ~]# sed -i 's#peer#md5#g' /var/lib/pgsql/data/pg_hba.conf
[root@ansible-server ~]# sed -i 's#ident#md5#g' /var/lib/pgsql/data/pg_hba.conf
[root@ansible-server ~]# service postgresql-9.4 restart
Stopping postgresql service: [ OK ]
Starting postgresql service: [ OK ]
测试awx用户连接,输入密码连接,并创建数据库
[root@ansible-server pgsql]# psql -U awx -d postgres -h 127.0.0.1
Password for user awx:
psql (8.4.20)
Type "help" for help.
postgres=> create database awx;
CREATE DATABASE
postgres=> \q
再次执行安装过程
[root@ansible-server ansible-tower-setup-3.0.3]# ./setup.sh
最后出现安装成功的提示说明tower安装完成
三、导入licenses
安装完成后就可以通过https://IP/#来访问你的tower界面了,这里的IP是安装tower的服务器IP
访问如下图所示:
接下来导入我们申请的license
提交后就可以进入tower的管理页面了
参考文档:
http://www.jianshu.com/p/1c6aa6ceeca6

相关文章推荐
- CentOS 7 中安装并使用自动化工具 Ansible
- 在CentOS7上安装使用Ansibel(自动化工具)Install and use Ansible (Automation Tool) in CentOS 7
- 在 CentOS 7 中安装并使用自动化工具 Ansible
- 在 CentOS 7 中安装并使用自动化工具 Ansible
- 在 CentOS 7 中安装并使用自动化工具 Ansible
- 在 CentOS 7 中安装并使用自动化工具 Ansible
- CentOS6.5自动化安装LAMP脚本,判断主机是否存活邮件报警脚本
- VMware Workstation 9 安装图形化界面 CentOS6.5
- Centos6.5 PXE自动化安装
- ansible自动化运维工具的安装与使用
- Linux系统之工具篇(一)DRBD Centos6.5(64bit)编译安装,双主模式
- 【原创】centos6.5安装vnc-server实现windows/linux下的图形化远程登录
- 集群运维自动化工具ansible之使用playbook安装zabbix客户端
- Linux系统CentOS6.5 64位注册、安装git版本控制工具
- ansible自动化运维工具的安装与使用
- 【原创】centos6.5安装vnc-server实现windows/linux下的图形化远程登录
- 自动化部署与统一安装升级 - 类ansible工具 udeploy0.3版本发布 (更新时间2014-12-24)
- 集群运维自动化工具ansible使用playbook安装mysql
- 在CentOS 6.5上安装Puppet配置管理工具
- 构建PXE环境--网络自动化安装CentOs6.5