depth/stencil buffer的作用
2016-12-30 08:41
323 查看
本文转载自这里
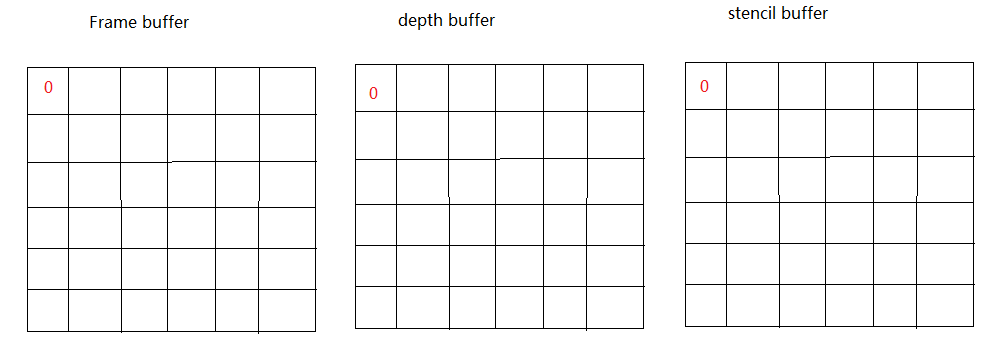
在D3D11中,有depth/stencil buffer,它们和framebuffer相对应,如下图所示,framebuffer中一个像素,有相对应的depth buffer和stencil buffer值:
D3D11中,depth buffer和stencil buffer一起定义,比如DXGI_FORMAT_D24_UNORM_S8_UINT,是指用一个无符号24位的值做为像素的深度缓冲值,并把它映射到[0,1],用一个8位的值表示像素stencil值,并把它映射到[0,255]。注意:在hardware中,detph buffer和stencil buffer实际上是两个独立的buffer。
下面我们看看depth buffer和stencil buffer的作用:
在光栅化阶段,光栅化硬件在光栅化primitive(比如一个三角形)的时候,会访问stencil buffer和depth buffer,并进行相应的比较,这种比较我们通常称为stencil test和depth test,只有通过stencil test和depth test的pixel(或者称为sample 或者fragment更合适),才能最终被写入framebuffer。
下图是stencil test和depth test的框图:

首先会进行stecil test,就是当前pixel的stencil值和stencil buffer中对应的stencil值进行某种比较,只有通过比较测试的pixel才会进行depth test,否则就会被光栅化硬件丢弃掉。接着会进行depth test,depth test能够保证物体在场景中前后位置关系。如果两个test都pass,就会更新depth buffer值(当然stencil pass的时候,就可以根据stencil function更新或者保持stencil buffer值了)。
通过使用stencil test,我们可以实现蒙版的效果,从而实现一些渲染效果,比如镜子,体积阴影等。
举个例子:
在一个frame中,我们首先渲染一个四边形,做为镜子,渲染前,清除depth/stencil buffer值(depth设置为1.0, stencil 设置为0),这时场景中stencil buffer为

接着,我们设置stencil 总是pass,并设置stencil buffer值为1,渲染一个镜子(四边形)。这是stencil buffer的值为

接下来,我们渲染其它的primitive,比如一个三角形,先设置stencil 值为1,并设置stencil比较函数为等于,这样渲染三角形时候,会比较stencil值,对于三角形光栅化后的pixel,如果它在镜子的范围内,1=1,所以stencil pass,会保留这个像素,如果在镜子的外面,因为stencil buffer的值为0,所以stencil test fail,从而放弃这个pixel。如下图三角形,最后实际保留的像素只为蓝色的pass stencil test的部分。

下面,我们将在D3D11中,通过使用stencil,实现一个镜子的效果。
首先我们要在D3DClass中增加几个成员变量及函数。
m_depthStencilStateMirror是渲染镜子时候,使用的depth stencil 状态,我们设置stencil 函数为D3D11_COMPARISON_ALWAYS,这样,stencil测试总能pass,然后pass的操作为D3D11_STENCIL_OP_REPLACE,这样,会用设置的ref值填充stencil buffer。
m_depthStencilStateReflect用来渲染镜子中反射的物体,此时禁止depth test,使depth test总是pass,stencil函数用等于比较,及当前的stencil ref值和stencil buffer中的值比较,等于则pass stencil test。
m_alphaEnableBlendingState状态变量创建一个alpha blend状态,这个状态主要在渲染镜子中物体时候使用,因为我们的镜面是一个纹理表示,alpha blend会把镜面纹理和渲染物体进行混合操作。
另外还有一个函数ChangeBackCullMode(bool b),用来改变渲染状态,设置front face 为顺时针渲染。因为在渲染镜子中物体时候,镜子中物体正面其实对应物体的反面,这是需要改变渲染次序。
下面的几个函数用来改变这几个新增加的状态。
D3Dclass中的BeginSence函数小改动,每帧渲染之前清除stencil值为0
增加了一个MirrorModelClass类用来表示镜子的mesh。
在graphicsClass类中依次渲染物体
首先渲染地面,墙以及box
渲染镜子
定义镜子反射平面,计算反射矩阵,注意D3DXMatrixReflect计算反射矩阵时候,对平面进行了归一化,所以我加了一个平移操作。
接下来,设置状态
渲染镜子中box
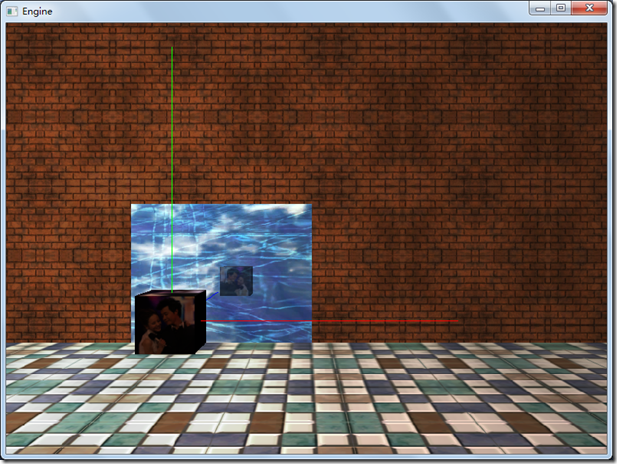
程序最终的效果如下:
在D3D11中,有depth/stencil buffer,它们和framebuffer相对应,如下图所示,framebuffer中一个像素,有相对应的depth buffer和stencil buffer值:
D3D11中,depth buffer和stencil buffer一起定义,比如DXGI_FORMAT_D24_UNORM_S8_UINT,是指用一个无符号24位的值做为像素的深度缓冲值,并把它映射到[0,1],用一个8位的值表示像素stencil值,并把它映射到[0,255]。注意:在hardware中,detph buffer和stencil buffer实际上是两个独立的buffer。
下面我们看看depth buffer和stencil buffer的作用:
在光栅化阶段,光栅化硬件在光栅化primitive(比如一个三角形)的时候,会访问stencil buffer和depth buffer,并进行相应的比较,这种比较我们通常称为stencil test和depth test,只有通过stencil test和depth test的pixel(或者称为sample 或者fragment更合适),才能最终被写入framebuffer。
下图是stencil test和depth test的框图:
首先会进行stecil test,就是当前pixel的stencil值和stencil buffer中对应的stencil值进行某种比较,只有通过比较测试的pixel才会进行depth test,否则就会被光栅化硬件丢弃掉。接着会进行depth test,depth test能够保证物体在场景中前后位置关系。如果两个test都pass,就会更新depth buffer值(当然stencil pass的时候,就可以根据stencil function更新或者保持stencil buffer值了)。
通过使用stencil test,我们可以实现蒙版的效果,从而实现一些渲染效果,比如镜子,体积阴影等。
举个例子:
在一个frame中,我们首先渲染一个四边形,做为镜子,渲染前,清除depth/stencil buffer值(depth设置为1.0, stencil 设置为0),这时场景中stencil buffer为
接着,我们设置stencil 总是pass,并设置stencil buffer值为1,渲染一个镜子(四边形)。这是stencil buffer的值为
接下来,我们渲染其它的primitive,比如一个三角形,先设置stencil 值为1,并设置stencil比较函数为等于,这样渲染三角形时候,会比较stencil值,对于三角形光栅化后的pixel,如果它在镜子的范围内,1=1,所以stencil pass,会保留这个像素,如果在镜子的外面,因为stencil buffer的值为0,所以stencil test fail,从而放弃这个pixel。如下图三角形,最后实际保留的像素只为蓝色的pass stencil test的部分。
下面,我们将在D3D11中,通过使用stencil,实现一个镜子的效果。
首先我们要在D3DClass中增加几个成员变量及函数。
ID3D11DepthStencilState* m_depthStencilStateMirror;
ID3D11DepthStencilState* m_depthStencilStateReflect;
m_depthStencilStateMirror是渲染镜子时候,使用的depth stencil 状态,我们设置stencil 函数为D3D11_COMPARISON_ALWAYS,这样,stencil测试总能pass,然后pass的操作为D3D11_STENCIL_OP_REPLACE,这样,会用设置的ref值填充stencil buffer。
depthStencilDesc.DepthEnable = true;
depthStencilDesc.DepthWriteMask = D3D11_DEPTH_WRITE_MASK_ALL

depthStencilDesc.DepthFunc = D3D11_COMPARISON_LESS;

depthStencilDesc.StencilEnable = true;
depthStencilDesc.StencilReadMask = 0xFF;
depthStencilDesc.StencilWriteMask = 0xFF;

// 对于front face 像素使用的模版操作操作.
depthStencilDesc.FrontFace.StencilFailOp = D3D11_STENCIL_OP_KEEP;
depthStencilDesc.FrontFace.StencilDepthFailOp = D3D11_STENCIL_OP_KEEP;
depthStencilDesc.FrontFace.StencilPassOp = D3D11_STENCIL_OP_REPLACE;
depthStencilDesc.FrontFace.StencilFunc = D3D11_COMPARISON_ALWAYS;

// 对于back face像素使用的模版操作模式.
depthStencilDesc.BackFace.StencilFailOp = D3D11_STENCIL_OP_KEEP;
depthStencilDesc.BackFace.StencilDepthFailOp = D3D11_STENCIL_OP_DECR;
depthStencilDesc.BackFace.StencilPassOp = D3D11_STENCIL_OP_REPLACE;
depthStencilDesc.BackFace.StencilFunc = D3D11_COMPARISON_ALWAYS;

// 创建深度模版状态,使其生效
result = m_device->CreateDepthStencilState(&depthStencilDesc, &m_depthStencilStateMirror);
if(FAILED(result))
{
HR(result);
return false;

}
m_depthStencilStateReflect用来渲染镜子中反射的物体,此时禁止depth test,使depth test总是pass,stencil函数用等于比较,及当前的stencil ref值和stencil buffer中的值比较,等于则pass stencil test。
// 设置reflect object深度模版状态描述.
depthStencilDesc.DepthEnable = true;
depthStencilDesc.DepthWriteMask = D3D11_DEPTH_WRITE_MASK_ZERO;//D3D11_DEPTH_WRITE_MASK_ZERO禁止写深度缓冲
depthStencilDesc.DepthFunc = D3D11_COMPARISON_ALWAYS;

// 对于front face 像素使用的模版操作操作.
depthStencilDesc.FrontFace.StencilPassOp = D3D11_STENCIL_OP_KEEP;
depthStencilDesc.FrontFace.StencilFunc = D3D11_COMPARISON_EQUAL;

// 创建深度模版状态,使其生效
result = m_device->CreateDepthStencilState(&depthStencilDesc, &m_depthStencilStateReflect);
if(FAILED(result))
{
HR(result);
return false;

}
m_alphaEnableBlendingState状态变量创建一个alpha blend状态,这个状态主要在渲染镜子中物体时候使用,因为我们的镜面是一个纹理表示,alpha blend会把镜面纹理和渲染物体进行混合操作。
// 创建一个alpha blend状态.
blendStateDescription.RenderTarget[0].BlendEnable = TRUE;
//blendStateDescription.RenderTarget[0].SrcBlend = D3D11_BLEND_ONE;
blendStateDescription.RenderTarget[0].SrcBlend = D3D11_BLEND_BLEND_FACTOR;
blendStateDescription.RenderTarget[0].DestBlend = D3D11_BLEND_INV_BLEND_FACTOR;
blendStateDescription.RenderTarget[0].BlendOp = D3D11_BLEND_OP_ADD;
blendStateDescription.RenderTarget[0].SrcBlendAlpha = D3D11_BLEND_ONE;
blendStateDescription.RenderTarget[0].DestBlendAlpha = D3D11_BLEND_ZERO;
blendStateDescription.RenderTarget[0].BlendOpAlpha = D3D11_BLEND_OP_ADD;
blendStateDescription.RenderTarget[0].RenderTargetWriteMask = D3D11_COLOR_WRITE_ENABLE_ALL;//0x0f;

// 用描述符创建一个alpha blend状态
result = m_device->CreateBlendState(&blendStateDescription, &m_alphaEnableBlendingState);
if(FAILED(result))
{
return false;
}
另外还有一个函数ChangeBackCullMode(bool b),用来改变渲染状态,设置front face 为顺时针渲染。因为在渲染镜子中物体时候,镜子中物体正面其实对应物体的反面,这是需要改变渲染次序。
下面的几个函数用来改变这几个新增加的状态。
void TurnOnAlphaBlending();
void TurnOffAlphaBlending();
void ChangeBackCullMode(bool b);

void EnableDefaultDepthStencil();
void EnableMirrorDepthStencil();
void EnableReflectDepthStencil();
D3Dclass中的BeginSence函数小改动,每帧渲染之前清除stencil值为0
void D3DClass::BeginScene(float red, float green, float blue, float alpha)
{
…
//清除深度缓冲.
m_deviceContext->ClearDepthStencilView(m_depthStencilView, D3D11_CLEAR_DEPTH|D3D11_CLEAR_STENCIL, 1.0f, 0);

return;
}
增加了一个MirrorModelClass类用来表示镜子的mesh。
在graphicsClass类中依次渲染物体
首先渲染地面,墙以及box
m_D3D->EnableMirrorDepthStencil();
渲染镜子
m_D3D->EnableDefaultDepthStencil();
定义镜子反射平面,计算反射矩阵,注意D3DXMatrixReflect计算反射矩阵时候,对平面进行了归一化,所以我加了一个平移操作。
D3DXPLANE mirrorPlane(0.0, 0.0, 10.99, 0.0);
D3DXMATRIX R;
//得到基于mirrorPlane平面的反射矩阵
D3DXMatrixReflect(&R, &mirrorPlane);
//box在原点位置,没有变化,它的世界坐标矩阵为worldMatrix
D3DXMATRIX W = worldMatrix * R;
D3DXMatrixTranslation(&worldMatrix1, 0.0, 0.0, -18.0);
W = worldMatrix1*W;
接下来,设置状态
m_D3D->EnableReflectDepthStencil();
m_D3D->TurnOnAlphaBlending();
m_D3D->ChangeBackCullMode(true);
渲染镜子中box
m_D3D->EnableDefaultDepthStencil();
m_D3D->TurnOffAlphaBlending();
m_D3D->ChangeBackCullMode(false);
程序最终的效果如下:

相关文章推荐
- Directx11教程(48) depth/stencil buffer的作用
- depthstencil buffer 不支持 msaa
- MSAA 与 Depth Stencil Buffer
- 引擎设计跟踪(九.14.3.1) deferred shading: Depthstencil as GBuffer depth
- Directx11教程(50) 输出depth/stencil buffer的内容
- [转]Linear Depth Buffer(线性深度缓冲区)
- 【Unity Shader】浅析Unity shader中RenderType的作用及_CameraDepthNormalsTexture
- BindDepthStencilState
- Stencil Buffer&Stencil Test
- Constructive Solid Geometry with the Stencil Buffer
- UnityShader实例09:Stencil Buffer&Stencil Test
- 《大话处理器》连载——微架构(16) Buffer的作用——去耦合
- oracle学习笔记 buffer_cache作用概述
- cocos3.2 cocos2dx Stencil buffer is not enabled
- java ByteBuffer flip()和limit()的理解, 转载的, 从里面理解到flip()的作用, 想象一下 老式打字机
- OpenGL.Stencil Buffer
- OpenGL Depth and Stencil Test
- 3D角色遮挡住UI的实现,关于Stencil Buffer,描边,以及其他
- Java NIO中的Buffer、Channel和Selector的概念和作用
- OpenGL学习笔记——StencilBuffer