一个优秀的C#开源绘图软件 DrawTools
2016-12-27 14:20
801 查看
1、Extensions to DrawTools
Author
Mark MillerI develop software for a leading healthcare system in Northern Illinois.
Download updated demo - 55.57 KB
Download (VS 2010) updated source - 889.43 KB

Introduction
Alex Fr provided an excellent set of drawing tools in his DrawTools article and these tools serve as a basis for this article, which expands on the original toolset in the following ways:In addition to the basic Rectangle, Ellipse, Line and Scribble tools, this version adds PolyLine, Filled Ellipse, Filled Rectangle, Textand Imagetools
Multiple drawing Layers
Zooming
Panning
Rotation
In this article, I will describe how Layerswere implemented, as well as the Textand Imagetools.
Background
See the original DrawTools article for details on how the basic application is built, class structure, etc.It is also assumed that the reader has a working understanding of GDI+ fundamentals, including Matrices. For an excellent introduction to GDI+, see www.bobpowell.net.
Implementing Layers
Adding Layersto the application involved adding two classes,Layerand
Layers, where
Layerdefines a single
Layerand
Layersdefines the collection of
Layersin an
ArrayList.
Each
Layerexposes the following properties:
private string _name;
private bool _isDirty;
private bool _visible;
private bool _active;
private GraphicsList _graphicsList;
Note that the
Layercontains the
GraphicsList- this is the key to the whole thing - each
Layercontains its own list of drawing objects instead of
DrawArea.
DrawAreais modified to declare a
Layerscollection instead of a
GraphicsListcollection:
// Define the Layerscollection
private Layers_layers;
When
DrawAreais initialized, the
Layersare initialized by creating the first
Layerand setting it
Activeand
Visible:
public DrawArea()
{
// create list of Layers, with one default active visible layer
_layers = new Layers();
_layers.CreateNewLayer("Default");
_panning = false;
_panX = 0;
_panY = 0;
// This call is required by the Windows.Forms Form Designer.
InitializeComponent();
}
In the
Layersclass, the
CreateNewLayer()method actually creates the new
Layer:
/// <summary>
/// Create a new layer at the head of the layers list and set it
/// to Activeand Visible.
/// </summary>
/// <param name="theName">The name to assign to the new layer</param>
public void CreateNewLayer(string theName)
{
// Deactivate the currently active Layer
if(layerList.Count > 0)
((Layer)layerList[ActiveLayerIndex]).IsActive= false;
// Create new Layer, set it visible and active
Layerl = new Layer();
l.IsVisible = true;
l.IsActive= true;
l.LayerName = theName;
// Initialize empty GraphicsList for future objects
l.Graphics = new GraphicsList();
// Add to Layerscollection
this.Add(l);
}
Note that any one or all
Layerscan be visible at the same time, but only one
Layermay be active at any time.
You can control the
Layersin the sample application by clicking on the Current
Layer: name at the bottom of the application window - Click on the name ("
Default") to open the
Layersdialog:
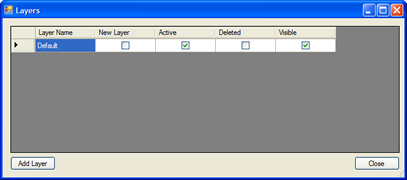
From this dialog, you can Add new
Layers, change the names of the
Layer(s), and change the
Layer(s) visibility and which
Layeris
Active. The "New Layer" column is checked whenever you click the "Add Layer" button. To delete Layer(s), simply check the "Deleted" column and close the dialog with the "Close" button. Remember only one Layermay be active at any one time. You will be reminded of this if you attempt to have more than one
Layeractive. Also note the Active
Layermust be
Visible.
When the application runs, each object that is drawn is added to the
GraphicsListmaintained by the active
Layer. Note this relationship is preserved through saving and re-opening a drawing file.
Layerscome in very handy when you want to draw "on top of" another image. For example, the image at the top of this article contains two layers. The following image shows the same picture with the Background Layerturned off:
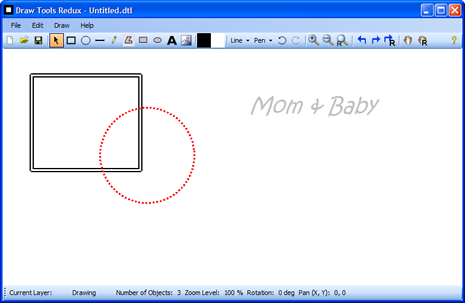
Here is the same drawing with the Drawing Layerinvisible and the Background Layervisible:
Objects on Layerswhich are visible but not active cannot be selected, moved, deleted, etc.
Each drawing object is added to the correct
Layerby the
AddNewObject()method in the
ToolObjectclass:
protected void AddNewObject(DrawAreadrawArea, DrawObject o)
{
int al = drawArea.TheLayers.ActiveLayerIndex;
drawArea.TheLayers[al].Graphics.UnselectAll();
o.Selected = true;
o.Dirty= true;
drawArea.TheLayers[al].Graphics.Add(o);
drawArea.Capture = true;
drawArea.Refresh();
}
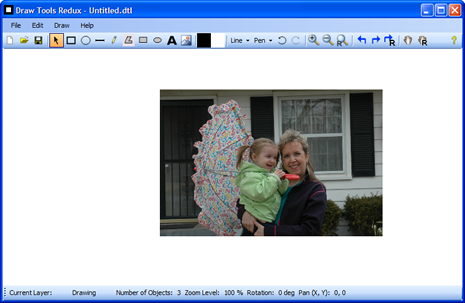
Implementing Zooming, Panning, and Rotation
Zooming, Panning, and Rotation are implemented by adding a few variables and some code to theMainFormand
DrawAreaclasses.
Zooming is controlled by buttons on the form, and also by the mouse wheel when Ctrl is held down.
Pan is controlled by the Hand button on the form, and can be cancelled by a right-click.
Rotation is controlled by buttons on the form - note Rotation affects the entire drawing.
Here is an example of all three in use:
The heart of this code is the
BackTrackMouse()method, which takes the "apparent" mouse position and converts it to a valid point based on the current Zoom level, Pan position, and Rotation:
/// <summary>
/// Back Track the Mouse to return accurate coordinates regardless of
/// zoom or pan effects.
/// Courtesy of BobPowell.net <seealso cref="http://www.bobpowell.net/backtrack.htm"/>
/// </summary>
/// <param name="p">Point to backtrack</param>
/// <returns>Backtracked point</returns>
public Point BackTrackMouse(Point p)
{
// Backtrack the mouse...
Point[] pts = new Point[] { p };
Matrix mx = new Matrix();
mx.Translate(-this.ClientSize.Width / 2, -this.ClientSize.Height / 2,
MatrixOrder.Append);
mx.Rotate(_rotation, MatrixOrder.Append);
mx.Translate(this.ClientSize.Width / 2 + _panX, this.ClientSize.Height / 2 +
_panY, MatrixOrder.Append);
mx.Scale(_zoom, _zoom, MatrixOrder.Append);
mx.Invert();
mx.TransformPoints(pts);
return pts[0];
}
This routine comes from Bob Powell's excellent website. Through the use of the GDI+ Matrix class, the mouse point passed to this method is moved (Translate), Rotated, and Scaled based on the current PanX, PanY, Zoom, and Rotation values. The important thing to remember is that anytime you need to determine where the mouse pointer actually is in your drawing, you must call this method. You will see this method used throughout the program in the
DrawAreaclass as well as others. An example of its usage is shown here:
private void DrawArea_MouseDown(object sender, System.Windows.Forms.MouseEventArgs e)
{
lastPoint = BackTrackMouse(e.Location);
if (e.Button == MouseButtons.Left)
tools[(int)activeTool].OnMouseDown(this, e);
else if (e.Button == MouseButtons.Right)
{
if (_panning == true)
_panning = false;
ActiveTool = DrawArea.DrawToolType.Pointer;
}
//OnContextMenu(e);
}
The current zoom level is controlled by the following simple routine:
private void AdjustZoom(float _amount)
{
drawArea.Zoom += _amount;
if (drawArea.Zoom < .1f)
drawArea.Zoom = .1f;
if (drawArea.Zoom > 10)
drawArea.Zoom = 10f;
drawArea.Invalidate();
SetStateOfControls();
}
Then in the
DrawArea.Paint()method, the zoom, pan, and rotation values are used to alter the way the canvas is painted:
private void DrawArea_Paint(object sender, System.Windows.Forms.PaintEventArgs e)
{
Matrix mx = new Matrix();
mx.Translate(-this.ClientSize.Width / 2, -this.ClientSize.Height / 2,
MatrixOrder.Append);
mx.Rotate(_rotation, MatrixOrder.Append);
mx.Translate(this.ClientSize.Width / 2 + _panX, this.ClientSize.Height / 2 +
_panY, MatrixOrder.Append);
mx.Scale(_zoom, _zoom, MatrixOrder.Append);
e.Graphics.Transform = mx;

SolidBrush brush = new SolidBrush(Color.FromArgb(255, 255, 255));
e.Graphics.FillRectangle(brush,
this.ClientRectangle);
// Drawobjects on each layer, in succession so we get the correct layering.
// Only draw layers that are visible
if (_layers != null)
{
int lc = _layers.Count;
for (int i = 0; i < lc; i++)
{
if(_layers[i].IsVisible == true)
if(_layers[i].Graphics != null)
_layers[i].Graphics.Draw(e.Graphics);
}
}
DrawNetSelection(e.Graphics);
brush.Dispose();
}
Update - 8/25/2007 - Individual Object Rotation & Bug Fixes
The primary advancement in this update is the ability to rotate individual objects - when one or more objects are selected, clicking the Rotate tools will rotate those objects instead of the entire drawing surface.There is one caveat, however - the selection rectangle for the rotated object is not rotated - if someone can help with this, I would greatly appreciate it!
This update also includes several small bug fixes reported by users - thanks to all for reporting!
History
3/6/2007Original article uploaded to The Code Project
3/6/2007
Updated to include more information on zoom/pan/rotation
8/25/2007
Updated Individual Object Rotation
9/27/2007
Added the missing links to the new source code
12/23/2009
Added Tooltip control which appears when mouse is over an object. Tooltip displays the Center coordinates of the object for
Rectangle,
Ellipseand
Imageobjects. For other objects, Tooltip displays starting and ending coordinates.
Textobjects do not display Tooltip.
This was implemented adding the Tooltip control to the
ToolPointerclass. Each
DrawObject fills the
TipTextproperty and the
MouseMoveevent in
ToolPointercontrols
when the Tooltip is displayed and removed from the canvas. This
implementation is not perfect, as the Tooltip flashes when displayed so
is meant as an example of one way information about the object can be
displayed.
Perhaps a better way to do this would be to display
information about the object in a separate "Information Window" and then
only when the object is selected.
See the new source code for details.
6/23/2010
Updated project to include object ordering fix that corrects the way objects are stacked when a file is opened
Updated project to Visual Studio 2010
See the new source code for details
10/4/2011
Corrected several issues with Layersand layering
2、DrawTools 2014
AuthorArnault Bonafos, 16 Jan 2014
Download source - 85 KB
Download binaries - 37.9 KB
Introduction
Current alternative is based on the CodeProject DrawTools 2005, built under Visual Studio C# 2010.The main goal of this tip is to post and save the DrawTools project back to the community after some enhancements. The tip is short, as the improvements are minor.
A few improvements have been made, as follows:
Add scroll bars to the draw area
Handling of
AutoScrollPositionin the different tools provided by the original project
Export of the drawing with jpeg format
Background
Knowledge of C# is required, but this project shows the basics of UI programming under '.NET'.Architecture
Dynamic handling for showing scroll bars
A dirty boolean is handled inGraphicsList, the canvas document, where it should be. To this
Dirtyproperty is associated a
DocumentDirtyObserverinterface.
Hide Copy Code
public interface DocumentDirtyObserver
{
void IsDirty(GraphicsList gList);
}
Every time the document is modified, look with the different draw tools, its
Dirtyproperty is set to
trueand any
DocumentDirtyObserveris fired.
Hide Copy Code
public bool Dirty
{
get
{
return this.dirty;
}
set
{
this.dirty = value;
if (this.dirty)
{
NotifyDirty();
}
}
}
The class
DrawAreaimplements the
DocumentDirtyObserver, and every time the document is '
dirty', it calls
AdjustRendering, which in turn computes the bounding box of the canvas document (
GraphicsList).
Hide Copy Code
void AdjustRendering()
{
Size docSize;

if (this.GraphicsList != null)
{
docSize = this.GraphicsList.GetSize();
docSize.Width += 20;
docSize.Height += 20;
AutoScrollMinSize = docSize;
}
else
{
AutoScrollMinSize = new Size(0, 0);
}
Invalidate();
}
This way, it implements the Mode/View/Controller design pattern, the
GraphicsListbeing the model,
DrawAreabeing the View and the draw
Toolsbeing the controller.
In the future,
Dirtyproperty should be handled in only one place (it is also handled in the
DrawAreaclass).
Export the graph to JPEG format
The DrawTools 2014 architecture is good enough to be followed to implement a new menu strip option.Add a menu item to the menu bar
Simply open the MainFormdesigner and add the option
Link the
MenuItemto a
MainFormmethod to trigger the
CommandExportToJpg
Hide Copy Code
private void CommandExportToJpg()
{
docManager.ExportToJpg();
}
Implement the user interface logic in the
DocManagerExportToJpg
I let you look at the
DocManager.ExportToJpg
Subscribe
MainFormExportEventmethod implementation to
DocManagerevent.
Hide Copy Code
docManager.ExportEvent += docManager_ExportEvent;
Implement
MainFormlogic to actually transform image bitmap into JPEG file.
All is in the source code, I don't copy it here as it is essentially technical stuff.
Result
The result is best shown by the following graph, obtained with a customized version of the DrawTools.
Points of Interest
Architecture is already well thought in the original project, please read the original document for insight about it.DrawTools 2005
There was a bug where the status bar was hiding the horizontal scroll bar, but after some thorough inspection of the code, it has been fixed.
Issue on Stackoverflow
History
Added scroll bars to the draw areaAdded a status bar
Fixed a bug on the context menu when the scroll bar position is not 0
Export of the drawing with jpeg format
Fixed an
OutOfMemoryExceptionwith JPEG format export
Special thank you to Alex, who originally posted the DrawTools project on CodeProject.
License
This article, along with any associated source code and files, is licensed under The Code Project Open License (CPOL)
相关文章推荐
- 推荐一个 开源C#股票软件
- 一个开源的lazarus绘图软件:LazPaint
- [开源][设计]优秀的3D绘图软件——Blender
- 开源纯C#工控网关+组态软件(三)加入一个新驱动:西门子S7
- GeoGebra-一个功能类似于几何画板的开源绘图软件
- 一个开源的lazarus绘图软件:LazPaint
- Community Server(CS)是一个非常优秀的Asp.net开源软件
- 发布一个倒计时软件(C# 开源)
- 想到linux到其它,开源对商业化的软件是一个促进
- GPURT 1.1.0 --一个开源的基于GPU的光线追踪渲染软件
- c#怎么编写一个软件的帮助文档
- .net开源我也开&amp;gt;&amp;gt;C#远程控制软件整个项目代码发布
- 开发一个理财软件 C#
- 启动生平一个开源软件
- C#+MO实现一个道路编辑软件(刚开始)
- 我们期待自己成为一个优秀的软件模型设计者
- KTDictSeg 一个C#.net做的简单快速准确的开源中文分词组件
- 对我学习C#至今所写的软件做一个总结
- JIRA介绍- 一个专业优秀的缺陷跟踪管理软件
- 一个开源的C#工具类库,有校验、加密、注册表操作等功能,share给大家