Centos7 httpd+openssl+ssh登录实现过程(爱你就给你写详细点)
2016-12-24 14:45
513 查看
上篇已经讲了LAMP的yum简易搭建
http://rexchow.blog.51cto.com/11619161/1885533
我们针对这套服务延伸openssl功能
原理就不多说了,谷X百X去
环境说明:
server:CentOS7-192.168.230.202
client: win8.1-192.168.230.59
Apache/2.4.6
php Version 5.4.16 5.5.52-MariaDB
新增签发服务器:192.168.230.204 需要安装openssl (yum install openssl)
ssh密钥认证登
server服务器:
客户端我就不写了,研究不透求补充

搭建https服务
CA端:192.168.230.204
一、建立基础文件
二、给私有CA自签证书
openssl req命令中各选项的含义:-new:生成新证书签署请求;-x509:专用于CA生成自签证书;-key:生成请求时用到的私钥文件;-days:证书的有效期限;-out:证书的保存路径;
-------------------------------------------------------------------------------------------
httpd-server端(192.168.230.202):
webserver开启ssl功能
[root@localhost ssl]# service httpd start
Redirecting to /bin/systemctl start httpd.service
Job for httpd.service failed because the control process exited with error code. See "systemctl status httpd.service" and "journalctl -xe" for details.
启动失败了,它让我们去查看日志
tail /var/log/httpd/error_log
httpd -L
日志信息
Using configuration from /etc/pki/tls/openssl.cnf
Check that the request matches the signature
Signature ok
The stateOrProvinceName field needed to be the same in the
CA certificate (gz) and the request (gd)
##上面报错,自签证书的城市项填写错是,对端的时候GD,自己的GZ,所以签发失败。
##在web-server重新执行下面的命令
##重新拷贝过去
签证端再次签证
出现上面的界面,证明签证成功了
scp httpd.crt root@192.168.230.202:/etc/httpd/ssl/
##于签证服务器回传
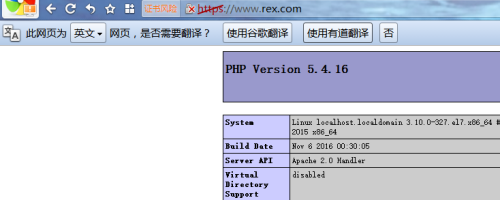
已经正常访问
由于不是interner公认的签证端,所以都会打个斜杠。
http://rexchow.blog.51cto.com/11619161/1885533
我们针对这套服务延伸openssl功能
原理就不多说了,谷X百X去
环境说明:
server:CentOS7-192.168.230.202
client: win8.1-192.168.230.59
Apache/2.4.6
php Version 5.4.16 5.5.52-MariaDB
新增签发服务器:192.168.230.204 需要安装openssl (yum install openssl)
ssh密钥认证登
server服务器:[root@localhost ~]# ssh-keygen -t rsa ##生成密钥对 Generating public/private rsa key pair. #这里询问你要把生成的密钥文件保存在哪里,默认是在家目录下的.ssh文件夹中,回车保存默认目录 Enter file in which to save the key (/root/.ssh/id_rsa): Created directory '/root/.ssh'. ##这里是对密钥文件加密,不输入则表示不加密 Enter passphrase (empty for no passphrase): ##输入密码(无密码为空) Enter same passphrase again: ##再次输入相同的密码 Your identification has been saved in /root/.ssh/id_rsa. 你的认证文件保存在/... Your public key has been saved in /root/.ssh/id_rsa.pub. ##你的公钥保存在/.... The key fingerprint is: 95:e3:e4:89:92:c4:c9:e3:f1:ba:9b:bc:f0:1b:3b:af root@localhost.localdomain The key's randomart image is: +--[ RSA 2048]----+ | | | o . . | | B = | | o = * o | | + S + | | o | | . o | | +.= | | EB. | +-----------------+
#已经成功生成了一对密钥[root@localhost ~]# ls /root/.ssh
id_rsa  id_rsa.pub
出现这图,证明已经成功生成
#其中id_rsa为私钥,id_rsa.pub为公钥
[root@localhost ~]# scp /root/.ssh/id_rsa.pub root@192.168.230.204:.ssh/id_rsa.pub
##从server复制刚刚生产的id_rsa.pub文件到签发服务器192.168.230.204上
The authenticity of host '192.168.230.204 (192.168.230.204)' can't be established.
ECDSA key fingerprint is f9:70:7f:aa:eb:1f:df:f3:30:60:95:82:e1:56:82:fd.
Are you sure you want to continue connecting (yes/no)? yes
##是否继续连接yes
Warning: Permanently added '192.168.230.204' (ECDSA) to the list of known hosts.
root@192.168.230.204's password:
id_rsa.pub                                                       100%  408     0.4KB/s   00:00
客户端我就不写了,研究不透求补充
scp:远程复制命令
常用选项:-r: 递归复制;-p: 保持原文件的属性信息;-q: 静默模式-P PORT: 指明remote host的监听的端口;下载:scp 远程主机上的账户@远程主机:远程主机对应的文件 本机目录[root@localhost ~]# scp -r root@172.16.9.9:/root/tmp /root上传:scp 本机文件 远程主机上的账户@远程主机:远程主机对应的目录
[root@localhost ~]# scp -r /root root@172.16.9.9:/root/tmp
搭建https服务
CA端:192.168.230.204
一、建立基础文件
[root@rex CA]# cd /etc/pki/CA/
##进入对应的目录
[root@rex CA]# touch index.txt
二、给私有CA自签证书
##生成密钥对保存在/etc/pki/CA/private/cakey.pem中

Generating RSA private key, 2048 bit long modulus..............................................+++
...........................................................+++e is 65537 (0x10001)
[root@localhost CA]# openssl req -new -x509 -key /etc/pki/CA/private/cakey.pem -days 7300 -out /etc/pki/CA/cacert.pem

##生成密钥对保存在/etc/pki/CA/private/cacert.pem中

Country Name (2 letter code) [XX]:cn    #国家缩写,只有2位
State or Province Name (full name) []:gd    #地区名称,全称
Locality Name (eg, city) [Default City]:sz    #城市名称
Organization Name (eg, company) [Default Company Ltd]:hisun   #组织名称或公司名称Organizatio
Organizational Unit Name (eg, section) []:it    #部门名称
Common Name (eg, your name or your server's hostname) []:www.rex.com    #主机名,这里是CA主机通过DNS解析出来的名称,请不要填错
Email Address []:rex@rex.com    #邮箱地址
##执行第二条命令的信息要保证与httpd服务器的一样
openssl req命令中各选项的含义:-new:生成新证书签署请求;-x509:专用于CA生成自签证书;-key:生成请求时用到的私钥文件;-days:证书的有效期限;-out:证书的保存路径;
-------------------------------------------------------------------------------------------
httpd-server端(192.168.230.202):
[root@localhost httpd]# mkdir /etc/httpd/ssl
[root@localhost httpd]# cd /etc/httpd/ssl/

[root@localhost ssl]# (umask 077;openssl genrsa -out httpd.key 2048)
#给httpd服务器生产私钥文件
Generating RSA private key, 2048 bit long modulus
....................+++
...+++
e is 65537 (0x10001)

[root@localhost ssl]# openssl req -new -key httpd.key -days 365 -out /etc/httpd/ssl/httpd.csr
#用私钥中提取的公钥生成证书签署请求,其中的信息要与自签的CA保持一致
Country Name (2 letter code) [XX]:cn
State or Province Name (full name) []:gz
Locality Name (eg, city) [Default City]:sz
Organization Name (eg, company) [Default Company Ltd]:hisun
Organizational Unit Name (eg, section) []:it
Common Name (eg, your name or your server's hostname) []:www.rex.com
Email Address []:rex@rex.com
[root@localhost ssl]# scp httpd.csr root@192.168.230.204:/tmp
#将证书请求上传到CA的/tmp目录下
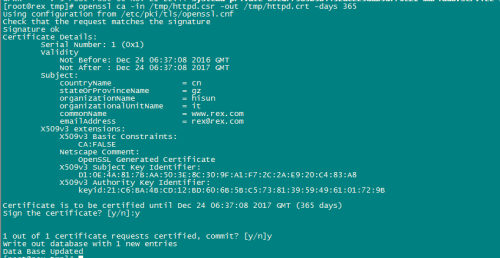
[root@rex CA]# openssl ca -in /tmp/httpd.csr -out /tmp/httpd.crt -days 365
##对刚才上传的/tmp/htppd.csr进行签证,有效期356天,生成的证书是/tmp/httpd.crt
Using configuration from /etc/pki/tls/openssl.cnf
Check that the request matches the signature
Signature ok
The stateOrProvinceName field needed to be the same in the
CA certificate (gz) and the request (gd)

[root@rex CA]# scp /tmp/httpd.crt root@192.168.230.202:/etc/httpd/ssl
##讲证书回传至httpd服务器
webserver开启ssl功能
[root@localhost ssl]#yum -y install mod_ssl
#先安装ssl模块
#打开/etc/httpd/conf.d/ssl.conf进行配置
60行#ServerName www.rex.com:443
##改成自己的域名
SSLCertificateKeyFile /etc/httpd/ssl/httpd.key

56行#将<VirtualHost _default_:443>改为
<VirtualHost *:443>
[root@localhost conf]# vim /etc/httpd/conf/httpd.conf
#编辑httpd主配置文件
Loadmodule ssl_module modules/mod_ssl.so
[root@localhost ssl]# service httpd start
Redirecting to /bin/systemctl start httpd.service
Job for httpd.service failed because the control process exited with error code. See "systemctl status httpd.service" and "journalctl -xe" for details.
启动失败了,它让我们去查看日志
tail /var/log/httpd/error_log
httpd -L
日志信息
Using configuration from /etc/pki/tls/openssl.cnf
Check that the request matches the signature
Signature ok
The stateOrProvinceName field needed to be the same in the
CA certificate (gz) and the request (gd)
##上面报错,自签证书的城市项填写错是,对端的时候GD,自己的GZ,所以签发失败。
##在web-server重新执行下面的命令
[root@localhost ssl]# openssl req -new -key httpd.key -days 365 -out /etc/httpd/ssl/httpd.csr

Country Name (2 letter code) [XX]:cn
State or Province Name (full name) []:gd
Locality Name (eg, city) [Default City]:sz
Organization Name (eg, company) [Default Company Ltd]:hisun
Organizational Unit Name (eg, section) []:it
Common Name (eg, your name or your server's hostname) []:www.rex.com
Email Address []:rex@rex.com
scp /etc/httpd/ssl/httpd.csr root@192.168.230.204:/tmp
##重新拷贝过去
签证端再次签证
openssl ca -in /tmp/httpd.csr -out /tmp/httpd.crt -days 365
出现上面的界面,证明签证成功了
scp httpd.crt root@192.168.230.202:/etc/httpd/ssl/
##于签证服务器回传
已经正常访问
由于不是interner公认的签证端,所以都会打个斜杠。

相关文章推荐
- SSH免密码登录过程解析和实现
- ssh详细登录过程
- 精心为您准备的Openssl实现私有CA的详细过程,以及如何配置安装证书 推荐
- Hadoop架设过程中实现普通用户权限下SSH无密码登录
- centos7中实现SSH免密码登录
- Ubuntu 14.04 LTS ssh 详细登录过程
- ssh详细登录过程
- SSH2.0编程 ssh协议过程实现
- SSH2.0编程 ssh协议过程实现(转)
- Openssl:构建CA的过程并实现web服务基于https访问的网络架构
- 定制微型linux实现启用虚拟终端基于帐号密码登录、提供ssh服务,提供Web服务(下)附有命令移植脚本 推荐
- shell脚本实现ssh自动登录功能分享
- SSH之IDEA使用maven整合实现简易用户登录
- Ubuntu使用ssh公钥实现免密码登录
- Servlet之用户登录过程实现
- Android解析XML(PULL方式)和JSON 工作原理和实现过程(详细代码)
- Android解析XML(PULL方式)和JSON 工作原理和实现过程(详细代码)
- CentOS7搭建FastDFS V5.11分布式文件系统及Java整合详细过程(四)
- xshell登录到CentOS7上时出现“The remote SSH server rejected X11 forwarding request.