Java设计模式一——策略模式
2016-12-20 21:54
501 查看
前言:这段时间探究设计模式系列。
一、策略模式的应用
策略模式的应用来自鸿洋大神的
策略模式(Strategy Pattern):定义了算法族,分别封装起来,让它们之间可相互替换,此模式让算法的变化独立于使用算法的客户。
好了,对于定义,肯定不是一眼就能看明白的,不然这篇文章就收尾了,对于定于大家简单扫一眼,知道个大概,然后继续读下面的文章,读完以后再来回味,效果嘎嘣脆。大家应该都玩过武侠角色游戏,下面我就以角色游戏为背景,为大家介绍:假设公司需要做一款武侠游戏,我们就是负责游戏的角色模块,需求是这样的:每个角色对应一个名字,每类角色对应一种样子,每个角色拥有一个逃跑、攻击、防御的技能。
初步的代码:
[java] view
plain copy


package com.zhy.bean;
/**
* 游戏的角色超类
*
* @author zhy
*
*/
public abstract class Role
{
protected String name;
protected abstract void display();
protected abstract void run();
protected abstract void attack();
protected abstract void defend();
}
[java] view
plain copy
package com.zhy.bean;
public class RoleA extends Role
{
public RoleA(String name)
&nb
24000
sp;{
this.name = name;
}
@Override
protected void display()
{
System.out.println("样子1");
}
@Override
protected void run()
{
System.out.println("金蝉脱壳");
}
@Override
protected void attack()
{
System.out.println("降龙十八掌");
}
@Override
protected void defend()
{
System.out.println("铁头功");
}
}
没几分钟,你写好了上面的代码,觉得已经充分发挥了OO的思想,正在窃喜,这时候项目经理说,再添加两个角色
RoleB(样子2 ,降龙十八掌,铁布衫,金蝉脱壳)。
RoleC(样子1,拥有九阳神功,铁布衫,烟雾弹)。
于是你觉得没问题,开始写代码,继续集成Role,写成下面的代码:
[java] view
plain copy
package com.zhy.bean;
public class RoleB extends Role
{
public RoleB(String name)
{
this.name = name;
}
@Override
protected void display()
{
System.out.println("样子2");
}
@Override
protected void run()
{
System.out.println("金蝉脱壳");//从RoleA中拷贝
}
@Override
protected void attack()
{
System.out.println("降龙十八掌");//从RoleA中拷贝
}
@Override
protected void defend()
{
System.out.println("铁布衫");
}
}
[java] view
plain copy
package com.zhy.bean;
public class RoleC extends Role
{
public RoleC(String name)
{
this.name = name;
}
@Override
protected void display()
{
System.out.println("样子1");//从RoleA中拷贝
}
@Override
protected void run()
{
System.out.println("烟雾弹");
}
@Override
protected void attack()
{
System.out.println("九阳神功");
}
@Override
protected void defend()
{
System.out.println("铁布衫");//从B中拷贝
}
}
写完之后,你自己似乎没有当初那么自信了,你发现代码中已经存在相当多重复的代码,需要考虑重新设计架构了。于是你想,要不把每个技能都写成接口,有什么技能的角色实现什么接口,简单一想,觉得这想法高大尚啊,但是实现起来会发现,接口并不能实现代码的复用,每个实现接口的类,还是必须写自己写实现。于是,we
need change ! 遵循设计的原则,找出应用中可能需要变化的部分,把它们独立出来,不要和那些不需要变化的代码混在一起。我们发现,对于每个角色的display,attack,defend,run都是有可能变化的,于是我们必须把这写独立出来。再根据另一个设计原则:针对接口(超类型)编程,而不是针对实现编程,于是我们把代码改造成这样:
[java] view
plain copy
package com.zhy.bean;
public interface IAttackBehavior
{
void attack();
}
[java] view
plain copy
package com.zhy.bean;
public interface IDefendBehavior
{
void defend();
}
[java] view
plain copy
package com.zhy.bean;
public interface IDisplayBehavior
{
void display();
}
[java] view
plain copy
package com.zhy.bean;
public class AttackJY implements IAttackBehavior
{
@Override
public void attack()
{
System.out.println("九阳神功!");
}
}
[java] view
plain copy
package com.zhy.bean;
public class DefendTBS implements IDefendBehavior
{
@Override
public void defend()
{
System.out.println("铁布衫");
}
}
[java] view
plain copy
package com.zhy.bean;
public class RunJCTQ implements IRunBehavior
{
@Override
public void run()
{
System.out.println("金蝉脱壳");
}
}
这时候需要对Role的代码做出改变:
[java] view
plain copy
package com.zhy.bean;
/**
* 游戏的角色超类
*
* @author zhy
*
*/
public abstract class Role
{
protected String name;
protected IDefendBehavior defendBehavior;
protected IDisplayBehavior displayBehavior;
protected IRunBehavior runBehavior;
protected IAttackBehavior attackBehavior;
public Role setDefendBehavior(IDefendBehavior defendBehavior)
{
this.defendBehavior = defendBehavior;
return this;
}
public Role setDisplayBehavior(IDisplayBehavior displayBehavior)
{
this.displayBehavior = displayBehavior;
return this;
}
public Role setRunBehavior(IRunBehavior runBehavior)
{
this.runBehavior = runBehavior;
return this;
}
public Role setAttackBehavior(IAttackBehavior attackBehavior)
{
this.attackBehavior = attackBehavior;
return this;
}
protected void display()
{
displayBehavior.display();
}
protected void run()
{
runBehavior.run();
}
protected void attack()
{
attackBehavior.attack();
}
protected void defend()
{
defendBehavior.defend();
}
}
每个角色现在只需要一个name了:
[java] view
plain copy
package com.zhy.bean;
public class RoleA extends Role
{
public RoleA(String name)
{
this.name = name;
}
}
现在我们需要一个金蝉脱壳,降龙十八掌!,铁布衫,样子1的角色A只需要这样:
[java] view
plain copy
package com.zhy.bean;
public class Test
{
public static void main(String[] args)
{
Role roleA = new RoleA("A");
roleA.setAttackBehavior(new AttackXL())//
.setDefendBehavior(new DefendTBS())//
.setDisplayBehavior(new DisplayA())//
.setRunBehavior(new RunJCTQ());
System.out.println(roleA.name + ":");
roleA.run();
roleA.attack();
roleA.defend();
roleA.display();
}
}
经过我们的修改,现在所有的技能的实现做到了100%的复用,并且随便项目经理需要什么样的角色,对于我们来说只需要动态设置一下技能和展示方式,是不是很完美。恭喜你,现在你已经学会了策略模式,现在我们回到定义,定义上的算法族:其实就是上述例子的技能;定义上的客户:其实就是RoleA,RoleB...;我们已经定义了一个算法族(各种技能),且根据需求可以进行相互替换,算法(各种技能)的实现独立于客户(角色)。现在是不是很好理解策略模式的定义了。
附上一张UML图,方便大家理解:
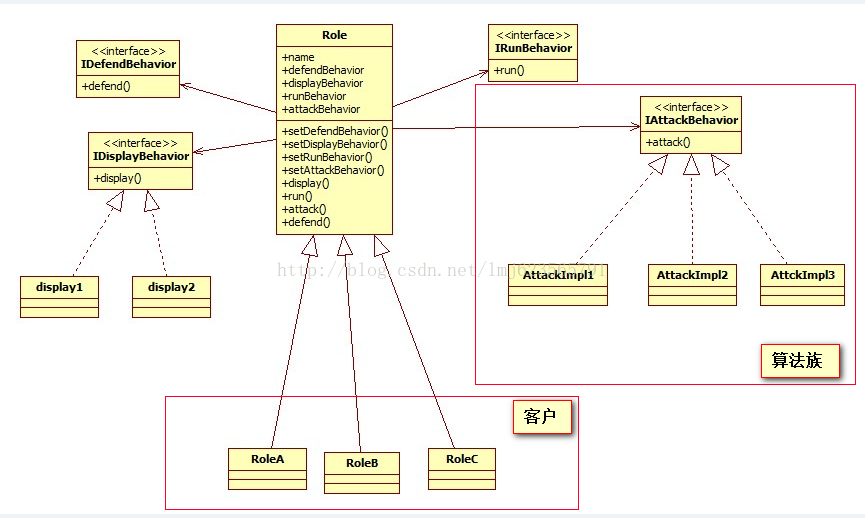
最后总结一下OO的原则:
1、封装变化(把可能变化的代码封装起来)
2、多用组合,少用继承(我们使用组合的方式,为客户设置了算法)
3、针对接口编程,不针对实现(对于Role类的设计完全的针对角色,和技能的实现没有关系)
上面是鸿洋大神的,附加我自己在策略模式中深究过的流程:
二、策略模式的应用场景
而在Android的系统源码中,策略模式也是应用的相当广泛的.最典型的就是属性动画中的应用.
我们知道,在属性动画中,有一个东西叫做插值器,它的作用就是根据时间流逝的百分比来来计算出当前属性值改变的百分比.
我们使用属性动画的时候,可以通过set方法对插值器进行设置.可以看到内部维持了一个时间插值器的引用,并设置了getter和setter方法,默认情况下是先加速后减速的插值器,set方法如果传入的是null,则是线性插值器。而时间插值器TimeInterpolator是个接口,有一个接口继承了该接口,就是Interpolator这个接口,其作用是为了保持兼容
2
3
4
5
6
7
8
9
10
11
12
13
14
15
16
17
[/code]
2
3
4
5
6
[/code]
此外还有一个BaseInterpolator插值器实现了Interpolator接口,并且是一个抽象类
2
3
4
5
6
7
8
9
10
11
12
13
14
15
16
[/code]
平时我们使用的时候,通过设置不同的插值器,实现不同的动画速率变换效果,比如线性变换,回弹,自由落体等等。这些都是插值器接口的具体实现,也就是具体的插值器策略。我们略微来看几个策略。
2
3
4
5
6
7
8
9
10
11
12
13
14
15
16
17
18
19
[/code]
2
3
4
5
6
7
8
9
10
11
12
13
14
15
16
17
18
19
20
[/code]
内部使用的时候直接调用getInterpolation方法就可以返回对应的值了,也就是属性值改变的百分比。
属性动画中另外一个应用策略模式的地方就是估值器,它的作用是根据当前属性改变的百分比来计算改变后的属性值。该属性和插值器是类似的,有几个默认的实现。其中TypeEvaluator是一个接口。
2
3
4
5
6
[/code]
2
3
4
5
6
7
[/code]
2
3
4
5
6
7
[/code]
2
3
4
5
6
7
8
9
10
11
12
13
14
15
16
17
18
19
20
21
22
23
24
25
26
[/code]
2
3
4
5
6
7
8
9
10
11
12
13
14
15
16
17
18
19
20
21
22
23
24
25
26
[/code]
上面的都是一些系统实现好的估值策略,在内部调用估值器的evaluate方法即可返回改变后的值了。我们也可以自定义估值策略。这里就不展开了。
当然,在开源框架中,策略模式也是无处不在的。
首先在Volley中,策略模式就能看到。
有一个重试策略接口
2
3
4
5
6
7
8
9
10
11
12
[/code]
在Volley中,该接口有一个默认的实现DefaultRetryPolicy,Volley 默认的重试策略实现类。主要通过在 retry(…) 函数中判断重试次数是否达到上限确定是否继续重试。
2
3
4
[/code]
而策略的设置是在Request类中
2
3
4
5
6
7
8
9
10
11
12
[/code]
此外,各大网络请求框架,或多或少都会使用到缓存,缓存一般会定义一个Cache接口,然后实现不同的缓存策略,如内存缓存,磁盘缓存等等,这个缓存的实现,其实也可以使用策略模式。直接看Volley,里面也有缓存。
定义了一个缓存接口
2
3
4
5
6
7
8
9
10
11
12
13
14
15
16
17
18
19
20
21
22
23
24
25
26
27
28
29
30
31
32
33
34
35
36
37
38
39
40
41
42
43
44
45
46
47
48
49
50
51
52
53
54
55
56
57
58
59
60
61
62
63
64
65
66
67
68
69
70
71
72
73
74
75
76
77
78
79
80
[/code]
它有两个实现类NoCache和DiskBasedCache,使用的时候设置对应的缓存策略即可。
在android开发中,ViewPager是一个使用非常常见的控件,它的使用往往需要伴随一个Indicator指示器。如果让你重新实现一个ViewPager,并且带有Indicator,这时候,你会不会想到用策略模式呢?在你自己写的ViewPager中(不是系统的,当然你也可以继承系统的)持有一个策略接口Indicator的变量,通过set方法设置策略,然后ViewPager滑动的时候调用策略接口的对应方法改变指示器。默认提供几个Indicator接口的实现类,比如圆形指示器CircleIndicator、线性指示器LineIndicator、Tab指示器TabIndicator、图标指示器IconIndicator
等等等等。有兴趣的话自己去实现一个吧。
代码链接:https://github.com/371894545/StrategyPattern(中间有相关代码解释)
一、策略模式的应用
策略模式的应用来自鸿洋大神的
策略模式(Strategy Pattern):定义了算法族,分别封装起来,让它们之间可相互替换,此模式让算法的变化独立于使用算法的客户。
好了,对于定义,肯定不是一眼就能看明白的,不然这篇文章就收尾了,对于定于大家简单扫一眼,知道个大概,然后继续读下面的文章,读完以后再来回味,效果嘎嘣脆。大家应该都玩过武侠角色游戏,下面我就以角色游戏为背景,为大家介绍:假设公司需要做一款武侠游戏,我们就是负责游戏的角色模块,需求是这样的:每个角色对应一个名字,每类角色对应一种样子,每个角色拥有一个逃跑、攻击、防御的技能。
初步的代码:
[java] view
plain copy
package com.zhy.bean;
/**
* 游戏的角色超类
*
* @author zhy
*
*/
public abstract class Role
{
protected String name;
protected abstract void display();
protected abstract void run();
protected abstract void attack();
protected abstract void defend();
}
[java] view
plain copy
package com.zhy.bean;
public class RoleA extends Role
{
public RoleA(String name)
&nb
24000
sp;{
this.name = name;
}
@Override
protected void display()
{
System.out.println("样子1");
}
@Override
protected void run()
{
System.out.println("金蝉脱壳");
}
@Override
protected void attack()
{
System.out.println("降龙十八掌");
}
@Override
protected void defend()
{
System.out.println("铁头功");
}
}
没几分钟,你写好了上面的代码,觉得已经充分发挥了OO的思想,正在窃喜,这时候项目经理说,再添加两个角色
RoleB(样子2 ,降龙十八掌,铁布衫,金蝉脱壳)。
RoleC(样子1,拥有九阳神功,铁布衫,烟雾弹)。
于是你觉得没问题,开始写代码,继续集成Role,写成下面的代码:
[java] view
plain copy
package com.zhy.bean;
public class RoleB extends Role
{
public RoleB(String name)
{
this.name = name;
}
@Override
protected void display()
{
System.out.println("样子2");
}
@Override
protected void run()
{
System.out.println("金蝉脱壳");//从RoleA中拷贝
}
@Override
protected void attack()
{
System.out.println("降龙十八掌");//从RoleA中拷贝
}
@Override
protected void defend()
{
System.out.println("铁布衫");
}
}
[java] view
plain copy
package com.zhy.bean;
public class RoleC extends Role
{
public RoleC(String name)
{
this.name = name;
}
@Override
protected void display()
{
System.out.println("样子1");//从RoleA中拷贝
}
@Override
protected void run()
{
System.out.println("烟雾弹");
}
@Override
protected void attack()
{
System.out.println("九阳神功");
}
@Override
protected void defend()
{
System.out.println("铁布衫");//从B中拷贝
}
}
写完之后,你自己似乎没有当初那么自信了,你发现代码中已经存在相当多重复的代码,需要考虑重新设计架构了。于是你想,要不把每个技能都写成接口,有什么技能的角色实现什么接口,简单一想,觉得这想法高大尚啊,但是实现起来会发现,接口并不能实现代码的复用,每个实现接口的类,还是必须写自己写实现。于是,we
need change ! 遵循设计的原则,找出应用中可能需要变化的部分,把它们独立出来,不要和那些不需要变化的代码混在一起。我们发现,对于每个角色的display,attack,defend,run都是有可能变化的,于是我们必须把这写独立出来。再根据另一个设计原则:针对接口(超类型)编程,而不是针对实现编程,于是我们把代码改造成这样:
[java] view
plain copy
package com.zhy.bean;
public interface IAttackBehavior
{
void attack();
}
[java] view
plain copy
package com.zhy.bean;
public interface IDefendBehavior
{
void defend();
}
[java] view
plain copy
package com.zhy.bean;
public interface IDisplayBehavior
{
void display();
}
[java] view
plain copy
package com.zhy.bean;
public class AttackJY implements IAttackBehavior
{
@Override
public void attack()
{
System.out.println("九阳神功!");
}
}
[java] view
plain copy
package com.zhy.bean;
public class DefendTBS implements IDefendBehavior
{
@Override
public void defend()
{
System.out.println("铁布衫");
}
}
[java] view
plain copy
package com.zhy.bean;
public class RunJCTQ implements IRunBehavior
{
@Override
public void run()
{
System.out.println("金蝉脱壳");
}
}
这时候需要对Role的代码做出改变:
[java] view
plain copy
package com.zhy.bean;
/**
* 游戏的角色超类
*
* @author zhy
*
*/
public abstract class Role
{
protected String name;
protected IDefendBehavior defendBehavior;
protected IDisplayBehavior displayBehavior;
protected IRunBehavior runBehavior;
protected IAttackBehavior attackBehavior;
public Role setDefendBehavior(IDefendBehavior defendBehavior)
{
this.defendBehavior = defendBehavior;
return this;
}
public Role setDisplayBehavior(IDisplayBehavior displayBehavior)
{
this.displayBehavior = displayBehavior;
return this;
}
public Role setRunBehavior(IRunBehavior runBehavior)
{
this.runBehavior = runBehavior;
return this;
}
public Role setAttackBehavior(IAttackBehavior attackBehavior)
{
this.attackBehavior = attackBehavior;
return this;
}
protected void display()
{
displayBehavior.display();
}
protected void run()
{
runBehavior.run();
}
protected void attack()
{
attackBehavior.attack();
}
protected void defend()
{
defendBehavior.defend();
}
}
每个角色现在只需要一个name了:
[java] view
plain copy
package com.zhy.bean;
public class RoleA extends Role
{
public RoleA(String name)
{
this.name = name;
}
}
现在我们需要一个金蝉脱壳,降龙十八掌!,铁布衫,样子1的角色A只需要这样:
[java] view
plain copy
package com.zhy.bean;
public class Test
{
public static void main(String[] args)
{
Role roleA = new RoleA("A");
roleA.setAttackBehavior(new AttackXL())//
.setDefendBehavior(new DefendTBS())//
.setDisplayBehavior(new DisplayA())//
.setRunBehavior(new RunJCTQ());
System.out.println(roleA.name + ":");
roleA.run();
roleA.attack();
roleA.defend();
roleA.display();
}
}
经过我们的修改,现在所有的技能的实现做到了100%的复用,并且随便项目经理需要什么样的角色,对于我们来说只需要动态设置一下技能和展示方式,是不是很完美。恭喜你,现在你已经学会了策略模式,现在我们回到定义,定义上的算法族:其实就是上述例子的技能;定义上的客户:其实就是RoleA,RoleB...;我们已经定义了一个算法族(各种技能),且根据需求可以进行相互替换,算法(各种技能)的实现独立于客户(角色)。现在是不是很好理解策略模式的定义了。
附上一张UML图,方便大家理解:
最后总结一下OO的原则:
1、封装变化(把可能变化的代码封装起来)
2、多用组合,少用继承(我们使用组合的方式,为客户设置了算法)
3、针对接口编程,不针对实现(对于Role类的设计完全的针对角色,和技能的实现没有关系)
上面是鸿洋大神的,附加我自己在策略模式中深究过的流程:
二、策略模式的应用场景
而在Android的系统源码中,策略模式也是应用的相当广泛的.最典型的就是属性动画中的应用.
我们知道,在属性动画中,有一个东西叫做插值器,它的作用就是根据时间流逝的百分比来来计算出当前属性值改变的百分比.
我们使用属性动画的时候,可以通过set方法对插值器进行设置.可以看到内部维持了一个时间插值器的引用,并设置了getter和setter方法,默认情况下是先加速后减速的插值器,set方法如果传入的是null,则是线性插值器。而时间插值器TimeInterpolator是个接口,有一个接口继承了该接口,就是Interpolator这个接口,其作用是为了保持兼容
private static final TimeInterpolator sDefaultInterpolator =
new AccelerateDecelerateInterpolator();
private TimeInterpolator mInterpolator = sDefaultInterpolator;
@Override
public void setInterpolator(TimeInterpolator value) {
if (value != null) {
mInterpolator = value;
} else {
mInterpolator = new LinearInterpolator();
}
}

@Override
public TimeInterpolator getInterpolator() {
return mInterpolator;
}12
3
4
5
6
7
8
9
10
11
12
13
14
15
16
17
[/code]
public interface Interpolator extends TimeInterpolator {
// A new interface, TimeInterpolator, was introduced for the new android.animation
// package. This older Interpolator interface extends TimeInterpolator so that users of
// the new Animator-based animations can use either the old Interpolator implementations or
// new classes that implement TimeInterpolator directly.
}12
3
4
5
6
[/code]
此外还有一个BaseInterpolator插值器实现了Interpolator接口,并且是一个抽象类
abstract public class BaseInterpolator implements Interpolator {
private int mChangingConfiguration;
/**
* @hide
*/
public int getChangingConfiguration() {
return mChangingConfiguration;
}

/**
* @hide
*/
void setChangingConfiguration(int changingConfiguration) {
mChangingConfiguration = changingConfiguration;
}
}12
3
4
5
6
7
8
9
10
11
12
13
14
15
16
[/code]
平时我们使用的时候,通过设置不同的插值器,实现不同的动画速率变换效果,比如线性变换,回弹,自由落体等等。这些都是插值器接口的具体实现,也就是具体的插值器策略。我们略微来看几个策略。
public class LinearInterpolator extends BaseInterpolator implements NativeInterpolatorFactory {

public LinearInterpolator() {
}

public LinearInterpolator(Context context, AttributeSet attrs) {
}

public float getInterpolation(float input) {
return input;
}

/** @hide */
@Override
public long createNativeInterpolator() {
return NativeInterpolatorFactoryHelper.createLinearInterpolator();
}
}12
3
4
5
6
7
8
9
10
11
12
13
14
15
16
17
18
19
[/code]
public class AccelerateDecelerateInterpolator extends BaseInterpolator
implements NativeInterpolatorFactory {
public AccelerateDecelerateInterpolator() {
}

@SuppressWarnings({"UnusedDeclaration"})
public AccelerateDecelerateInterpolator(Context context, AttributeSet attrs) {
}

public float getInterpolation(float input) {
return (float)(Math.cos((input + 1) * Math.PI) / 2.0f) + 0.5f;
}

/** @hide */
@Override
public long createNativeInterpolator() {
return NativeInterpolatorFactoryHelper.createAccelerateDecelerateInterpolator();
}
}12
3
4
5
6
7
8
9
10
11
12
13
14
15
16
17
18
19
20
[/code]
内部使用的时候直接调用getInterpolation方法就可以返回对应的值了,也就是属性值改变的百分比。
属性动画中另外一个应用策略模式的地方就是估值器,它的作用是根据当前属性改变的百分比来计算改变后的属性值。该属性和插值器是类似的,有几个默认的实现。其中TypeEvaluator是一个接口。
public interface TypeEvaluator<T> {

public T evaluate(float fraction, T startValue, T endValue);

}12
3
4
5
6
[/code]
public class IntEvaluator implements TypeEvaluator<Integer> {

public Integer evaluate(float fraction, Integer startValue, Integer endValue) {
int startInt = startValue;
return (int)(startInt + fraction * (endValue - startInt));
}
}12
3
4
5
6
7
[/code]
public class FloatEvaluator implements TypeEvaluator<Number> {

public Float evaluate(float fraction, Number startValue, Number endValue) {
float startFloat = startValue.floatValue();
return startFloat + fraction * (endValue.floatValue() - startFloat);
}
}12
3
4
5
6
7
[/code]
public class PointFEvaluator implements TypeEvaluator<PointF> {

private PointF mPoint;

public PointFEvaluator() {
}

public PointFEvaluator(PointF reuse) {
mPoint = reuse;
}

@Override
public PointF evaluate(float fraction, PointF startValue, PointF endValue) {
float x = startValue.x + (fraction * (endValue.x - startValue.x));
float y = startValue.y + (fraction * (endValue.y - startValue.y));

if (mPoint != null) {
mPoint.set(x, y);
return mPoint;
} else {
return new PointF(x, y);
}
}
}12
3
4
5
6
7
8
9
10
11
12
13
14
15
16
17
18
19
20
21
22
23
24
25
26
[/code]
public class ArgbEvaluator implements TypeEvaluator {
private static final ArgbEvaluator sInstance = new ArgbEvaluator();

public static ArgbEvaluator getInstance() {
return sInstance;
}

public Object evaluate(float fraction, Object startValue, Object endValue) {
int startInt = (Integer) startValue;
int startA = (startInt >> 24) & 0xff;
int startR = (startInt >> 16) & 0xff;
int startG = (startInt >> 8) & 0xff;
int startB = startInt & 0xff;

int endInt = (Integer) endValue;
int endA = (endInt >> 24) & 0xff;
int endR = (endInt >> 16) & 0xff;
int endG = (endInt >> 8) & 0xff;
int endB = endInt & 0xff;

return (int)((startA + (int)(fraction * (endA - startA))) << 24) |
(int)((startR + (int)(fraction * (endR - startR))) << 16) |
(int)((startG + (int)(fraction * (endG - startG))) << 8) |
(int)((startB + (int)(fraction * (endB - startB))));
}
}12
3
4
5
6
7
8
9
10
11
12
13
14
15
16
17
18
19
20
21
22
23
24
25
26
[/code]
上面的都是一些系统实现好的估值策略,在内部调用估值器的evaluate方法即可返回改变后的值了。我们也可以自定义估值策略。这里就不展开了。
当然,在开源框架中,策略模式也是无处不在的。
首先在Volley中,策略模式就能看到。
有一个重试策略接口
public interface RetryPolicy {

public int getCurrentTimeout();//获取当前请求用时(用于 Log)

public int getCurrentRetryCount();//获取已经重试的次数(用于 Log)

public void retry(VolleyError error) throws VolleyError;//确定是否重试,参数为这次异常的具体信息。在请求异常时此接口会被调用,可在此函数实现中抛出传入的异常表示停止重试。
}12
3
4
5
6
7
8
9
10
11
12
[/code]
在Volley中,该接口有一个默认的实现DefaultRetryPolicy,Volley 默认的重试策略实现类。主要通过在 retry(…) 函数中判断重试次数是否达到上限确定是否继续重试。
public class DefaultRetryPolicy implements RetryPolicy {
...
}12
3
4
[/code]
而策略的设置是在Request类中
public abstract class Request<T> implements Comparable<Request<T>> {
private RetryPolicy mRetryPolicy;
public Request<?> setRetryPolicy(RetryPolicy retryPolicy) {
mRetryPolicy = retryPolicy;
return this;
}
public RetryPolicy getRetryPolicy() {
return mRetryPolicy;
}
}12
3
4
5
6
7
8
9
10
11
12
[/code]
此外,各大网络请求框架,或多或少都会使用到缓存,缓存一般会定义一个Cache接口,然后实现不同的缓存策略,如内存缓存,磁盘缓存等等,这个缓存的实现,其实也可以使用策略模式。直接看Volley,里面也有缓存。
定义了一个缓存接口
/**
* An interface for a cache keyed by a String with a byte array as data.
*/
public interface Cache {
/**
* Retrieves an entry from the cache.
* @param key Cache key
* @return An {@link Entry} or null in the event of a cache miss
*/
public Entry get(String key);

/**
* Adds or replaces an entry to the cache.
* @param key Cache key
* @param entry Data to store and metadata for cache coherency, TTL, etc.
*/
public void put(String key, Entry entry);

/**
* Performs any potentially long-running actions needed to initialize the cache;
* will be called from a worker thread.
*/
public void initialize();

/**
* Invalidates an entry in the cache.
* @param key Cache key
* @param fullExpire True to fully expire the entry, false to soft expire
*/
public void invalidate(String key, boolean fullExpire);

/**
* Removes an entry from the cache.
* @param key Cache key
*/
public void remove(String key);

/**
* Empties the cache.
*/
public void clear();

/**
* Data and metadata for an entry returned by the cache.
*/
public static class Entry {
/** The data returned from cache. */
public byte[] data;

/** ETag for cache coherency. */
public String etag;

/** Date of this response as reported by the server. */
public long serverDate;

/** The last modified date for the requested object. */
public long lastModified;

/** TTL for this record. */
public long ttl;

/** Soft TTL for this record. */
public long softTtl;

/** Immutable response headers as received from server; must be non-null. */
public Map<String, String> responseHeaders = Collections.emptyMap();

/** True if the entry is expired. */
public boolean isExpired() {
return this.ttl < System.currentTimeMillis();
}

/** True if a refresh is needed from the original data source. */
public boolean refreshNeeded() {
return this.softTtl < System.currentTimeMillis();
}
}

}12
3
4
5
6
7
8
9
10
11
12
13
14
15
16
17
18
19
20
21
22
23
24
25
26
27
28
29
30
31
32
33
34
35
36
37
38
39
40
41
42
43
44
45
46
47
48
49
50
51
52
53
54
55
56
57
58
59
60
61
62
63
64
65
66
67
68
69
70
71
72
73
74
75
76
77
78
79
80
[/code]
它有两个实现类NoCache和DiskBasedCache,使用的时候设置对应的缓存策略即可。
在android开发中,ViewPager是一个使用非常常见的控件,它的使用往往需要伴随一个Indicator指示器。如果让你重新实现一个ViewPager,并且带有Indicator,这时候,你会不会想到用策略模式呢?在你自己写的ViewPager中(不是系统的,当然你也可以继承系统的)持有一个策略接口Indicator的变量,通过set方法设置策略,然后ViewPager滑动的时候调用策略接口的对应方法改变指示器。默认提供几个Indicator接口的实现类,比如圆形指示器CircleIndicator、线性指示器LineIndicator、Tab指示器TabIndicator、图标指示器IconIndicator
等等等等。有兴趣的话自己去实现一个吧。
代码链接:https://github.com/371894545/StrategyPattern(中间有相关代码解释)

相关文章推荐
- Java设计模式 -- 策略模式
- [设计模式] - 策略模式(Java篇)
- Java设计模式-----Strategy策略模式
- 设计模式之三 --- 策略模式(Strategy Pattern) (java)
- java设计模式-策略模式
- java设计模式之 策略模式
- Java设计模式之策略模式
- 设计模式一:java设计模式之策略模式(一)
- java设计模式---Strategy Pattern---策略模式
- JAVA 设计模式之 策略模式
- java设计模式之strategy(策略模式)和policy模式(泛化的strategy模式)
- java 设计模式-策略模式
- Java设计模式 Design Pattern:策略模式 Strategy Pattern
- java设计模式--策略模式
- Java设计模式-----Strategy策略模式
- java设计模式-----策略模式
- All About JAVA 关于设计模式中的“策略模式”
- 设计模式:策略模式的实现 c++ 与 java
- java 设计模式--策略模式(strategy)
- java设计模式:策略模式(Strategy)