基于VS2013 X64的boost.python环境搭建
2016-12-16 14:21
519 查看
本机测试失败!
本文参考:
http://blog.csdn.net/lpp0900320123/article/details/52014741
http://edyfox.codecarver.org/html/boost_python.html
https://zhuanlan.zhihu.com/p/22547951
http://blog.chinaunix.net/uid-15063109-id-3834408.html
1.环境介绍
64位 win7 操作系统
VS2013
64位 python2.7
boost1.62.0
2.软件安装
VS2013与python的安装,在此不再讲述。
3.boost.python动态编译库编译
(1) 首先去boost官网(http://www.boost.org/)下载boost源码库,并将其解压到一个目录:D:\boost_1_62_0
(2) 编译boost 的编译器 bjam.exe
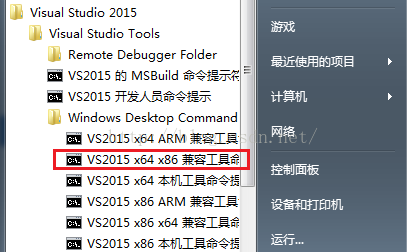
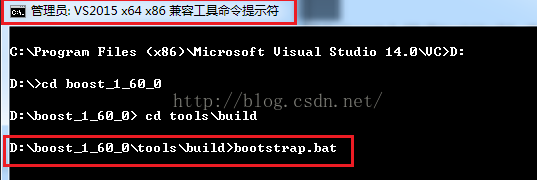
使用VS2015提供的开发人员工具编译bjam.exe,把目录切换到D:\boost_1_60_0\tools\build,执行bootstrap.bat文件进行编译,如下图所示。
(3)修改bjam的配置文件
在D:\boost_1_60_0\tools\build\example 目录下,用文本编辑器打开user-config.jam配置文件,这个配置文件需要修改两项一个是msvc版本,另一个python安装路径和版本。(我用的是VS2013,改为12.0)
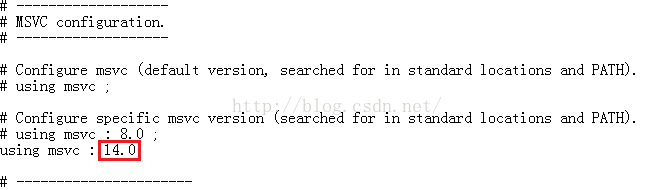

因为VS用的是2013版本,所以msvc为12.0,并设置python的包含目录和库目录。
(4)执行bjam.exe编译命令
将刚才的bjam.exe 拷贝到 D:\boost_1_62_0\下,准备boost 库的编译。将命令提示符定位到 D:\boost_1_62_0\ 下
执行 bjam 编译命令。
编译release版本(x64)
bjam --with-python --prefix=d:\boost stage toolset=msvc-12.0 variant=release link=shared address-model=64 threading=multi runtime-link=shared install
编译debug版本(x64)
bjam --with-python --prefix=d:\boost stage toolset=msvc-12.0 variant=debug link=shared address-model=64 threading=multi runtime-link=shared install
遇到的问题:bjam --with-python --build-type=complete ,只能编译出静态库,动态库编译不出来。理论上能生成所有可能版本的lib (debug 动态库版,debug静态库版,release 动态库版,release静态库版,debug单线程版,debug多线程版, release单线程版,release多线程版。但是在编译时发现 编译boost python动态库版时会报python 的函数无法解析的外部符号,能成功编译boost python静态库的版本。因为64位寻址和32 位寻址的不同,所以不加address-model=64 的话会造成编译动态库版boost python 出现python 无法解析的外部符号的问题。如下图所示为x64的release和debug版本。

编译好的库下载链接:http://download.csdn.net/detail/lpp0900320123/9584814
注:
--prefix设置boost安装目录;
stage表示只生成库文件(dll与lib文件);
toolset指定编译器
variant决定编译什么版本;
link决定使用静态库还是动态库,shared是动态库,static是静态库;
address-model决定地址长度,即32还是64位程序;
threading决定使用单线程(single)还是多线程(multi)库;
runtime-link决定是静态(static)还是动态(shared)链接C/C++标准库;
install会生成包含头文件的include目录。
4.测试
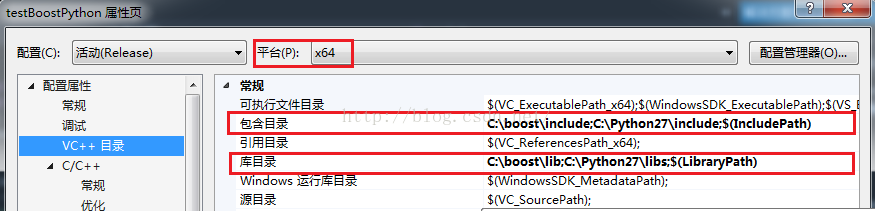
在VS2015中,新建win32控制台工程,配置Release,平台为x64。并配置python和boost的包含路径和库路径。
python脚本如下:

C++代码:
#include<iostream>
#include<boost\python.hpp>
#include<Python.h>
using namespace std;
using namespace boost::python;
int main()
{
Py_Initialize(); // 检查初始化是否成功
if (!Py_IsInitialized())
{
return -1;
}
PyRun_SimpleString("import sys");
PyRun_SimpleString("sys.path.append('./')");
object mainModule;
object mainNamespace;
try
{
mainModule = import("__main__");
mainNamespace = mainModule.attr("__dict__");
//要求simple.py与可执行文件在相同路径下! 运行ok
object simple = exec_file("simple.py", mainNamespace, mainNamespace);
//object result = exec_file("simple.py", global, global);
object foo = mainNamespace["foo"];
int val = extract<int>(foo(5));
object add = mainNamespace["add"];
string url = extract<string>(add("abc"));
cout << "Python has caculated add as " << val << endl;
cout << "Python has caculated foo as " << url << endl;
}
catch (...)
{
if (PyErr_Occurred())
PyErr_Print();
}
// 关闭Python
Py_Finalize();
system("pause");
return 0;
}
运行结果如下图:

注:1)报运行时缺少boost_python-vc140-mt-1_60.dll动态库文件时,解决办法把boost_python-vc140-mt-1_60.dll拷贝到C:\Windows\System32目录下。
本文参考:
http://blog.csdn.net/lpp0900320123/article/details/52014741
http://edyfox.codecarver.org/html/boost_python.html
https://zhuanlan.zhihu.com/p/22547951
http://blog.chinaunix.net/uid-15063109-id-3834408.html
1.环境介绍
64位 win7 操作系统
VS2013
64位 python2.7
boost1.62.0
2.软件安装
VS2013与python的安装,在此不再讲述。
3.boost.python动态编译库编译
(1) 首先去boost官网(http://www.boost.org/)下载boost源码库,并将其解压到一个目录:D:\boost_1_62_0
(2) 编译boost 的编译器 bjam.exe
使用VS2015提供的开发人员工具编译bjam.exe,把目录切换到D:\boost_1_60_0\tools\build,执行bootstrap.bat文件进行编译,如下图所示。
(3)修改bjam的配置文件
在D:\boost_1_60_0\tools\build\example 目录下,用文本编辑器打开user-config.jam配置文件,这个配置文件需要修改两项一个是msvc版本,另一个python安装路径和版本。(我用的是VS2013,改为12.0)
因为VS用的是2013版本,所以msvc为12.0,并设置python的包含目录和库目录。
(4)执行bjam.exe编译命令
将刚才的bjam.exe 拷贝到 D:\boost_1_62_0\下,准备boost 库的编译。将命令提示符定位到 D:\boost_1_62_0\ 下
执行 bjam 编译命令。
编译release版本(x64)
bjam --with-python --prefix=d:\boost stage toolset=msvc-12.0 variant=release link=shared address-model=64 threading=multi runtime-link=shared install
编译debug版本(x64)
bjam --with-python --prefix=d:\boost stage toolset=msvc-12.0 variant=debug link=shared address-model=64 threading=multi runtime-link=shared install
遇到的问题:bjam --with-python --build-type=complete ,只能编译出静态库,动态库编译不出来。理论上能生成所有可能版本的lib (debug 动态库版,debug静态库版,release 动态库版,release静态库版,debug单线程版,debug多线程版, release单线程版,release多线程版。但是在编译时发现 编译boost python动态库版时会报python 的函数无法解析的外部符号,能成功编译boost python静态库的版本。因为64位寻址和32 位寻址的不同,所以不加address-model=64 的话会造成编译动态库版boost python 出现python 无法解析的外部符号的问题。如下图所示为x64的release和debug版本。
编译好的库下载链接:http://download.csdn.net/detail/lpp0900320123/9584814
注:
--prefix设置boost安装目录;
stage表示只生成库文件(dll与lib文件);
toolset指定编译器
variant决定编译什么版本;
link决定使用静态库还是动态库,shared是动态库,static是静态库;
address-model决定地址长度,即32还是64位程序;
threading决定使用单线程(single)还是多线程(multi)库;
runtime-link决定是静态(static)还是动态(shared)链接C/C++标准库;
install会生成包含头文件的include目录。
4.测试
在VS2015中,新建win32控制台工程,配置Release,平台为x64。并配置python和boost的包含路径和库路径。
python脚本如下:
C++代码:
#include<iostream>
#include<boost\python.hpp>
#include<Python.h>
using namespace std;
using namespace boost::python;
int main()
{
Py_Initialize(); // 检查初始化是否成功
if (!Py_IsInitialized())
{
return -1;
}
PyRun_SimpleString("import sys");
PyRun_SimpleString("sys.path.append('./')");
object mainModule;
object mainNamespace;
try
{
mainModule = import("__main__");
mainNamespace = mainModule.attr("__dict__");
//要求simple.py与可执行文件在相同路径下! 运行ok
object simple = exec_file("simple.py", mainNamespace, mainNamespace);
//object result = exec_file("simple.py", global, global);
object foo = mainNamespace["foo"];
int val = extract<int>(foo(5));
object add = mainNamespace["add"];
string url = extract<string>(add("abc"));
cout << "Python has caculated add as " << val << endl;
cout << "Python has caculated foo as " << url << endl;
}
catch (...)
{
if (PyErr_Occurred())
PyErr_Print();
}
// 关闭Python
Py_Finalize();
system("pause");
return 0;
}
运行结果如下图:
注:1)报运行时缺少boost_python-vc140-mt-1_60.dll动态库文件时,解决办法把boost_python-vc140-mt-1_60.dll拷贝到C:\Windows\System32目录下。

相关文章推荐
- 基于VS2015 X64的boost.python环境搭建
- Python基于VS2013 开发环境搭建 Hello World 10分钟搞定
- CUDA 8.0 + VS2013 + win7 x64开发环境搭建
- win10下caffe环境搭建: win10 + vs2013 + caffe + CUDA 7.5 + cudnn v4 + Anaconda2 (python 2.7) 目前未使用GPU
- 利用VS2013在win7 64位机器上搭建xgboost 0.6+Anaconda3 环境
- VS2013下boost环境的搭建
- 基于windows下使用CMake和VS2013编译OpenCV的环境搭建
- windows8 下基于vs2013开发环境CGAL配置(cmake,cgal,qt.boost,qglviewer)教程
- CUDA 8.0 + VS2013 + win10 x64开发环境搭建
- 【VS2013】C语言调用Python脚本环境搭建、函数调用和调用demo.py脚本an
- VS2013中Python学习笔记[环境搭建]
- VS2013中Python学习环境搭建
- Windows下基于Anaconda、CUDA、VS2013的Theano环境搭建
- CUDA 8.0 + VS2013 + win7 x64开发环境搭建
- 基于VS.Net 2003的S60开发环境的搭建
- 基于VS.NET 2003S60开发环境的搭建
- Windows开发环境搭建(安装 VS2010, VS2013, Windows Server 2008 R2)
- 【cocos2dx】基于visual studio 2013 的环境搭建
- 基于Selenium2与Python自动化测试环境搭建
- 基于VS.NET 2003S60开发环境的搭建