2.新浪微博Swift项目第二天
2016-12-14 18:21
183 查看
第二天
1. 创建文件目录结构,这里,使用的是MVVM的系统架构
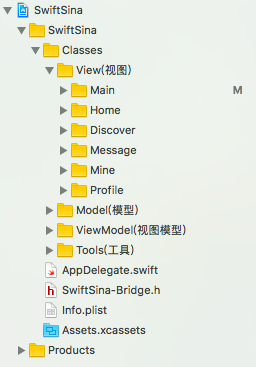
2. 创建各个类
// 各个主页面类
//  XQWBHomeViewController.swift
//  XQWBDiscoverViewController.swift
//  XQWBMessageViewController.swift
//  XQWBMineViewController.swift
//  XQWBBaseViewController.swift
// 根据需要创建基类
//  XQWBMainViewController.swift (继承 UITabBarController)
//  XQWBBaseViewController.swift (继承 ViewController)
//  XQWBNavigationController.swift (继承 NavigationController)
3. 在APPDelegate 中设置启用页面
window = UIWindow()
window?.backgroundColor = UIColor.white
window?.rootViewController = XQWBMainViewController()
window?.makeKeyAndVisible()
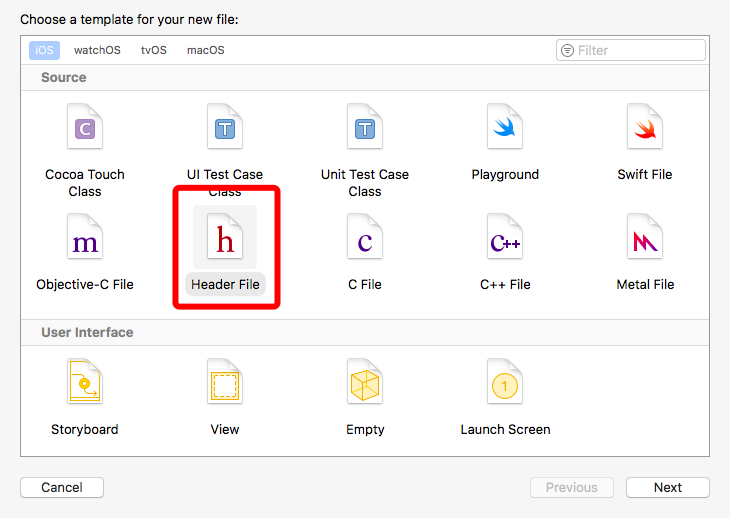
4. 为了方便开发,加入使用OC写的各个分类,并且设置桥接文件
当你在swift项目里边新建一个OC类的时候,系统会自动帮你生成一个桥接文件直接加入OC分类的时候却不会自动,生成,需要我们自己添加桥接文件.
4.1 添加一个桥接文件,(其实就是一个.h文件)
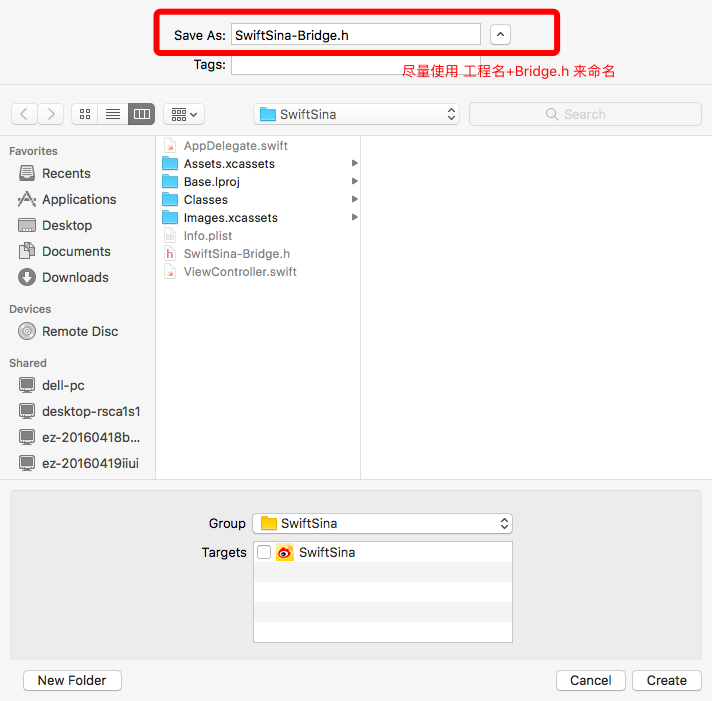
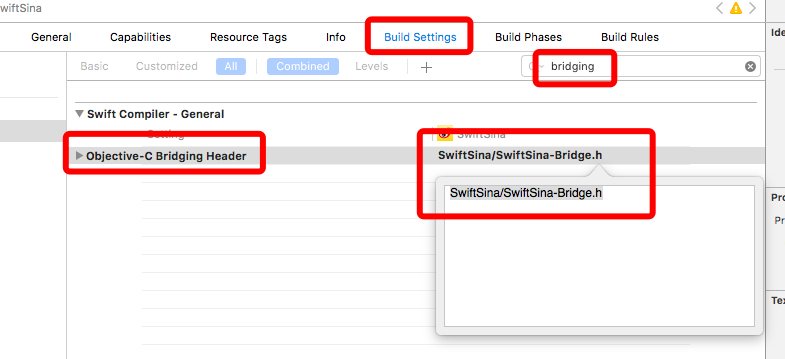
4.2. 设置桥接文件 : 在build Setting 中搜索 bridging, 找到OC Bridging Header 项, 添加一个新的项目,格式为:(项目名字/桥接文件名字)
5. 使用字典创建自定义的UITabBarController
5.1 声明一个方法,用来创建控制器信息的字典数组,并且通过遍历数组创建控制器,给UITabBarController的viewControllers赋值// 设置所有字控制器
func setupChildControllers() {
let array = [
["clsName":"XQWBHomeViewController", "title":"首页", "imgName":"home"],
["clsName":"XQWBDiscoverViewController", "title":"发现", "imgName":"discover"],
["clsName":"UIViewController", "title":"", "imgName":""], // 第二个控制器使用UIViewcontroller 实现占位作用
["clsName":"XQWBMessageViewController", "title":"消息", "imgName":"message_center"],
["clsName":"XQWBMineViewController", "title":"我的", "imgName":"profile"]
]
var arrayM = [UIViewController]()
for dict in array { // 注意: swift 3.0以后循环只能使用for_in 来实现,普通的for循环因为 i++的语法被废除而无法使用
arrayM.append(controller(dict: dict))
}
viewControllers = arrayM
}5.2 根据控制器信息的字典和反射原理使用字符串创建UIViewController,创建NavigationController,并且返回
// 根据字典创建一个子控制器
func controller(dict:[String:String]) -> UIViewController {
// 1. 取字典信息
// 这里使用guard let 守护一下,可以避免去到空值,另外可以设置中间的站位UIViewcontroller
guard let clsName = dict["clsName"],
let title = dict["title"],
let imgname = dict["imgName"],
let cls = NSClassFromString(Bundle.main.nameSpace + "." + clsName) as? UIViewController.Type else {
return UIViewController()
}
// 2. 创建视图控制器
let vc = cls.init()
// 2.1 设置标题
vc.title = title;
// 2.2 设置图像
vc.tabBarItem.image = UIImage(named: "tabbar_" + imgname);
vc.tabBarItem.selectedImage = UIImage(named: "tabbar_" + imgname + "_highlighted")?.withRenderingMode(.alwaysOriginal)
// 3. 设置nav
let  nav = XQWBNavigationController(rootViewController: vc)
// 4. 设置tabbar 字体
vc.tabBarItem.setTitleTextAttributes([NSForegroundColorAttributeName: UIColor.orange], for: .highlighted)    // 设置选择状态下的图片颜色
vc.tabBarItem.setTitleTextAttributes([NSFontAttributeName: UIFont.systemFont(ofSize: 14)], for: [])    // 设置文字大小只能在normal 状态下设置
return nav
}
6. 设置UITabBarController 中间的"撰写微博"按钮
6.1 声明一个懒加载的属性按钮/// 编写按钮
lazy var composeBtn:UIButton = {
// 设置按钮图片
let btn = UIButton.cz_imageButton("tabbar_compose_icon_add", backgroundImageName: "tabbar_compose_button")
// 设置按钮点击事件
btn?.addTarget(self, action: #selector(composeStatus), for: .touchUpInside)
return btn!;
}()6.2 设置"写微博"按钮的frame
/// 设置写按钮
func setupComposeBtn()  {
// 添加到视图
tabBar.addSubview(composeBtn)
// 设置按钮位置
let count = CGFloat(childViewControllers.count)
let width = tabBar.bounds.width / count - 1;    // 这里-1 是让按钮变宽,防止点击到默认的占位按钮,跳转到占位Viewcontroller
composeBtn.frame = tabBar.bounds.insetBy(dx: 2 * width, dy: 0)
}
6.3 实现"写微博"按钮的点击事件
// FIXME: 写微博没有实现
@objc func composeStatus() {
print("写微博")
}
注意:swift3.0中,按钮的点击事件需要用 @objc 来修饰,表示是在运行时调用的方法
PS: swift 可以使用 // MARK: - XXX 实现文档注释, 还可以使用 // FIXME: XXX 给自己提示为完成的模块
7. 设置导航栏 (这里为了方便验证push/pop,创建了一个测试用的UIViewcontroller)
7.1 在 BaseViewController 中添加懒加载的UINavigationBar和UINavigationItem// 自定义导航条 lazy var navigationBar = UINavigationBar(frame: CGRect(x: 0, y: 0, width: UIScreen.cz_screenWidth(), height: 64)) // 自定义导航项 以后设置导航栏内容 用navItem lazy var navItem = UINavigationItem()
7.2 添加 setupUI() 方法,设置基本UI,可以让子类重写
func setupUI() {
// 随机背景颜色
view.backgroundColor = UIColor.cz_random()
// 添加导航条
view.addSubview(navigationBar)
// 设置item
navigationBar.items = [navItem]
// 设置navbar 的渲染颜色
navigationBar.barTintColor = UIColor.cz_color(withHex: 0xF6F6F6)
// 设置navbar title 字体颜色
navigationBar.titleTextAttributes = [NSForegroundColorAttributeName:UIColor.darkGray]

}
7.3 重写 title 的disSet 方法,设置navItem.title
override var title: String? {
didSet {
navItem.title = title
}
}
7.4 在HomeViewController和DemoViewController中重写setupUI()方法,设置BarButtonItem测试push/pop
// 重写 setupUI()
override func setupUI() {
super.setupUI()
navItem.rightBarButtonItem = UIBarButtonItem(title: "下一个", target: self, action: #selector(showNext))

}
// 实现点击按钮方法
@objc func showNext() {
let vc = XQWBDemoViewController()
navigationController?.pushViewController(vc, animated: true)
}
7.5 重写func pushViewController(_ viewController: UIViewController, animated: Bool) {} 方法,设置当push的时候隐藏tabBar,设置返回按钮显示的文字
override func pushViewController(_ viewController: UIViewController, animated: Bool) {
if childViewControllers.count > 0 {
// 设置push后隐藏tabbar
viewController.hidesBottomBarWhenPushed  = true
// 判断控制器类型
if let vc = viewController as? XQWBBaseViewController {
var title = "返回"
if childViewControllers.count == 1 {
title = childViewControllers.first?.title ?? "返回"
}
vc.navItem.leftBarButtonItem = UIBarButtonItem(title: title, target: self, action: #selector(popToParent), isBackButton: true)
}
}
super.pushViewController(viewController, animated: animated)
}
总结
第二天的内容主要自定义了UItabBarController 和 UINavigationBar, 并且处理了push隐藏tabbar和返回按钮的文字PS: 目前工作可能有点忙,更新会比较慢,希望大家多多关注
往期内容: Swift新浪微博项目更新目录
项目git地址

相关文章推荐
- 自学 iOS - 三十天三十个 Swift 项目 第二天
- 30天学习Swift项目实战第二天--------自定义字体
- swift项目第二天:初始化项目
- OA项目第二天:后端页面的显示
- struts2第二天----属性注入值,项目负责,在工程中重新命名部署文件
- 每天进步一点点——Swift项目实践
- ps项目第二天
- ASP.Net 实战项目 之 《图书商城》 第二天
- 项目运营第二天——热锅上的蚂蚁
- 使用Swift开发iOS项目、UI创建、方法调用
- Swift-iOS-项目实战-1-开发环境篇(Mac OS10.10 + Xcode 6.0)
- 新年工作的第二天,学习jsp,因为这个项目要对jsp网站进行测试。
- swift教程 swift高手 swift项目 开发者论坛.
- 在项目里交叉使用Swift和OC
- swift安装以及创建项目
- 手机卫士项目(第二天)
- (项目部署实际经验)第二天:Tomcat(64bit)+JDK(64bit)+SQL server 2005(32bit) 安装与优化。
- 项目管理十日谈--第二天--项目目标的确立与演化
- Swift学习第二天
- 论坛源码推荐(6月24日):用Swift实现的自动布局和翻转动画以及iOS iBeacon项目