qt+opencv对两幅图片进行融合
2016-12-09 23:37
453 查看
本文博客链接:http://blog.csdn.net/jdh99,作者:jdh,转载请注明.
源代码:
[cpp] view plain copy
#include "widget.h"
#include "ui_widget.h"
#include "public.h"
Widget::Widget(QWidget *parent) :
QWidget(parent),
ui(new Ui::Widget)
{
ui->setupUi(this);
cvNamedWindow("jdh1",1);
cvNamedWindow("jdh2",1);
cvNamedWindow("jdh3",1);
src1 = cvLoadImage("test.jpg");
src2 = cvLoadImage("lena.jpg");
dst = cvLoadImage("test.jpg");
QString str;
str.setNum(src1->width);
ui->lineEdit->setText(str);
str.setNum(src1->height);
ui->lineEdit_2->setText(str);
str.setNum(src2->width);
ui->lineEdit_3->setText(str);
str.setNum(src2->height);
ui->lineEdit_4->setText(str);
}
Widget::~Widget()
{
delete ui;
cvReleaseImage(&src1);
cvReleaseImage(&src2);
cvReleaseImage(&dst);
cvDestroyAllWindows();
}
void Widget::on_pushButton_clicked()
{
bool ok;
double alpha,beta,temp;
int x,y,width,height;
temp = ui->lineEdit_7->text().toDouble(&ok);
if (ok)
{
alpha = temp;
}
else
{
alpha = 0.4;
}
cout << alpha << endl;
temp = ui->lineEdit_8->text().toDouble(&ok);
if (ok)
{
beta = temp;
}
else
{
beta = 0.6;
}
cout << beta << endl;
x= ui->lineEdit_5->text().toInt(&ok,10);
cout << x << endl;
y = ui->lineEdit_6->text().toInt(&ok,10);
cout << y << endl;
width = ui->lineEdit_9->text().toInt(&ok,10);
cout << width << endl;
height = ui->lineEdit_10->text().toInt(&ok,10);
cout << height << endl;
cvSetImageROI(src1,cvRect(x,y,width,height));
cvSetImageROI(src2,cvRect(x,y,width,height));
cvSetImageROI(dst,cvRect(x,y,width,height));
cvAddWeighted(src1,alpha,src2,beta,0.0,dst);
cvResetImageROI(src1);
cvResetImageROI(src2);
cvResetImageROI(dst);
cvShowImage("jdh1",src1);
cvShowImage("jdh2",src2);
cvShowImage("jdh3",dst);
}
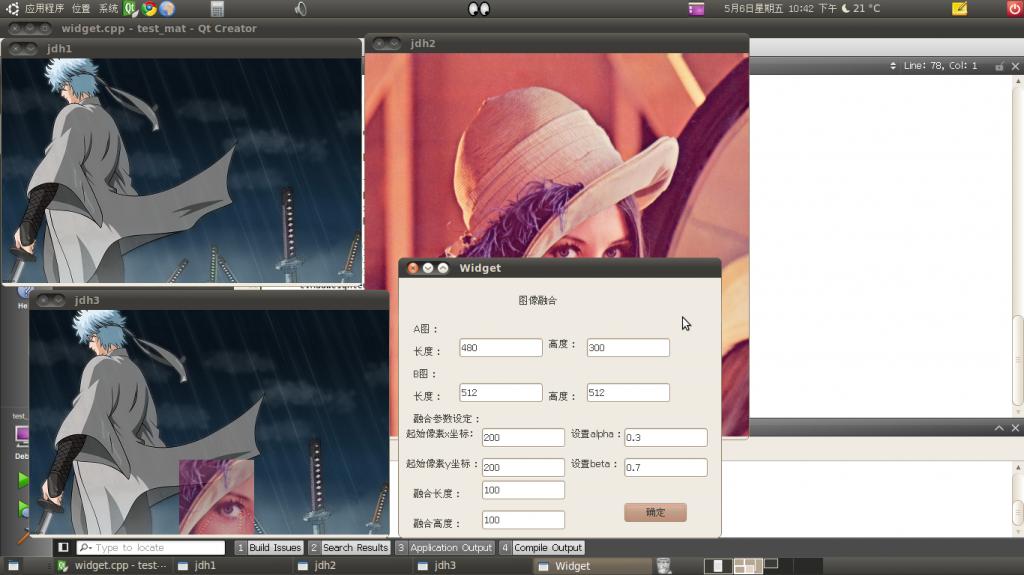
效果图:
http://blog.csdn.net/jdh99/article/details/6401000
源代码:
[cpp] view plain copy
#include "widget.h"
#include "ui_widget.h"
#include "public.h"
Widget::Widget(QWidget *parent) :
QWidget(parent),
ui(new Ui::Widget)
{
ui->setupUi(this);
cvNamedWindow("jdh1",1);
cvNamedWindow("jdh2",1);
cvNamedWindow("jdh3",1);
src1 = cvLoadImage("test.jpg");
src2 = cvLoadImage("lena.jpg");
dst = cvLoadImage("test.jpg");
QString str;
str.setNum(src1->width);
ui->lineEdit->setText(str);
str.setNum(src1->height);
ui->lineEdit_2->setText(str);
str.setNum(src2->width);
ui->lineEdit_3->setText(str);
str.setNum(src2->height);
ui->lineEdit_4->setText(str);
}
Widget::~Widget()
{
delete ui;
cvReleaseImage(&src1);
cvReleaseImage(&src2);
cvReleaseImage(&dst);
cvDestroyAllWindows();
}
void Widget::on_pushButton_clicked()
{
bool ok;
double alpha,beta,temp;
int x,y,width,height;
temp = ui->lineEdit_7->text().toDouble(&ok);
if (ok)
{
alpha = temp;
}
else
{
alpha = 0.4;
}
cout << alpha << endl;
temp = ui->lineEdit_8->text().toDouble(&ok);
if (ok)
{
beta = temp;
}
else
{
beta = 0.6;
}
cout << beta << endl;
x= ui->lineEdit_5->text().toInt(&ok,10);
cout << x << endl;
y = ui->lineEdit_6->text().toInt(&ok,10);
cout << y << endl;
width = ui->lineEdit_9->text().toInt(&ok,10);
cout << width << endl;
height = ui->lineEdit_10->text().toInt(&ok,10);
cout << height << endl;
cvSetImageROI(src1,cvRect(x,y,width,height));
cvSetImageROI(src2,cvRect(x,y,width,height));
cvSetImageROI(dst,cvRect(x,y,width,height));
cvAddWeighted(src1,alpha,src2,beta,0.0,dst);
cvResetImageROI(src1);
cvResetImageROI(src2);
cvResetImageROI(dst);
cvShowImage("jdh1",src1);
cvShowImage("jdh2",src2);
cvShowImage("jdh3",dst);
}
效果图:
http://blog.csdn.net/jdh99/article/details/6401000

相关文章推荐
- qt+opencv对两幅图片进行融合
- opencv实现两幅图片的加权融合
- 基于Qt与OpenCV的图片读取、保存,并利用Canny进行简单的边缘处理结果显示
- 转换排列Qt中使用OpenCV显示图片时,Mat结构转换为QImage结构的问题
- opencv中实现两幅不同尺寸大小图片的相加
- 【OpenCV学习】Kmean均值聚类对图片进行减色处理
- cvAddWeighted 进行图片融合
- 用opencv画两幅图片的直方图
- linux下用python进行opencv开发----简单的图片操作
- Qt中使用OpenCV显示图片时,Mat结构转换为QImage结构的问题
- 在Qt的QGraphicsView中显示OpenCV的iplimage图片
- opencv<二>基于opencv对图片进行高斯滤波
- 利用OpenCV通过HSV直方图来进行图片定位
- opencv 学习第二天 学习opencv(中文版)对一幅图片进行高斯平滑并缩小一半
- opencv 学习第二天 学习opencv(中文版)对一幅图片进行canny边缘检测
- opencv读取某文件夹下图片并进行归一化
- QT框架中快速应用OpenCV——基于图片
- ubuntu11.04下QT4.7+OpenCV2.2开发环境搭建成功,成功打开并显示图片
- opencv-输入两幅图像实现线性融合
- 矩阵图片使用Qt显示openCV矩阵图片