Android Studio中AIDL使用方法
2016-11-29 21:21
267 查看
版权声明:本文为博主原创文章,未经博主允许不得转载。
一、简介:
AIDL:Android Interface Define Language(Android接口定义语言),主要用于服务端与客户端进程间通信(服务端与多客户端)
二、配置
Android Studio中使用(最好采用project模式)
1、第一类:
简单数据传递(基本数据类型,String ,List,Map)
<1>服务端配置(不需要界面)
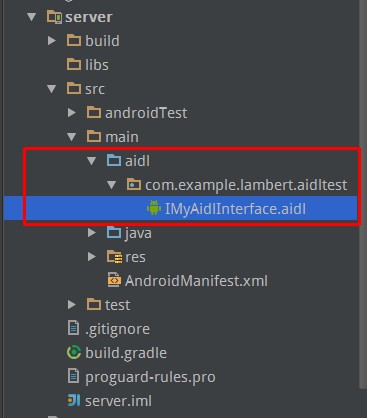
①.创建aidl自定义接口文件 —IMyAidlInterface.aidl
步骤:File –> New –> AIDL –> AIDL File
然后可以看到在src/main目录下生成了一个目录aidl,点开aidl,可以看到刚才创建的IMyAidlInterface.aidl文件
IMyAidlInterface.aidl代码如下:
2
3
4
5
6
7
8
1
2
3
4
5
6
7
8
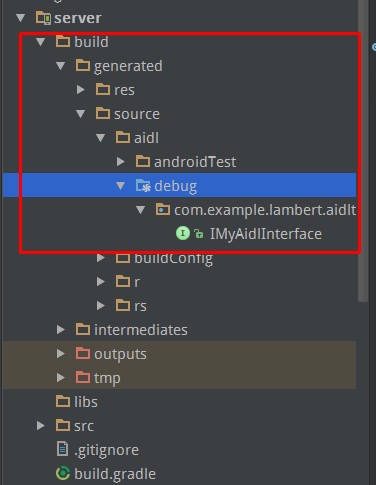
②编译(因为Android Studio不能像Eclipse那样自动编译aidl文件,所以需要手动编译)
点击Build –> Make Module’server’
然后可以看到在build/generated/source/debug/com.example.lambert.aidlproject/目录下生成了一个文件IMyAidlInterface,表示编译成功;
③编写Service
2
3
4
5
6
7
8
9
10
11
12
13
14
15
16
17
18
19
20
21
22
23
24
25
1
2
3
4
5
6
7
8
9
10
11
12
13
14
15
16
17
18
19
20
21
22
23
24
25
④在AndroidMenifest.xml中对Service进行配置:
2
3
4
5
6
7
8
1
2
3
4
5
6
7
8
到此为止,服务端配置完毕。
<2>客户端配置
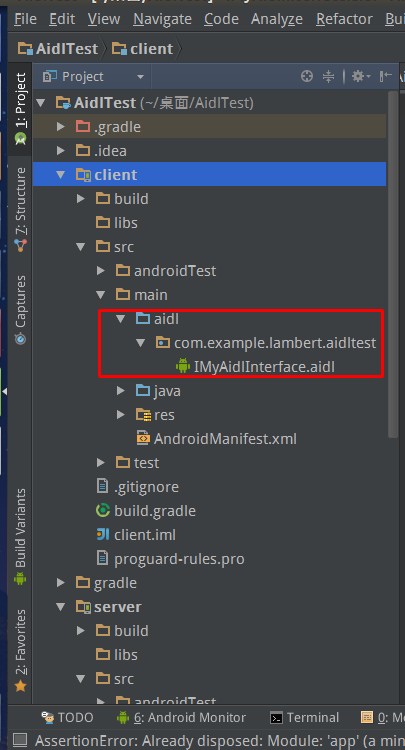
①需要将服务端配置的整个aidl目录一并拷贝到客户端所在工程src/main目录下(包名与文件名必须与服务端一模一样)
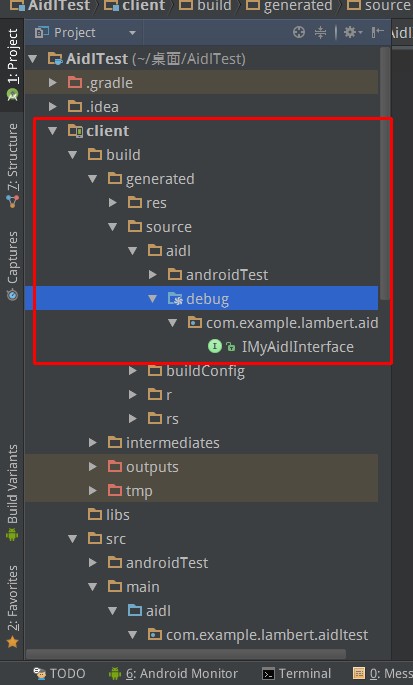
②编译(同服务端)
③绑定服务
MainActivity.Java
2
3
4
5
6
7
8
9
10
11
12
13
14
15
16
17
18
19
20
21
22
23
24
25
26
27
28
29
30
31
32
33
34
35
36
37
38
39
40
41
42
43
44
45
46
47
48
49
50
51
52
53
54
55
56
57
58
59
60
61
62
63
64
65
66
67
68
69
70
71
72
73
74
75
76
77
78
79
80
1
2
3
4
5
6
7
8
9
10
11
12
13
14
15
16
17
18
19
20
21
22
23
24
25
26
27
28
29
30
31
32
33
34
35
36
37
38
39
40
41
42
43
44
45
46
47
48
49
50
51
52
53
54
55
56
57
58
59
60
61
62
63
64
65
66
67
68
69
70
71
72
73
74
75
76
77
78
79
80
通过 mService = IMyAidlInterface.Stub.asInterface(service); 可以获取到服务端的代理对象,从而可以通过回调方法从服务端获取到我们所需的数据。
2.第二类:自定义复杂数据类型(Parcelable)
<1>服务端配置(不需要界面)
①.在上述aidl目录下创建复杂数据对象aidl文件(这里以Person.aidl为例)对复杂对象进行声明:
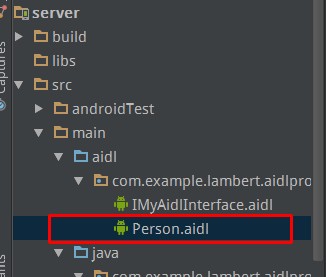
Person.aidl
2
3
1
2
3
②在src/main/java目录下创建Person.java文件
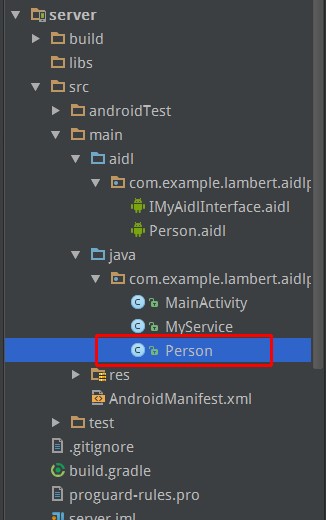
Person.java
2
3
4
5
6
7
8
9
10
11
12
13
14
15
16
17
18
19
20
21
22
23
24
25
26
27
28
29
30
31
32
33
34
35
36
37
38
39
40
41
42
43
44
45
46
47
48
49
50
51
52
53
54
1
2
3
4
5
6
7
8
9
10
11
12
13
14
15
16
17
18
19
20
21
22
23
24
25
26
27
28
29
30
31
32
33
34
35
36
37
38
39
40
41
42
43
44
45
46
47
48
49
50
51
52
53
54
③修改IMyAidlInterface.aidl如下:
2
3
4
5
6
7
8
9
10
1
2
3
4
5
6
7
8
9
10
④Service类也做出相应修改
2
3
4
5
6
7
8
9
10
1
2
3
4
5
6
7
8
9
10
⑤编译(同上)
到此为止,服务端配置完毕。
<2>客户端配置
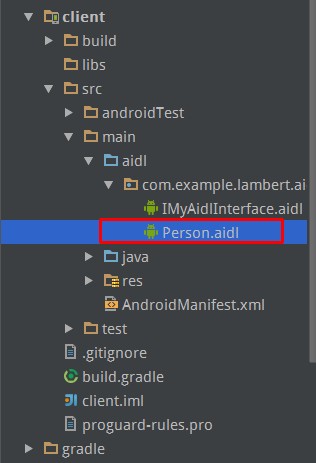
①拷贝Person.aidl和Person.java文件到客户端工程下:
Person.aidl可以拷贝到aidl目录下:
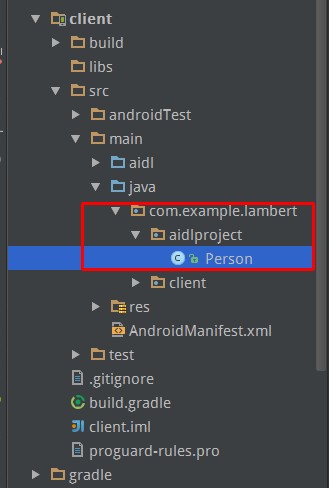
Person.java文件需要拷贝到src/main/java目录下,并且所在包名必须与服务端保持一致,但是客户端工程包名与服务端包名未必一致,所以在这里我们需要重新创建一个包com.example.lambert.aidlproject(服务端工程包名),并将Person.java文件拷贝至此;
另:IMyAidlInterface.aidl做同上修改,当然也可以直接拷贝过来
②编译(同上)
③MainActivity代码也做相应修改
2
3
4
5
6
1
2
3
4
5
6
客户端配置完毕。
关于AIDL在Android Studio中的使用暂且简单介绍到这里。
一、简介:
AIDL:Android Interface Define Language(Android接口定义语言),主要用于服务端与客户端进程间通信(服务端与多客户端)
二、配置
Android Studio中使用(最好采用project模式)
1、第一类:
简单数据传递(基本数据类型,String ,List,Map)
<1>服务端配置(不需要界面)
①.创建aidl自定义接口文件 —IMyAidlInterface.aidl
步骤:File –> New –> AIDL –> AIDL File
然后可以看到在src/main目录下生成了一个目录aidl,点开aidl,可以看到刚才创建的IMyAidlInterface.aidl文件
IMyAidlInterface.aidl代码如下:
package com.example.lambert.aidltest;

interface IMyAidlInterface {

String getValue();

}12
3
4
5
6
7
8
1
2
3
4
5
6
7
8
②编译(因为Android Studio不能像Eclipse那样自动编译aidl文件,所以需要手动编译)
点击Build –> Make Module’server’
然后可以看到在build/generated/source/debug/com.example.lambert.aidlproject/目录下生成了一个文件IMyAidlInterface,表示编译成功;
③编写Service
package com.example.lambert.aidltest;

import android.app.Service;
import android.content.Intent;
import android.os.IBinder;
import android.os.RemoteException;

public class MyService extends Service {
@Override
public IBinder onBind(Intent intent) {

//记得要return一个IMyService,否则客户端调用的时候会报空指针
return new IMyService();
}

public class IMyService extends IMyAidlInterface.Stub {

@Override
public String getValue() throws RemoteException {
return "This is Lambert Server";
}
}

}12
3
4
5
6
7
8
9
10
11
12
13
14
15
16
17
18
19
20
21
22
23
24
25
1
2
3
4
5
6
7
8
9
10
11
12
13
14
15
16
17
18
19
20
21
22
23
24
25
④在AndroidMenifest.xml中对Service进行配置:
<!-- MyService -->
<service
android:name=".MyService"
android:process=":remote">
<intent-filter>
<action android:name="com.example.lambert.aidlproject.MyService" />
</intent-filter>
</service>
1
2
3
4
5
6
7
8
1
2
3
4
5
6
7
8
到此为止,服务端配置完毕。
<2>客户端配置
①需要将服务端配置的整个aidl目录一并拷贝到客户端所在工程src/main目录下(包名与文件名必须与服务端一模一样)
②编译(同服务端)
③绑定服务
MainActivity.Java
package com.example.lambert.client;

import android.app.Activity;
import android.content.ComponentName;
import android.content.Intent;
import android.content.ServiceConnection;
import android.os.Bundle;
import android.os.IBinder;
import android.os.RemoteException;
import android.util.Log;
import android.view.View;
import android.widget.Button;
import android.widget.TextView;

import com.example.lambert.aidlproject.IMyAidlInterface;
import com.example.lambert.aidlproject.Person;

public class MainActivity extends Activity implements View.OnClickListener {
private IMyAidlInterface mService;
private Button btn_bind, btn_get;
private TextView tv;
private ServiceConnection connection = new ServiceConnection() {
@Override
public void onServiceConnected(ComponentName name, IBinder service) {
mService = IMyAidlInterface.Stub.asInterface(service);
}

@Override
public void onServiceDisconnected(ComponentName name) {
mService = null;
}
};

@Override
protected void onCreate(Bundle savedInstanceState) {
super.onCreate(savedInstanceState);
setContentView(R.layout.activity_main);
init();
}

private void init() {
btn_bind = (Button) findViewById(R.id.btn_bind);
btn_get = (Button) findViewById(R.id.btn_get);
tv = (TextView) findViewById(R.id.tv);

btn_bind.setOnClickListener(this);
btn_get.setOnClickListener(this);
}

@Override
public void onClick(View v) {
switch (v.getId()) {
case R.id.btn_bind:
Intent intent = new Intent();
intent.setAction("com.example.lambert.aidlproject.MyService");
//从 Android 5.0开始 隐式Intent绑定服务的方式已不能使用,所以这里需要设置Service所在服务端的包名
intent.setPackage("com.example.lambert.aidlproject");
bindService(intent, connection, Context.BIND_AUTO_CREATE);
break;
case R.id.btn_get:
try {
String str = mService.getValue();
tv.setText(str);
} catch (RemoteException e) {
e.printStackTrace();
}
break;
}
}

@Override
protected void onDestroy() {
super.onDestroy();
if (serviceConnection != null) {
unbindService(connection);
}
}

}12
3
4
5
6
7
8
9
10
11
12
13
14
15
16
17
18
19
20
21
22
23
24
25
26
27
28
29
30
31
32
33
34
35
36
37
38
39
40
41
42
43
44
45
46
47
48
49
50
51
52
53
54
55
56
57
58
59
60
61
62
63
64
65
66
67
68
69
70
71
72
73
74
75
76
77
78
79
80
1
2
3
4
5
6
7
8
9
10
11
12
13
14
15
16
17
18
19
20
21
22
23
24
25
26
27
28
29
30
31
32
33
34
35
36
37
38
39
40
41
42
43
44
45
46
47
48
49
50
51
52
53
54
55
56
57
58
59
60
61
62
63
64
65
66
67
68
69
70
71
72
73
74
75
76
77
78
79
80
通过 mService = IMyAidlInterface.Stub.asInterface(service); 可以获取到服务端的代理对象,从而可以通过回调方法从服务端获取到我们所需的数据。
2.第二类:自定义复杂数据类型(Parcelable)
<1>服务端配置(不需要界面)
①.在上述aidl目录下创建复杂数据对象aidl文件(这里以Person.aidl为例)对复杂对象进行声明:
Person.aidl
// Person.aidl
package com.example.lambert.aidlproject;
parcelable Person;
1
2
3
1
2
3
②在src/main/java目录下创建Person.java文件
Person.java
package com.example.lambert.aidlproject;

import android.os.Parcel;
import android.os.Parcelable;

public class Person implements Parcelable {
public static final Creator<Person> CREATOR = new Creator<Person>() {
@Override
public Person createFromParcel(Parcel in) {
return new Person(in);
}

@Override
public Person[] newArray(int size) {
return new Person[size];
}
};
private String name;

public Person(String name) {
this.name = name;
}

protected Person(Parcel in) {
name = in.readString();
}

public String getName() {
return name;
}

public void setName(String name) {
this.name = name;
}

@Override
public String toString() {
return "Person{" +
"name='" + name + '\'' +
'}';
}

@Override
public int describeContents() {
return 0;
}

@Override
public void writeToParcel(Parcel dest, int flags) {
dest.writeString(name);
}

}12
3
4
5
6
7
8
9
10
11
12
13
14
15
16
17
18
19
20
21
22
23
24
25
26
27
28
29
30
31
32
33
34
35
36
37
38
39
40
41
42
43
44
45
46
47
48
49
50
51
52
53
54
1
2
3
4
5
6
7
8
9
10
11
12
13
14
15
16
17
18
19
20
21
22
23
24
25
26
27
28
29
30
31
32
33
34
35
36
37
38
39
40
41
42
43
44
45
46
47
48
49
50
51
52
53
54
③修改IMyAidlInterface.aidl如下:
package com.example.lambert.aidlproject;
//PS:这里需要注意import导入Person,第一类不需要导入
import com.example.lambert.aidlproject.Person;

interface IMyAidlInterface {

Person getValue();

}12
3
4
5
6
7
8
9
10
1
2
3
4
5
6
7
8
9
10
④Service类也做出相应修改
public class IMyService extends IMyAidlInterface.Stub {

@Override
public Person getValue() throws RemoteException {
return new Person("Rose");
}
}

}12
3
4
5
6
7
8
9
10
1
2
3
4
5
6
7
8
9
10
⑤编译(同上)
到此为止,服务端配置完毕。
<2>客户端配置
①拷贝Person.aidl和Person.java文件到客户端工程下:
Person.aidl可以拷贝到aidl目录下:
Person.java文件需要拷贝到src/main/java目录下,并且所在包名必须与服务端保持一致,但是客户端工程包名与服务端包名未必一致,所以在这里我们需要重新创建一个包com.example.lambert.aidlproject(服务端工程包名),并将Person.java文件拷贝至此;
另:IMyAidlInterface.aidl做同上修改,当然也可以直接拷贝过来
②编译(同上)
③MainActivity代码也做相应修改
try {
Person person = mService.getValue();
tv.setText(person.toString());
} catch (RemoteException e) {
e.printStackTrace();
}12
3
4
5
6
1
2
3
4
5
6
客户端配置完毕。
关于AIDL在Android Studio中的使用暂且简单介绍到这里。

相关文章推荐
- Android IPC机制(三)在Android Studio中使用AIDL实现跨进程方法调用
- Android IPC机制(三)在Android Studio中使用AIDL实现跨进程方法调用
- Android Studio中AIDL使用方法
- Android Studio下AIDL的使用方法
- Android IPC机制(三)在Android Studio中使用AIDL实现跨进程方法调用
- Android Studio中AIDL使用方法
- Android IPC机制(三)在Android Studio中使用AIDL实现跨进程方法调用
- Android Studio 实现AIDL时在不能使用 aidl 目录下内容的解决方法
- Android IPC机制(三)在Android Studio中使用AIDL实现跨进程方法调用
- Android AIDL使用方法详解
- android 中activity调用远程service中的方法之 aidl的使用
- Android跨进程通信——AIDL使用方法浅析
- Android studio在使用过程中常见的问题及解决方法(不定期更新)
- 在android studio中使用aidl文件注意事项
- 关于android studio中使用class.forname()方法动态获取类实例报NO CLASS FOUND异常的几种处理方法
- Android Aidl 的使用方法
- Android Studio使用方法
- Android Studio的使用之 添加重载函数的方法
- Android Studio使用小技巧:提取方法代码片段
- 快速掌握 Android Studio 中 Gradle 的使用方法