Unity&Shader案例篇—绘制雨滴
2016-11-24 21:21
573 查看
一、前言
转载请注明出处凯尔八阿哥专栏惯例先上效果图,本文不只是简单的绘制雨滴,同时处理了摄像机不同朝向看到的雨滴下落的方向也不一样。
二、方法
1、绘制雨线:绘制雨使用的是C#脚本绘制的,脚本为:using UnityEngine;
using System.Collections;
public class Debris : MonoBehaviour
{
const int POINT_MAX = 4096;
private Vector3[] vertices_;
private int[] indices_;
private Color[] colors_;
private Vector2[] uvs_;
private float range_;
private float rangeR_;
private float move_ = 0f;
private Matrix4x4 prev_view_matrix_;
void Start ()
{
range_ = 32f;
rangeR_ = 1.0f/range_;
vertices_ = new Vector3[POINT_MAX*3];
//先制作随机的点
for (var i = 0; i < POINT_MAX; ++i) {
float x = Random.Range (-range_, range_);
float y = Random.Range (-range_, range_);
float z = Random.Range (-range_, range_);
var point = new Vector3(x, y, z);
vertices_ [i*3+0] = point;
vertices_ [i*3+1] = point;
vertices_ [i*3+2] = point;
}
indices_ = new int[POINT_MAX*3];
for (var i = 0; i < POINT_MAX*3; ++i) {
indices_ [i] = i;
}
colors_ = new Color[POINT_MAX*3];
for (var i = 0; i < POINT_MAX; ++i) {
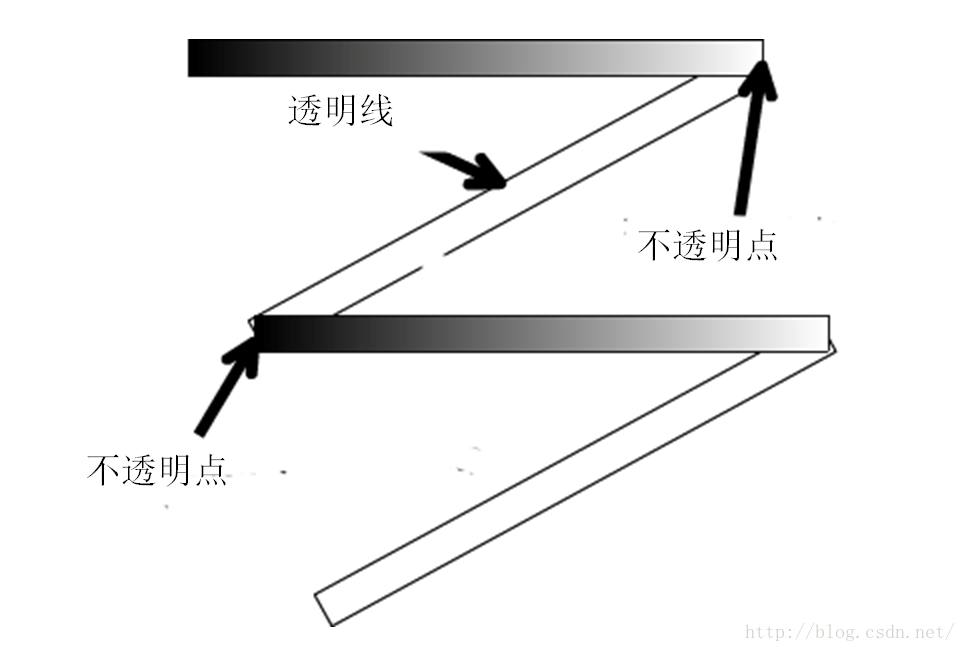
//线的间隔之间有透明部分,使得看起来不是完整的连线
colors_ [i*3+0] = new Color (1f, 1f, 1f, 0f);
colors_ [i*3+1] = new Color (1f, 1f, 1f, 1f);
colors_ [i*3+2] = new Color (1f, 1f, 1f, 0f);
}
uvs_ = new Vector2[POINT_MAX*3];
//将随机的点进行连线
for (var i = 0; i < POINT_MAX; ++i) {
//使得线保持弯折
uvs_ [i*3+0] = new Vector2 (1f, 0f);
uvs_ [i*3+1] = new Vector2 (1f, 0f);
uvs_ [i*3+2] = new Vector2 (0f, 1f);
}
Mesh mesh = new Mesh ();
mesh.name = "debris";
mesh.vertices = vertices_;
mesh.colors = colors_;
mesh.uv = uvs_;
mesh.bounds = new Bounds(Vector3.zero, Vector3.one * 99999999);
var mf = GetComponent<MeshFilter> ();
mf.sharedMesh = mesh;
mf.mesh.SetIndices (indices_, MeshTopology.Lines, 0);
prev_view_matrix_ = Camera.main.worldToCameraMatrix;
}
// Update is called once per frame
void Update ()
{
var target_position = Camera.main.transform.TransformPoint(Vector3.forward * range_);
var matrix = prev_view_matrix_ * Camera.main.cameraToWorldMatrix; // prev-view * inverted-cur-view
var mr = GetComponent<Renderer> ();
const float raindrop_speed = -1f;
mr.material.SetFloat ("_Range", range_);
mr.material.SetFloat ("_RangeR", rangeR_);
mr.material.SetFloat ("_MoveTotal", move_);
mr.material.SetFloat ("_Move", raindrop_speed);
mr.material.SetVector ("_TargetPosition", target_position);
mr.material.SetMatrix ("_PrevInvMatrix", matrix);
move_ += raindrop_speed;
move_ = Mathf.Repeat(move_, range_ * 2f);
prev_view_matrix_ = Camera.main.worldToCameraMatrix;
}
}在Start()方法中先绘制随机的点,然后再将点进行弯折连接,并保证连接的两条线间隔透明,如图所示
然后在Update()函数里更新着色器的渲染状态。通过计算实际雨线轨迹的着色,并始终保持雨线出现在镜头前面
2、渲染:渲染的Shader脚本为
Shader "Custom/debris" {
SubShader {
Tags { "Queue"="Transparent" "IgnoreProjector"="True" "RenderType"="Transparent" }
ZWrite Off
Blend SrcAlpha OneMinusSrcAlpha // alpha blending
//		Blend SrcAlpha One 				// alpha additive

Pass {
CGPROGRAM

#pragma vertex vert
#pragma fragment frag
#pragma target 3.0

#include "UnityCG.cginc"

struct appdata_custom {
float4 vertex : POSITION;
fixed4 color : COLOR;
float4 texcoord : TEXCOORD0;
};

struct v2f
{
float4 pos:SV_POSITION;
fixed4 color:COLOR;
};

float4x4 _PrevInvMatrix;
float3   _TargetPosition;
float    _Range;//雨滴的范围
float    _RangeR;//_Range的倒数
float    _MoveTotal;//整体雨滴的移动位移
float    _Move;//每一帧的整体雨滴的移动位移

v2f vert(appdata_custom v)
{
v.vertex.y += _MoveTotal;
float3 target = _TargetPosition;
float3 trip;
trip = floor( ((target - v.vertex.xyz)*_RangeR + 1) * 0.5 );
trip *= (_Range * 2);
v.vertex.xyz += trip;

float4 tv0 = v.vertex * v.texcoord.x;
tv0 = mul (UNITY_MATRIX_MVP, tv0);

v.vertex.y -= _Move;
float4 tv1 = v.vertex * v.texcoord.y;
tv1 = mul (UNITY_MATRIX_MV, tv1);
tv1 = mul (_PrevInvMatrix, tv1);
tv1 = mul (UNITY_MATRIX_P, tv1);

v2f o;
o.pos = tv0 + tv1;
float depth = o.pos.z * 0.02;
float normalized_depth = (1 - depth);
o.color = v.color;
o.color.a *= (normalized_depth);
return o;
}

fixed4 frag(v2f i) : SV_Target
{
return i.color;
}

ENDCG
}
}
}3、最后:创建一个新的空物体,给空物体一个MeshRender组件。最后,将上面的C#脚本和附有上面的Shader的材质球赋给这个物体。三、还是附上工程文件吧
喜欢的童鞋可以下来自己慢慢研究,工程里有效果图中的天空盒子可以作为场景搭建的素材。百度网盘下载地址:点击打开链接

相关文章推荐
- Unity&Shader案例篇—绘制雨滴
- Unity&Shader案例篇—绘制雪花
- Unity&Shader案例篇—五子棋
- Unity&Shader案例篇—声纳光波效果
- Unity&Shader案例篇—屏幕渐暗效果
- Unity&Shader基础篇-常用函数的使用与案例
- Unity&Shader基础篇-可编程GPU图形绘制管线
- Unity&Shader案例篇—屏幕渐暗效果
- Unity&Shader案例篇—膨胀效果
- Unity&Shader案例篇-镜子1
- Unity&Shader案例篇—五子棋
- Unity&Shader高级案例篇—图形命令缓冲
- Unity&Shader案例篇—火焰
- Unity&Shader基础篇-常用函数的使用与案例
- Unity&Shader案例篇-镜子2
- Unity&Shader案例篇—声纳光波效果
- Unity&Shader基础篇-绘制网格+圆盘
- Unity&Shader案例篇—膨胀效果
- Unity&Shader基础篇-绘制网格+圆盘
- Unity&Shader基础篇-“Hello Cg”