bootstrap 可编辑表格
2016-11-24 10:39
295 查看
表格是一个办公系统最基础的部分,如何给用户提供更加灵活多变的功能是我们的不懈追求……
现在在做的一款办公系统,大约用到十来个表格,最开始的需求是满足显示功能就ok,这很简单,根本不用做变动;
然而,我们都懂得用户的需求是不会停止的,so又来了一个给用户提供表格编辑的权限,包括增删改、编辑下拉列表,我觉得再弹出一个框框或者跳出一个页面让用户修改这样的设计挺不人性的(除非有必要),所以不到万不得已不会用这个糊弄用户;
接着,我把表格差不多重新修改一边以后,新需求coming,把表格的表头做成动态的……在把十几个表格重新翻新了一遍的基础上,对于这样的要求,多多少少有了点排斥情绪,因为就剩十几天结项,这样总反工效率挺低的。最后还是忍不住尝试的欲望,开始着手这个功能,没思考几分钟,就发现这个功能似曾相识,一翻看以前的博客,原来去年的我已经帮忙实现了,只是当时用的EasyUi
[php]
view plain
copy
print?


<div class="containe">
<table class="table table-striped table-bordered table-hover">
<thead>
<tr class="success">
<th>序号</th>
<th style="display: none">ActionID</th>
<th>Category</th>
<th>SubProcess Name</th>
<th>Description</th>
<th>Do Action</th>
</tr>
</thead>
<tbody>
<?php
//遍历传递过来的变量$subprocess_info
$i=1;
foreach($subprocess_info as $_v){
?>
<tr id="">
<td><?php echo $i; ?></td>
<td style="display: none"><?php echo $_v->ActionID; ?></td>
<td><?php echo $_v->Category; ?></td>
<td><a href="#"><?php echo $_v->ActionName; ?></a></td>
<td><?php echo $_v -> Description; ?></td>
<td>
<a href="./index.php?r=subprocess/update&id=<?php echo $_v->ActionID; ?>">修改</a>
<a href="./index.php?r=subprocess/del&id=<?php echo $_v->ActionID; ?>">删除</a>
</td>
</tr>
<?php $i++; }?>
</tbody>
</table>
</div>
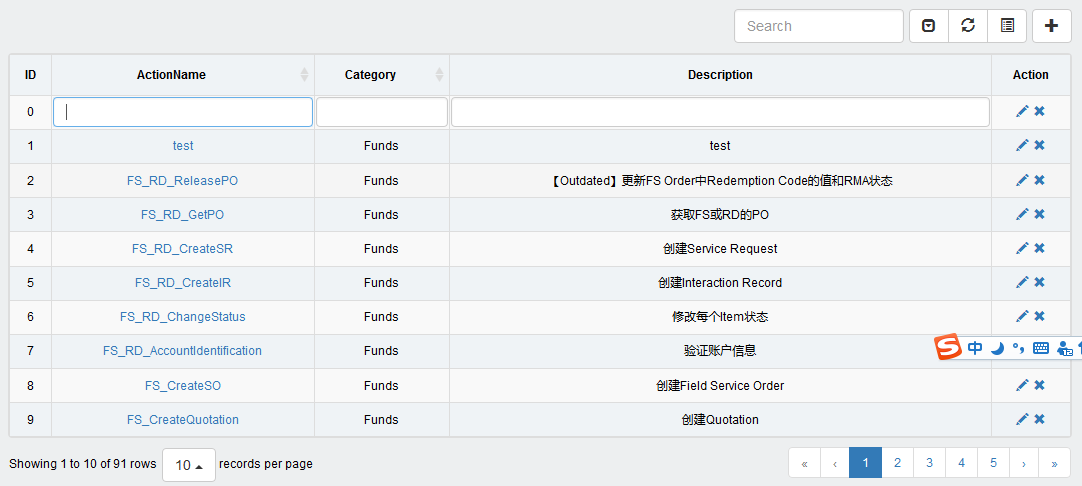
1. 效果展示
表格初始化后

添加新行
2. 在使用时,首先需要引入它的js,我是统一引用到入口文件中的
[javascript]
view plain
copy
print?
<!--表格编辑-->
<link href="./assets/tableEdit/css/bootstrap-table.min.css" rel="stylesheet" />
<script src="./assets/tableEdit/js/bootstrap-table.js"></script>
<script src="./assets/tableEdit/js/bootstrap-table-edit.js"></script>
<script src="./assets/tableEdit/js/bootstrap-select.js"></script>
<script src="./assets/tableEdit/js/bootstrap-datetimepicker.min.js"></script>
<link href="./assets/tableEdit/css/bootstrap-datetimepicker.min.css" rel="stylesheet" />
在页面中定义表格,可添加自定义按钮
[javascript]
view plain
copy
print?
<script src="./js/subprocess/subprocess.js"></script>
<div class="col-md-12">
<div style="float:right;margin:10px 0px 10px 5px">
<a title="Add" href="./index.php?r=subprocess/add">
<button type="button" class="btn btn-default" id="addData"<span style="color:#008000;background-color:#efefef;font-weight:bold;"></span>>
<span class="glyphicon glyphicon-plus"></span>
</button>
</a>
</div>
<table class="table table-striped table-bordered table-hover" id="subprocessTable"></table>
</div>
3. js初始化表格
[javascript]
view plain
copy
print?
$(function(){
//初始化表格
$('#subprocessTable').bootstrapTable({
method: 'get',
url:"./index.php?r=subprocess/subprocessInfo",
editable:true,//开启编辑模式
clickToSelect: true,
cache: false,
showToggle:true, //显示切换按钮来切换表/卡片视图。
showPaginationSwitch:true, //显示分页切换按钮
pagination: true,
pageList: [10,25,50,100],
pageSize:10,
pageNumber:1,
uniqueId: 'index', //将index列设为唯一索引
striped: true,
search: true,
showRefresh: true,
minimumCountColumns: 2,
smartDisplay:true,
columns: [
[
{field:"index",title:"ID",align:"center",edit:false,formatter:function(value, row, index){
return row.index=index ; //返回行号
}},
{field:"actionName",title:"ActionName",align:"center",order:"asc",sortable:"true",formatter:function(value,row,index){
var strHtml ='<a href="./index.php?r=subprocess/modify&id='+ row.actionId +'">'+ row.actionName +'</a>';
return strHtml;
}},
{field:"category",title:"Category",align:"center",sortable:"true"},
{field:"description",title:"Description",align:"center"},
{field:"action",title:"Action",align:"center",formatter:function(value,row,index){
var strHtml ='<a href="./index.php?r=subprocess/modify&id='+ row.actionId +'"><li class="glyphicon glyphicon-pencil"></li></a>'+
'<a href="javascript:void(0);" onclick="removeData('+ index +')" style="margin-left:5px;"><li class="glyphicon glyphicon-remove"></li></a>';
return strHtml;
},edit:false},
{field:"actionId",title:"ActionID",align:"center",edit:false,visible:false,searchable:false}
]
]
});
/**
* add a new row
*/
$('#addData').click(function(){
$('#subprocessTable').bootstrapTable('selectPage', 1); //Jump to the first page
var data = {actionId: '', actionName: '',category:'', description: ''}; //define a new row data,certainly it's empty
$('#subprocessTable').bootstrapTable('prepend', data); //the method of prepend must defined all fields,but append needn't
//$('#dataTable').bootstrapTable('append',data);
$("#dataTable tr:eq(1) td:eq(0)").trigger("dblclick");
$("#dataTable input")[0].focus();
});
});
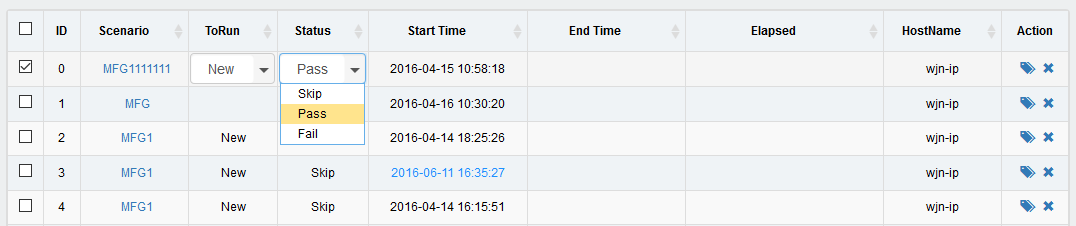
需要用下拉列表的,在定义列的时候这样定义
[javascript]
view plain
copy
print?
{field:"toRun",title:"Run Flag",align:"center",edit:{
type:'select',//下拉框
url:'./index.php?r=dictionary/dictionaryInfo&type='+"run",
//data:[{id:1,text:'hello'},{id:2,text:'hi'}],
valueField:'id',
textField:'text',
editable : false,
onSelect:function(val,rec){
//console.log(val,rec);
}
},sortable:true}
效果如下
其它的操作,大家可以到这个插件的网站上查阅文档,或者看js源码
[javascript]
view plain
copy
print?
$(function(){
var columnsAll = new Array(); //定义一个新的列集合,用来保存返回的数据
//把列数据封装到一个对象中
var col = {};
col["field"] = "index";
col["title"] = "ID";
col["align"] = 'center';
col["formatter"] = function(value, row, index){
return row.index=index ; //返回行号
};
col["edit"] = false;
columnsAll.push(col); //把这个对象添加到列集合中
var col2 = {};
col2["field"] = "scenarioId";
col2["title"] = "haha";
col2["align"] = 'center';
col2["edit"] = false;
columnsAll.push(col2); //把这个对象添加到列集合中
//表格数据
$('#detailTable').bootstrapTable({
method: 'get',
url:"./index.php?r=session/sessionInfo",
editable:true,//开启编辑模式
clickToSelect: true,
cache: false,
uniqueId: 'index', //将index列设为唯一索引
striped: true,
minimumCountColumns: 2,
smartDisplay:true,
columns: [
columnsAll
]
});
});
效果如下:

现在在做的一款办公系统,大约用到十来个表格,最开始的需求是满足显示功能就ok,这很简单,根本不用做变动;
然而,我们都懂得用户的需求是不会停止的,so又来了一个给用户提供表格编辑的权限,包括增删改、编辑下拉列表,我觉得再弹出一个框框或者跳出一个页面让用户修改这样的设计挺不人性的(除非有必要),所以不到万不得已不会用这个糊弄用户;
接着,我把表格差不多重新修改一边以后,新需求coming,把表格的表头做成动态的……在把十几个表格重新翻新了一遍的基础上,对于这样的要求,多多少少有了点排斥情绪,因为就剩十几天结项,这样总反工效率挺低的。最后还是忍不住尝试的欲望,开始着手这个功能,没思考几分钟,就发现这个功能似曾相识,一翻看以前的博客,原来去年的我已经帮忙实现了,只是当时用的EasyUi
一、 显示数据(基础功能)
在html页面中定义表格以及表格的列名,最后把从数据库中查询出来的数据,循环显示到页面中。这个系统用的是PHP语言,里边用到了php中的语法,如果是Java语言,把php换成jsp中对应的语法就行[php]
view plain
copy
print?
<div class="containe">
<table class="table table-striped table-bordered table-hover">
<thead>
<tr class="success">
<th>序号</th>
<th style="display: none">ActionID</th>
<th>Category</th>
<th>SubProcess Name</th>
<th>Description</th>
<th>Do Action</th>
</tr>
</thead>
<tbody>
<?php
//遍历传递过来的变量$subprocess_info
$i=1;
foreach($subprocess_info as $_v){
?>
<tr id="">
<td><?php echo $i; ?></td>
<td style="display: none"><?php echo $_v->ActionID; ?></td>
<td><?php echo $_v->Category; ?></td>
<td><a href="#"><?php echo $_v->ActionName; ?></a></td>
<td><?php echo $_v -> Description; ?></td>
<td>
<a href="./index.php?r=subprocess/update&id=<?php echo $_v->ActionID; ?>">修改</a>
<a href="./index.php?r=subprocess/del&id=<?php echo $_v->ActionID; ?>">删除</a>
</td>
</tr>
<?php $i++; }?>
</tbody>
</table>
</div>
二、表格编辑(高级功能)
在html页面中,先定义一个表格,然后到js中初始化。这个功能引用了一个第三方插件,可以到这里下载 http://bootstrap-table.wenzhixin.net.cn/zh-cn/,这个插件是修改了 http://bootstrap-table.wenzhixin.net.cn/zh-cn/ 里边的一些功能后形成的。在使用过程中,我做了一些小的改动,大家用的时候可以根据情况来1. 效果展示
表格初始化后
添加新行
2. 在使用时,首先需要引入它的js,我是统一引用到入口文件中的
[javascript]
view plain
copy
print?
<!--表格编辑-->
<link href="./assets/tableEdit/css/bootstrap-table.min.css" rel="stylesheet" />
<script src="./assets/tableEdit/js/bootstrap-table.js"></script>
<script src="./assets/tableEdit/js/bootstrap-table-edit.js"></script>
<script src="./assets/tableEdit/js/bootstrap-select.js"></script>
<script src="./assets/tableEdit/js/bootstrap-datetimepicker.min.js"></script>
<link href="./assets/tableEdit/css/bootstrap-datetimepicker.min.css" rel="stylesheet" />
在页面中定义表格,可添加自定义按钮
[javascript]
view plain
copy
print?
<script src="./js/subprocess/subprocess.js"></script>
<div class="col-md-12">
<div style="float:right;margin:10px 0px 10px 5px">
<a title="Add" href="./index.php?r=subprocess/add">
<button type="button" class="btn btn-default" id="addData"<span style="color:#008000;background-color:#efefef;font-weight:bold;"></span>>
<span class="glyphicon glyphicon-plus"></span>
</button>
</a>
</div>
<table class="table table-striped table-bordered table-hover" id="subprocessTable"></table>
</div>
3. js初始化表格
[javascript]
view plain
copy
print?
$(function(){
//初始化表格
$('#subprocessTable').bootstrapTable({
method: 'get',
url:"./index.php?r=subprocess/subprocessInfo",
editable:true,//开启编辑模式
clickToSelect: true,
cache: false,
showToggle:true, //显示切换按钮来切换表/卡片视图。
showPaginationSwitch:true, //显示分页切换按钮
pagination: true,
pageList: [10,25,50,100],
pageSize:10,
pageNumber:1,
uniqueId: 'index', //将index列设为唯一索引
striped: true,
search: true,
showRefresh: true,
minimumCountColumns: 2,
smartDisplay:true,
columns: [
[
{field:"index",title:"ID",align:"center",edit:false,formatter:function(value, row, index){
return row.index=index ; //返回行号
}},
{field:"actionName",title:"ActionName",align:"center",order:"asc",sortable:"true",formatter:function(value,row,index){
var strHtml ='<a href="./index.php?r=subprocess/modify&id='+ row.actionId +'">'+ row.actionName +'</a>';
return strHtml;
}},
{field:"category",title:"Category",align:"center",sortable:"true"},
{field:"description",title:"Description",align:"center"},
{field:"action",title:"Action",align:"center",formatter:function(value,row,index){
var strHtml ='<a href="./index.php?r=subprocess/modify&id='+ row.actionId +'"><li class="glyphicon glyphicon-pencil"></li></a>'+
'<a href="javascript:void(0);" onclick="removeData('+ index +')" style="margin-left:5px;"><li class="glyphicon glyphicon-remove"></li></a>';
return strHtml;
},edit:false},
{field:"actionId",title:"ActionID",align:"center",edit:false,visible:false,searchable:false}
]
]
});
/**
* add a new row
*/
$('#addData').click(function(){
$('#subprocessTable').bootstrapTable('selectPage', 1); //Jump to the first page
var data = {actionId: '', actionName: '',category:'', description: ''}; //define a new row data,certainly it's empty
$('#subprocessTable').bootstrapTable('prepend', data); //the method of prepend must defined all fields,but append needn't
//$('#dataTable').bootstrapTable('append',data);
$("#dataTable tr:eq(1) td:eq(0)").trigger("dblclick");
$("#dataTable input")[0].focus();
});
});
需要用下拉列表的,在定义列的时候这样定义
[javascript]
view plain
copy
print?
{field:"toRun",title:"Run Flag",align:"center",edit:{
type:'select',//下拉框
url:'./index.php?r=dictionary/dictionaryInfo&type='+"run",
//data:[{id:1,text:'hello'},{id:2,text:'hi'}],
valueField:'id',
textField:'text',
editable : false,
onSelect:function(val,rec){
//console.log(val,rec);
}
},sortable:true}
效果如下
其它的操作,大家可以到这个插件的网站上查阅文档,或者看js源码
三、动态表头
动态表头,说到底就是每次的列数据是不固定的,根据前提条件查询数据库,再根据查询结果加载表头。有了上边的修改,实现这个功能已经不在话下,只要把初始化表格的columns替换成我们自定义的数据就可以了,做了个简单的小demo,具体的可以看【EasyUi DataGrid】动态加载列这篇文章[javascript]
view plain
copy
print?
$(function(){
var columnsAll = new Array(); //定义一个新的列集合,用来保存返回的数据
//把列数据封装到一个对象中
var col = {};
col["field"] = "index";
col["title"] = "ID";
col["align"] = 'center';
col["formatter"] = function(value, row, index){
return row.index=index ; //返回行号
};
col["edit"] = false;
columnsAll.push(col); //把这个对象添加到列集合中
var col2 = {};
col2["field"] = "scenarioId";
col2["title"] = "haha";
col2["align"] = 'center';
col2["edit"] = false;
columnsAll.push(col2); //把这个对象添加到列集合中
//表格数据
$('#detailTable').bootstrapTable({
method: 'get',
url:"./index.php?r=session/sessionInfo",
editable:true,//开启编辑模式
clickToSelect: true,
cache: false,
uniqueId: 'index', //将index列设为唯一索引
striped: true,
minimumCountColumns: 2,
smartDisplay:true,
columns: [
columnsAll
]
});
});
效果如下:

相关文章推荐
- 基于Bootstrap使用jQuery实现简单可编辑表格
- 【一点一滴Bootstrap】可编辑的表格
- Bootstrap可编辑表格
- BootStrap和jQuery相结合实现可编辑表格
- 基于Bootstrap使用jQuery实现简单可编辑表格
- Bootstrap可编辑表格
- Bootstrap可编辑表格
- BootStrap和jQuery相结合实现可编辑表格
- 基于Bootstrap使用jQuery实现简单可编辑表格
- 基于Bootstrap使用jQuery实现简单可编辑表格
- bootstrap-table 插件二次开发添加表格行新增和编辑功能
- JS表格组件BootstrapTable行内编辑解决方案x-editable
- 基于Bootstrap使用jQuery实现简单可编辑表格
- bootstrap 表格基于jqgrid学习
- jQuery+PHP实现实时编辑表格字段内容
- js做带编辑,保存,删除,添加功能的表格
- JS可编辑表格
- jquery中Grid表格编辑状态判断
- 可编辑的表格
- JS组件系列——表格组件神器:bootstrap table(三:终结篇,最后的干货福利)