textview实现底部栏图文效果
2016-11-21 14:47
323 查看
textview实现底部栏图文效果
以前写底部栏的总是习惯用textview+imageview这种写法实现,发现每次写代码麻烦,还需要在最外面添加一层布局嵌套,当然这样一嵌套层级增加,布局就影响到了性能。我可不想因为这小小的地方造成代码的冗余和apk的内存增加太多。然后在网上搜索了一番,在掘金上发现一个类似的,但是运行后不是自己想要的结果。先声明我用的Hyman大神的auto适配库,所以代码都会和auto库结合,当然也有不用这个库的代码编写,如果你还不知道auto库,那么戳(戳戳戳戳戳戳)这里吧!!!
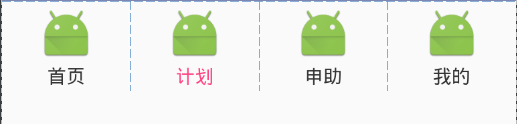
效果如下图,很丑
后来经过其他的帮助,修改出了适合自己项目用的效果代码。废话少说,代码来了。
1. attrs.xml文件
<declare-styleable name="itb">
<attr name="img" format="reference" />
<attr name="text" format="string|reference"></attr>
<attr name="text_size" format="integer|reference"></attr>
<attr name="img_width" format="dimension|reference"></attr>
<attr name="img_height" format="dimension|reference"></attr>
<attr name="margin_top" format="dimension|reference"></attr>
<attr name="text_margin_bottom" format="dimension|reference"></attr>
<attr name="text_color" format="color|reference"></attr>
<attr name="margin_bottom" format="dimension|reference"></attr>
</declare-styleable>
属性定义,这个就不用说了
2.自定义代码
package com.hangzhou.bijianhuzhu.customView;
import android.content.Context;
import android.content.res.TypedArray;
import android.graphics.Bitmap;
import android.graphics.Matrix;
import android.graphics.drawable.BitmapDrawable;
import android.graphics.drawable.Drawable;
import android.util.AttributeSet;
import android.view.LayoutInflater;
import android.view.View;
import android.widget.ImageView;
import android.widget.LinearLayout;
import android.widget.TextView;

import com.hangzhou.bijianhuzhu.bjhz.R;
import com.hangzhou.bijianhuzhu.tools.ImageUtil;
import com.zhy.autolayout.AutoLinearLayout;
import com.zhy.autolayout.utils.AutoUtils;

/**
* 设置TextView drawable图片大小 图片距离文字的大小
* Created by  chunfu on 2016/11/9.
*/

public class RichText  extends AutoLinearLayout {

private Context context;

private View mRoot = null;
private ImageView mImgView = null;
private TextView mTextView = null;
private Drawable mImg;//图片资源
private String mText;//文字内容
private float mTextSize;
private float width;
private float height;
private int mImgWidth;
private int mImgHeigh;

private float marginTop;
private float textMarginbottom;
private float marginBottom;

private static int TEXT_MARGIN_BOTTOM = 5;
private static int MARGIN_TOP = 8;
private static int MARGIN_BOTTOM = 3;
private static int IMAGE_WIDTH = 18;
private static int IMAGE_HEIGHT = 18;// px像素值
private static int TEXT_SIZE = 15;

int textColor;

public RichText(Context context, AttributeSet attrs) {
super(context, attrs);
this.context = context;
TypedArray ta = context.obtainStyledAttributes(attrs, R.styleable.itb);
mImg = ta.getDrawable(R.styleable.itb_img);
mText = ta.getString(R.styleable.itb_text);

//        resetSize();

mTextSize = ta.getFloat(R.styleable.itb_text_size, TEXT_SIZE);
width = ta.getDimension(R.styleable.itb_img_width, IMAGE_WIDTH);

height = ta.getDimension(R.styleable.itb_img_height, IMAGE_HEIGHT);
marginTop = ta.getDimension(R.styleable.itb_margin_top, MARGIN_TOP);
textMarginbottom = ta.getDimension(R.styleable.itb_text_margin_bottom,
TEXT_MARGIN_BOTTOM);
marginBottom = ta.getDimension(R.styleable.itb_margin_bottom, MARGIN_BOTTOM);
textColor = ta.getColor(R.styleable.itb_text_color, 0xff333333);

// TODO: 2016/11/9  实现效果适配需要放开下面的代码
//        width = AutoUtils.getPercentWidthSize((int) width);
//        height = AutoUtils.getPercentWidthSize((int) height);
//        marginTop= AutoUtils.getPercentWidthSize((int)marginTop);

if (width == IMAGE_WIDTH) {
resetSize();
}

initView();
// 及时回收资源(一定需要,防止OOM)
ta.recycle();
}
/**
* 重新设置大小
*
*/
private void resetSize() {
width = dip2px(context, width);
height = dip2px(context, height);
marginTop = dip2px(context, marginTop);
textMarginbottom = dip2px(context, textMarginbottom);
marginBottom = dip2px(context, marginBottom);
}
/**
* 初始化控件
*
*/
private void initView() {
LayoutInflater inflater = (LayoutInflater) context
.getSystemService(Context.LAYOUT_INFLATER_SERVICE);
mRoot = inflater.inflate(R.layout.view_imagetext, this, true);

mImgView = (ImageView) mRoot.findViewById(R.id.img);
mTextView = (TextView) mRoot.findViewById(R.id.txt);
if (textMarginbottom != TEXT_MARGIN_BOTTOM) {
LayoutParams params = new LayoutParams(LayoutParams.WRAP_CONTENT,
LayoutParams.WRAP_CONTENT);
params.setMargins(0, 0, 0, (int) textMarginbottom);
mTextView.setLayoutParams(params);
}

setImageSize();

mTextView.setText(mText);
mTextView.setTextSize(mTextSize);
mTextView.setTextColor(textColor);
}
/**
* 设置图片size大小
*
*/
private void setImageSize() {
mImgWidth = mImg.getIntrinsicWidth();
mImgHeigh = mImg.getIntrinsicHeight();

if (width * mImgHeigh > height * mImgWidth) {
LayoutParams params = new LayoutParams(
(int) (mImgWidth * height / mImgHeigh), (int) (mImgHeigh
* height / mImgHeigh));
params.setMargins(0, (int) marginTop, 0, (int) marginBottom);
mImgView.setLayoutParams(params);
} else {
LayoutParams params = new LayoutParams(
(int) (mImgWidth * width / mImgWidth), (int) (mImgHeigh
* width / mImgWidth));
params.setMargins(0, (int) marginTop, 0, (int) marginBottom);
mImgView.setLayoutParams(params);
}

ImageUtil.setBackgroundInDrawable(mImgView, mImg);
}

/**
* 设置背景图片
*
* @param resId
* @param text
*/
public void setImageViewBackground(int resId, String text) {
mImg = context.getResources().getDrawable(resId);
setImageSize();
mTextView.setText(text);
}

/**
* @param context 上下文
* @param dpValue 手机分辨率
* @return
* @Title: dip2px
* @Description: 根据手机的分辨率从 dp 的单位 转成为 px(像素)
* @author Linlj
*/
private int dip2px(Context context, float dpValue) {
final float scale = context.getResources().getDisplayMetrics().density;
return (int) (dpValue * scale + 0.5f);
}
}
代码也不很难,相信各位都能看懂,此段代码使用了线性布局加载imageview和textview,说白了还是用了俩个控件。需要注意的就是我之前说的如果用的是auto这个库,则放开如下代码:
width = AutoUtils.getPercentWidthSize((int) width);
height = AutoUtils.getPercentWidthSize((int) height);
marginTop= AutoUtils.getPercentWidthSize((int)marginTop);
另外需要将继承的类改为普通的布局
public class RichText extends LinearLayout
2.1 R.layout.view_imagetext 布局代码
mRoot = inflater.inflate(R.layout.view_imagetext, this, true);

<?xml version="1.0" encoding="utf-8"?>
<com.zhy.autolayout.AutoLinearLayout xmlns:android="http://schemas.android.com/apk/res/android"
android:id="@+id/rootView"
android:layout_width="match_parent"
android:layout_height="wrap_content"
android:gravity="center"
android:orientation="vertical" >

<ImageView
android:src="@drawable/ic_launcher"
android:id="@+id/img"
android:layout_width="40px"
android:layout_height="40px"
android:layout_gravity="center"
android:layout_marginBottom="3px"
android:layout_marginTop="8px" />

<TextView
android:layout_marginTop="5px"
android:id="@+id/txt"
android:text="11111111"
android:layout_width="wrap_content"
android:layout_height="wrap_content"
android:layout_gravity="center"
android:layout_marginBottom="5px"
android:gravity="center" />

</com.zhy.autolayout.AutoLinearLayout>
imageview和textview之间的间距通过android:layout_marginBottom和android:layout_marginTop的属性来控制,其他的属性照旧
3.引用代码
上面我们将代码写完了,现在就可以开始引用了(textview原有的属性可以继续使用)
切记一定要先引用auto属性
xmlns:app="http://schemas.android.com/apk/res-auto"

<com.hangzhou.bijianhuzhu.customView.RichText
android:id="@+id/rt_index"
android:layout_width="0dp"
android:layout_height="match_parent"
android:layout_weight="1"
android:gravity="center"
app:img="@drawable/ic_launcher"
app:img_height="80px"     //设置高度
app:img_width="80px"      //设置宽度
app:text="@string/indexpager" //文字
app:text_size="14" />     //文字大小
全部代码到此为止就结束了。使用这个的好处就是不需要每次写俩个控件了,减少了层级布局,apk性能得到部分优化。其他的属性可以参考attrs文件进行使用。
如果你有更好的解决办法或者是方案,欢迎一起探讨交流!

相关文章推荐
- jQuery+ajax实现滚动到页面底部自动加载图文列表效果(类似图片懒加载)
- jquery实现"跳到底部","回到顶部"效果
- WinForm 实现鼠标拖动控件跟随效果(图文)
- css2.1多重背景和边框效果实现原理及代码(图文介绍)
- 通过jQuery来实现页脚永远固定在页面底部的效果
- iOS实现简单图文混排效果
- CSS实现简单的图文互绕排版效果
- 【Android UI设计与开发】第15期:顶部标题栏(六)实现悬浮式顶部和底部标题栏效果
- iOS实现简单图文混排效果
- Android自定义View实现HTML图文环绕效果
- IOS_实现TabBar切换时底部切换效果
- Android自定义View实现HTML图文环绕效果
- Android自定义View实现HTML图文环绕效果
- 通过jQuery来实现页脚永远固定在页面底部的效果
- Android自定义View实现HTML图文环绕效果
- 不用获得焦点也能实现跑马灯效果的textView
- android 用textview实现文字滚动效果
- iOS实现简单图文混排效果
- 使用jquery实现图文切换效果另加特效