Mongodb3分片部署及故障模拟验证
2016-11-18 10:12
330 查看
本文分两部分介绍mongodb3.2.1分片部署配置及故障模拟验证。
第一部分 安装配置一、实验环境两组副本集做分片版本3.2.1副本集1:192.168.115.11:27017,192.168.115.12:27017,192.168.115.11:47017(arbiter)副本集2:192.168.115.11:37017,192.168.115.12:37017,192.168.115.12:47017(arbiter)configserver:192.168.115.11:10000,192.168.115.11:10001,192.168.115.12:10000mongos:192.168.115.11:20000二、分片介绍1.逻辑图

片(shard):每一个分片一个副本集配置服务器(config server):存储集群的配置信息,3.2以上版本支持副本集模式部署路由进程(mongos):路由所有请求,然后将结果聚合。它不保存存储数据或配置信息,配置信息从配置服务器上加载到内存中。 副本集方式部署confiserver
一、部署条件1.集群中不能有仲裁节点2.集群中不能有延迟节点3.每个成员必须可以创建索引二、configserver安装配置1.修改配置文件(其他两个节点配置文件类似,主要修改监听端口,及数据路径,如果一台机器上运行多个实例,注意配置文件名称要不一样)
-f /usr/local/mongodb/etc/config.conf /usr/local/mongodb/bin/mongod --shutdown
--port 10000 --dbpath=/data/config3.配置副本集连接任意一个节点进行配置> show dbs2016-11-17T09:06:08.088+0800
E QUERY [thread1] Error: listDatabases
failed:{ "ok" : 0, "errmsg" : "not master and
slaveOk=false", "code" : 13435 } :_getErrorWithCode@src/mongo/shell/utils.js:23:13Mongo.prototype.getDBs@src/mongo/shell/mongo.js:53:1shellHelper.show@src/mongo/shell/utils.js:700:19shellHelper@src/mongo/shell/utils.js:594:15@(shellhelp2):1:1出现以上错误,需要执行> rs.slaveOk()> use admin>
db.runCommand({"replSetInitiate" : { "_id" :
"hnrconfig" ,"members" : [ { "_id" : 1,
"host" : "192.168.115.11:10000"},{ "_id" : 2,
"host" : "192.168.115.12:10000"},{"_id" : 3,
"host" : "192.168.115.11:10001"}]}}){ "ok" : 1
}三、mongos配置1.配置文件
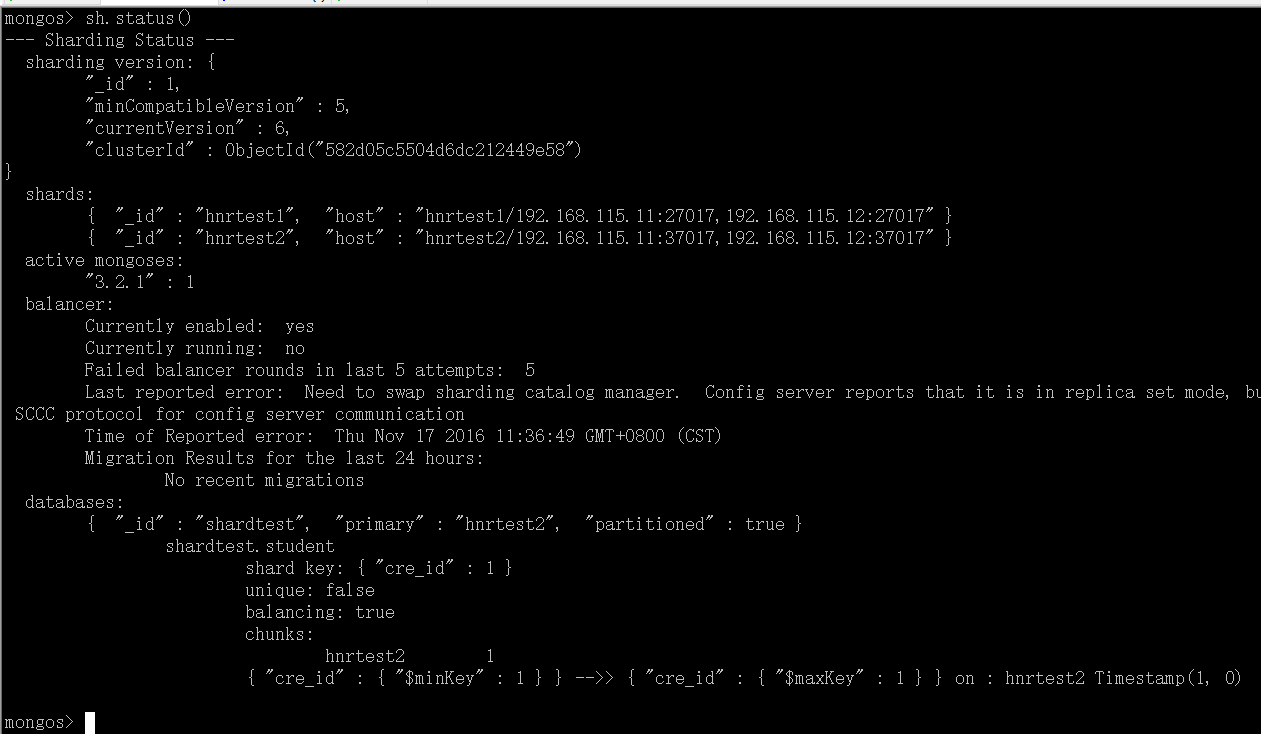
-f /usr/local/mongodb/etc/mongos.conf四、往集群中添加分片连接mongosmongos>
sh.addShard("hnrtest1/192.168.115.11:27017"){
"shardAdded" : "hnrtest1", "ok" : 1 }mongos>mongos>
sh.addShard("hnrtest2/192.168.115.12:37017"){
"shardAdded" : "hnrtest2", "ok" : 1 }mongos>

五、开启分片1.先对数据库启用分片功能mongos>
sh.enableSharding("shardtest"){ "ok" : 1
}mongos>2.对集合开启分片(自动分片建)mongos>
sh.shardCollection("shardtest.student",{"cre_id":1}){
"collectionsharded" : "shardtest.student", "ok" :
1 }mongos>
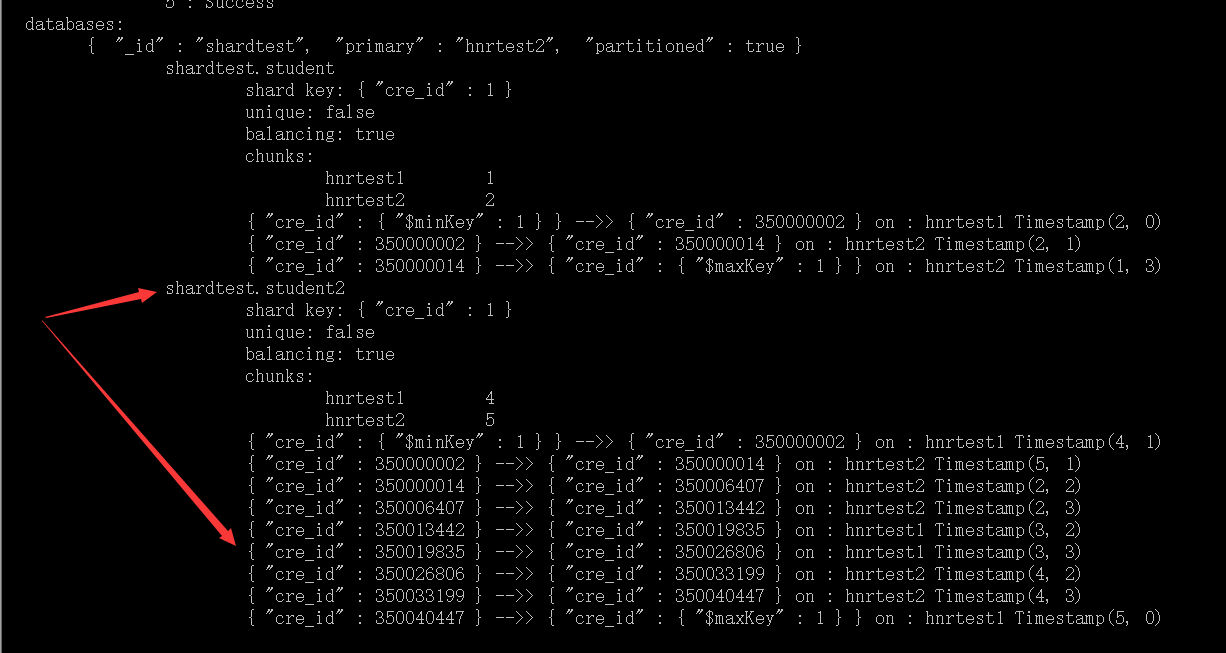
3.修改默认chunk大小(默认为64M),自动分片测试效果不好,需要插入大量数据,将其修改为1Mmongos> use configmongos>
db.settings.save({ "_id" : "chunksize", "value" :
NumberLong(1) })修改后对student2集合进行分片mongos>
sh.shardCollection("shardtest.student2",{"cre_id":1})插入5万条数据
直接在后端分片副本集上查询hnrtest2:PRIMARY>
db.student2.find().count()27081hnrtest2:PRIMARY> hnrtest1:PRIMARY>
db.student2.find().count()22918hnrtest1:PRIMARY> 4.采用哈希分片修改chunk为默认值64Mmongos>
db.settings.save({ "_id" : "chunksize", "value" :
NumberLong(64) })student3集合在cre_id字段使用哈希分片mongos>
sh.shardCollection("shardtest.student3",{"cre_id":"hashed"}){
"collectionsharded" : "shardtest.student3", "ok"
: 1 }mongos>
sh.status() shardtest.student3 shard key: {
"cre_id" : "hashed" } unique: false balancing: true chunks: hnrtest1 2 hnrtest2 2 { "cre_id" :
{ "$minKey" : 1 } } -->> { "cre_id" :
NumberLong("-4611686018427387902") } on : hnrtest1 Timestamp(2, 2) { "cre_id" :
NumberLong("-4611686018427387902") } -->> { "cre_id"
: NumberLong(0) } on : hnrtest1 Timestamp(2, 3) { "cre_id" :
NumberLong(0) } -->> { "cre_id" :
NumberLong("4611686018427387902") } on : hnrtest2 Timestamp(2, 4) { "cre_id" :
NumberLong("4611686018427387902") } -->> { "cre_id" :
{ "$maxKey" : 1 } } on : hnrtest2 Timestamp(2, 5) 往student3插入1万条数据,在每个分片上查询hnrtest1:PRIMARY>
db.student3.find().count()4952hnrtest1:PRIMARY> hnrtest2:PRIMARY>
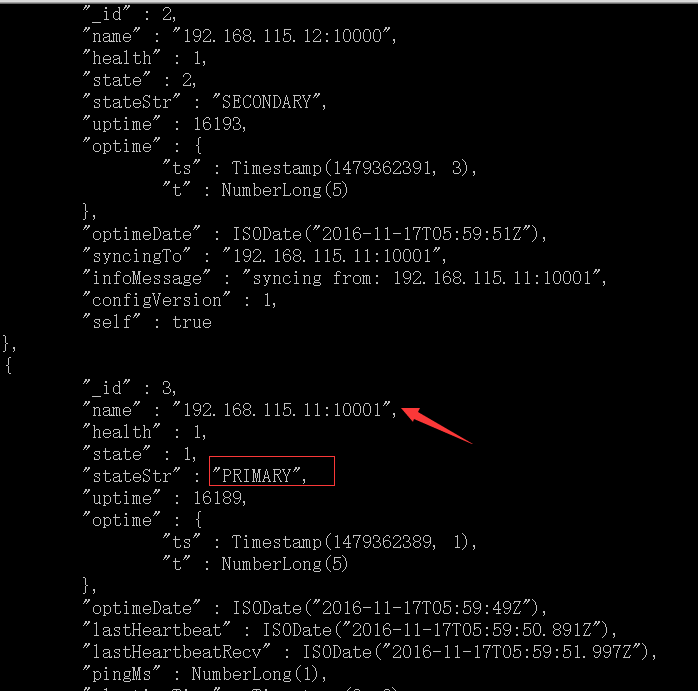
db.student3.find().count()5047hnrtest2:PRIMARY> 第二部分 故障模拟验证一、模拟config服务副本集primary节点宕机1.关闭服务/usr/local/mongodb/bin/mongod
--shutdown --port 10000 --dbpath=/data/config2.副本集重新选举一个primary节点
3.读取数据,所有数据均正常返回mongos> use
shardtestswitched to db
shardtestmongos>mongos>
db.student.find().count()99999mongos>
db.student2.find().count()49999mongos>
db.student3.find().count()9999mongos>4.对新的集合进行分片,插入5千条数据mongos>
sh.shardCollection("shardtest.student4",{"cre_id":"hashed"}){
"collectionsharded" : "shardtest.student4", "ok"
: 1 }mongos>在每个分片上查询数据hnrtest2:PRIMARY>
db.student4.find().count()2525hnrtest2:PRIMARY> hnrtest1:PRIMARY>
db.student4.find().count()2474hnrtest1:PRIMARY> 二、config服务数据备份恢复1.数据备份/usr/local/mongodb/bin/mongodump
-h 192.168.115.11:10001 -o configdata2.关闭所有config服务节点/usr/local/mongodb/bin/mongod
--shutdown --port 10000 --dbpath=/data/config/usr/local/mongodb/bin/mongod
--shutdown --port 10001 --dbpath=/data/config13.数据读取操作由于mongos是将config的配置信息全部加载到内存中运行,因此此时通过mongos查询数据一切正常,但是不能对新的集合进行分片操作mongos>
db.student.find().count()99999mongos>
db.student2.find().count()49999mongos>
db.student3.find().count()9999mongos>
db.student4.find().count()4999mongos>4.对集合进行分片操作,无法完成mongos>
sh.shardCollection("shardtest.student5",{"cre_id":"hashed"}){ "ok" : 0, "errmsg" : "None of the
hosts for replica set hnrconfig could be contacted.", "code" : 71}mongos> 5.关闭mongos服务,删除config节点所有数据6.重新启动三个config服务7.重新初始化副本集> rs.slaveOk()> use admin>
db.runCommand({"replSetInitiate" : { "_id" :
"hnrconfig" ,"members" : [ { "_id" : 1,
"host" : "192.168.115.11:10000"},{ "_id" : 2,
"host" : "192.168.115.12:10000"},{"_id" : 3,
"host" : "192.168.115.11:10001"}]}})8.启动mongos服务,此时没有任何数据
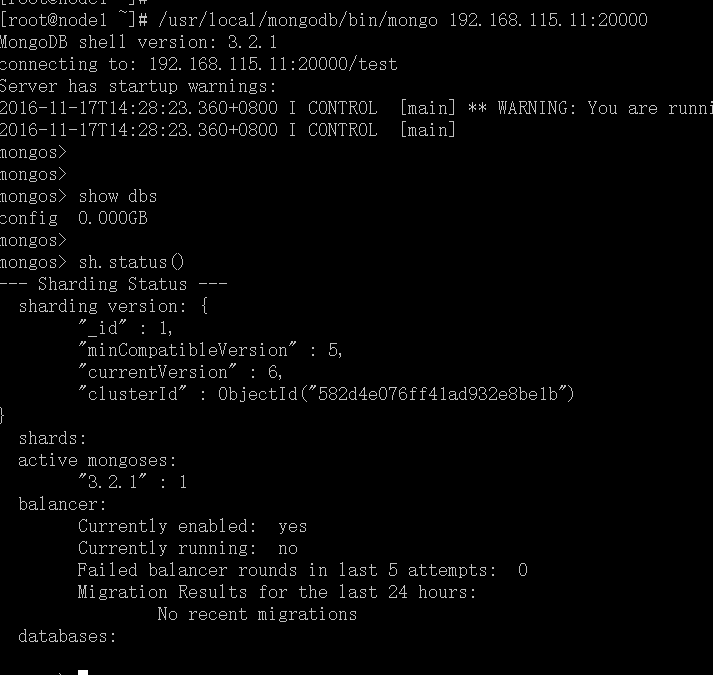
9.导入备份的config数据/usr/local/mongodb/bin/mongorestore
-h 192.168.115.11:10000 -d config configdata/config/在mongos查询,但是查询数据会出现超时,数据无法查询

10.在mongos执行如下命令mongos>
sh.enableSharding("shardtest"){ "ok" :
0, "errmsg" : "Operation timed out", "code" : 50
}mongos日志2016-11-17T14:46:21.197+0800
I SHARDING [Balancer] about to log metadata event into actionlog: { _id:
"node1.hnr.com-2016-11-17T14:46:21.197+0800-582d523ded1c4b679a84877b",
server: "node1.hnr.com", clientAddr: "", time: new Date(1479365181197),
what: "balancer.round", ns: "", details: {
executionTimeMillis: 30007, errorOccured: true, errmsg: "could not get
updated shard list from config server due to ExceededTimeLimit Operation timed
out" } }官网上说是bug,恢复失败https://jira.mongodb.org/browse/SERVER-22392
第一部分 安装配置一、实验环境两组副本集做分片版本3.2.1副本集1:192.168.115.11:27017,192.168.115.12:27017,192.168.115.11:47017(arbiter)副本集2:192.168.115.11:37017,192.168.115.12:37017,192.168.115.12:47017(arbiter)configserver:192.168.115.11:10000,192.168.115.11:10001,192.168.115.12:10000mongos:192.168.115.11:20000二、分片介绍1.逻辑图
片(shard):每一个分片一个副本集配置服务器(config server):存储集群的配置信息,3.2以上版本支持副本集模式部署路由进程(mongos):路由所有请求,然后将结果聚合。它不保存存储数据或配置信息,配置信息从配置服务器上加载到内存中。 副本集方式部署confiserver
一、部署条件1.集群中不能有仲裁节点2.集群中不能有延迟节点3.每个成员必须可以创建索引二、configserver安装配置1.修改配置文件(其他两个节点配置文件类似,主要修改监听端口,及数据路径,如果一台机器上运行多个实例,注意配置文件名称要不一样)
cat config.conf
fork = true
quiet = true
port = 10000
dbpath = /data/config
logpath = /usr/local/mongodb/logs/config.log
logappend = true
directoryperdb = true
configsvr = true
replSet = hnrconfig/192.168.115.11:10000,192.168.115.11:10001,192.168.115.12:10000
2.服务启动和停止/usr/local/mongodb/bin/mongod
-f /usr/local/mongodb/etc/config.conf /usr/local/mongodb/bin/mongod --shutdown
--port 10000 --dbpath=/data/config3.配置副本集连接任意一个节点进行配置> show dbs2016-11-17T09:06:08.088+0800
E QUERY [thread1] Error: listDatabases
failed:{ "ok" : 0, "errmsg" : "not master and
slaveOk=false", "code" : 13435 } :_getErrorWithCode@src/mongo/shell/utils.js:23:13Mongo.prototype.getDBs@src/mongo/shell/mongo.js:53:1shellHelper.show@src/mongo/shell/utils.js:700:19shellHelper@src/mongo/shell/utils.js:594:15@(shellhelp2):1:1出现以上错误,需要执行> rs.slaveOk()> use admin>
db.runCommand({"replSetInitiate" : { "_id" :
"hnrconfig" ,"members" : [ { "_id" : 1,
"host" : "192.168.115.11:10000"},{ "_id" : 2,
"host" : "192.168.115.12:10000"},{"_id" : 3,
"host" : "192.168.115.11:10001"}]}}){ "ok" : 1
}三、mongos配置1.配置文件
cat mongos.conf
fork = true
quiet = true
port = 20000
logpath = /usr/local/mongodb/logs/mongos.log
logappend = true
configdb = 192.168.115.11:10000,192.168.115.11:10001,192.168.115.12:10000
2.启动mongos服务/usr/local/mongodb/bin/mongos
-f /usr/local/mongodb/etc/mongos.conf四、往集群中添加分片连接mongosmongos>
sh.addShard("hnrtest1/192.168.115.11:27017"){
"shardAdded" : "hnrtest1", "ok" : 1 }mongos>mongos>
sh.addShard("hnrtest2/192.168.115.12:37017"){
"shardAdded" : "hnrtest2", "ok" : 1 }mongos>
五、开启分片1.先对数据库启用分片功能mongos>
sh.enableSharding("shardtest"){ "ok" : 1
}mongos>2.对集合开启分片(自动分片建)mongos>
sh.shardCollection("shardtest.student",{"cre_id":1}){
"collectionsharded" : "shardtest.student", "ok" :
1 }mongos>
3.修改默认chunk大小(默认为64M),自动分片测试效果不好,需要插入大量数据,将其修改为1Mmongos> use configmongos>
db.settings.save({ "_id" : "chunksize", "value" :
NumberLong(1) })修改后对student2集合进行分片mongos>
sh.shardCollection("shardtest.student2",{"cre_id":1})插入5万条数据
直接在后端分片副本集上查询hnrtest2:PRIMARY>
db.student2.find().count()27081hnrtest2:PRIMARY> hnrtest1:PRIMARY>
db.student2.find().count()22918hnrtest1:PRIMARY> 4.采用哈希分片修改chunk为默认值64Mmongos>
db.settings.save({ "_id" : "chunksize", "value" :
NumberLong(64) })student3集合在cre_id字段使用哈希分片mongos>
sh.shardCollection("shardtest.student3",{"cre_id":"hashed"}){
"collectionsharded" : "shardtest.student3", "ok"
: 1 }mongos>
sh.status() shardtest.student3 shard key: {
"cre_id" : "hashed" } unique: false balancing: true chunks: hnrtest1 2 hnrtest2 2 { "cre_id" :
{ "$minKey" : 1 } } -->> { "cre_id" :
NumberLong("-4611686018427387902") } on : hnrtest1 Timestamp(2, 2) { "cre_id" :
NumberLong("-4611686018427387902") } -->> { "cre_id"
: NumberLong(0) } on : hnrtest1 Timestamp(2, 3) { "cre_id" :
NumberLong(0) } -->> { "cre_id" :
NumberLong("4611686018427387902") } on : hnrtest2 Timestamp(2, 4) { "cre_id" :
NumberLong("4611686018427387902") } -->> { "cre_id" :
{ "$maxKey" : 1 } } on : hnrtest2 Timestamp(2, 5) 往student3插入1万条数据,在每个分片上查询hnrtest1:PRIMARY>
db.student3.find().count()4952hnrtest1:PRIMARY> hnrtest2:PRIMARY>
db.student3.find().count()5047hnrtest2:PRIMARY> 第二部分 故障模拟验证一、模拟config服务副本集primary节点宕机1.关闭服务/usr/local/mongodb/bin/mongod
--shutdown --port 10000 --dbpath=/data/config2.副本集重新选举一个primary节点
3.读取数据,所有数据均正常返回mongos> use
shardtestswitched to db
shardtestmongos>mongos>
db.student.find().count()99999mongos>
db.student2.find().count()49999mongos>
db.student3.find().count()9999mongos>4.对新的集合进行分片,插入5千条数据mongos>
sh.shardCollection("shardtest.student4",{"cre_id":"hashed"}){
"collectionsharded" : "shardtest.student4", "ok"
: 1 }mongos>在每个分片上查询数据hnrtest2:PRIMARY>
db.student4.find().count()2525hnrtest2:PRIMARY> hnrtest1:PRIMARY>
db.student4.find().count()2474hnrtest1:PRIMARY> 二、config服务数据备份恢复1.数据备份/usr/local/mongodb/bin/mongodump
-h 192.168.115.11:10001 -o configdata2.关闭所有config服务节点/usr/local/mongodb/bin/mongod
--shutdown --port 10000 --dbpath=/data/config/usr/local/mongodb/bin/mongod
--shutdown --port 10001 --dbpath=/data/config13.数据读取操作由于mongos是将config的配置信息全部加载到内存中运行,因此此时通过mongos查询数据一切正常,但是不能对新的集合进行分片操作mongos>
db.student.find().count()99999mongos>
db.student2.find().count()49999mongos>
db.student3.find().count()9999mongos>
db.student4.find().count()4999mongos>4.对集合进行分片操作,无法完成mongos>
sh.shardCollection("shardtest.student5",{"cre_id":"hashed"}){ "ok" : 0, "errmsg" : "None of the
hosts for replica set hnrconfig could be contacted.", "code" : 71}mongos> 5.关闭mongos服务,删除config节点所有数据6.重新启动三个config服务7.重新初始化副本集> rs.slaveOk()> use admin>
db.runCommand({"replSetInitiate" : { "_id" :
"hnrconfig" ,"members" : [ { "_id" : 1,
"host" : "192.168.115.11:10000"},{ "_id" : 2,
"host" : "192.168.115.12:10000"},{"_id" : 3,
"host" : "192.168.115.11:10001"}]}})8.启动mongos服务,此时没有任何数据
9.导入备份的config数据/usr/local/mongodb/bin/mongorestore
-h 192.168.115.11:10000 -d config configdata/config/在mongos查询,但是查询数据会出现超时,数据无法查询
10.在mongos执行如下命令mongos>
sh.enableSharding("shardtest"){ "ok" :
0, "errmsg" : "Operation timed out", "code" : 50
}mongos日志2016-11-17T14:46:21.197+0800
I SHARDING [Balancer] about to log metadata event into actionlog: { _id:
"node1.hnr.com-2016-11-17T14:46:21.197+0800-582d523ded1c4b679a84877b",
server: "node1.hnr.com", clientAddr: "", time: new Date(1479365181197),
what: "balancer.round", ns: "", details: {
executionTimeMillis: 30007, errorOccured: true, errmsg: "could not get
updated shard list from config server due to ExceededTimeLimit Operation timed
out" } }官网上说是bug,恢复失败https://jira.mongodb.org/browse/SERVER-22392

相关文章推荐
- 快速部署有身份验证和授权的MongoDB Replica SET复制集
- angular nodejs express mongodb apache,模拟线上部署
- RHEL 6.4 部署RAID1 并模拟发生故障
- 部署vsphere6.5 vcenterHA时出现“请验证管理接口nic0”故障
- MongoDB远程主从部署下的全量数据同步及故障恢复策略
- 部署cas服务器实现定制JDBC验证
- 部署cas服务器实现定制JDBC验证
- 部署cas服务器实现定制JDBC验证
- 部署cas服务器实现定制JDBC验证
- 使用版本控制的分支合并进行开发,模拟,运营环境的统一部署
- 部署cas服务器实现定制JDBC验证
- 数据验证(模拟检测用户名是否存在) http://www.cnblogs.com/beniao/archive/2008/03/29/1129141.html
- 部署cas服务器实现定制JDBC验证
- 逻辑模拟和故障模拟
- 部署cas服务器实现定制JDBC验证
- Exchange部署吐血故障连载三:被CiscoPIX剥离了的ESMTP导致外部smtp请求无法正确连接服务器 推荐
- 部署cas服务器实现定制JDBC验证
- 数据验证(模拟检测用户名是否存在)
- (转)查看需要验证的网站信息 模拟登陆
- Exchange部署吐血故障连载一:手工添加活动目录站点复制,致不能满足Ex03部署的“先决条件”导致安装失败