Android 5.0 Usb调试拦截分析及修改
2016-11-17 22:35
411 查看
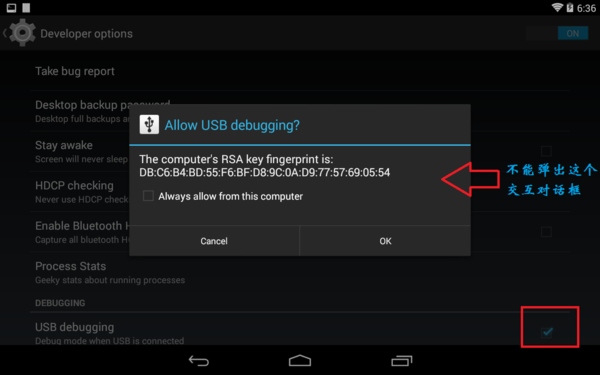
当我们调试安卓机器时,第一次插上usb线,会弹出一个授权的对话框,(前提是打开了usb调试功能)点击确认,才会允许调试.
如果我们想机器默认就可以调试该怎么做呢?
如果我们想动态拦截,需要用户输入帐号密码,才确认是否可以调试,该怎么做呢?或者只是单纯的想改变这个不好看的UI,又该怎么做呢?
分析的源码基于android 5.0.2_r1
前面所说的情况1,想在默认情况下就允许usb调试,需要修改源码下的/build/core/main.mk文件,然后重新编译,刷机,具体请看:
http://blog.csdn.net/fanmengke_im/article/details/28389439?utm_source=tuicool&utm_medium=referral
至于后面的那一种,就是我要说的重点,需要去看一看android源码,然后做一些适当的修改.首先,我们要找到关于usb的源码,主要在/frameworks/base/services/java/目录下,也就是这几个文件:
UsbDebuggingManager.java
UsbDeviceManager.java
UsbHostManager.java
UsbService.java
UsbSettingsManager.java
其中涉及到的一些资源文件在/frameworks/base/core/res/res/目录下
你会发现,在UsbDebuggingmanager类中,你会发现有这样的几个方法:
会不会就是这些方法弹出了对话框呢?继续追踪,发现startConfirmationActivity()和startConfirmationService()都是在startConfirmation()方法中调用的,现在我们来看下startConfirmation()方法:
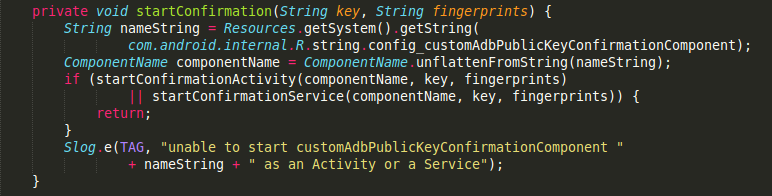
首先通过资源文件拿到一个String类型的nameString,然后通过unflattenFromString()方法,传入nameString得到一个ComponentName对象,那么nameString到底是什么呢?
在/frameworks/base/core/res/res/values/config.xml 文件中,我们看到:

原来ConponentName就是:
包名为com.android.systemui
组件为com.android.systemui.usb.UsbDebuggingActivity的类
弹窗UI在这修改
哦哦,原来我们弹出的授权对话框就是systemui app中的一个activity,如果你只是单纯的想改变这个UI,你现在只要到/frameworks/base/packages/SystemUI/usb/目录下,找到UsbDebuggingActivity这个类,修改它的布局文件即可.等会再来看下这个类,做了哪些事情.
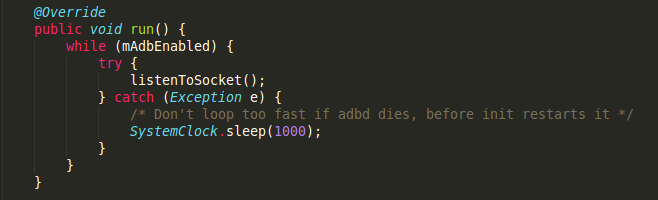
继续回到上面的分析,你会发现startConfirmation()方法在一个Handler被调用,什么情况下会出发这个Handler呢?原来,UsbDebuggingManager实现了Runnable,在run()方法中开启了一个LocalSocket,去读取底层的usb信息,做出响应的操作.至于该线程的开启,也在Handler中,只要你调用了setAdbEnabled(),如果参数为true,就开启该线程.

现在我们只要看看在哪个地方实例化了UsbDebuggingManager类,调用了setAdbEnabled()方法.
追踪发现在UsbDeviceManager中,它的构造方法中初始化了UsbDebuggingManager类.
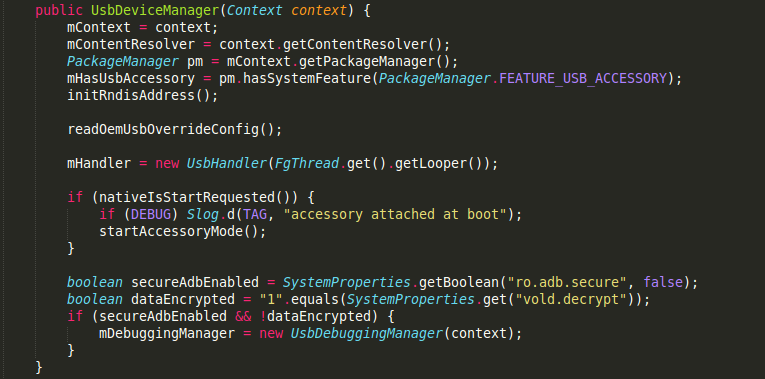
可以看到会通过SystemProperties读取ro.adb.secure 和 vold.decrypt的值,这两个值,我请教了做rom的同事,说这些值是在编译的时候修改的,主要来区分user,eng版本,这两个值主要就是来进行是否进行usb认证机制的.
然后就初始化了UsbDeviceManager类,在看看调用mDebuggingManager.setAdbEnabled(mAdbEnabled)的地方.
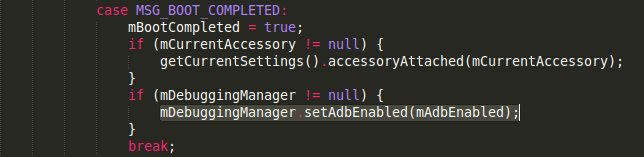
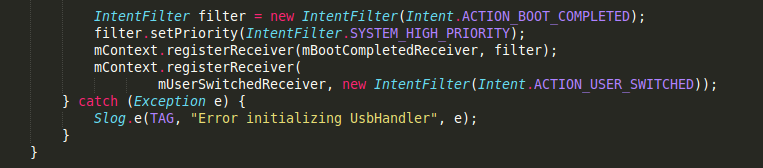
也是在UsbDeviceManager的Handler中调用的,它注册啦一个开机广播,每次开机就会触发它.代码只截取了一小部分…

当然,还有几个地方调用了setAdbEnabled()方法,比如在这个Handler初始化的时候,我就没有追踪了,如果你有兴趣,可以去调试下~
接下来,继续往上追踪,看看UsbDeviceManager在哪被实例化了.它是通过UsbService的构造方法来实例化的.

在UsbService这个类中,它是继承自IUsbManager.Stub类的,也就是IUsbManager.aidl这个文件,它在/frameworks/base/core/java/android/hardware/usb/文件夹下,这个接口是@hide的,因为外部不可以引用,文件内容如下:
看方法名就大致能猜出来该方法的作用,允许授权,拒绝授权,清除授权.
在看看UsbService在哪被实例化?在UsbService中有一个Lifecycle静态内部类,继承自SystemService,在onStart()方法中,实例化了UsbService类.

那是在何处调用了Lifecycle类呢?通过查找发现,原来是在SystemService这个类调用的.
对于SystemService类,我也不是很了解,具体的相关信息可以去查询.SystemService是android系统一个很重要的服务,它是由zytote来初始化的,然后会启动android系统的一些必要服务和支持组件,地位相当重要.直接看看代码吧.
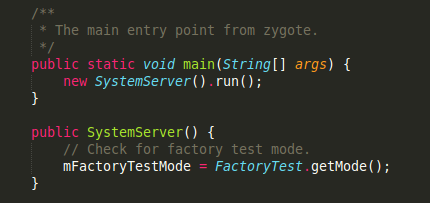
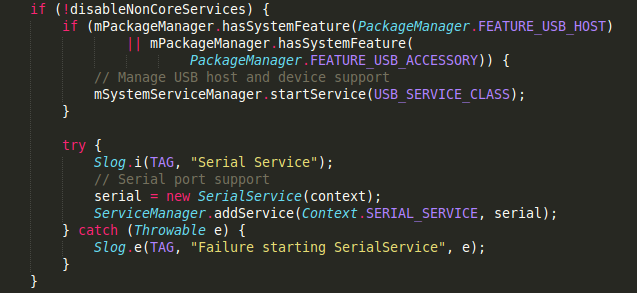
可以看到初始化很多东西,创建Context,加载android_servers,初始化主线程…最后调用了startBootstrapServices(),startCoreServices(),startOtherServices()方法,在这个方法中,启动了Lifecycle服务.
这样的话,整体流程就串起来了.
1.首先android系统启动,初始化了SystemServer
2.在由SystemServer去启动UsbService$Lifecycle服务,然后实例化UsbService
3.在由UsbService初始化了UsbHostManager和UsbDeviceManager.
4.然后UsbDeviceManager通过读取ro.adb.secure和vold.decrypt的值,来判定是否开启调试拦截流程(也就是初始化UsbDebuggingManager)
5.如果初始化UsbDebuggingManager,它会一直监听LocalSocketAddress(“adbd”, LocalSocketAddress.Namespace.RESERVED)这个端口,判断是否弹出授权窗口
分析弹出授权的UI窗口
也就是UsbDebuggingActivity类,继承自AlertActivity,我们主要看一些确认和取消的事件.
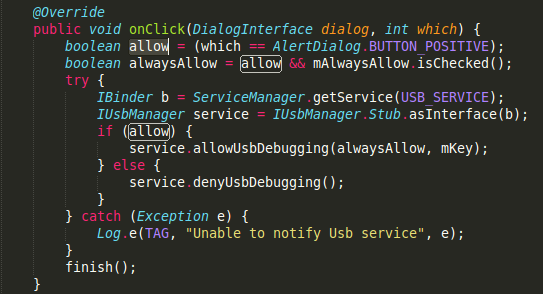
通过ServiceManager得到一个IBinder对象,然后通过IBinder得到一个IUsbManager对象,这个就是前面所说的aidl接口,UsbService实现了IUsbManager接口,调用allowUsbDebugging()和denyUsbDebugging(),同意授权和不同意授权.
那我们在回过头来,看一看IUsbManager接口中的allowUsbDebugging()和denyUsbDebugging()的实现.
在UsbService中:
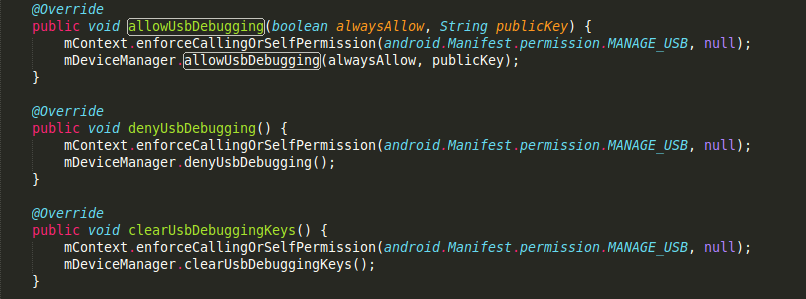
其实调用的是UsbDeviceManager中的方法:
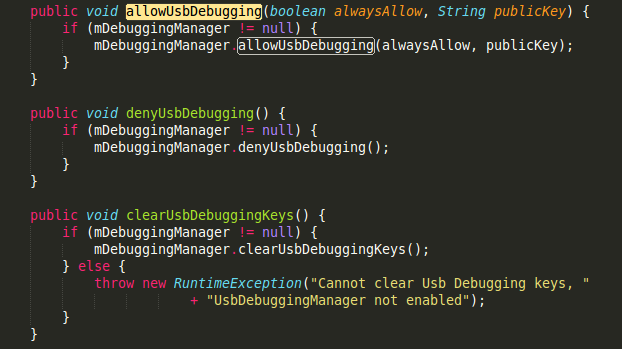
最终发现原来调用的是UsbDebuggingManager中的方法:
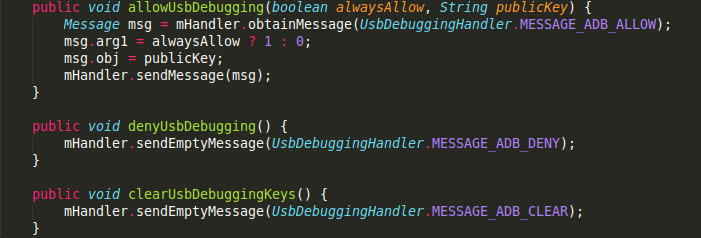
最终,找到了原来所有的操作还是在它的UsbDebuggingHandler中,如果授权成功了,会向文件中写入这个key和相关信息,然后通过上面所说的Socket写入一条”OK”这样的信息.如果取消授权,会通过Socket写入一条”NO”这样的信息.到此,整个流程就走完了.
至于Socket的另一端,暂时没有去寻找它,据个人估计,可能与驱动方面有关.(咱待研究)
2.如该想改动相关逻辑,就需要在UsbDebuggingManager类中改动,是否弹窗,或者根本不想用systemui里面的Activity,都可以在这里面进行改动.
不过上层如果想要授权的话,需要调用IUsbManager的授权和取消授权方法.
如果获取不到该类或者它的实现类UsbService(好像是因为IUsbManager是@hide,我没有试过),建议你仿照IUsbManager.adil文件,上下层都去实现其中的几个重要方法,就可以拿来用了.
3.如果你根本想不拦截调试授权的话,就需要在main.mk文件中做一些相应的修改了,具体的话,可以去网上搜一下.
4.当然,如果你修改UsbDeviceManager类的,在初始化的时候给它再加一个判断条件的话,也可以显示自由拦截功能.
暂时就研究到这了,因为公司需要定制这东西,等需求有变化了,可能需要在做研究,到时候在补充吧~
相关文章:
android4.4 debug调试授权拦截(替换掉 允许USB调试吗? UI)
Android 如何开启与关闭adb 的认证机制(google adb secure) (adb RSA 指纹认证)
Android 下的usb框架及功能点
Android设备adb授权的原理
如果我们想机器默认就可以调试该怎么做呢?
如果我们想动态拦截,需要用户输入帐号密码,才确认是否可以调试,该怎么做呢?或者只是单纯的想改变这个不好看的UI,又该怎么做呢?
分析的源码基于android 5.0.2_r1
前面所说的情况1,想在默认情况下就允许usb调试,需要修改源码下的/build/core/main.mk文件,然后重新编译,刷机,具体请看:
http://blog.csdn.net/fanmengke_im/article/details/28389439?utm_source=tuicool&utm_medium=referral
至于后面的那一种,就是我要说的重点,需要去看一看android源码,然后做一些适当的修改.首先,我们要找到关于usb的源码,主要在/frameworks/base/services/java/目录下,也就是这几个文件:
UsbDebuggingManager.java
UsbDeviceManager.java
UsbHostManager.java
UsbService.java
UsbSettingsManager.java
其中涉及到的一些资源文件在/frameworks/base/core/res/res/目录下
寻找入口点
源码与资源文件都在这了,从哪入手,我也是一头雾水,还好,只有5个java文件,去读一读,看看有什么收获.你会发现,在UsbDebuggingmanager类中,你会发现有这样的几个方法:
startConfirmation(String key, String fingerprints)

startConfirmationActivity(ComponentName componentName, String key,
String fingerprints)

startConfirmationService(ComponentName componentName, String key,
String fingerprints)
会不会就是这些方法弹出了对话框呢?继续追踪,发现startConfirmationActivity()和startConfirmationService()都是在startConfirmation()方法中调用的,现在我们来看下startConfirmation()方法:
首先通过资源文件拿到一个String类型的nameString,然后通过unflattenFromString()方法,传入nameString得到一个ComponentName对象,那么nameString到底是什么呢?
在/frameworks/base/core/res/res/values/config.xml 文件中,我们看到:
原来ConponentName就是:
包名为com.android.systemui
组件为com.android.systemui.usb.UsbDebuggingActivity的类
弹窗UI在这修改
哦哦,原来我们弹出的授权对话框就是systemui app中的一个activity,如果你只是单纯的想改变这个UI,你现在只要到/frameworks/base/packages/SystemUI/usb/目录下,找到UsbDebuggingActivity这个类,修改它的布局文件即可.等会再来看下这个类,做了哪些事情.
继续回到上面的分析,你会发现startConfirmation()方法在一个Handler被调用,什么情况下会出发这个Handler呢?原来,UsbDebuggingManager实现了Runnable,在run()方法中开启了一个LocalSocket,去读取底层的usb信息,做出响应的操作.至于该线程的开启,也在Handler中,只要你调用了setAdbEnabled(),如果参数为true,就开启该线程.
现在我们只要看看在哪个地方实例化了UsbDebuggingManager类,调用了setAdbEnabled()方法.
追踪发现在UsbDeviceManager中,它的构造方法中初始化了UsbDebuggingManager类.
可以看到会通过SystemProperties读取ro.adb.secure 和 vold.decrypt的值,这两个值,我请教了做rom的同事,说这些值是在编译的时候修改的,主要来区分user,eng版本,这两个值主要就是来进行是否进行usb认证机制的.
然后就初始化了UsbDeviceManager类,在看看调用mDebuggingManager.setAdbEnabled(mAdbEnabled)的地方.
也是在UsbDeviceManager的Handler中调用的,它注册啦一个开机广播,每次开机就会触发它.代码只截取了一小部分…
当然,还有几个地方调用了setAdbEnabled()方法,比如在这个Handler初始化的时候,我就没有追踪了,如果你有兴趣,可以去调试下~
接下来,继续往上追踪,看看UsbDeviceManager在哪被实例化了.它是通过UsbService的构造方法来实例化的.
在UsbService这个类中,它是继承自IUsbManager.Stub类的,也就是IUsbManager.aidl这个文件,它在/frameworks/base/core/java/android/hardware/usb/文件夹下,这个接口是@hide的,因为外部不可以引用,文件内容如下:
// 只摘录了IUsbManager中的几个方法
/** @hide */
interface IUsbManager{

/* Allow USB debugging from the attached host. If alwaysAllow is true, add the
* the public key to list of host keys that the user has approved.
*/
void allowUsbDebugging(boolean alwaysAllow, String publicKey);

/* Deny USB debugging from the attached host */
void denyUsbDebugging();

/* Clear public keys installed for secure USB debugging */
void clearUsbDebuggingKeys();
}
看方法名就大致能猜出来该方法的作用,允许授权,拒绝授权,清除授权.
在看看UsbService在哪被实例化?在UsbService中有一个Lifecycle静态内部类,继承自SystemService,在onStart()方法中,实例化了UsbService类.
那是在何处调用了Lifecycle类呢?通过查找发现,原来是在SystemService这个类调用的.
对于SystemService类,我也不是很了解,具体的相关信息可以去查询.SystemService是android系统一个很重要的服务,它是由zytote来初始化的,然后会启动android系统的一些必要服务和支持组件,地位相当重要.直接看看代码吧.
private void run() {
// If a device's clock is before 1970 (before 0), a lot of
// APIs crash dealing with negative numbers, notably
// java.io.File#setLastModified, so instead we fake it and
// hope that time from cell towers or NTP fixes it shortly.
if (System.currentTimeMillis() < EARLIEST_SUPPORTED_TIME) {
Slog.w(TAG, "System clock is before 1970; setting to 1970.");
SystemClock.setCurrentTimeMillis(EARLIEST_SUPPORTED_TIME);
}

// Here we go!
Slog.i(TAG, "Entered the Android system server!");
EventLog.writeEvent(EventLogTags.BOOT_PROGRESS_SYSTEM_RUN, SystemClock.uptimeMillis());

// In case the runtime switched since last boot (such as when
// the old runtime was removed in an OTA), set the system
// property so that it is in sync. We can't do this in
// libnativehelper's JniInvocation::Init code where we already
// had to fallback to a different runtime because it is
// running as root and we need to be the system user to set
// the property. http://b/11463182 SystemProperties.set("persist.sys.dalvik.vm.lib.2", VMRuntime.getRuntime().vmLibrary());

// Enable the sampling profiler.
if (SamplingProfilerIntegration.isEnabled()) {
SamplingProfilerIntegration.start();
mProfilerSnapshotTimer = new Timer();
mProfilerSnapshotTimer.schedule(new TimerTask() {
@Override
public void run() {
SamplingProfilerIntegration.writeSnapshot("system_server", null);
}
}, SNAPSHOT_INTERVAL, SNAPSHOT_INTERVAL);
}

// Mmmmmm... more memory!
VMRuntime.getRuntime().clearGrowthLimit();

// The system server has to run all of the time, so it needs to be
// as efficient as possible with its memory usage.
VMRuntime.getRuntime().setTargetHeapUtilization(0.8f);

// Some devices rely on runtime fingerprint generation, so make sure
// we've defined it before booting further.
Build.ensureFingerprintProperty();

// Within the system server, it is an error to access Environment paths without
// explicitly specifying a user.
Environment.setUserRequired(true);

// Ensure binder calls into the system always run at foreground priority.
BinderInternal.disableBackgroundScheduling(true);

// Prepare the main looper thread (this thread).
android.os.Process.setThreadPriority(
android.os.Process.THREAD_PRIORITY_FOREGROUND);
android.os.Process.setCanSelfBackground(false);
Looper.prepareMainLooper();

// Initialize native services.
System.loadLibrary("android_servers");
nativeInit();

// Check whether we failed to shut down last time we tried.
// This call may not return.
performPendingShutdown();

// Initialize the system context.
createSystemContext();

// Create the system service manager.
mSystemServiceManager = new SystemServiceManager(mSystemContext);
LocalServices.addService(SystemServiceManager.class, mSystemServiceManager);

// Start services.
try {
startBootstrapServices();
startCoreServices();
startOtherServices();
} catch (Throwable ex) {
Slog.e("System", "******************************************");
Slog.e("System", "************ Failure starting system services", ex);
throw ex;
}

// For debug builds, log event loop stalls to dropbox for analysis.
if (StrictMode.conditionallyEnableDebugLogging()) {
Slog.i(TAG, "Enabled StrictMode for system server main thread.");
}

// Loop forever.
Looper.loop();
throw new RuntimeException("Main thread loop unexpectedly exited");
}
可以看到初始化很多东西,创建Context,加载android_servers,初始化主线程…最后调用了startBootstrapServices(),startCoreServices(),startOtherServices()方法,在这个方法中,启动了Lifecycle服务.
这样的话,整体流程就串起来了.
1.首先android系统启动,初始化了SystemServer
2.在由SystemServer去启动UsbService$Lifecycle服务,然后实例化UsbService
3.在由UsbService初始化了UsbHostManager和UsbDeviceManager.
4.然后UsbDeviceManager通过读取ro.adb.secure和vold.decrypt的值,来判定是否开启调试拦截流程(也就是初始化UsbDebuggingManager)
5.如果初始化UsbDebuggingManager,它会一直监听LocalSocketAddress(“adbd”, LocalSocketAddress.Namespace.RESERVED)这个端口,判断是否弹出授权窗口
分析弹出授权的UI窗口
也就是UsbDebuggingActivity类,继承自AlertActivity,我们主要看一些确认和取消的事件.
通过ServiceManager得到一个IBinder对象,然后通过IBinder得到一个IUsbManager对象,这个就是前面所说的aidl接口,UsbService实现了IUsbManager接口,调用allowUsbDebugging()和denyUsbDebugging(),同意授权和不同意授权.
那我们在回过头来,看一看IUsbManager接口中的allowUsbDebugging()和denyUsbDebugging()的实现.
在UsbService中:
其实调用的是UsbDeviceManager中的方法:
最终发现原来调用的是UsbDebuggingManager中的方法:
最终,找到了原来所有的操作还是在它的UsbDebuggingHandler中,如果授权成功了,会向文件中写入这个key和相关信息,然后通过上面所说的Socket写入一条”OK”这样的信息.如果取消授权,会通过Socket写入一条”NO”这样的信息.到此,整个流程就走完了.
至于Socket的另一端,暂时没有去寻找它,据个人估计,可能与驱动方面有关.(咱待研究)
定制调试拦截
1.如果你只是想改动弹出的UI,只需要修改UsbDebuggingActivity的布局文件就可以了.2.如该想改动相关逻辑,就需要在UsbDebuggingManager类中改动,是否弹窗,或者根本不想用systemui里面的Activity,都可以在这里面进行改动.
不过上层如果想要授权的话,需要调用IUsbManager的授权和取消授权方法.
如果获取不到该类或者它的实现类UsbService(好像是因为IUsbManager是@hide,我没有试过),建议你仿照IUsbManager.adil文件,上下层都去实现其中的几个重要方法,就可以拿来用了.
3.如果你根本想不拦截调试授权的话,就需要在main.mk文件中做一些相应的修改了,具体的话,可以去网上搜一下.
4.当然,如果你修改UsbDeviceManager类的,在初始化的时候给它再加一个判断条件的话,也可以显示自由拦截功能.
暂时就研究到这了,因为公司需要定制这东西,等需求有变化了,可能需要在做研究,到时候在补充吧~
相关文章:
android4.4 debug调试授权拦截(替换掉 允许USB调试吗? UI)
Android 如何开启与关闭adb 的认证机制(google adb secure) (adb RSA 指纹认证)
Android 下的usb框架及功能点
Android设备adb授权的原理

相关文章推荐
- Android系统移植与调试之------->如何修改Android系统默认显示【开发者选项】并默认打开【USB调试】和【未知来源】开关
- Android系统移植与调试之如何修改Android系统默认显示【开发者选项】并默认打开【USB调试】和【未知来源】开关
- 使用eclipse跟踪调试Android源码及其.classpath的作用分析
- 在Linux下安装android开发环境并以USB调试方式链接手机进行开发
- android:添加usb键盘+按键布局和映射的修改
- android usb挂载分析---FAT文件系统原理详细介绍
- android usb挂载分析---vold处理内核消息
- Android RIL 调试分析全记录
- android usb挂载分析---解析NTFS底层结构
- 分析android的usb-gadget
- 在Linux下安装android开发环境并以USB调试方式链接手机进行开发e
- android usb挂载分析---FrameWork层处理收到的vold消息
- ubuntu10.04 下通过usb在真机调试android程序的设置
- 用Android代码实现自动打开USB调试
- android USB调试进行开发程序
- android 中对 gps 默认关闭+语言默认中文的设置+时区设置+修改系统名字+修改系统默认时间+修改屏幕休眠时间+修改usb debug默认关闭+mtk修改默认字体大小
- 如何安全的修改原有代码---android mms player调试总结
- eclipse 编译器的版本默认是1.5只需修改成1.6即可Android requires compiler compliance level 5.0. Please
- android 的2.3 的单双camera的调试 使用android的prop技术点滴分析
- android usb挂载分析---MountService启动