Junit使用教程(三)
2016-11-15 13:23
316 查看
四、实例总结
1. 参数化测试
有时一个测试方法,不同的参数值会产生不同的结果,那么我们为了测试全面,会把多个参数值都写出来并一一断言测试,这样有时难免费时费力,这是我们便可以采用参数化测试来解决这个问题。参数化测试就好比把一个“输入值,期望值”的集合传入给测试方法,达到一次性测试的目的。
[java] view plain copy print?package test;
import static org.junit.Assert.*;
import java.util.Arrays;
import org.junit.Test;
import org.junit.runner.RunWith;
import org.junit.runners.Parameterized;
import org.junit.runners.Parameterized.Parameters;
@RunWith(Parameterized.class)
public class FibonacciTest {
@Parameters(name = “{index}: fib({0})={1}”)
public static Iterable<Object[]> data() {
return Arrays.asList(new Object[][] { { 0, 0 }, { 1, 1 }, { 2, 1 },
{ 3, 2 }, { 4, 3 }, { 5, 5 }, { 6, 8 } });
}
private int input;
private int expected;
public FibonacciTest(int input, int expected) {
this.input = input;
this.expected = expected;
}
@Test
public void test() {
assertEquals(expected, Fibonacci.compute(input));
}
}
class Fibonacci {
public static int compute(int input) {
int result;
switch (input) {
case 0:
result = 0;
break;
case 1:
case 2:
result = 1;
break;
case 3:
result = 2;
break;
case 4:
result = 3;
&nbs
4000
p; break;
case 5:
result = 5;
break;
case 6:
result = 8;
break;
default:
result = 0;
}
return result;
}
}

import static org.junit.Assert.*;
import java.util.Arrays;
import org.junit.Test;
import org.junit.runner.RunWith;
import org.junit.runners.Parameterized;
import org.junit.runners.Parameterized.Parameters;
@RunWith(Parameterized.class)
public class FibonacciTest {
}
class Fibonacci {
}
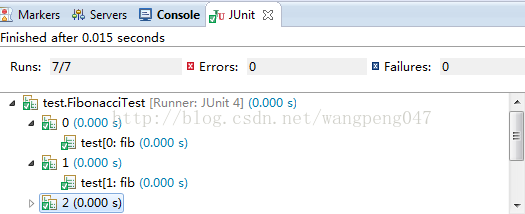
@Parameters注解参数name,实际是测试方法名称。由于一个test()方法就完成了所有测试,那假如某一组测试数据有问题,那在Junit的结果页面里该如何呈现?因此采用name实际上就是区分每个测试数据的测试方法名。如下图:
2. 打包测试
同样,如果一个项目中有很多个测试用例,如果一个个测试也很麻烦,因此打包测试就是一次性测试完成包中含有的所有测试用例。
[java] view plain copy print?package test; import org.junit.runner.RunWith; import org.junit.runners.Suite; @RunWith(Suite.class) @Suite.SuiteClasses({ AssertTests.class, FibonacciTest.class, JDemoTest.class }) public class AllCaseTest { }
这个功能也需要使用一个特殊的Runner ,需要向@RunWith注解传递一个参数Suite.class 。同时,我们还需要另外一个注解@Suite.SuiteClasses,来表明这个类是一个打包测试类。并将需要打包的类作为参数传递给该注解就可以了。至于AllCaseTest随便起一个类名,内容为空既可。运行AllCaseTest类即可完成打包测试
3. 异常测试
异常测试与普通断言测试不同,共有三种方法,其中最为灵活的是第三种,可以与断言结合使用
第一种:
[java] view plain copy print?@Test(expected= IndexOutOfBoundsException.class)
public void empty() {
new ArrayList<Object>().get(0);
}
第二种:
[java] view plain copy print?@Test
public void testExceptionMessage() {
try {
new ArrayList<Object>().get(0);
fail(”Expected an IndexOutOfBoundsException to be thrown”);
} catch (IndexOutOfBoundsException anIndexOutOfBoundsException) {
assertThat(anIndexOutOfBoundsException.getMessage(), is(”Index: 0, Size: 0”));
}
}
第三种:
[java] view plain copy print?@Rule
public ExpectedException thrown = ExpectedException.none();
@Test
public void shouldTestExceptionMessage() throws IndexOutOfBoundsException {
List<Object> list = new ArrayList<Object>();
thrown.expect(IndexOutOfBoundsException.class);
thrown.expectMessage(”Index: 0, Size: 0”);
list.get(0);
Assert.assertEquals(1, list.get(0));
}
在上述几种方法中,无论是expected还是expect都表示期望抛出的异常,假如某一方法,当参数为某一值时会抛出异常,那么使用第一种方法就必须为该参数单独写一个测试方法来测试异常,而无法与其他参数值一同写在一个测试方法里,所以显得累赘。第二种方法虽然解决这个问题,但是写法不仅繁琐也不利于理解。而第三种犯法,不仅能动态更改期望抛出的异常,与断言语句结合的也非常好,因此推荐使用该方法来测试异常。
4. 限时测试
有时为了防止出现死循环或者方法执行过长(或检查方法效率),而需要使用到限时测试。顾名思义,就是超出设定时间即视为测试失败。共有两种写法。
第一种:
[java] view plain copy print?@Test(timeout=1000)
public void testWithTimeout() {
…
}
1. 参数化测试
有时一个测试方法,不同的参数值会产生不同的结果,那么我们为了测试全面,会把多个参数值都写出来并一一断言测试,这样有时难免费时费力,这是我们便可以采用参数化测试来解决这个问题。参数化测试就好比把一个“输入值,期望值”的集合传入给测试方法,达到一次性测试的目的。
[java] view plain copy print?package test;
import static org.junit.Assert.*;
import java.util.Arrays;
import org.junit.Test;
import org.junit.runner.RunWith;
import org.junit.runners.Parameterized;
import org.junit.runners.Parameterized.Parameters;
@RunWith(Parameterized.class)
public class FibonacciTest {
@Parameters(name = “{index}: fib({0})={1}”)
public static Iterable<Object[]> data() {
return Arrays.asList(new Object[][] { { 0, 0 }, { 1, 1 }, { 2, 1 },
{ 3, 2 }, { 4, 3 }, { 5, 5 }, { 6, 8 } });
}
private int input;
private int expected;
public FibonacciTest(int input, int expected) {
this.input = input;
this.expected = expected;
}
@Test
public void test() {
assertEquals(expected, Fibonacci.compute(input));
}
}
class Fibonacci {
public static int compute(int input) {
int result;
switch (input) {
case 0:
result = 0;
break;
case 1:
case 2:
result = 1;
break;
case 3:
result = 2;
break;
case 4:
result = 3;
&nbs
4000
p; break;
case 5:
result = 5;
break;
case 6:
result = 8;
break;
default:
result = 0;
}
return result;
}
}
package test;
import static org.junit.Assert.*;
import java.util.Arrays;
import org.junit.Test;
import org.junit.runner.RunWith;
import org.junit.runners.Parameterized;
import org.junit.runners.Parameterized.Parameters;
@RunWith(Parameterized.class)
public class FibonacciTest {
@Parameters(name = "{index}: fib({0})={1}")
public static Iterable<Object[]> data() {
return Arrays.asList(new Object[][] { { 0, 0 }, { 1, 1 }, { 2, 1 },
{ 3, 2 }, { 4, 3 }, { 5, 5 }, { 6, 8 } });
}

private int input;
private int expected;

public FibonacciTest(int input, int expected) {
this.input = input;
this.expected = expected;
}

@Test
public void test() {
assertEquals(expected, Fibonacci.compute(input));
}
}
class Fibonacci {
public static int compute(int input) {
int result;
switch (input) {
case 0:
result = 0;
break;
case 1:
case 2:
result = 1;
break;
case 3:
result = 2;
break;
case 4:
result = 3;
break;
case 5:
result = 5;
break;
case 6:
result = 8;
break;
default:
result = 0;
}
return result;
}
}
@Parameters注解参数name,实际是测试方法名称。由于一个test()方法就完成了所有测试,那假如某一组测试数据有问题,那在Junit的结果页面里该如何呈现?因此采用name实际上就是区分每个测试数据的测试方法名。如下图:
2. 打包测试
同样,如果一个项目中有很多个测试用例,如果一个个测试也很麻烦,因此打包测试就是一次性测试完成包中含有的所有测试用例。
[java] view plain copy print?package test; import org.junit.runner.RunWith; import org.junit.runners.Suite; @RunWith(Suite.class) @Suite.SuiteClasses({ AssertTests.class, FibonacciTest.class, JDemoTest.class }) public class AllCaseTest { }
package test;

import org.junit.runner.RunWith;
import org.junit.runners.Suite;

@RunWith(Suite.class)
@Suite.SuiteClasses({ AssertTests.class, FibonacciTest.class, JDemoTest.class })
public class AllCaseTest {

}
这个功能也需要使用一个特殊的Runner ,需要向@RunWith注解传递一个参数Suite.class 。同时,我们还需要另外一个注解@Suite.SuiteClasses,来表明这个类是一个打包测试类。并将需要打包的类作为参数传递给该注解就可以了。至于AllCaseTest随便起一个类名,内容为空既可。运行AllCaseTest类即可完成打包测试
3. 异常测试
异常测试与普通断言测试不同,共有三种方法,其中最为灵活的是第三种,可以与断言结合使用
第一种:
[java] view plain copy print?@Test(expected= IndexOutOfBoundsException.class)
public void empty() {
new ArrayList<Object>().get(0);
}
@Test(expected= IndexOutOfBoundsException.class)
public void empty() {
new ArrayList<Object>().get(0);
}
第二种:
[java] view plain copy print?@Test
public void testExceptionMessage() {
try {
new ArrayList<Object>().get(0);
fail(”Expected an IndexOutOfBoundsException to be thrown”);
} catch (IndexOutOfBoundsException anIndexOutOfBoundsException) {
assertThat(anIndexOutOfBoundsException.getMessage(), is(”Index: 0, Size: 0”));
}
}
@Test
public void testExceptionMessage() {
try {
new ArrayList<Object>().get(0);
fail("Expected an IndexOutOfBoundsException to be thrown");
} catch (IndexOutOfBoundsException anIndexOutOfBoundsException) {
assertThat(anIndexOutOfBoundsException.getMessage(), is("Index: 0, Size: 0"));
}
}
第三种:
[java] view plain copy print?@Rule
public ExpectedException thrown = ExpectedException.none();
@Test
public void shouldTestExceptionMessage() throws IndexOutOfBoundsException {
List<Object> list = new ArrayList<Object>();
thrown.expect(IndexOutOfBoundsException.class);
thrown.expectMessage(”Index: 0, Size: 0”);
list.get(0);
Assert.assertEquals(1, list.get(0));
}
@Rule
public ExpectedException thrown = ExpectedException.none();

[code]@Test
public void shouldTestExceptionMessage() throws IndexOutOfBoundsException {
List<Object> list = new ArrayList<Object>();

thrown.expect(IndexOutOfBoundsException.class);
thrown.expectMessage("Index: 0, Size: 0");
list.get(0);
Assert.assertEquals(1, list.get(0));
}</pre>
在上述几种方法中,无论是expected还是expect都表示期望抛出的异常,假如某一方法,当参数为某一值时会抛出异常,那么使用第一种方法就必须为该参数单独写一个测试方法来测试异常,而无法与其他参数值一同写在一个测试方法里,所以显得累赘。第二种方法虽然解决这个问题,但是写法不仅繁琐也不利于理解。而第三种犯法,不仅能动态更改期望抛出的异常,与断言语句结合的也非常好,因此推荐使用该方法来测试异常。
4. 限时测试
有时为了防止出现死循环或者方法执行过长(或检查方法效率),而需要使用到限时测试。顾名思义,就是超出设定时间即视为测试失败。共有两种写法。
第一种:
[java] view plain copy print?@Test(timeout=1000)
public void testWithTimeout() {
…
}
@Test(timeout=1000)
public void testWithTimeout() {
...
}[/code]

第二种:

[java] view plain copy print?public class HasGlobalTimeout {
public static String log;

@Rule
public Timeout globalTimeout = new Timeout(10000); // 10 seconds max per method tested

@Test
public void testInfiniteLoop1() {
log += ”ran1”;
for (;;) {
&nb
be09
sp;    }
}

@Test
public void testInfiniteLoop2() {
log += ”ran2”;
for (;;) {
}
}
}


public class HasGlobalTimeout {
public static String log;

[code]@Rule
public Timeout globalTimeout = new Timeout(10000); // 10 seconds max per method tested

@Test
public void testInfiniteLoop1() {
log += "ran1";
for (;;) {
}
}

@Test
public void testInfiniteLoop2() {
log += "ran2";
for (;;) {
}
}

}
[/code]

其中,第二种方法与异常测试的第三种方法的写法类似。也是推荐的写法。

至此,Junit的教程总结性文章已介绍完了。通过系统总结也进一步加深了对Junit的认识,希望也能同样帮助到对Junit还不太理解的朋友。如果大家还有什么好的建议和用法,很欢迎能提出来一起交流。

相关文章推荐
- Junit使用教程(四)
- Junit使用教程(二)
- Junit使用教程(一)
- Junit使用教程(一)
- JUnit简单使用教程
- Junit使用教程(一)
- Junit使用教程(三) .
- Junit使用教程(二)
- Junit使用教程(一)
- Junit使用教程(三)
- 在Myeclipse里使用Junit贴图教程与使用JUnit在struts+spring+hibernate框架环境下进行单元测试
- Junit使用教程(四)
- Junit使用教程(四) .
- Junit使用教程(一)
- Junit使用教程(一)
- 使用WebDriver + Java + Junit做自动化测试教程
- JUnit简单使用教程
- Junit使用教程(三)
- Junit使用教程(一)
- 在Myeclipse里使用Junit贴图教程