Centos 6.5安装oracle 11g
2016-11-12 13:57
525 查看
1.下载Centos 6.5 64位和oracle 11g 64位数据库软件
2.操作系统安装 (1).图形化界面安装 (2).系统分区 / 根分区(27G) /boot 安装oracle分区(512G) swap 交换分区(4G) (3).禁用防火墙 (4).禁用Selinuxoracle dba专业群 581851278
oracle rac专业群 476687362
3.配置网络和yum源
[root@oracle11g ~]# ping baidu.com
PING baidu.com (180.149.132.47) 56(84) bytes of data.
64 bytes from 180.149.132.47: icmp_seq=1 ttl=47 time=144 ms
64 bytes from 180.149.132.47: icmp_seq=2 ttl=47 time=62.8 ms
--- baidu.com ping statistics ---
2 packets transmitted, 2 received, 0% packet loss, time 1424ms
rtt min/avg/max/mdev = 62.828/103.529/144.230/40.701 ms
[root@oracle11g ~]# vim /etc/yum.repos.d/CentOS-Base.repo
baseurl=http://mirror.centos.org/centos/$releasever/updates/$basearch/ --这行全部取消注释
[root@oracle11g ~]# yum repolist
Loaded plugins: fastestmirror, refresh-packagekit, security
Loading mirror speeds from cached hostfile
* base: mirrors.btte.net
* centosplus: mirrors.cn99.com
* contrib: mirrors.cn99.com
* extras: mirrors.cn99.com
* updates: mirrors.cn99.com
repo id repo name status
base CentOS-6 - Base 6,696
centosplus CentOS-6 - Plus 52
contrib CentOS-6 - Contrib 0
extras CentOS-6 - Extras 62
updates CentOS-6 - Updates 581
repolist: 7,391
[root@oracle11g ~]#
4.安装依赖包
[root@oracle11g ~]# yum install -y binutils compat-libstdc++-33 elfutils-libelf elfutils-libelf-devel gcc gcc-c++ glibc glibc-common glibc-devel libaio libaio-devel libgcc libstdc++ libstdc++-devel make numactl sysstat libXp unixODBC unixODBC-devel -y
[root@oracle11g ~]#
5.修改内核参数
[root@oracle11g ~]# vim /etc/sysctl.conf
fs.file-max = 6815744
fs.aio-max-nr=1048576
kernel.shmall = 2097152
kernel.shmmax = 4127434752
kernel.shmmni = 4096
kernel.sem = 250 32000 100 128
net.ipv4.ip_local_port_range = 9000 65500
net.core.rmem_default = 262144
net.core.rmem_max = 4194304
net.core.wmem_default = 262144
net.core.wmem_max = 1048576
[root@oracle11g ~]# sysctl -p
6.用户对系统资源的限制
[root@oracle11g ~]# vim /etc/security/limits.conf
oracle soft nproc 2047
oracle hard nproc 16384
oracle soft nofile 1024
oracle hard nofile 65536
oracle soft stack 10240
[root@oracle11g ~]#
7.用户对shell的限制
[root@oracle11g ~]# vim /etc/profile
if [ $USER = "oracle" ]; then
if [ $SHELL = "/bin/ksh" ]; then
ulimit -p 16384
ulimit -n 65536
else
ulimit -u 16384 -n 65536
fi
fi
[root@oracle11g ~]#
8.添加用户登陆模块
[root@oracle11g ~]# vim /etc/pam.d/login
session required /lib/security/pam_limits.so
session required pam_limits.so
[root@oracle11g ~]#
9.主机与IP地址解析
[root@oracle11g ~]# vim /etc/hosts
192.168.3.20 oracle11g
10.创建用户与用户组
[root@oracle11g ~]# groupadd -g 500 oinstall
[root@oracle11g ~]# groupadd -g 501 dba
[root@oracle11g ~]# groupadd -g 502 oper
[root@oracle11g ~]# useradd -u 500 -g oinstall -G dba,oper oracle
[root@oracle11g ~]# chown -R oracle:oinstall /home/oracle
[root@oracle11g ~]# passwd oracle
Changing password for user oracle.
New password:
BAD PASSWORD: it is based on a dictionary word
BAD PASSWORD: is too simple
Retype new password:
passwd: all authentication tokens updated successfully.
[root@oracle11g ~]#
11.创建所需要要的目录和设置环境变量
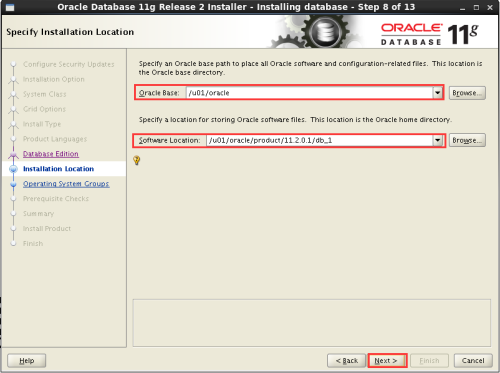
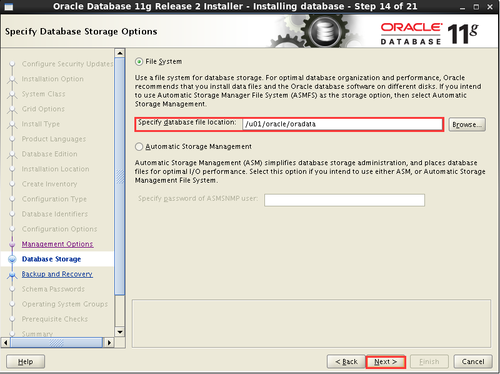
[root@oracle11g ~]# mkdir -p /u01/oracle/product/11.2.0.1/db_1
[root@oracle11g ~]# chown -R oracle:oinstall /u01
[root@oracle11g ~]# vim /home/oracle/.bash_profile
export ORACLE_BASE=/u01/oracle
export ORACLE_HOME=$ORACLE_BASE/product/11.2.0.1/db_1
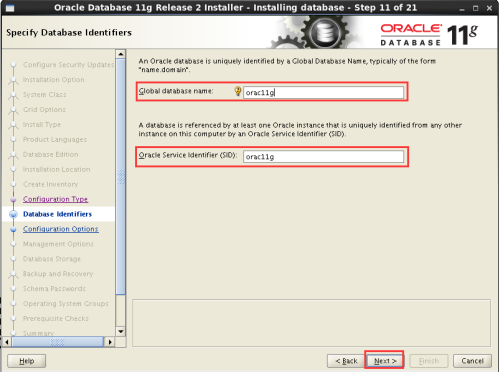
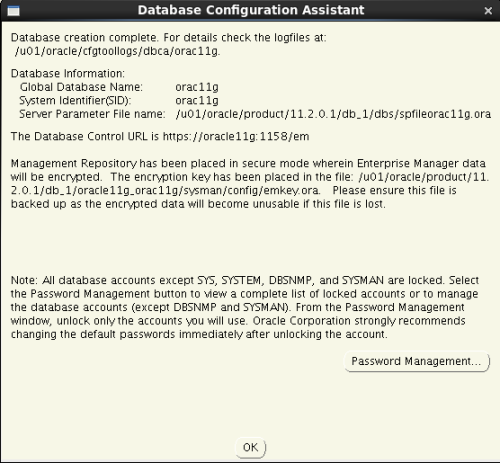
export ORACLE_SID=orac11g
export PATH=$ORACLE_HOME/bin:$PATH
[root@oracle11g ~]# . /home/oracle/.bash_profile
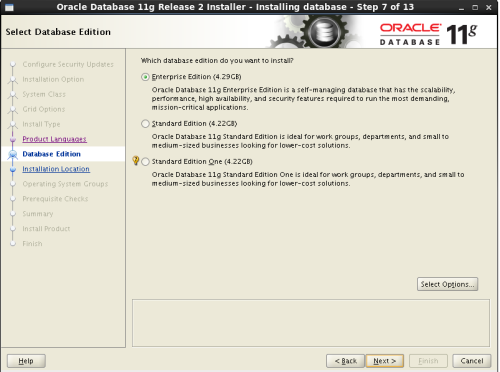
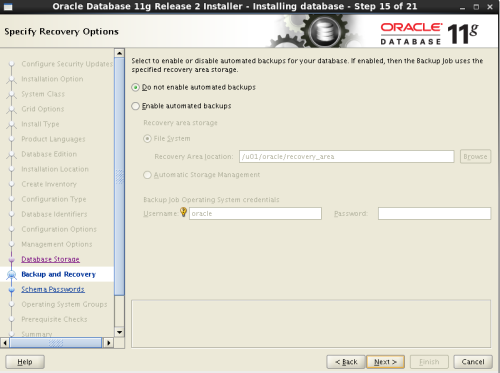
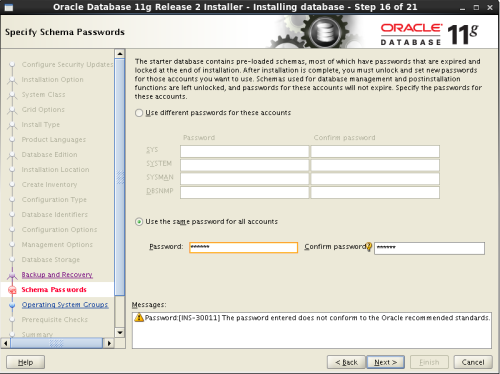
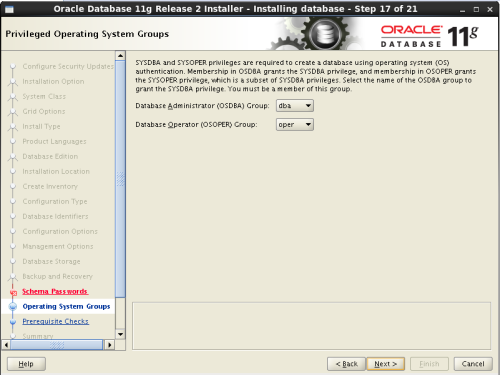
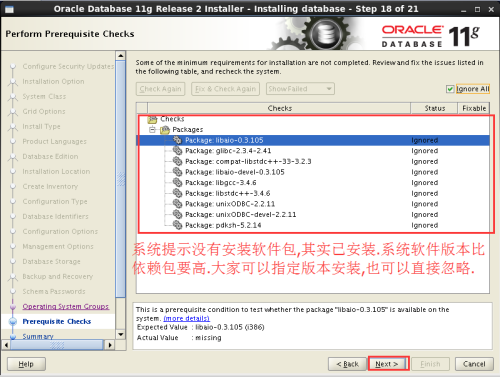
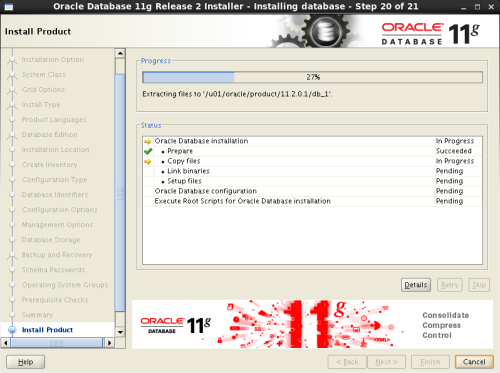
12.解压oracle 11g软件并安装
[root@oracle11g ~]# xhost +
access control disabled, clients can connect from any host
[root@oracle11g ~]# su - oracle
[oracle@oracle11g ~]$ unzip linux.x64_11gR2_database_1of2.zip
[oracle@oracle11g ~]$ unzip linux.x64_11gR2_database_2of2.zip
[oracle@oracle11g ~]$ cd database/
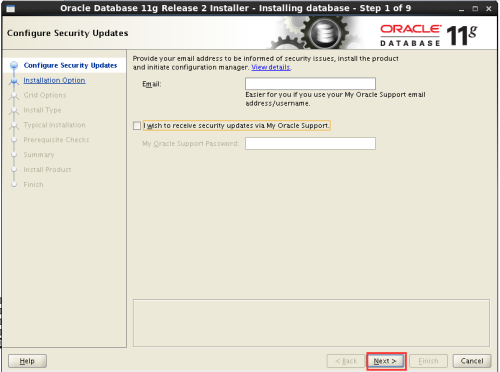
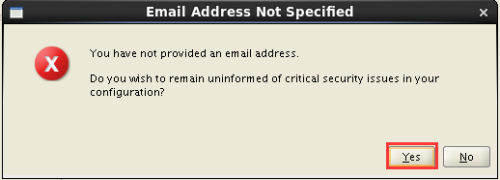
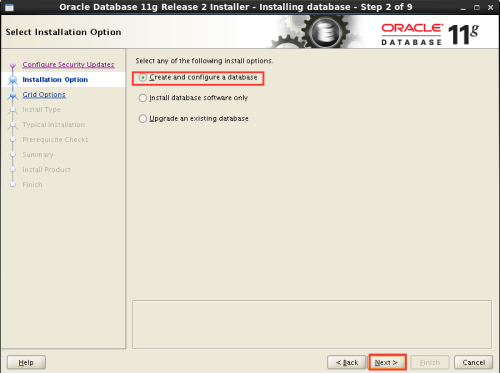
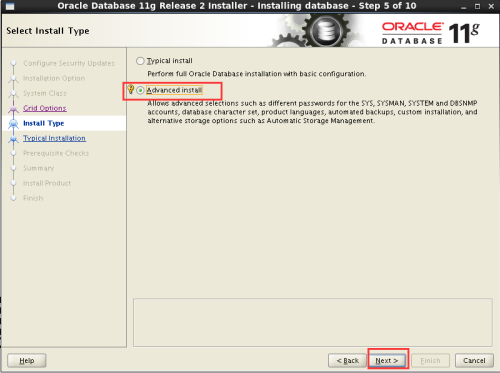
[oracle@oracle11g database]$ ./runInstaller


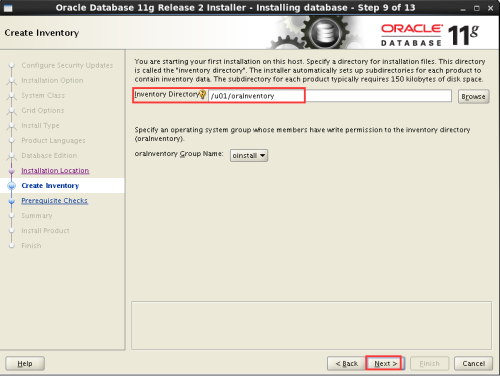


[root@oracle11g ~]# sh /u01/oraInventory/orainstRoot.sh
Changing permissions of /u01/oraInventory.
Adding read,write permissions for group.
Removing read,write,execute permissions for world.
Changing groupname of /u01/oraInventory to oinstall.
The execution of the script is complete.
[root@oracle11g ~]# sh /u01/oracle/product/11.2.0.1/db_1/root.sh
Running Oracle 11g root.sh script...
The following environment variables are set as:
ORACLE_OWNER= oracle
ORACLE_HOME= /u01/oracle/product/11.2.0.1/db_1
Enter the full pathname of the local bin directory: [/usr/local/bin]:
Copying dbhome to /usr/local/bin ...
Copying oraenv to /usr/local/bin ...
Copying coraenv to /usr/local/bin ...
Creating /etc/oratab file...
Entries will be added to the /etc/oratab file as needed by
Database Configuration Assistant when a database is created
Finished running generic part of root.sh script.
Now product-specific root actions will be performed.
Finished product-specific root actions.
[root@oracle11g ~]#
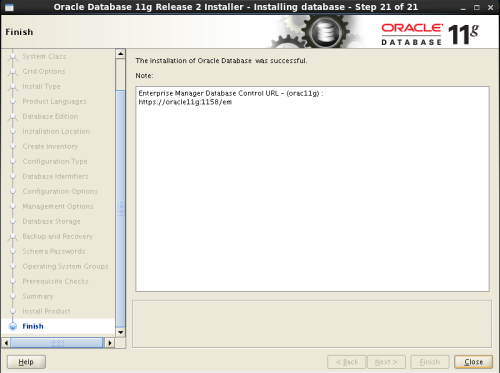
13.登陆oracle数据库
[oracle@oracle11g database]$ sqlplus / as sysdba
SQL*Plus: Release 11.2.0.1.0 Production on Sat Nov 12 23:22:35 2016
Copyright (c) 1982, 2009, Oracle. All rights reserved.
Connected to:
Oracle Database 11g Enterprise Edition Release 11.2.0.1.0 - 64bit Production
With the Partitioning, OLAP, Data Mining and Real Application Testing options
SQL> select * from dual;
D
-
X
SQL> select instance_name from v$instance;
INSTANCE_NAME
----------------
orac11g
SQL>
2.操作系统安装 (1).图形化界面安装 (2).系统分区 / 根分区(27G) /boot 安装oracle分区(512G) swap 交换分区(4G) (3).禁用防火墙 (4).禁用Selinuxoracle dba专业群 581851278
oracle rac专业群 476687362
3.配置网络和yum源
[root@oracle11g ~]# ping baidu.com
PING baidu.com (180.149.132.47) 56(84) bytes of data.
64 bytes from 180.149.132.47: icmp_seq=1 ttl=47 time=144 ms
64 bytes from 180.149.132.47: icmp_seq=2 ttl=47 time=62.8 ms
--- baidu.com ping statistics ---
2 packets transmitted, 2 received, 0% packet loss, time 1424ms
rtt min/avg/max/mdev = 62.828/103.529/144.230/40.701 ms
[root@oracle11g ~]# vim /etc/yum.repos.d/CentOS-Base.repo
baseurl=http://mirror.centos.org/centos/$releasever/updates/$basearch/ --这行全部取消注释
[root@oracle11g ~]# yum repolist
Loaded plugins: fastestmirror, refresh-packagekit, security
Loading mirror speeds from cached hostfile
* base: mirrors.btte.net
* centosplus: mirrors.cn99.com
* contrib: mirrors.cn99.com
* extras: mirrors.cn99.com
* updates: mirrors.cn99.com
repo id repo name status
base CentOS-6 - Base 6,696
centosplus CentOS-6 - Plus 52
contrib CentOS-6 - Contrib 0
extras CentOS-6 - Extras 62
updates CentOS-6 - Updates 581
repolist: 7,391
[root@oracle11g ~]#
4.安装依赖包
[root@oracle11g ~]# yum install -y binutils compat-libstdc++-33 elfutils-libelf elfutils-libelf-devel gcc gcc-c++ glibc glibc-common glibc-devel libaio libaio-devel libgcc libstdc++ libstdc++-devel make numactl sysstat libXp unixODBC unixODBC-devel -y
[root@oracle11g ~]#
5.修改内核参数
[root@oracle11g ~]# vim /etc/sysctl.conf
fs.file-max = 6815744
fs.aio-max-nr=1048576
kernel.shmall = 2097152
kernel.shmmax = 4127434752
kernel.shmmni = 4096
kernel.sem = 250 32000 100 128
net.ipv4.ip_local_port_range = 9000 65500
net.core.rmem_default = 262144
net.core.rmem_max = 4194304
net.core.wmem_default = 262144
net.core.wmem_max = 1048576
[root@oracle11g ~]# sysctl -p
6.用户对系统资源的限制
[root@oracle11g ~]# vim /etc/security/limits.conf
oracle soft nproc 2047
oracle hard nproc 16384
oracle soft nofile 1024
oracle hard nofile 65536
oracle soft stack 10240
[root@oracle11g ~]#
7.用户对shell的限制
[root@oracle11g ~]# vim /etc/profile
if [ $USER = "oracle" ]; then
if [ $SHELL = "/bin/ksh" ]; then
ulimit -p 16384
ulimit -n 65536
else
ulimit -u 16384 -n 65536
fi
fi
[root@oracle11g ~]#
8.添加用户登陆模块
[root@oracle11g ~]# vim /etc/pam.d/login
session required /lib/security/pam_limits.so
session required pam_limits.so
[root@oracle11g ~]#
9.主机与IP地址解析
[root@oracle11g ~]# vim /etc/hosts
192.168.3.20 oracle11g
10.创建用户与用户组
[root@oracle11g ~]# groupadd -g 500 oinstall
[root@oracle11g ~]# groupadd -g 501 dba
[root@oracle11g ~]# groupadd -g 502 oper
[root@oracle11g ~]# useradd -u 500 -g oinstall -G dba,oper oracle
[root@oracle11g ~]# chown -R oracle:oinstall /home/oracle
[root@oracle11g ~]# passwd oracle
Changing password for user oracle.
New password:
BAD PASSWORD: it is based on a dictionary word
BAD PASSWORD: is too simple
Retype new password:
passwd: all authentication tokens updated successfully.
[root@oracle11g ~]#
11.创建所需要要的目录和设置环境变量
[root@oracle11g ~]# mkdir -p /u01/oracle/product/11.2.0.1/db_1
[root@oracle11g ~]# chown -R oracle:oinstall /u01
[root@oracle11g ~]# vim /home/oracle/.bash_profile
export ORACLE_BASE=/u01/oracle
export ORACLE_HOME=$ORACLE_BASE/product/11.2.0.1/db_1
export ORACLE_SID=orac11g
export PATH=$ORACLE_HOME/bin:$PATH
[root@oracle11g ~]# . /home/oracle/.bash_profile
12.解压oracle 11g软件并安装
[root@oracle11g ~]# xhost +
access control disabled, clients can connect from any host
[root@oracle11g ~]# su - oracle
[oracle@oracle11g ~]$ unzip linux.x64_11gR2_database_1of2.zip
[oracle@oracle11g ~]$ unzip linux.x64_11gR2_database_2of2.zip
[oracle@oracle11g ~]$ cd database/
[oracle@oracle11g database]$ ./runInstaller
[root@oracle11g ~]# sh /u01/oraInventory/orainstRoot.sh
Changing permissions of /u01/oraInventory.
Adding read,write permissions for group.
Removing read,write,execute permissions for world.
Changing groupname of /u01/oraInventory to oinstall.
The execution of the script is complete.
[root@oracle11g ~]# sh /u01/oracle/product/11.2.0.1/db_1/root.sh
Running Oracle 11g root.sh script...
The following environment variables are set as:
ORACLE_OWNER= oracle
ORACLE_HOME= /u01/oracle/product/11.2.0.1/db_1
Enter the full pathname of the local bin directory: [/usr/local/bin]:
Copying dbhome to /usr/local/bin ...
Copying oraenv to /usr/local/bin ...
Copying coraenv to /usr/local/bin ...
Creating /etc/oratab file...
Entries will be added to the /etc/oratab file as needed by
Database Configuration Assistant when a database is created
Finished running generic part of root.sh script.
Now product-specific root actions will be performed.
Finished product-specific root actions.
[root@oracle11g ~]#
13.登陆oracle数据库
[oracle@oracle11g database]$ sqlplus / as sysdba
SQL*Plus: Release 11.2.0.1.0 Production on Sat Nov 12 23:22:35 2016
Copyright (c) 1982, 2009, Oracle. All rights reserved.
Connected to:
Oracle Database 11g Enterprise Edition Release 11.2.0.1.0 - 64bit Production
With the Partitioning, OLAP, Data Mining and Real Application Testing options
SQL> select * from dual;
D
-
X
SQL> select instance_name from v$instance;
INSTANCE_NAME
----------------
orac11g
SQL>

相关文章推荐
- Centos6.5 x86_64下 静默安装Oracle 11g R2
- 安装平台centos6.5 + oracle 11g
- 新手教你centOS 6.5下面如何安装Oracle 11g(通用版)
- Centos6.5安装oracle 11G
- CentOS 6.5_x64安装Oracle 11g R2
- Centos6.5安装JDK8+tomcat8.0.22+oracle-11g
- Centos6.5 下 本地Oracle 11g R2 x86安装
- CentOS 6.5 无界面安装 Oracle 11g R2
- CentOS 6.5 安装Oracle 11g R2
- CentOS 6.5_x64安装Oracle 11g R2
- Oracle 11g r2 linux centos 6.5 安装配置教程(多图超详细)
- Oracle ASM + 11g R2 + Centos 6.5 安装
- Centos 6.5 X86_64 安装oracle 11g rac,采用ASMlib创建asm磁盘
- CentOS 6.5_x64安装Oracle 11g R2 亲测
- Centos 6.5 X86_64 安装oracle 11g rac,采用ASMlib创建asm磁盘
- CentOS6.5 静默安装Oracle 11g过程中提示:Exception in thread “main” java.lang.NoClassDefFoundError
- Centos6.5安装JDK8+tomcat8.0.22+oracle-11g
- Centos6.5安装oracle 11G
- Centos 6.5安装oracle 11g