Android 仿支付宝支付密码输入框
2016-11-11 16:52
501 查看
看到网友:http://www.jointforce.com/jfperiodical/article/3527?ref=myread 做的仿支付宝支付密码输入框,感觉挺适合初学自定义view的同仁练手的,自己敲了一下,并进行了改进!
1、添加了自定义属性
2、接口回调
这边直接上代码了:
values/attrs.xml文件:
<resources>
<declare-styleable name="PassWordEditText">
<attr name="bound_line_color" format="color" />
<attr name="parting_line_color" format="color" />
<attr name="point_color" format="color" />
</declare-styleable>
</resources>
自定义view:
/**
* 固定密码长度输入框
*
* @author 21778 . 2016-11-09 11:34
*/
public class PassWordEditText extends EditText {
private Paint mBoundPaint;//外边框画笔
private Paint mLinePaint;//分割线画笔
private Paint mPsdPointPaint;//密码画笔
private int boundPaintColor;
private int partLineColor;
private int psdPointColor;
private int mPasswordTextLength;//输入密码的长度
private int mWidth;
private int mHeight;
private static final int psdLength = 6;//密码长度
private static final int psdPointR = 16;//小圆点半径
private OnTextEndListener onTextEndListener;
public void setOnTextEndListener(OnTextEndListener onTextEndListener) {
this.onTextEndListener = onTextEndListener;
}
public PassWordEditText(Context context) {
this(context, null);
}
public PassWordEditText(Context context, AttributeSet attrs) {
this(context, attrs, 0);
}
public PassWordEditText(Context context, AttributeSet attrs, int defStyleAttr) {
super(context, attrs, defStyleAttr);
TypedArray typedArray = context.obtainStyledAttributes(attrs, R.styleable.PassWordEditText);
boundPaintColor = typedArray.getColor(R.styleable.PassWordEditText_bound_line_color, Color.WHITE);
partLineColor = typedArray.getColor(R.styleable.PassWordEditText_parting_line_color, Color.GRAY);
psdPointColor = typedArray.getColor(R.styleable.PassWordEditText_point_color, Color.BLACK);
init();
}
private void init() {
//设置获取焦点
setFocusable(true);
setFocusableInTouchMode(true);
//移除自带光标
setCursorVisible(false);
mBoundPaint = new Paint();
mBoundPaint.setStrokeWidth(8);
mBoundPaint.setAntiAlias(true);
mBoundPaint.setColor(boundPaintColor);
//实心矩形为了覆盖编辑框原有的字符串,有兴趣的同仁可以设置为空心矩形试一下
// mBoundPaint.setStyle(Paint.Style.STROKE);
mBoundPaint.setStyle(Paint.Style.FILL);
mLinePaint = new Paint();
mLinePaint.setStrokeWidth(4);
mLinePaint.setAntiAlias(true);
mLinePaint.setColor(partLineColor);
mPsdPointPaint = new Paint();
mPsdPointPaint.setStrokeWidth(12);
mPsdPointPaint.setAntiAlias(true);
mPsdPointPaint.setColor(psdPointColor);
}
@Override
protected void onDraw(Canvas canvas) {
super.onDraw(canvas);
mWidth = getMeasuredWidth();
mHeight = getMeasuredHeight();
drawRoundRect(canvas);
drawPsdLine(canvas);
drawPsdPoints(canvas);
}
/**
* 画圆角边框
*
* @param canvas
*/
@TargetApi(Build.VERSION_CODES.LOLLIPOP)
private void drawRoundRect(Canvas canvas) {
canvas.drawRoundRect(0, 0, mWidth, mHeight, 12, 12, mBoundPaint);
}
/**
* 画密码分割线
*
* @param canvas
*/
private void drawPsdLine(Canvas canvas) {
for (int i = 1; i < psdLength; i++) {
float mX = mWidth * i / psdLength;
canvas.drawLine(mX, 12, mX, mHeight - 12, mLinePaint);
}
}
/**
* 绘画密码点
*
* @param canvas
*/
private void drawPsdPoints(Canvas canvas) {
float cx, cy = mHeight / 2;
float half = mWidth / psdLength;
for (int i = 0; i < mPasswordTextLength; i++) {
cx = half / 2 + half * i;
canvas.drawCircle(cx, cy, psdPointR, mPsdPointPaint);
}
}
@Override
protected void onTextChanged(CharSequence text, int start, int lengthBefore, int lengthAfter) {
super.onTextChanged(text, start, lengthBefore, lengthAfter);
mPasswordTextLength = text.toString().length();
if (mPasswordTextLength == psdLength) {//这边可以做接口回调,或者用过eventBus的同仁们进行事件发布
if (onTextEndListener != null) {
onTextEndListener.onTextEndListener(text.toString());
}
return;
}
invalidate();
}
public interface OnTextEndListener {
void onTextEndListener(String textString);
}
}布局文件:
<?xml version="1.0" encoding="utf-8"?>
<LinearLayout xmlns:android="http://schemas.android.com/apk/res/android"
xmlns:cyj="http://schemas.android.com/apk/res-auto"
xmlns:tools="http://schemas.android.com/tools"
android:id="@+id/activity_main"
android:layout_width="match_parent"
android:layout_height="match_parent"
android:orientation="vertical"
android:paddingBottom="@dimen/activity_vertical_margin"
android:paddingLeft="@dimen/activity_horizontal_margin"
android:paddingRight="@dimen/activity_horizontal_margin"
android:paddingTop="@dimen/activity_vertical_margin"
tools:context="com.aomai.selfviews.MainActivity">
<com.aomai.selfviews.views.PassWordEditText
android:id="@+id/pw_et"
android:layout_width="match_parent"
android:layout_height="45dp"
cyj:bound_line_color="@android:color/white"
cyj:parting_line_color="@android:color/holo_red_dark"
cyj:point_color="@android:color/black" />
</LinearLayout>
最后是效果图:
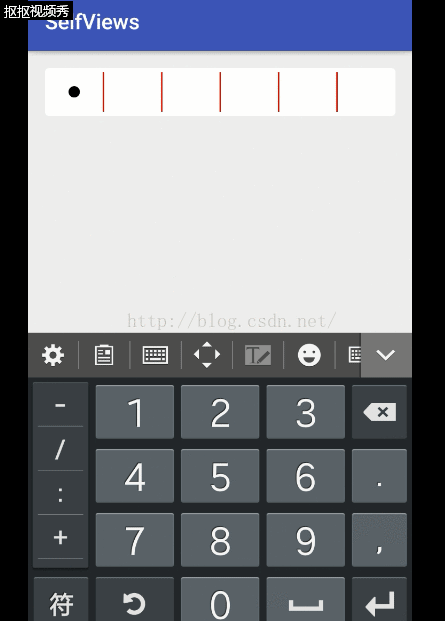
发一下牢骚:截gif图就是麻烦,要先截视频,然后在转gif!
1、添加了自定义属性
2、接口回调
这边直接上代码了:
values/attrs.xml文件:
<resources>
<declare-styleable name="PassWordEditText">
<attr name="bound_line_color" format="color" />
<attr name="parting_line_color" format="color" />
<attr name="point_color" format="color" />
</declare-styleable>
</resources>
自定义view:
/**
* 固定密码长度输入框
*
* @author 21778 . 2016-11-09 11:34
*/
public class PassWordEditText extends EditText {
private Paint mBoundPaint;//外边框画笔
private Paint mLinePaint;//分割线画笔
private Paint mPsdPointPaint;//密码画笔
private int boundPaintColor;
private int partLineColor;
private int psdPointColor;
private int mPasswordTextLength;//输入密码的长度
private int mWidth;
private int mHeight;
private static final int psdLength = 6;//密码长度
private static final int psdPointR = 16;//小圆点半径
private OnTextEndListener onTextEndListener;
public void setOnTextEndListener(OnTextEndListener onTextEndListener) {
this.onTextEndListener = onTextEndListener;
}
public PassWordEditText(Context context) {
this(context, null);
}
public PassWordEditText(Context context, AttributeSet attrs) {
this(context, attrs, 0);
}
public PassWordEditText(Context context, AttributeSet attrs, int defStyleAttr) {
super(context, attrs, defStyleAttr);
TypedArray typedArray = context.obtainStyledAttributes(attrs, R.styleable.PassWordEditText);
boundPaintColor = typedArray.getColor(R.styleable.PassWordEditText_bound_line_color, Color.WHITE);
partLineColor = typedArray.getColor(R.styleable.PassWordEditText_parting_line_color, Color.GRAY);
psdPointColor = typedArray.getColor(R.styleable.PassWordEditText_point_color, Color.BLACK);
init();
}
private void init() {
//设置获取焦点
setFocusable(true);
setFocusableInTouchMode(true);
//移除自带光标
setCursorVisible(false);
mBoundPaint = new Paint();
mBoundPaint.setStrokeWidth(8);
mBoundPaint.setAntiAlias(true);
mBoundPaint.setColor(boundPaintColor);
//实心矩形为了覆盖编辑框原有的字符串,有兴趣的同仁可以设置为空心矩形试一下
// mBoundPaint.setStyle(Paint.Style.STROKE);
mBoundPaint.setStyle(Paint.Style.FILL);
mLinePaint = new Paint();
mLinePaint.setStrokeWidth(4);
mLinePaint.setAntiAlias(true);
mLinePaint.setColor(partLineColor);
mPsdPointPaint = new Paint();
mPsdPointPaint.setStrokeWidth(12);
mPsdPointPaint.setAntiAlias(true);
mPsdPointPaint.setColor(psdPointColor);
}
@Override
protected void onDraw(Canvas canvas) {
super.onDraw(canvas);
mWidth = getMeasuredWidth();
mHeight = getMeasuredHeight();
drawRoundRect(canvas);
drawPsdLine(canvas);
drawPsdPoints(canvas);
}
/**
* 画圆角边框
*
* @param canvas
*/
@TargetApi(Build.VERSION_CODES.LOLLIPOP)
private void drawRoundRect(Canvas canvas) {
canvas.drawRoundRect(0, 0, mWidth, mHeight, 12, 12, mBoundPaint);
}
/**
* 画密码分割线
*
* @param canvas
*/
private void drawPsdLine(Canvas canvas) {
for (int i = 1; i < psdLength; i++) {
float mX = mWidth * i / psdLength;
canvas.drawLine(mX, 12, mX, mHeight - 12, mLinePaint);
}
}
/**
* 绘画密码点
*
* @param canvas
*/
private void drawPsdPoints(Canvas canvas) {
float cx, cy = mHeight / 2;
float half = mWidth / psdLength;
for (int i = 0; i < mPasswordTextLength; i++) {
cx = half / 2 + half * i;
canvas.drawCircle(cx, cy, psdPointR, mPsdPointPaint);
}
}
@Override
protected void onTextChanged(CharSequence text, int start, int lengthBefore, int lengthAfter) {
super.onTextChanged(text, start, lengthBefore, lengthAfter);
mPasswordTextLength = text.toString().length();
if (mPasswordTextLength == psdLength) {//这边可以做接口回调,或者用过eventBus的同仁们进行事件发布
if (onTextEndListener != null) {
onTextEndListener.onTextEndListener(text.toString());
}
return;
}
invalidate();
}
public interface OnTextEndListener {
void onTextEndListener(String textString);
}
}布局文件:
<?xml version="1.0" encoding="utf-8"?>
<LinearLayout xmlns:android="http://schemas.android.com/apk/res/android"
xmlns:cyj="http://schemas.android.com/apk/res-auto"
xmlns:tools="http://schemas.android.com/tools"
android:id="@+id/activity_main"
android:layout_width="match_parent"
android:layout_height="match_parent"
android:orientation="vertical"
android:paddingBottom="@dimen/activity_vertical_margin"
android:paddingLeft="@dimen/activity_horizontal_margin"
android:paddingRight="@dimen/activity_horizontal_margin"
android:paddingTop="@dimen/activity_vertical_margin"
tools:context="com.aomai.selfviews.MainActivity">
<com.aomai.selfviews.views.PassWordEditText
android:id="@+id/pw_et"
android:layout_width="match_parent"
android:layout_height="45dp"
cyj:bound_line_color="@android:color/white"
cyj:parting_line_color="@android:color/holo_red_dark"
cyj:point_color="@android:color/black" />
</LinearLayout>
最后是效果图:
发一下牢骚:截gif图就是麻烦,要先截视频,然后在转gif!

相关文章推荐
- Android仿支付宝支付密码输入框
- 安卓/Android 模仿支付宝/微信 支付密码输入框的自定义View
- Android 支付宝支付密码输入界面
- Android自定义控件开发系列(三)——仿支付宝六位支付密码输入页面
- android中6个EditText输入验证码(仿支付宝支付输入密码框)
- Android仿支付宝支付密码输入框
- Android自定义控件开发系列——仿支付宝六位支付密码输入
- Android仿支付宝支付密码输入框
- Android的支付密码输入框实现浅析
- js仿支付宝填写支付密码效果实现多方框输入密码
- Android自定义类似支付宝密码输入的控件
- Android支付密码输入框【转】
- android:仿支付宝/微信的密码输入框效果
- Android 仿微信/支付宝的密码输入框效果(一)
- 仿微信/支付宝的密码输入框效果 android
- Archlinux下firefox无法使用支付宝控件(aliedit)输入密码/进行支付的解决办法
- GridPasswordView 类似支付宝支付密码输入框
- js仿支付宝多方框输入支付密码效果
- 仿微信/支付宝的密码输入框效果 android
- [Android UI开发] 仿微信/支付宝的密码输入框效果:GridPasswordView