Android 图片模糊、高斯模糊、毛玻璃的三种实现方法
2016-11-10 17:29
435 查看
转载自:http://blog.csdn.net/fan7983377/article/details/51568059
效果图:
原文链接:点击访问
这使用也很简单,导入依赖,使用模糊方法就行,就这两步搞定
依赖:
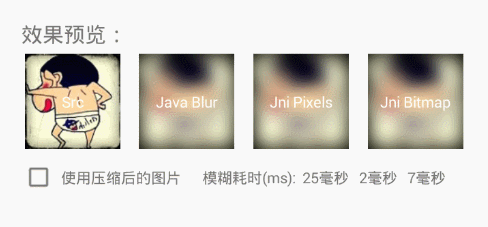
实现方法有三种,第一个是Java实现的,第二个和第三个是调用C语言实现的
,具体的区别也就是代码执行的耗时操作时间,从图片中可以看出java使用时间远大于c运行的时间。
可以通过改变radius的值来改变模糊度,值越大,模糊度越大,radius<=0时则图片不显示;一般radius的值以20左右为佳!
另外附上 ImageView 转换 Bitmap 的方法
效果图:
原文链接:点击访问
这使用也很简单,导入依赖,使用模糊方法就行,就这两步搞定
依赖:
<code class="hljs bash has-numbering" style="display: block; padding: 0px; color: inherit; box-sizing: border-box; font-family: 'Source Code Pro', monospace;font-size:undefined; white-space: pre; border-radius: 0px; word-wrap: normal; background: transparent;">compile <span class="hljs-string" style="color: rgb(0, 136, 0); box-sizing: border-box;">'net.qiujuer.genius:blur:2.0.0-beta4'</span></code><ul class="pre-numbering" style="box-sizing: border-box; position: absolute; width: 50px; top: 0px; left: 0px; margin: 0px; padding: 6px 0px 40px; border-right-width: 1px; border-right-style: solid; border-right-color: rgb(221, 221, 221); list-style: none; text-align: right; background-color: rgb(238, 238, 238);"><li style="box-sizing: border-box; padding: 0px 5px;">1</li></ul><ul class="pre-numbering" style="box-sizing: border-box; position: absolute; width: 50px; top: 0px; left: 0px; margin: 0px; padding: 6px 0px 40px; border-right-width: 1px; border-right-style: solid; border-right-color: rgb(221, 221, 221); list-style: none; text-align: right; background-color: rgb(238, 238, 238);"><li style="box-sizing: border-box; padding: 0px 5px;">1</li></ul>
实现方法有三种,第一个是Java实现的,第二个和第三个是调用C语言实现的
,具体的区别也就是代码执行的耗时操作时间,从图片中可以看出java使用时间远大于c运行的时间。
可以通过改变radius的值来改变模糊度,值越大,模糊度越大,radius<=0时则图片不显示;一般radius的值以20左右为佳!
// Java
Bitmap newBitmap = StackBlur.blur(mBitmap, (int) radius, false);

// Bitmap JNI Native
Bitmap newBitmap = StackBlur.blurNatively(mBitmap, (int) radius, false);

// Pixels JNI Native
Bitmap newBitmap = StackBlur.blurNativelyPixels(mBitmap, (int) radius, false);
另外附上 ImageView 转换 Bitmap 的方法
img_f = (ImageView) findViewById(R.id.img_f);
img_new = (ImageView) findViewById(R.id.img_new);

Bitmap mBitmap = ((BitmapDrawable) ((ImageView) img_f).getDrawable()).getBitmap();
// Bitmap JNI Native
Bitmap newBitmap = StackBlur.blurNatively(mBitmap, (int) 50, false);
img_new.setImageBitmap(newBitmap);

相关文章推荐
- Android 图片模糊、高斯模糊、毛玻璃的三种实现方法
- Android 实现图片模糊、高斯模糊、毛玻璃效果的三种方法
- Android 图片模糊、高斯模糊、毛玻璃的三种实现方法
- Android 图片模糊、高斯模糊、毛玻璃的三种实现方法
- Android 图片模糊、高斯模糊、毛玻璃的三种实现方法
- Android 图片模糊、高斯模糊、毛玻璃的三种实现方法
- Android实现图片 高斯模糊,以及图片镜像 翻转。
- Android图片实现模糊的一些方法
- Android 实现图片轮播的三种方法
- [Android]-图片JNI(C++\Java)高斯模糊的实现与比较
- [Android]-图片JNI(C++\Java)高斯模糊的实现与比較
- android实现图片圆角化实现三种方法
- [Android]-图片JNI(C++\Java)高斯模糊的实现与比较
- [Android]-图片JNI(C++\Java)高斯模糊的实现与比较
- [Android]-图片JNI(C++)高斯模糊的实现与比较
- Android利用RenderScript对图片处理实现高斯模糊效果。
- iOS毛玻璃效果的实现及图片模糊效果的三种方法
- [Android]-图片JNI(C++\Java)高斯模糊的实现与比较
- iOS 毛玻璃效果和高斯图片模糊实现
- Android实现图片转高斯模糊以及高斯模糊布局