OpenCV基本的阈值操作
2016-11-09 22:25
441 查看
目的:
使用OpenCV 中的函数cv::threshold实现阈值操作理论:
阈值?1) 最简单的分割方法
2) 应用实例:从图像中分割出我们要分析的对象区域。这种分离基于对象的像素和背景像素之间的强度的变化实现。
3) 为了区分我们感兴趣的像素(which will eventually be rejected),我们将用每一个像素的值和threshold比较(依据要解决的问题确定)。
4) 一旦我们正确的分离出重要的像素,我们可以将这些像素的值设置成一个确定的值来确定它们(例如,可以用0表示黑色,255表示白色或任何你需要的值)。

阈值的类型
1) 基于OpenCV中的函数cv::threshold可以进行5中阈值类型。2) 为了说明阈值操作如何工作, 考虑我们有一个原图,图像像素的灰度值为
src(x,y).
如下图描绘蓝色的水平线表示阈值
thresh
(固定值).
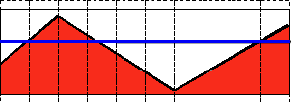
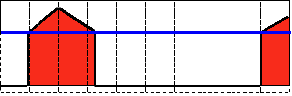
阈值二值化
这个阈值操作可以表示为:
如果src(x,y)的像素值大于thresh,像素值将被设置成MaxVal.反之设置成0.
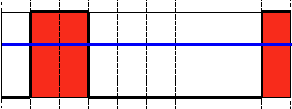
反向阈值二值化
这个阈值操作可以表示为:
如果src(x,y)的像素值大于thresh,像素值将被设置成0.反之设置成MaxVal.
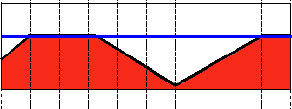
截断
这个阈值操作可以表示为:
图像最大的像素值为thresh,如果src(x,y)的像素值大于阈值,像素值将会被截断为阈值.如下图所示:
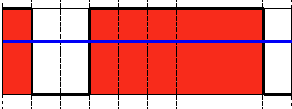
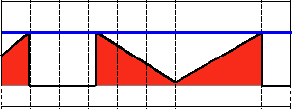
低于阈值零化
这个阈值操作可以表示为:
如果src(x,y)的像素值低于thresh,像素的值将会被设置成0.
反向低于阈值零化
这个阈值操作可以表示为:
如果src(x,y)的像素值大于thresh,像素的值会设置成0.
/**
* @file Threshold.cpp
* @brief Sample code that shows how to use the diverse threshold options offered by OpenCV
* @author OpenCV team
*/

#include "opencv2/imgproc.hpp"
#include "opencv2/imgcodecs.hpp"
#include "opencv2/highgui.hpp"

using namespace cv;

/// Global variables

int threshold_value = 0;
int threshold_type = 3;
int const max_value = 255;
int const max_type = 4;
int const max_BINARY_value = 255;

Mat src, src_gray, dst;
const char* window_name = "Threshold Demo";

const char* trackbar_type = "Type: \n 0: Binary \n 1: Binary Inverted \n 2: Truncate \n 3: To Zero \n 4: To Zero Inverted";
const char* trackbar_value = "Value";

/// Function headers
void Threshold_Demo( int, void* );

/**
* @function main
*/
int main( int, char** argv )
{
//! [load]
src = imread( argv[1], IMREAD_COLOR ); // Load an image

if( src.empty() )  return -1;

cvtColor( src, src_gray, COLOR_BGR2GRAY ); // Convert the image to Gray
//! [load]

//! [window]
namedWindow( window_name, WINDOW_AUTOSIZE ); // Create a window to display results
//! [window]

//! [trackbar]
createTrackbar( trackbar_type,
window_name, &threshold_type,
max_type, Threshold_Demo ); // Create Trackbar to choose type of Threshold

createTrackbar( trackbar_value,
window_name, &threshold_value,
max_value, Threshold_Demo ); // Create Trackbar to choose Threshold value
//! [trackbar]

Threshold_Demo( 0, 0 ); // Call the function to initialize

/// Wait until user finishes program
for(;;)
{
int c;
c = waitKey( 20 );
if( (char)c == 27 ) break;
}

}

//![Threshold_Demo]
/**
* @function Threshold_Demo
*/
void Threshold_Demo( int, void* )
{
/* 0: Binary
1: Binary Inverted
2: Threshold Truncated
3: Threshold to Zero
4: Threshold to Zero Inverted
*/

threshold( src_gray, dst, threshold_value, max_BINARY_value,threshold_type );

imshow( window_name, dst );
}
//![Threshold_Demo]
结果
1)原图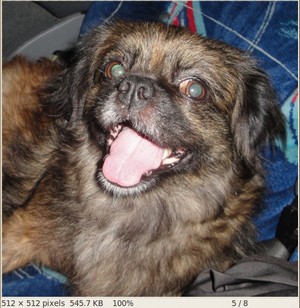
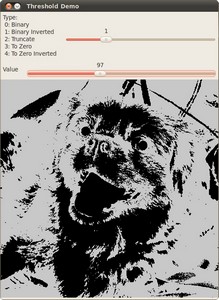
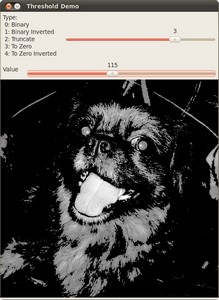
2)对原图像使用反向阈值二值化。图像中doggie的舌头和眼睛比较亮,像素值大于阈值所以显示成黑色。sh
3)使用低于阈值零化操作。低于阈值的像素将会变成全黑,大于阈值的像素不变。如下图所示:

相关文章推荐
- opencv c++函数 imgproc模块 5 基本的阈值操作
- opencv学习笔记--基本阈值操作
- OpenCV学习13--基本阈值操作
- 【opencv练习18 - 基本阈值操作】
- (23)Air Band OpenCV2.4.13_基本阈值操作
- OpenCV学习第十五篇:基本阈值操作
- OpenCV之imgproc 模块. 图像处理(1)图像平滑处理 腐蚀与膨胀(Eroding and Dilating) 更多形态学变换 图像金字塔 基本的阈值操作
- opencv学习(二十八)之基本图像阈值操作threshold
- 逐步积累openCV基本操作
- Python & OpenCV 图像基本操作
- opencv-基础阈值操作
- OpenCV 编程简介(矩阵/图像/视频的基本读写操作)
- openCV2基本操作1
- OpenCV 编程简介(矩阵/图像/视频的基本读写操作)
- Opencv2系列学习笔记1(图像的基本操作)
- opencv2.3图像基本操作
- opencv基本操作
- OpenCV 编程简介(矩阵/图像/视频的基本读写操作)
- 【OpenCV学习】矩阵基本操作
- OpenCV 编程简介(矩阵/图像/视频的基本读写操作)