Android:关灯游戏简单闯关
2016-11-05 13:54
211 查看
Demo地址:http://download.csdn.net/detail/yyn_12138/9673802
今天来实现一下5*5的关灯游戏, 其中内置一个不可以点击的石头来增加一下闯关难度
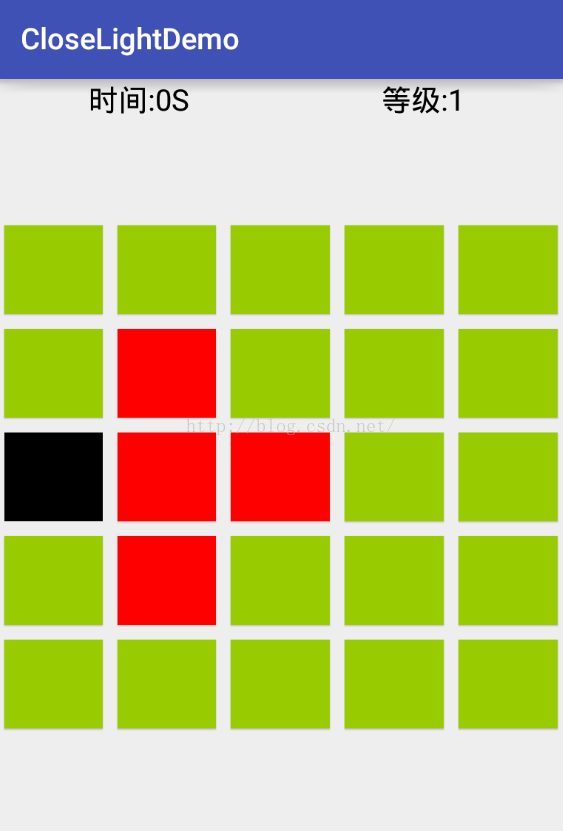
先来铺一下布局的代码, 让大家先对其有个直观的认识
下面就是关卡问题了, 如果一关一个activity就会浪费资源浪费, 而且麻烦, 现在可以直接改变这个activity的视图就OK了, 很简单, 跳转自己就可以了, 别忘了传递一个参数, 设置level
然后根据关卡设置每关起始的亮灯位置
其中要注意, 随机数的生成有一定的几率让随机数相同, 然后导致本关最后没有亮着的灯, 会导致Dialog空指针, 为解决这个问题, 引入一个Boolean, 最后根据亮灯的数量和Boolean综合判断是否弹出Dialog
计时的问题通过一个线程来实现, 就不写了, 其他小问题如有有疑问请下载demo
希望多多支持!!!
今天来实现一下5*5的关灯游戏, 其中内置一个不可以点击的石头来增加一下闯关难度
先来铺一下布局的代码, 让大家先对其有个直观的认识
<?xml version="1.0" encoding="utf-8"?>
<LinearLayout xmlns:android="http://schemas.android.com/apk/res/android"
android:layout_width="match_parent"
android:layout_height="match_parent"
android:id="@+id/close_light_ll"
android:orientation="vertical">

<LinearLayout
android:orientation="horizontal"
android:layout_width="match_parent"
android:layout_height="wrap_content">
<TextView
android:id="@+id/close_light_count"
android:layout_width="0dp"
android:layout_height="wrap_content"
android:gravity="center_horizontal"
android:textColor="#000"
android:layout_weight="1"
android:textSize="20sp"
android:text="时间:0"/>
<TextView
android:id="@+id/close_light_level"
android:layout_width="0dp"
android:layout_weight="1"
android:gravity="center_horizontal"
android:textColor="#000"
android:layout_height="wrap_content"
android:text="等级"
android:textSize="20sp"/>
</LinearLayout>

<LinearLayout
android:layout_width="match_parent"
android:layout_height="0dp"
android:layout_weight="1"
android:gravity="center"
android:orientation="vertical">

<LinearLayout
android:layout_width="match_parent"
android:layout_height="wrap_content"
android:orientation="horizontal">

<Button
android:id="@+id/button_1"
style="@style/button"
android:background="@android:color/holo_green_light"
android:tag="1" />

<Button
android:id="@+id/button_2"
style="@style/button"
android:background="@android:color/holo_green_light"
android:tag="2" />

<Button
android:id="@+id/button_3"
style="@style/button"
android:background="@android:color/holo_green_light"
android:tag="3" />

<Button
android:id="@+id/button_4"
style="@style/button"
android:background="@android:color/holo_green_light"
android:tag="4" />

<Button
android:id="@+id/button_5"
style="@style/button"
android:background="@android:color/holo_green_light"
android:tag="5" />

</LinearLayout>

<LinearLayout
android:layout_width="match_parent"
android:layout_height="wrap_content"
android:orientation="horizontal">

<Button
android:id="@+id/button_6"
style="@style/button"
android:background="@android:color/holo_green_light"
android:tag="6" />

<Button
android:id="@+id/button_7"
style="@style/button"
android:background="@android:color/holo_green_light"
android:tag="7" />

<Button
android:id="@+id/button_8"
style="@style/button"
android:background="@android:color/holo_green_light"
android:tag="8" />

<Button
android:id="@+id/button_9"
style="@style/button"
android:background="@android:color/holo_green_light"
android:tag="9" />

<Button
android:id="@+id/button_10"
style="@style/button"
android:background="@android:color/holo_green_light"
android:tag="10" />

</LinearLayout>

<LinearLayout
android:layout_width="match_parent"
android:layout_height="wrap_content"
android:orientation="horizontal">

<Button
android:id="@+id/button_11"
style="@style/button"
android:background="@android:color/holo_green_light"
android:tag="11" />

<Button
android:id="@+id/button_12"
style="@style/button"
android:background="@android:color/holo_green_light"
android:tag="12" />

<Button
android:id="@+id/button_13"
style="@style/button"
android:background="@android:color/holo_green_light"
android:tag="13" />

<Button
android:id="@+id/button_14"
style="@style/button"
android:background="@android:color/holo_green_light"
android:tag="14" />

<Button
android:id="@+id/button_15"
style="@style/button"
android:background="@android:color/holo_green_light"
android:tag="15" />

</LinearLayout>

<LinearLayout
android:layout_width="match_parent"
android:layout_height="wrap_content"
android:orientation="horizontal">

<Button
android:id="@+id/button_16"
style="@style/button"
android:background="@android:color/holo_green_light"
android:tag="16" />

<Button
android:id="@+id/button_17"
style="@style/button"
android:background="@android:color/holo_green_light"
android:tag="17" />

<Button
android:id="@+id/button_18"
style="@style/button"
android:background="@android:color/holo_green_light"
android:tag="18" />

<Button
android:id="@+id/button_19"
style="@style/button"
android:background="@android:color/holo_green_light"
android:tag="19" />

<Button
android:id="@+id/button_20"
style="@style/button"
android:background="@android:color/holo_green_light"
android:tag="20" />

</LinearLayout>

<LinearLayout
android:layout_width="match_parent"
android:layout_height="wrap_content"
android:orientation="horizontal">

<Button
android:id="@+id/button_21"
style="@style/button"
android:background="@android:color/holo_green_light"
android:tag="21" />

<Button
android:id="@+id/button_22"
style="@style/button"
android:background="@android:color/holo_green_light"
android:tag="22" />

<Button
android:id="@+id/button_23"
style="@style/button"
android:background="@android:color/holo_green_light"
android:tag="23" />

<Button
android:id="@+id/button_24"
style="@style/button"
android:background="@android:color/holo_green_light"
android:tag="24" />

<Button
android:id="@+id/button_25"
style="@style/button"
android:background="@android:color/holo_green_light"
android:tag="25" />

</LinearLayout>
</LinearLayout>
</LinearLayout>
</pre><pre name="code" class="java"><pre name="code" class="java"><style name="button">
<item name="android:layout_width">0dp</item>
<item name="android:layout_height">60dp</item>
<item name="android:layout_weight">1</item>
<item name="android:layout_margin">5dp</item>
<item name="android:onClick">buttonClick</item>
</style>
首先, 关灯游戏是点击一个点, 其上下左右四个点都要跟着改变颜色, 但是要注意四个地方, 第一行, 最后一行, 最左边一列, 最右边一列, 比如点击第一个点, 其上和左没有点, 要加以判断, 负责会空指针, 下面给出5*5关灯游戏的四个特殊点的判断
//获取当前背景的颜色
ColorDrawable colorDrawable = (ColorDrawable) v.getBackground();
if (colorDrawable.getColor() == Color.parseColor("#99cc00")) {
v.setBackgroundColor(Color.RED);
count++;
} else {
v.setBackgroundColor(Color.parseColor("#99cc00"));
count--;
}
int index = Integer.parseInt((String) v.getTag());

//上
if (index > 5) {
Button upBtu = arrayList.get(index - 6);
if (index - 6 != stone) {
ColorDrawable upColorDrawable = (ColorDrawable) upBtu.getBackground();
if (upColorDrawable.getColor() == Color.parseColor("#99cc00")) {
upBtu.setBackgroundColor(Color.RED);
count++;
} else {
upBtu.setBackgroundColor(Color.parseColor("#99cc00"));
count--;
}
}
}
//下
if (index < 21) {
Button upBtu = arrayList.get(index + 4);
if (index + 4 != stone) {
ColorDrawable upColorDrawable = (ColorDrawable) upBtu.getBackground();
if (upColorDrawable.getColor() == Color.parseColor("#99cc00")) {
upBtu.setBackgroundColor(Color.RED);
count++;
} else {
upBtu.setB
999f
ackgroundColor(Color.parseColor("#99cc00"));
count--;
}
}
}
//右
if (index % 5 != 0) {
Button upBtu = arrayList.get(index);
if (index != stone) {
ColorDrawable upColorDrawable = (ColorDrawable) upBtu.getBackground();
if (upColorDrawable.getColor() == Color.parseColor("#99cc00")) {
upBtu.setBackgroundColor(Color.RED);
count++;
} else {
upBtu.setBackgroundColor(Color.parseColor("#99cc00"));
count--;
}
}
}
//左
if (index % 5 != 1) {
Button upBtu = arrayList.get(index - 2);
if (index - 2 != stone) {
ColorDrawable upColorDrawable = (ColorDrawable) upBtu.getBackground();
if (upColorDrawable.getColor() == Color.parseColor("#99cc00")) {
upBtu.setBackgroundColor(Color.RED);
count++;
} else {
upBtu.setBackgroundColor(Color.parseColor("#99cc00"));
count--;
}
}
}
下面就是关卡问题了, 如果一关一个activity就会浪费资源浪费, 而且麻烦, 现在可以直接改变这个activity的视图就OK了, 很简单, 跳转自己就可以了, 别忘了传递一个参数, 设置level
Intent intent = new Intent(MainActivity.this, MainActivity.class);
intent.putExtra(KEY_LEVEL, level + 1);
startActivity(intent);
MainActivity.this.finish();
然后根据关卡设置每关起始的亮灯位置
for (int i = 0; i < level; i++) {
int num = new Random().nextInt(24) + 1;
if (num == stone) {

} else {
buttonClick(arrayList.get(num));
}
}
其中要注意, 随机数的生成有一定的几率让随机数相同, 然后导致本关最后没有亮着的灯, 会导致Dialog空指针, 为解决这个问题, 引入一个Boolean, 最后根据亮灯的数量和Boolean综合判断是否弹出Dialog
if (!isCreating && count == 0) {
//显示Dialog
initNormalDialog();
}
计时的问题通过一个线程来实现, 就不写了, 其他小问题如有有疑问请下载demo
希望多多支持!!!

相关文章推荐
- 【Android游戏开发之一】设置全屏以及绘画简单的图形
- 【Android游戏开发之一】设置全屏以及绘画简单的图形
- 【Android游戏开发之一】设置全屏以及绘画简单的图形
- android 游戏开发涉及到的API简单介绍
- 【Android游戏开发二十一】Android os设备谎言分辨率的解决方案!以及简单阐述游戏引擎如何使用!
- 我对android Snake游戏的简单改进,更有利于初学者学习
- Android 游戏引擎libgdx 图片简单加密解密 生成Pixmap
- 【Android游戏开发之一】设置全屏以及绘画简单的图形
- 【Android游戏开发二十一】Android os设备谎言分辨率的解决方案!以及简单阐述游戏引擎如何使用!
- android游戏开发框架libgdx的使用(十八)—简单的AVG游戏效果实现
- 【Android游戏开发十六】Android Gesture之【触摸屏手势识别】操作!利用触摸屏手势实现一个简单切换图片的功能!
- 【Android游戏开发二十一】Android os设备谎言分辨率的解决方案!以及简单阐述游戏引擎如何使用!
- 【Android游戏开发二十一】Android os设备谎言分辨率的解决方案!以及简单阐述游戏引擎如何使用!
- 【Android游戏开发之一】设置全屏以及绘画简单的图形
- 16—【Android游戏开发十六】Android Gesture之【触摸屏手势识别】操作!利用触摸屏手势实现一个简单切换图片的功能
- 【Android游戏开发之一】设置全屏以及绘画简单的图形
- 【Android游戏开发十六】Android Gesture之【触摸屏手势识别】操作!利用触摸屏手势实现一个简单切换图片的功能!
- android 3D 游戏实现之简单碰撞检测
- 【Android游戏开发十六】Android Gesture之【触摸屏手势识别】操作!利用触摸屏手势实现一个简单切换图片的功能!
- android游戏开发(一)简单的图形渲染