Ubuntu+Fedora进阶学习,指令迅速查询,Bug迅速查询(Ctrl+F)
2016-11-05 01:02
393 查看
There is some notes while I am learning Ubuntu Operate System!
(Ask Ubuntu & Fedora)
1-- Hard link : ln command have different parm. Hard link means that the two files is connect together for backup the original files.If you edit any of the two files , it will be sync immedietely. If you delete the original file. It will make all files used. If you delete the copy file , it will keep the context of the original file. This command can not link the directory but single file. ln A.txt B.txt
2-- Symbolic link: This is different from the hard link. This command can link the directory. This one is more usefull than Hard link. ln -s A.txt B.txt
3-- cat : cat is a command which can read the .txt .py .c etc without opening the origin files. Used like this: cat filename.suffix zcat is another command which can read the zip files : zcat filename.zip.
4-- du -sb;df -i : read the Memory and disk used and the information of the device.
5-- ln : The explaination have already said in the point 1 and the point 2.
6-- fdisk : fdisk /dev/sda1 check the information of this device. The memory,sector,node and so on.
7--df : df / command is for checking all device.df -i more information about all the device.
8-- while there is a question about that : sudo apt-get update . Then there is two errors say:”Could not get lock /var/lib/dpkg/lock” .And “Unable to lock administration directory(/var/lib/dpkg),is anther process using it?”.
That two error’s information tell us that we need to find out that whether there is anther process is using the dpkg. So we need to type anther command into the Terminal like that: sudo lsof /var/lib/dpkg/lock. Then it return some information like that :
COMMAND PID USER FD TYPE DEVICE SIZE/OFF NODE NAME
unattend 9241 root 5uW REG 8,1 0 699848 /var/lib/dpkg/lock
So, We need to kill the process like this :sudo kill -9 9214 .(The fromat: sudo kill -9 <PID>).
After these steps ,I can run the system normally. Congratulations!
9--when I moving the Ubuntu Terminal. It receive a command(Ctrl + C) to shutdown the process running in the Terminal. So need to solve this problem like this : Shutdown the processing running in your Original system(Our Ubuntu is install in the Vmware as a Vitrual Machine), The named of the process is YouDao Dictionary!
10--Error:Unable to find the remote helper for https:When I was upload the C files into the remote repository, it show like this error. After finding the answer, It said that the path named /usr/lib/git-core is not in the System’s PATH. So what we need to do is to set the path to include the git-core path so that we can use the command of git: PATH=$PATH:/usr/lib/git-core.
11-- When I try to change my authority to be a root, It turn out to be that Authourity failure. So I am going to find the reason. At last it told me That I have not set the root’password before.We are asked to set a new password for root. We set the password for root used this command: sudo passwd root .After running this command, it asks you to input the password of user now time, then you need to enter the password for root.
12-- When I am using git to manage my code.
There is some steps for you to do this(This for you to update your code to the github.com!).
Step1 : Go to the the file directory which you want to manage the code use the command ‘cd’. After yo u get into the directory, you need to use the first git command: git init -→this command make the directory to be a local repository. The later steps is based on this directory.
Step2 : You need to know the status of the directory, using this git command to get the status: git status. After you using this command. There show the status of the directory. Then you need to add these new files into the commit like this: git add filename.
Step3 : When you finished to add the new files into the commit. Now you can commit those files into the local repository. The command like this: get commit -m filename. After this step, you can check the status of the directory like this:git status to insure that there is no files is new needed to be update.
Step4 : There is two different positions. If you have not connect this local repository to the remote repository located in the service machine of the git.com. You need to do like this : git remote add origin https://github.com/user name/repository’s name,git . After this o peration, the local repository will link with the remote repository located in the service of github,com. Notice: We must insure that there have already make a repository in your github account of github.com. If you have already link your file s to the local repository with the repository in github.com, You just skip this step and read the next step.
Step5 :After all those operations, The last step you need to do is :git push -u origin master .
There is some steps for you do this(This is for you to clone the files from the github.com).
Step1 : You don’t need to add a new directory in your local computer. You just need to type this in your Terminal : git clone https://github.com/githubusername/local-repository-name.git
13--mkfs : The long form is : Make your file system
14-- badblocks : This command is for you to check whither there are some break sectors in the memory device. It takes more time.
15-- mount : mount commad is important. If you want to operate some devices, it firstly should be mount on. Mount -l command means to show all the devices have been mount on. Mount /dev/sda1 means to mount on the device you want to mount, once mount on, you can use it.before you eject the devices , you should firstly umount the divice like this : umount /dev/sda1 . Then you can eject the device. For example(You want to operate your flash device):
Step1 : df -i show all the device been connect to the operation system.
Step2 : mkdir /media/flash To make a directory to operate the flash device with this file.
Step3 : mount /dev/devicename /media/flash To mount the device on the system’s file.
Step4 : Do what you want to do on the flash directory in order to operate the flash device.
16-- umount : umount /dev/sdb1
17-- rm -rf : rm -rf file’directory. This command can directly delete the whole file directory.
18-- cp -r : cp -r /Original directory /Destination directoryCopy the whole directory.
19-- dumpe2fs :
20-- e2label : e2lable /dev/sab1 MM1994UESTCChange the device name.
21-- hdparm : hdparm /dev/sda1To show the parameters of device connect to the operate Sys.
22-- Some file’s suffix inform us the compress type of the file:
*.Z compressed by compress App
*.gz compressed by gzip App
*.bz2 compressed by bzip2 APP
*.tar Have not been compressed, Open with tar App
*.tar.gz packed by tar App, also been compressed by gzip App
*.tar.bz2 Packed by tar App, also been compressed by bzip2 APP
The Compress Command:
gzip :
bzip2 :
gunzip :
tar -jcv -ffilename.tar.bz2 filename
tar -jxv -ffilename.tar.bz2 -C filename
tar -zcv -ffilename.tar.gz filename
tar -zxv -ffilename.tar.gz -C filename
The package Command:
tar : tar -c -ffiledirectoryname.tar original filename
压缩指令:tar -zcvf target.tar.gz /source/*
解压指令:tar -xzvf target.tar.gz -C /dir/
23--mv : Acommad that can also change the filename. Mv A.txt B.txt
This command also can be used as moving the file into another place.
24-- alias : To rename the command with another name. EG: alias lm=’ls -al’ means that to use the lm name to respect the command ls -al.
25--declare -i number=$RANDOM*10/32768; echo $number
26-- history :
27-- vim -r .filename.swp : This command can help you to recovery the file that have not been saved before which suddenly be killed without saved.
28-- To install the MySQL on your Ubuntu Operation System.
Step1 :sudo apt-get install mysql-server
Step2 : apt-get install my-client
Step3 : sudo apt-get install libmysqlclient-dev
After those steps , Let us check whether the Mysql-server been installed on our Ubuntu’system
Command:sudo netstat -tap | grep mysql
If ubuntu’s terminal shows that your mysql’socket is in listening means that the mysql-server has been installed successfully.
29-- How to remove some App That we don’t want to use!
Step1 : sudo apt-get remove mysql-server mysql-client mysql-common
Step2 : sudo apt-get autoremove
Step3 : sudo apt-get autoclean
If you are trying to reinstall the mysql server ,and there is some problems,please redo the three steps above and then execute the follow command as this :
Step4 : sudo apt-get remove - -purge mysql-\*
Step5 : sudo apt-get install - -reinstall mysql-common (The most important command!)
Step6 : sudo apt-get install mysql-server mysql-client
We also can use this command to do this:sudo dpkg --purge Software
30-- How to stop/start the mysql-server under ubuntu?
sudo service mysql start(Notice:In order to prevent the system have already open the service for you while you continue try this start command , sudo service mysql restartis better!Also,you can use this command to find out while the mysql service is running:service mysql status)
sudo service mysql stop
sudo apt-get install ksnapshot
31-- Error:could not get lock /var/lib/dpkg/lock -open 出现这个问题的原因可能是有另外一个程序正在运行,导致资源被锁不可用。而导致资源被锁的原因,可能是上次安装时没正常完成,而导致出现此状况。
解决方法:输入以下命令
sudo rm /var/cache/apt/archives/lock
sudo rm /var/lib/dpkg/lock
删除完上面的东西之后有可能会出现下面的问题(Kylin中遇到过):dpkg 被中断,您必须手工运行sudo dpkg --configure -a解决此问题,但是按照提示输入命令之后还是没有解决问题,下面是解决办法:
sudo rm /var/lib/dpkg/update/*
sudo apt-get update
sudo apt-get upgrade
32-- can't use the command shutdown:
solution1:
echo $PATH
PATH=$PATH:/sbin
solution2:
/sbin/shutdown
33-- yum Error: Cannot retrieve repository metadata (repomd.xml) for repository: xxxxx:
问题是,在使用Fedora 14的过程中,发现上述的错误,Fedora的源数据库repo不能使用,或者不能获取元数据。猜测可能的原因是Fedora的版本太旧了,fedora系统中原有的repo库已经不能使用,于是更新一下库吧,找了半天发现163网易的源已经不支持了啊,然而有很多网友的方法中添加的是网易的源(2017-11-03)的内容是README,而README的内容如下:
所以我们要找的是http://archives.fedoraproject.org/pub/archive/fedora/,同样的我们添加下面的几个源:
添加之后的fedora.repo的库内容如下所示:
1、修改fedora.repo(文件的位置: etc/yum.repos.d/fedora.repo)
修改之后的fedora.repo的内容如下所示:
2、修改完成之后运行下面的指令:
OK,这样就可以使用了,下面是yum makecache的加载过程:

3、测试安装vim:
OK!完成操作,所以出现问题之后的错误信息很重要,解决这个问题的方法就是确定到底是为什么,然后再一次解决。
官方的fedora的库(国外镜像):http://archives.fedoraproject.org/pub/archive/fedora/linux/releases/
国内网易镜像(国内镜像,部分老版本的镜像已经删除):http://mirrors.163.com/fedora/updates/
34-- Failed to fetch http://cn.archive.ubuntu.com/xxx/xxx/xxx/*.gz(Ubuntu下源不存在需要更新的问题):

针对这个问题,首先我们需要确定我们的Ubuntu的版本是那个,采用如下的指令:

查询好对应的版本好之后,我们就可以在ubuntu的老版本的维护社区找到对应的源的链接了,所有老版本的源的地址如下:
http://old-releases.ubuntu.com/ 这里我们可以先在release的目录下查询Ubuntu10.04对应的版本的名称
从右图可以看出,Ubuntu10.04版本的名称时Lucid Lynx
根据名称我们在这里找到了对应的相关文件:http://old-releases.ubuntu.com/ubuntu/dists/lucid-xxx/
我们讲对应的下面的文件进行更改和替换:
插入的内容如下(如果你的版本不同,替换掉对应版本的的lucid的版本代号就可以了):
保存退出,测试更新源即可使用了,记得把不能使用的源链接都删除掉或者使用#来注释掉所有的源链接。(这里将所有文件夹下面的Source.gz都添加进来了。
main restricted universe multiverse文件夹下面都是Source.gz文件
release文件夹下面的对应的Source.gz的源文件
修改完成之后,我们需要更新apt的缓存:
更行的过程如下所示:

使用这种通用的老版本的源其实速度也不算慢,但是源标间稳定,推荐使用。
35-- How todeletesomefiles, and keep some other files in local folder?(如何删除大量的文件并保存部分的需要保留的文件?):
如下所示,我们需要删除除了hgfs,Disk_0,Disk_1,media这些文件夹意外的所有的文件,需要按照如下的处理方式:

按照如下的指令进行操作(注意一定要打开extglob的模式):

这样就能删除多个文件了。
36-- dd指令测试硬盘性能以及拷贝文件到对应的文件:
运行结果:
相关参数的解释:
这里我们就能看到sdb设备的写速度在649kB/s。
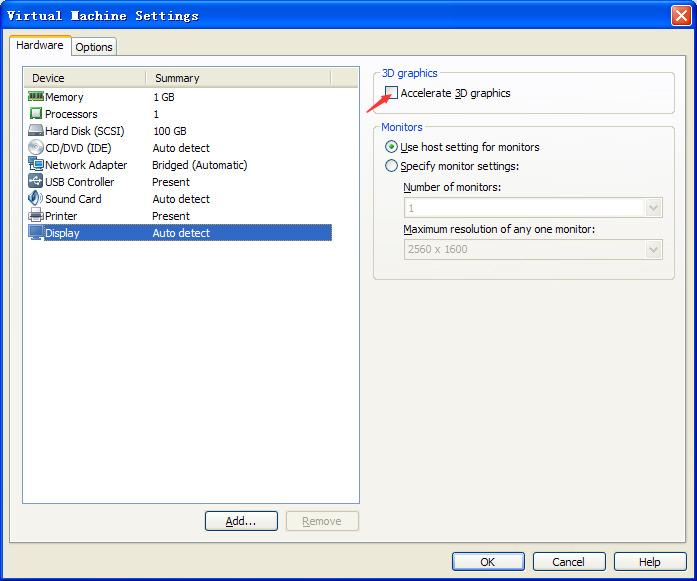
37-- 在使用VMware10的过程中,安装完成了Ubuntu10.0的虚拟机之后,发现虚拟机的桌面显示出现了问题,没有任何的边框存在,Ubuntu基本的左边缘的软件也没法选择,可能存在的原因是因为你选择的虚拟机设置当中存在这3D的选项,请将3D选项不要勾选在启动之后即可解决。
(Ask Ubuntu & Fedora)
1-- Hard link : ln command have different parm. Hard link means that the two files is connect together for backup the original files.If you edit any of the two files , it will be sync immedietely. If you delete the original file. It will make all files used. If you delete the copy file , it will keep the context of the original file. This command can not link the directory but single file. ln A.txt B.txt
2-- Symbolic link: This is different from the hard link. This command can link the directory. This one is more usefull than Hard link. ln -s A.txt B.txt
3-- cat : cat is a command which can read the .txt .py .c etc without opening the origin files. Used like this: cat filename.suffix zcat is another command which can read the zip files : zcat filename.zip.
4-- du -sb;df -i : read the Memory and disk used and the information of the device.
5-- ln : The explaination have already said in the point 1 and the point 2.
6-- fdisk : fdisk /dev/sda1 check the information of this device. The memory,sector,node and so on.
7--df : df / command is for checking all device.df -i more information about all the device.
8-- while there is a question about that : sudo apt-get update . Then there is two errors say:”Could not get lock /var/lib/dpkg/lock” .And “Unable to lock administration directory(/var/lib/dpkg),is anther process using it?”.
That two error’s information tell us that we need to find out that whether there is anther process is using the dpkg. So we need to type anther command into the Terminal like that: sudo lsof /var/lib/dpkg/lock. Then it return some information like that :
COMMAND PID USER FD TYPE DEVICE SIZE/OFF NODE NAME
unattend 9241 root 5uW REG 8,1 0 699848 /var/lib/dpkg/lock
So, We need to kill the process like this :sudo kill -9 9214 .(The fromat: sudo kill -9 <PID>).
After these steps ,I can run the system normally. Congratulations!
9--when I moving the Ubuntu Terminal. It receive a command(Ctrl + C) to shutdown the process running in the Terminal. So need to solve this problem like this : Shutdown the processing running in your Original system(Our Ubuntu is install in the Vmware as a Vitrual Machine), The named of the process is YouDao Dictionary!
10--Error:Unable to find the remote helper for https:When I was upload the C files into the remote repository, it show like this error. After finding the answer, It said that the path named /usr/lib/git-core is not in the System’s PATH. So what we need to do is to set the path to include the git-core path so that we can use the command of git: PATH=$PATH:/usr/lib/git-core.
11-- When I try to change my authority to be a root, It turn out to be that Authourity failure. So I am going to find the reason. At last it told me That I have not set the root’password before.We are asked to set a new password for root. We set the password for root used this command: sudo passwd root .After running this command, it asks you to input the password of user now time, then you need to enter the password for root.
12-- When I am using git to manage my code.
There is some steps for you to do this(This for you to update your code to the github.com!).
Step1 : Go to the the file directory which you want to manage the code use the command ‘cd’. After yo u get into the directory, you need to use the first git command: git init -→this command make the directory to be a local repository. The later steps is based on this directory.
Step2 : You need to know the status of the directory, using this git command to get the status: git status. After you using this command. There show the status of the directory. Then you need to add these new files into the commit like this: git add filename.
Step3 : When you finished to add the new files into the commit. Now you can commit those files into the local repository. The command like this: get commit -m filename. After this step, you can check the status of the directory like this:git status to insure that there is no files is new needed to be update.
Step4 : There is two different positions. If you have not connect this local repository to the remote repository located in the service machine of the git.com. You need to do like this : git remote add origin https://github.com/user name/repository’s name,git . After this o peration, the local repository will link with the remote repository located in the service of github,com. Notice: We must insure that there have already make a repository in your github account of github.com. If you have already link your file s to the local repository with the repository in github.com, You just skip this step and read the next step.
Step5 :After all those operations, The last step you need to do is :git push -u origin master .
There is some steps for you do this(This is for you to clone the files from the github.com).
Step1 : You don’t need to add a new directory in your local computer. You just need to type this in your Terminal : git clone https://github.com/githubusername/local-repository-name.git
13--mkfs : The long form is : Make your file system
14-- badblocks : This command is for you to check whither there are some break sectors in the memory device. It takes more time.
15-- mount : mount commad is important. If you want to operate some devices, it firstly should be mount on. Mount -l command means to show all the devices have been mount on. Mount /dev/sda1 means to mount on the device you want to mount, once mount on, you can use it.before you eject the devices , you should firstly umount the divice like this : umount /dev/sda1 . Then you can eject the device. For example(You want to operate your flash device):
Step1 : df -i show all the device been connect to the operation system.
Step2 : mkdir /media/flash To make a directory to operate the flash device with this file.
Step3 : mount /dev/devicename /media/flash To mount the device on the system’s file.
Step4 : Do what you want to do on the flash directory in order to operate the flash device.
16-- umount : umount /dev/sdb1
17-- rm -rf : rm -rf file’directory. This command can directly delete the whole file directory.
18-- cp -r : cp -r /Original directory /Destination directoryCopy the whole directory.
19-- dumpe2fs :
20-- e2label : e2lable /dev/sab1 MM1994UESTCChange the device name.
21-- hdparm : hdparm /dev/sda1To show the parameters of device connect to the operate Sys.
22-- Some file’s suffix inform us the compress type of the file:
*.Z compressed by compress App
*.gz compressed by gzip App
*.bz2 compressed by bzip2 APP
*.tar Have not been compressed, Open with tar App
*.tar.gz packed by tar App, also been compressed by gzip App
*.tar.bz2 Packed by tar App, also been compressed by bzip2 APP
The Compress Command:
gzip :
bzip2 :
gunzip :
tar -jcv -ffilename.tar.bz2 filename
tar -jxv -ffilename.tar.bz2 -C filename
tar -zcv -ffilename.tar.gz filename
tar -zxv -ffilename.tar.gz -C filename
The package Command:
tar : tar -c -ffiledirectoryname.tar original filename
压缩指令:tar -zcvf target.tar.gz /source/*
解压指令:tar -xzvf target.tar.gz -C /dir/
23--mv : Acommad that can also change the filename. Mv A.txt B.txt
This command also can be used as moving the file into another place.
24-- alias : To rename the command with another name. EG: alias lm=’ls -al’ means that to use the lm name to respect the command ls -al.
25--declare -i number=$RANDOM*10/32768; echo $number
26-- history :
27-- vim -r .filename.swp : This command can help you to recovery the file that have not been saved before which suddenly be killed without saved.
28-- To install the MySQL on your Ubuntu Operation System.
Step1 :sudo apt-get install mysql-server
Step2 : apt-get install my-client
Step3 : sudo apt-get install libmysqlclient-dev
After those steps , Let us check whether the Mysql-server been installed on our Ubuntu’system
Command:sudo netstat -tap | grep mysql
If ubuntu’s terminal shows that your mysql’socket is in listening means that the mysql-server has been installed successfully.
29-- How to remove some App That we don’t want to use!
Step1 : sudo apt-get remove mysql-server mysql-client mysql-common
Step2 : sudo apt-get autoremove
Step3 : sudo apt-get autoclean
If you are trying to reinstall the mysql server ,and there is some problems,please redo the three steps above and then execute the follow command as this :
Step4 : sudo apt-get remove - -purge mysql-\*
Step5 : sudo apt-get install - -reinstall mysql-common (The most important command!)
Step6 : sudo apt-get install mysql-server mysql-client
We also can use this command to do this:sudo dpkg --purge Software
30-- How to stop/start the mysql-server under ubuntu?
sudo service mysql start(Notice:In order to prevent the system have already open the service for you while you continue try this start command , sudo service mysql restartis better!Also,you can use this command to find out while the mysql service is running:service mysql status)
sudo service mysql stop
sudo apt-get install ksnapshot
31-- Error:could not get lock /var/lib/dpkg/lock -open 出现这个问题的原因可能是有另外一个程序正在运行,导致资源被锁不可用。而导致资源被锁的原因,可能是上次安装时没正常完成,而导致出现此状况。
解决方法:输入以下命令
sudo rm /var/cache/apt/archives/lock
sudo rm /var/lib/dpkg/lock
删除完上面的东西之后有可能会出现下面的问题(Kylin中遇到过):dpkg 被中断,您必须手工运行sudo dpkg --configure -a解决此问题,但是按照提示输入命令之后还是没有解决问题,下面是解决办法:
sudo rm /var/lib/dpkg/update/*
sudo apt-get update
sudo apt-get upgrade
32-- can't use the command shutdown:
solution1:
echo $PATH
PATH=$PATH:/sbin
solution2:
/sbin/shutdown
33-- yum Error: Cannot retrieve repository metadata (repomd.xml) for repository: xxxxx:
问题是,在使用Fedora 14的过程中,发现上述的错误,Fedora的源数据库repo不能使用,或者不能获取元数据。猜测可能的原因是Fedora的版本太旧了,fedora系统中原有的repo库已经不能使用,于是更新一下库吧,找了半天发现163网易的源已经不支持了啊,然而有很多网友的方法中添加的是网易的源(2017-11-03)的内容是README,而README的内容如下:
ATTENTION
======================================
The contents of this directory have been moved to our archives available at:
 http://archives.fedoraproject.org/pub/archive/fedora/
If you are having troubles finding something there please stop by #fedora-admin on irc.freenode.net
所以我们要找的是http://archives.fedoraproject.org/pub/archive/fedora/,同样的我们添加下面的几个源:
baseurl=http://archives.fedoraproject.org/pub/archive/fedora/linux/releases/14/Everything/x86_64/os/
baseurl=http://archives.fedoraproject.org/pub/archive/fedora/linux/releases/14/Everything/x86_64/debug/
baseurl=http://archives.fedoraproject.org/pub/archive/fedora/linux/releases/14/Everything/source/SRPMS/
添加之后的fedora.repo的库内容如下所示:
1、修改fedora.repo(文件的位置: etc/yum.repos.d/fedora.repo)
vi fedora.repo
修改之后的fedora.repo的内容如下所示:
[fedora]
name=Fedora $releasever - $basearch
failovermethod=priority
#baseurl=http://download.fedoraproject.org/pub/fedora/linux/releases/$releasever/Everything/$basearch/os/
baseurl=http://archives.fedoraproject.org/pub/archive/fedora/linux/releases/14/Everything/x86_64/os/
#mirrorlist=https://mirrors.fedoraproject.org/metalink?repo=fedora-$releasever&arch=$basearch
enabled=1
metadata_expire=7d
gpgcheck=1
gpgkey=file:///etc/pki/rpm-gpg/RPM-GPG-KEY-fedora-$basearch

[fedora-debuginfo]
name=Fedora $releasever - $basearch - Debug
failovermethod=priority
#baseurl=http://download.fedoraproject.org/pub/fedora/linux/releases/$releasever/Everything/$basearch/debug/
baseurl=http://archives.fedoraproject.org/pub/archive/fedora/linux/releases/14/Everything/x86_64/debug/
#mirrorlist=https://mirrors.fedoraproject.org/metalink?repo=fedora-debug-$releasever&arch=$basearch
enabled=0
metadata_expire=7d
gpgcheck=1
gpgkey=file:///etc/pki/rpm-gpg/RPM-GPG-KEY-fedora-$basearch

[fedora-source]
name=Fedora $releasever - Source
failovermethod=priority
#baseurl=http://download.fedoraproject.org/pub/fedora/linux/releases/$releasever/Everything/source/SRPMS/
baseurl=http://archives.fedoraproject.org/pub/archive/fedora/linux/releases/14/Everything/source/SRPMS/
#mirrorlist=https://mirrors.fedoraproject.org/metalink?repo=fedora-source-$releasever&arch=$basearch
enabled=0
metadata_expire=7d
gpgcheck=1
gpgkey=file:///etc/pki/rpm-gpg/RPM-GPG-KEY-fedora-$basearch
2、修改完成之后运行下面的指令:
yum clean all
yum makecache
OK,这样就可以使用了,下面是yum makecache的加载过程:
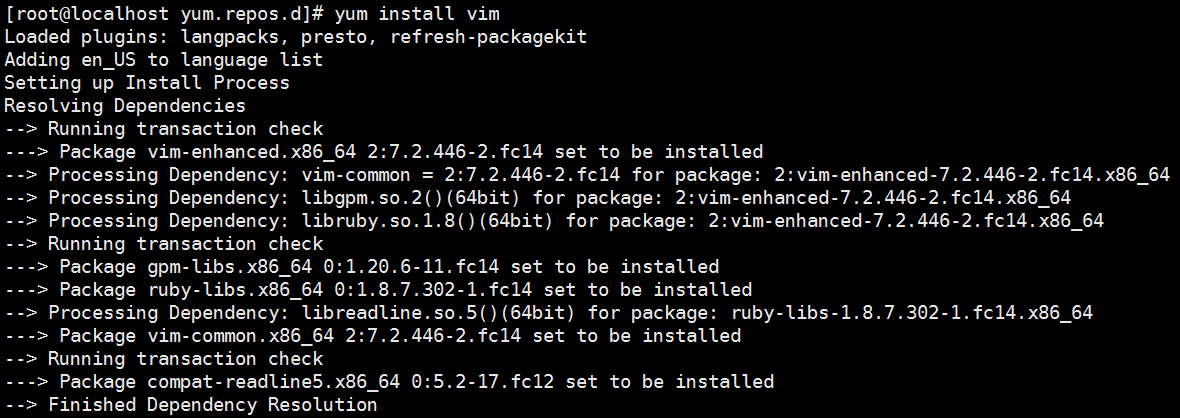
3、测试安装vim:
yum install vim
OK!完成操作,所以出现问题之后的错误信息很重要,解决这个问题的方法就是确定到底是为什么,然后再一次解决。
官方的fedora的库(国外镜像):http://archives.fedoraproject.org/pub/archive/fedora/linux/releases/
国内网易镜像(国内镜像,部分老版本的镜像已经删除):http://mirrors.163.com/fedora/updates/
34-- Failed to fetch http://cn.archive.ubuntu.com/xxx/xxx/xxx/*.gz(Ubuntu下源不存在需要更新的问题):
针对这个问题,首先我们需要确定我们的Ubuntu的版本是那个,采用如下的指令:
cat /etc/issue
查询好对应的版本好之后,我们就可以在ubuntu的老版本的维护社区找到对应的源的链接了,所有老版本的源的地址如下:
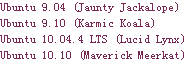
http://old-releases.ubuntu.com/ 这里我们可以先在release的目录下查询Ubuntu10.04对应的版本的名称
从右图可以看出,Ubuntu10.04版本的名称时Lucid Lynx
根据名称我们在这里找到了对应的相关文件:http://old-releases.ubuntu.com/ubuntu/dists/lucid-xxx/
我们讲对应的下面的文件进行更改和替换:
gedit /etc/apt/sources.list
插入的内容如下(如果你的版本不同,替换掉对应版本的的lucid的版本代号就可以了):
deb http://old-releases.ubuntu.com/ubuntu/ lucid main restricted universe multiverse
deb http://old-releases.ubuntu.com/ubuntu/ lucid-updates main restricted universe multiverse
deb http://old-releases.ubuntu.com/ubuntu/ lucid-security main restricted universe multiverse
deb http://old-releases.ubuntu.com/ubuntu/ lucid-proposed main restricted universe multiverse
deb http://old-releases.ubuntu.com/ubuntu/ lucid-backports main restricted universe multiverse

deb-src http://old-releases.ubuntu.com/ubuntu/ lucid main restricted universe multiverse
deb-src http://old-releases.ubuntu.com/ubuntu/ lucid-updates main restricted universe multiverse
deb-src http://old-releases.ubuntu.com/ubuntu/ lucid-security main restricted universe multiverse
deb-src http://old-releases.ubuntu.com/ubuntu/ lucid-proposed main restricted universe multiverse
deb-src http://old-releases.ubuntu.com/ubuntu/ lucid-backports main restricted universe multiverse
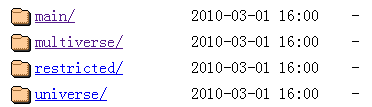
保存退出,测试更新源即可使用了,记得把不能使用的源链接都删除掉或者使用#来注释掉所有的源链接。(这里将所有文件夹下面的Source.gz都添加进来了。
main restricted universe multiverse文件夹下面都是Source.gz文件
release文件夹下面的对应的Source.gz的源文件
修改完成之后,我们需要更新apt的缓存:
sudo apt-get update
更行的过程如下所示:
使用这种通用的老版本的源其实速度也不算慢,但是源标间稳定,推荐使用。
35-- How todeletesomefiles, and keep some other files in local folder?(如何删除大量的文件并保存部分的需要保留的文件?):
如下所示,我们需要删除除了hgfs,Disk_0,Disk_1,media这些文件夹意外的所有的文件,需要按照如下的处理方式:
按照如下的指令进行操作(注意一定要打开extglob的模式):
shopt -s extglob  # 打开extglob模式
rm -fr !(file1)
这样就能删除多个文件了。
36-- dd指令测试硬盘性能以及拷贝文件到对应的文件:
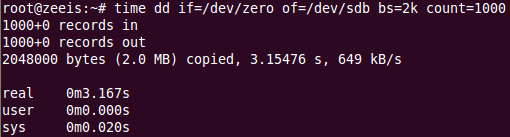
time dd if=/dev/zero of=/dev/sdb bs=2k count=1000
运行结果:
相关参数的解释:
time           用于计时(real实际耗时,user用户态耗时,sys系统态耗时)
dd             用于复制,从if读出(input file),写到of(output file)
if=/dev/zero   不产生IO,因此可以用来测试纯写速度(输入设备,改为/dev/sdb就表示从磁盘读取数据,测试磁盘的读取性能)
of=/dev/null   不产生IO,可以用来测试纯读速度(输出设备,改为/dev/sdb就表示向磁盘sdb写入数据,测试磁盘的写入性能)
bs             是每次读或写的大小,即一个块的大小
count          是读写块的数量,相乘就是读写数据量大小,数据量(count)越大越准确,多次测试取平均值
这里我们就能看到sdb设备的写速度在649kB/s。
37-- 在使用VMware10的过程中,安装完成了Ubuntu10.0的虚拟机之后,发现虚拟机的桌面显示出现了问题,没有任何的边框存在,Ubuntu基本的左边缘的软件也没法选择,可能存在的原因是因为你选择的虚拟机设置当中存在这3D的选项,请将3D选项不要勾选在启动之后即可解决。

相关文章推荐
- Ubuntu进阶学习,指令迅速查询,Bug迅速查询(Ctrl+F)
- Ubuntu上安装git以及常用的指令学习
- Docker学习(一):Ubuntu下Docker的一些基本指令和注意事项
- 慕课网c linux课程学习笔记(虚拟机 ubuntu 的安装以及基本指令)
- Docker学习系列(三):Ubuntu下使用Docker的基本指令记录及一些注意事项
- 学习进阶 Redhat与ubuntu配置网卡
- 【Linux学习】Linux用户管理1—用户查询指令、用户切换
- Linux之ubuntu学习笔记(八):linux下的功能指令( find , locate , grep , cut , sort , head , tail,type,which..
- Fedora和Ubuntu指令差别(待补充)
- 汇编学习笔记3——jmp命令与DEBUG进阶指令
- ubuntu指令学习
- Angular JS 学习笔记(自定义服务:factory,Promise 模式异步请求查询:$http,过滤器用法filter,指令:directive)
- Ubuntu_查询计算机信息学习笔记
- ubuntu配置深度学习框架过程中的实用指令
- Ubuntu操作系统学习笔记之五(Ubuntu常用指令)
- Linux新手学习笔记1:fedora 19修改启动项 (附ubuntu 14的启动项修改方法)
- Linux学习汇总 打开linux虚拟机客户端 Ctrl+Alt+t即可进入到linux的命令窗口 linux各种查询命令: Xshell连接Linux虚拟机失败解
- Linux学习总结(十一)—— Linux常用命令:版本信息查看(RedHat、CentOS、Debian、Ubuntu、Fedora、Oracle)
- TX2440 裸跑实验-伪指令学习例子(ADS1.2编译) 进阶(三)
- Linux (ubuntu) 下常用操作指令学习