windows下使用训练好的caffemodel做分类
2016-11-01 13:58
246 查看
随着深度学习的发展,越来越多的人开始进入这个行业,希望可以有所进展,但是各行业的大牛们,速度超神,deep哈希、deep稀疏、deep做分类、识别、跟踪、等等。很多人也开始训练自己的数据集或者下载别人训练好的model。训练好的caffemodel怎么使用对于刚入门的深度学习人来说是比较困难的,或者怎么用模型去验证自己的数据集等等
下面就从以下方向来说明怎么使用训练好model来预测自己的图片
1:编译caffe for windows
微软提供Windows工具包(caffe-master):https://github.com/Microsoft/caffe
此版严格只支持VS2013。此版本无需配置任何第三方环境哦,因为在项目属性里面都已经包含进去了,非常方便。如果出现了一些文件打不开或者其它问题,第一可能是VS自身问题,第二可能你配置过其它caffe,修改过环境变量,导致找不到头文件之类的。
caffe for windows的编译:
可以参考我的博客:
http://blog.csdn.net/shakevincent/article/details/51694686
http://m.blog.csdn.net/article/details?id=51355143
http://m.blog.csdn.net/article/details?id=51549105
编译好caffe-windows后删除其他不需要的工程,仅保留caffelib 和classfication工程。
打开classfication工程里面的classfication.cpp函数修改:
1:下载model:这里使用训练好的车辆识别的model
2:修改一下文件:
简单修改后就可以使用了。
model下载地址:链接:http://pan.baidu.com/s/1hs3CF9y 密码:j7m4
下面就从以下方向来说明怎么使用训练好model来预测自己的图片
1:编译caffe for windows
微软提供Windows工具包(caffe-master):https://github.com/Microsoft/caffe
此版严格只支持VS2013。此版本无需配置任何第三方环境哦,因为在项目属性里面都已经包含进去了,非常方便。如果出现了一些文件打不开或者其它问题,第一可能是VS自身问题,第二可能你配置过其它caffe,修改过环境变量,导致找不到头文件之类的。
caffe for windows的编译:
可以参考我的博客:
http://blog.csdn.net/shakevincent/article/details/51694686
http://m.blog.csdn.net/article/details?id=51355143
http://m.blog.csdn.net/article/details?id=51549105
编译好caffe-windows后删除其他不需要的工程,仅保留caffelib 和classfication工程。
打开classfication工程里面的classfication.cpp函数修改:
#include <caffe/caffe.hpp>
#ifdef USE_OPENCV
#include <opencv2/core/core.hpp>
#include <opencv2/highgui/highgui.hpp>
#include <opencv2/imgproc/imgproc.hpp>
#endif // USE_OPENCV
#include <algorithm>
#include <iosfwd>
#include <memory>
#include <string>
#include <utility>
#include <vector>
#include <iostream>
#include <string>
#include <sstream>
#include "io.h"
#include "stdio.h"
#include "stdlib.h"
#include "time.h"
#ifdef USE_OPENCV
using namespace caffe; // NOLINT(build/namespaces)
using std::string;
/* Pair (label, confidence) representing a prediction. */
typedef std::pair<string, float> Prediction;
class Classifier {
public:
Classifier(const string& model_file,
const string& trained_file,
const string& mean_file,
const string& label_file);
std::vector<Prediction> Classify(const cv::Mat& img, int N = 5);
private:
void SetMean(const string& mean_file);
std::vector<float> Predict(const cv::Mat& img);
void WrapInputLayer(std::vector<cv::Mat>* input_channels);
void Preprocess(const cv::Mat& img,
std::vector<cv::Mat>* input_channels);
private:
shared_ptr<Net<float> > net_;
cv::Size input_geometry_;
int num_channels_;
cv::Mat mean_;
std::vector<string> labels_;
};
Classifier::Classifier(const string& model_file,
const string& trained_file,
const string& mean_file,
const string& label_file) {
#ifdef CPU_ONLY
Caffe::set_mode(Caffe::CPU);
#else
Caffe::set_mode(Caffe::GPU);
#endif
/* Load the network. */
net_.reset(new Net<float>(model_file, TEST));
net_->CopyTrainedLayersFrom(trained_file);
CHECK_EQ(net_->num_inputs(), 1) << "Network should have exactly one input.";
CHECK_EQ(net_->num_outputs(), 1) << "Network should have exactly one output.";
Blob<float>* input_layer = net_->input_blobs()[0];
num_channels_ = input_layer->channels();
CHECK(num_channels_ == 3 || num_channels_ == 1)
<< "Input layer should have 1 or 3 channels.";
input_geometry_ = cv::Size(input_layer->width(), input_layer->height());
/* Load the binaryproto mean file. */
SetMean(mean_file);
/* Load labels. */
std::ifstream labels(label_file.c_str());
CHECK(labels) << "Unable to open labels file " << label_file;
string line;
while (std::getline(labels, line))
labels_.push_back(string(line));
Blob<float>* output_layer = net_->output_blobs()[0];
CHECK_EQ(labels_.size(), output_layer->channels())
<< "Number of labels is different from the output layer dimension.";
}
static bool PairCompare(const std::pair<float, int>& lhs,
const std::pair<float, int>& rhs) {
return lhs.first > rhs.first;
}
/* Return the indices of the top N values of vector v. */
static std::vector<int> Argmax(const std::vector<float>& v, int N) {
std::vector<std::pair<float, int> > pairs;
for (size_t i = 0; i < v.size(); ++i)
pairs.push_back(std::make_pair(v[i], static_cast<int>(i)));
std::partial_sort(pairs.begin(), pairs.begin() + N, pairs.end(), PairCompare);
std::vector<int> result;
for (int i = 0; i < N; ++i)
result.push_back(pairs[i].second);
return result;
}
/* Return the top N predictions. */
std::vector<Prediction> Classifier::Classify(const cv::Mat& img, int N) {
std::vector<float> output = Predict(img);
N = std::min<int>(labels_.size(), N);
std::vector<int> maxN = Argmax(output, N);
std::vector<Prediction> predictions;
for (int i = 0; i < N; ++i) {
int idx = maxN[i];
predictions.push_back(std::make_pair(labels_[idx], output[idx]));
}
return predictions;
}
/* Load the mean file in binaryproto format. */
void Classifier::SetMean(const string& mean_file) {
BlobProto blob_proto;
ReadProtoFromBinaryFileOrDie(mean_file.c_str(), &blob_proto);
/* Convert from BlobProto to Blob<float> */
Blob<float> mean_blob;
mean_blob.FromProto(blob_proto);
CHECK_EQ(mean_blob.channels(), num_channels_)
<< "Number of channels of mean file doesn't match input layer.";
/* The format of the mean file is planar 32-bit float BGR or grayscale. */
std::vector<cv::Mat> channels;
float* data = mean_blob.mutable_cpu_data();
for (int i = 0; i < num_channels_; ++i) {
/* Extract an individual channel. */
cv::Mat channel(mean_blob.height(), mean_blob.width(), CV_32FC1, data);
channels.push_back(channel);
data += mean_blob.height() * mean_blob.width();
}
/* Merge the separate channels into a single image. */
cv::Mat mean;
cv::merge(channels, mean);
/* Compute the global mean pixel value and create a mean image
* filled with this value. */
cv::Scalar channel_mean = cv::mean(mean);
mean_ = cv::Mat(input_geometry_, mean.type(), channel_mean);
}
std::vector<float> Classifier::Predict(const cv::Mat& img) {
Blob<float>* input_layer = net_->input_blobs()[0];
input_layer->Reshape(1, num_channels_,
input_geometry_.height, input_geometry_.width);
/* Forward dimension change to all layers. */
net_->Reshape();
std::vector<cv::Mat> input_channels;
WrapInputLayer(&input_channels);
Preprocess(img, &input_channels);
net_->Forward();
/* Copy the output layer to a std::vector */
Blob<float>* output_layer = net_->output_blobs()[0];
const float* begin = output_layer->cpu_data();
const float* end = begin + output_layer->channels();
return std::vector<float>(begin, end);
}
/* Wrap the input layer of the network in separate cv::Mat objects
* (one per channel). This way we save one memcpy operation and we
* don't need to rely on cudaMemcpy2D. The last preprocessing
* operation will write the separate channels directly to the input
* layer. */
void Classifier::WrapInputLayer(std::vector<cv::Mat>* input_channels) {
Blob<float>* input_layer = net_->input_blobs()[0];
int width = input_layer->width();
int height = input_layer->height();
float* input_data = input_layer->mutable_cpu_data();
for (int i = 0; i < input_layer->channels(); ++i) {
cv::Mat channel(height, width, CV_32FC1, input_data);
input_channels->push_back(channel);
input_data += width * height;
}
}
void Classifier::Preprocess(const cv::Mat& img,
std::vector<cv::Mat>* input_channels) {
/* Convert the input image to the input image format of the network. */
cv::Mat sample;
if (img.channels() == 3 && num_channels_ == 1)
cv::cvtColor(img, sample, cv::COLOR_BGR2GRAY);
else if (img.channels() == 4 && num_channels_ == 1)
cv::cvtColor(img, sample, cv::COLOR_BGRA2GRAY);
else if (img.channels() == 4 && num_channels_ == 3)
cv::cvtColor(img, sample, cv::COLOR_BGRA2BGR);
else if (img.channels() == 1 && num_channels_ == 3)
cv::cvtColor(img, sample, cv::COLOR_GRAY2BGR);
else
sample = img;
cv::Mat sample_resized;
if (sample.size() != input_geometry_)
cv::resize(sample, sample_resized, input_geometry_);
else
sample_resized = sample;
cv::Mat sample_float;
if (num_channels_ == 3)
sample_resized.convertTo(sample_float, CV_32FC3);
else
sample_resized.convertTo(sample_float, CV_32FC1);
cv::Mat sample_normalized;
cv::subtract(sample_float, mean_, sample_normalized);
/* This operation will write the separate BGR planes directly to the
* input layer of the network because it is wrapped by the cv::Mat
* objects in input_channels. */
cv::split(sample_normalized, *input_channels);
CHECK(reinterpret_cast<float*>(input_channels->at(0).data)
== net_->input_blobs()[0]->cpu_data())
<< "Input channels are not wrapping the input layer of the network.";
}
//获取路径path下的文件,并保存在files容器中
void getFiles(string path, vector<string>& files)
{
//文件句柄
long hFile = 0;
//文件信息
struct _finddata_t fileinfo;
string p;
if ((hFile = _findfirst(p.assign(path).append("\\*").c_str(), &fileinfo)) != -1)
{
do
{
if ((fileinfo.attrib & _A_SUBDIR))
{
if (strcmp(fileinfo.name, ".") != 0 && strcmp(fileinfo.name, "..") != 0)
getFiles(p.assign(path).append("\\").append(fileinfo.name), files);
}
else
{
files.push_back(p.assign(path).append("\\").append(fileinfo.name));
}
} while (_findnext(hFile, &fileinfo) == 0);
_findclose(hFile);
}
}
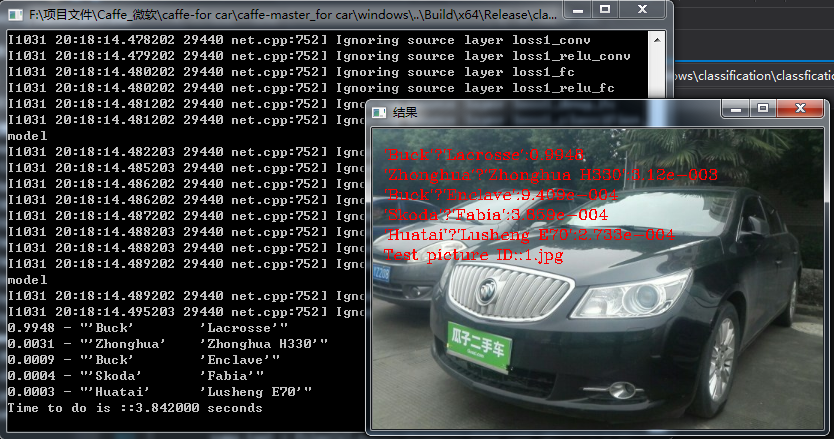
int main(int argc, char** argv) {
string model_file("../model/deploy.prototxt");
string trained_file("../model/type.caffemodel");
string mean_file("../model/type_mean.binaryproto");
string label_file("../model/labels.txt");
string picture_path("../model/type");
Classifier classifier(model_file, trained_file, mean_file, label_file);
vector<string> files;
getFiles(picture_path, files);
for (int i = 0; i < files.size(); i++)
{
clock_t start, finish;
double duration;
start = clock();
cv::Mat img = cv::imread(files[i], -1);
cv::Mat img2;
std::vector<Prediction> predictions = classifier.Classify(img);
//Prediction p = predictions[i];
IplImage* show;
CvSize sz;
sz.width = img.cols;
sz.height = img.rows;
float scal = 0;
scal = sz.width > sz.height ? (300.0 / (float)sz.height) : (300.0 / (float)sz.width);
sz.width *= scal;
sz.height *= scal;
resize(img, img2, sz, 0, 0, CV_INTER_LINEAR);
show = cvCreateImage(sz, IPL_DEPTH_8U, 3);
cvCopy(&(IplImage)img2, show);
CvFont font;
cvInitFont(&font, CV_FONT_HERSHEY_COMPLEX, 0.5, 0.5, 0, 1, 8); //初始化字体
//cvPutText(show, text.c_str(), cvPoint(10, 30), &font, cvScalar(0, 0, 255, NULL));
string name_text;
name_text = files[i].substr(files[i].find_last_of("\\") + 1);
name_text = "Test picture ID::"+ name_text;
cvPutText(show, name_text.c_str(), cvPoint(10, 130), &font, cvScalar(0, 0, 255, NULL));
for (size_t i = 0; i < predictions.size(); ++i)
{
Prediction p = predictions[i];
std::cout << std::fixed << std::setprecision(4) << p.second << " - \""
<< p.first << "\"" << std::endl;
string text = p.first;
char buff[20];
_gcvt(p.second, 4, buff);
text = text + ":" + buff;
/***************************输出英文标签*****************************************/
//CvFont font;
//cvInitFont(&font, CV_FONT_HERSHEY_COMPLEX, 0.5, 0.5, 0, 1, 8); //初始化字体
//cvPutText(show, text.c_str(), cvPoint(10, 30), &font, cvScalar(0, 0, 255, NULL));
//string name_text;
cvPutText(show, text.c_str(), cvPoint(10, 30 + i * 20), &font, cvScalar(0, 0, 255, NULL));
/**********************************************************************************/
cvNamedWindow("结果");
cvShowImage("结果", show);
cvWaitKey(1);
}
finish = clock();
duration = (double)(finish - start) / CLOCKS_PER_SEC;
printf("Time to do is ::");
printf("%f seconds\n", duration);
int c = cvWaitKey();
cvDestroyWindow("结果");
cvReleaseImage(&show);
std::cout << "///////////////////////////////////////////////////////////" << std::endl;
if (c == 27)
{
return 0;
}
}
return 0;
}
#else
int main(int argc, char** argv) {
LOG(FATAL) << "This example requires OpenCV; compile with USE_OPENCV.";
}
#endif // USE_OPENCV1:下载model:这里使用训练好的车辆识别的model
2:修改一下文件:
string model_file("../model/deploy.prototxt");
string trained_file("../model/type.caffemodel");
string mean_file("../model/type_mean.binaryproto");
string label_file("../model/labels.txt");
string picture_path("../model/type");//测试图片的路径
简单修改后就可以使用了。
model下载地址:链接:http://pan.baidu.com/s/1hs3CF9y 密码:j7m4

相关文章推荐
- windows下使用训练好的caffemodel做分类(2016-11-01)(车型分类)
- Caffe_Windows学习笔记(五)用训练好的caffemodel来进行分类
- 【神经网络与深度学习】【Qt开发】【VS开发】从caffe-windows-visual studio2013到Qt5.7使用caffemodel进行分类的移植过程
- Windows下caffe用fine-tuning训练好的caffemodel来进行图像分类
- 机器学习 - 使用训练好的Caffemodel 网络进行分类
- caffe for windows 下使用caffemodel 实现cifar10的图像分类
- 【神经网络与深度学习】【Qt开发】【VS开发】从caffe-windows-visual studio2013到Qt5.7使用caffemodel进行分类的移植过程<二>
- caffe学习--使用caffe中的imagenet对自己的图片进行分类训练(超级详细版) -----linux
- Windows下使用训练好的Caffe模型
- caffe_windows使用mnist训练的效果测试
- 在windows,linux平台进行caffemodel的批量训练
- 使用tf-slim的inception_resnet_v2预训练模型进行图像分类
- 用训练好的caffemodel来进行分类
- 使用LDA线性判别分析进行多类的训练分类
- 为什么在训练神经网络时候比较适合使用交叉熵错误率,而不是分类错误率或是均方差
- 用训练好的caffemodel来进行分类
- 使用caffe训练一个多标签分类/回归模型
- caffe 09 win10 使用训练好模型为给定图片分类
- Caffe学习系列(20):用训练好的caffemodel来进行分类
- caffe训练模型后,使用模型测试的分类结果全部都是相同的