第九周作业
2016-11-01 11:58
357 查看
1、详细描述一次加密通讯的过程,结合图示最佳。
TCP/IP协议组件可以使不同网络,不同操作系统的主机之间进行通信。TCP模型共分为四层,如下
1.应用层 (Application):应用层是个很广泛的概念,有一些基本相同的系统级 TCP/IP 应用以及应用协议,也有许多的企业商业应用和互联网应用,如http协议。
2.传输层 (Transport):传输层包括 UDP 和 TCP,UDP 几乎不对报文进行检查,而 TCP 提供差错检查机制,TCP三次握手建立连接,四次握手断开连接
3.网络层 (Network):网络层协议由一系列协议组成,包括 ICMP、IGMP、RIP、OSPF、IP(v4,v6)、BGP、ISIS 等
4.数据链路层 (Link):又称为物理数据网络接口层,负责报文传输,定义物理接口的规范
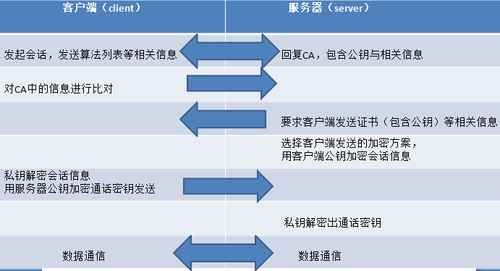
如上,我们可以看到,在TCP/IP模型中,定义了数据通信的规范,但TCP/IP并不提供更为安全的加密机制,因此在网络通信中,需要加入SSL协议,为数据通信提供更高的安全性。SSL协议能够保证交互双方的数据按密文方式传输,第三方在没有私钥的情况下几乎无法破解,从而到达保密的目的。下面我们来看看SSL双向认证是如何工作的吧。
一:浏览器发送一个连接请求给服务器;服务器将自己的证书(包含服务器公钥S_PuKey)、对称加密算法种类及其他相关信息返回客户端;
二:客户端浏览器检查服务器传送到CA证书是否由自己信赖的CA中心签发。若是,执行4步;否则,给客户一个警告信息:询问是否继续访问。
三:客户端浏览器比较证书里的信息,如证书有效期、服务器域名和公钥S_PK,与服务器传回的信息是否一致,如果一致,则浏览器完成对服务器的身份认证。
四:服务器要求客户端发送客户端证书(包含客户端公钥C_PuKey)、支持的对称加密方案及其他相关信息。收到后,服务器进行相同的身份认证,若没有通过验证,则拒绝连接;
五:服务器根据客户端浏览器发送到密码种类,选择一种加密程度最高的方案,用客户端公钥C_PuKey加密后通知到浏览器;
六:客户端通过私钥C_PrKey解密后,得知服务器选择的加密方案,并选择一个通话密钥key,接着用服务器公钥S_PuKey加密后发送给服务器;
七:服务器接收到的浏览器传送到消息,用私钥S_PrKey解密,获得通话密钥key
之后的数据通信都是通过对称加密来进行通信的了。
图示:
2、描述创建私有CA的过程,以及为客户端发来的证书请求进行办法证书。
建立CA服务器
1.初始化环境
2.生成密钥
3.自签证书
openssl命令:
req: 生成证书签署请求
-news: 新请求
-key /path/to/keyfile: 指定私钥文件
-out /path/to/somefile:
-x509: 生成自签署证书
-days n: 有效天数
客户端申请证书
4.客户端生成密钥对
5.生成证书签署请求
6.把签署请求文件发送给CA服务器
7.CA服务器验证信息并签署证书
8.将CA服务器签署好的证书发还客户端
3、搭建一套DNS服务器,负责解析magedu.com域名(自行设定主机名及IP)
(1)、能够对一些主机名进行正向解析和逆向解析; http://jiayimeng.blog.51cto.com/10604001/1852025 (2)、对子域cdn.magedu.com进行子域授权,子域负责解析对应子域中的主机名; http://jiayimeng.blog.51cto.com/10604001/1869624 (3)、为了保证DNS服务系统的高可用性,请设计一套方案,并写出详细的实施过程
4、请描述一次完整的http请求处理过程;
客户端向服务器端发送请求
服务器端接受并处理客户端的请求
获取请求报文中请求的资源
构建响应报文
发送响应报文
记录日志
5、httpd所支持的处理模型有哪些,他们的分别使用于哪些环境。
prefork:多进程模型,每个进程响应一个请求,一个主进程:负责生成n个子进程,子进程也称为工作进程,每个子进程处理一个用户请求,也会预先生成多个空闲进程,随时等待请求到达
worker:多线程模型,每个线程响应一个请求,一个主进程,生成多个子进程,每个子进程负责生成多个线程,每个线程响应一个请求m进程,n线程 m*n
event:事件驱动模型,每个线程响应n个请求,一个主进程,生成多个子进程,每个进程直接响应多个请求,m*n
6、建立httpd服务器(基于编译的方式进行),要求:
提供两个基于名称的虚拟主机:
(a)www1.stuX.com,页面文件目录为/web/vhosts/www1;错误日志为/var/log/httpd/www1.err,访问日志为/var/log/httpd/www1.access;
(b)www2.stuX.com,页面文件目录为/web/vhosts/www2;错误日志为/var/log/httpd/www2.err,访问日志为/var/log/httpd/www2.access;
(c)为两个虚拟主机建立各自的主页文件index.html,内容分别为其对应的主机名;
(d)通过www1.stuX.com/server-status输出httpd工作状态相关信息,且只允许提供帐号密码才能访问(status:status);
7、为第6题中的第2个虚拟主机提供https服务,使得用户可以通过https安全的访问此web站点;
(1)要求使用证书认证,证书中要求使用的国家(CN)、州(HA)、城市(ZZ)和组织(MageEdu);
(2)设置部门为Ops,主机名为www2.stuX.com,邮件为admin@stuX.com;
8、建立samba共享,共享目录为/data,要求:(描述完整的过程)
1)共享名为shared,工作组为magedu;
2)添加组develop,添加用户gentoo,centos和ubuntu,其中gentoo和centos以develop为附加组,ubuntu不属于develop组;密码均为用户名;
3)添加samba用户gentoo,centos和ubuntu,密码均为“mageedu”;
4)此samba共享shared仅允许develop组具有写权限,其他用户只能以只读方式访问;
5)此samba共享服务仅允许来自于172.16.0.0/16网络的主机访问;
9、搭建一套文件vsftp文件共享服务,共享目录为/ftproot,要求:(描述完整的过程)
1)基于虚拟用户的访问形式;
2)匿名用户只允许下载,不允许上传;
3)禁锢所有的用户于其家目录当中;
4)限制最大并发连接数为200:;
5)匿名用户的最大传输速率512KB/s
6)虚拟用户的账号存储在mysql数据库当中。
7)数据库通过NFS进行共享。
TCP/IP协议组件可以使不同网络,不同操作系统的主机之间进行通信。TCP模型共分为四层,如下
1.应用层 (Application):应用层是个很广泛的概念,有一些基本相同的系统级 TCP/IP 应用以及应用协议,也有许多的企业商业应用和互联网应用,如http协议。
2.传输层 (Transport):传输层包括 UDP 和 TCP,UDP 几乎不对报文进行检查,而 TCP 提供差错检查机制,TCP三次握手建立连接,四次握手断开连接
3.网络层 (Network):网络层协议由一系列协议组成,包括 ICMP、IGMP、RIP、OSPF、IP(v4,v6)、BGP、ISIS 等
4.数据链路层 (Link):又称为物理数据网络接口层,负责报文传输,定义物理接口的规范
如上,我们可以看到,在TCP/IP模型中,定义了数据通信的规范,但TCP/IP并不提供更为安全的加密机制,因此在网络通信中,需要加入SSL协议,为数据通信提供更高的安全性。SSL协议能够保证交互双方的数据按密文方式传输,第三方在没有私钥的情况下几乎无法破解,从而到达保密的目的。下面我们来看看SSL双向认证是如何工作的吧。
一:浏览器发送一个连接请求给服务器;服务器将自己的证书(包含服务器公钥S_PuKey)、对称加密算法种类及其他相关信息返回客户端;
二:客户端浏览器检查服务器传送到CA证书是否由自己信赖的CA中心签发。若是,执行4步;否则,给客户一个警告信息:询问是否继续访问。
三:客户端浏览器比较证书里的信息,如证书有效期、服务器域名和公钥S_PK,与服务器传回的信息是否一致,如果一致,则浏览器完成对服务器的身份认证。
四:服务器要求客户端发送客户端证书(包含客户端公钥C_PuKey)、支持的对称加密方案及其他相关信息。收到后,服务器进行相同的身份认证,若没有通过验证,则拒绝连接;
五:服务器根据客户端浏览器发送到密码种类,选择一种加密程度最高的方案,用客户端公钥C_PuKey加密后通知到浏览器;
六:客户端通过私钥C_PrKey解密后,得知服务器选择的加密方案,并选择一个通话密钥key,接着用服务器公钥S_PuKey加密后发送给服务器;
七:服务器接收到的浏览器传送到消息,用私钥S_PrKey解密,获得通话密钥key
之后的数据通信都是通过对称加密来进行通信的了。
图示:
2、描述创建私有CA的过程,以及为客户端发来的证书请求进行办法证书。
建立CA服务器
1.初始化环境
[root@jymlinux ~]# cd /etc/pki/CA/
[root@jymlinux CA]# touch /etc/pki/CA/{index.txt,serial}
[root@jymlinux CA]# echo 01 > /etc/pki/CA/serial
2.生成密钥
[root@jymlinux CA]# (umask 077; openssl genrsa -out /etc/pki/CA/private/cakey.pem 2048)
Generating RSA private key, 2048 bit long modulus
.................................+++
................................................................................................................................................................................................................................+++
e is 65537 (0x10001)
3.自签证书
openssl命令:
req: 生成证书签署请求
-news: 新请求
-key /path/to/keyfile: 指定私钥文件
-out /path/to/somefile:
-x509: 生成自签署证书
-days n: 有效天数
[root@jymlinux CA]# openssl req -new -x509 -key /etc/pki/CA/private/cakey.pem -out /etc/pki/CA/cacert.pem -days 3655
You are about to be asked to enter information that will be incorporated
into your certificate request.
What you are about to enter is what is called a Distinguished Name or a DN.
There are quite a few fields but you can leave some blank
For some fields there will be a default value,
If you enter '.', the field will be left blank.
-----
Country Name (2 letter code) [XX]:CN                 #国家名
State or Province Name (full name) []:XJ             #省份
Locality Name (eg, city) [Default City]:WS           #城市名
Organization Name (eg, company) [Default Company Ltd]:YTJ          #公司名
Organizational Unit Name (eg, section) []:OPS                      #部门名
Common Name (eg, your name or your server's hostname) []:JYM       #主机名
Email Address []:614949750@qq.com                                  #邮箱
客户端申请证书
4.客户端生成密钥对
[root@linus ~]# mkdir /etc/httpd/ssl/
[root@linus ~]# (umask 077; openssl genrsa -out /etc/httpd/ssl/httpd.key 2048)
Generating RSA private key, 2048 bit long modulus
.......+++
.....................+++
e is 65537 (0x10001)
5.生成证书签署请求
[root@linus ~]# openssl req -new -key /etc/httpd/ssl/httpd.key -out /etc/httpd/ssl/httpd.csr
You are about to be asked to enter information that will be incorporated
into your certificate request.
What you are about to enter is what is called a Distinguished Name or a DN.
There are quite a few fields but you can leave some blank
For some fields there will be a default value,
If you enter '.', the field will be left blank.
-----
Country Name (2 letter code) [XX]:CN
State or Province Name (full name) []:XJ
Locality Name (eg, city) [Default City]:WS
Organization Name (eg, company) [Default Company Ltd]:YTJ
Organizational Unit Name (eg, section) []:OPS
Common Name (eg, your name or your server's hostname) []:JYM
Email Address []:110@qq.com

Please enter the following 'extra' attributes
to be sent with your certificate request
A challenge password []:123456             #一个加密的密码
An optional company name []:RA             #可选公司
6.把签署请求文件发送给CA服务器
[root@linus ssl]# scp httpd.csr root@192.168.101.129:/root
The authenticity of host '192.168.101.129 (192.168.101.129)' can't be established.
RSA key fingerprint is e5:84:6c:f7:c0:60:3d:0b:39:b6:1e:12:0d:48:8b:07.
Are you sure you want to continue connecting (yes/no)? y
root@192.168.101.129's password:
httpd.csr                                           100% 1066     1.0KB/s   00:00
7.CA服务器验证信息并签署证书
[root@jymlinux ~]# openssl ca -in /root/httpd.csr -out /root/httpd.crt -days 365
Using configuration from /etc/pki/tls/openssl.cnf
Check that the request matches the signature
Signature ok
Certificate Details:
Serial Number: 1 (0x1)
Validity
Not Before: Oct 31 20:07:58 2016 GMT
Not After : Oct 31 20:07:58 2017 GMT
Subject:
countryName               = CN
stateOrProvinceName       = XJ
organizationName          = YTJ
organizationalUnitName    = OPS
commonName                = JYM
emailAddress              = 110@qq.com
X509v3 extensions:
X509v3 Basic Constraints:
CA:FALSE
Netscape Comment:
OpenSSL Generated Certificate
X509v3 Subject Key Identifier:
C4:ED:C0:CE:98:5A:B9:AF:FE:E0:59:54:DB:E1:2A:96:99:A4:B7:28
X509v3 Authority Key Identifier:
keyid:C2:1A:DE:02:69:35:41:AF:98:EB:72:69:EB:AE:74:49:72:52:2B:C6

Certificate is to be certified until Oct 31 20:07:58 2017 GMT (365 days)
Sign the certificate? [y/n]:y

1 out of 1 certificate requests certified, commit? [y/n]y
Write out database with 1 new entries
Data Base Updated
8.将CA服务器签署好的证书发还客户端
[root@jymlinux ~]# scp /root/httpd.crt root@192.168.101.130:/etc/httpd/ssl/
The authenticity of host '192.168.101.130 (192.168.101.130)' can't be established.
RSA key fingerprint is ef:85:f8:aa:1c:de:41:5a:fd:93:8d:9f:83:f7:a2:ff.
Are you sure you want to continue connecting (yes/no)? y
Please type 'yes' or 'no': yes
Warning: Permanently added '192.168.101.130' (RSA) to the list of known hosts.
Nasty PTR record "192.168.101.130" is set up for 192.168.101.130, ignoring
root@192.168.101.130's password:
httpd.crt                                           100% 4491     4.4KB/s   00:00
3、搭建一套DNS服务器,负责解析magedu.com域名(自行设定主机名及IP)
(1)、能够对一些主机名进行正向解析和逆向解析; http://jiayimeng.blog.51cto.com/10604001/1852025 (2)、对子域cdn.magedu.com进行子域授权,子域负责解析对应子域中的主机名; http://jiayimeng.blog.51cto.com/10604001/1869624 (3)、为了保证DNS服务系统的高可用性,请设计一套方案,并写出详细的实施过程
4、请描述一次完整的http请求处理过程;
客户端向服务器端发送请求
服务器端接受并处理客户端的请求
获取请求报文中请求的资源
构建响应报文
发送响应报文
记录日志
5、httpd所支持的处理模型有哪些,他们的分别使用于哪些环境。
prefork:多进程模型,每个进程响应一个请求,一个主进程:负责生成n个子进程,子进程也称为工作进程,每个子进程处理一个用户请求,也会预先生成多个空闲进程,随时等待请求到达
worker:多线程模型,每个线程响应一个请求,一个主进程,生成多个子进程,每个子进程负责生成多个线程,每个线程响应一个请求m进程,n线程 m*n
event:事件驱动模型,每个线程响应n个请求,一个主进程,生成多个子进程,每个进程直接响应多个请求,m*n
6、建立httpd服务器(基于编译的方式进行),要求:
提供两个基于名称的虚拟主机:
(a)www1.stuX.com,页面文件目录为/web/vhosts/www1;错误日志为/var/log/httpd/www1.err,访问日志为/var/log/httpd/www1.access;
(b)www2.stuX.com,页面文件目录为/web/vhosts/www2;错误日志为/var/log/httpd/www2.err,访问日志为/var/log/httpd/www2.access;
(c)为两个虚拟主机建立各自的主页文件index.html,内容分别为其对应的主机名;
(d)通过www1.stuX.com/server-status输出httpd工作状态相关信息,且只允许提供帐号密码才能访问(status:status);
一、编译安装apache

1.准备编译环境
[root@centfils ~]# yum groupinstall Development Tools ; yum groupinstall Server Platform Development

2.安装依赖包
[root@centfils ~]# yum install pcre-devel -y

3.下载源码包
[root@centfils ~]# wget
[root@centfils ~]# wget
[root@centfils ~]# wget

4. 编译安装apache,apr,apr-util
[root@centfils ~]# tar xf apr-1.5.2.tar.bz2
[root@centfils ~]# cd apr-1.5.2
[root@centfils apr-1.5.2]# ./configure --prefix=/usr/local/apr
[root@centfils apr-1.5.2]# make && make install

[root@centfils ~]# tar xf apr-util-1.5.4.tar.bz2
[root@centfils ~]# cd apr-util-1.5.4
[root@centfils apr-util-1.5.4]# ./configure --prefix=/usr/local/apr-util --with-apr=/usr/local/apr
[root@centfils apr-util-1.5.4]# make && make install

[root@centfils ~]# tar xf httpd-2.4.23.tar.bz2
[root@centfils ~]# cd httpd-2.4.23
[root@centfils httpd-2.4.23]# ./configure --prefix=/usr/local/apache --sysconfdir=/etc/httpd --enable-so --enable-ssl --enable-cgi --enable-rewrite --with-zlib --with-pcre --with-apr=/usr/local/apr --with-apr-util=/usr/local/apr-util --enable-modules=most --enable-mpms-shared=all
--perfix=/usr/local/apache 指定安装路径;
--sysconfdir=/etc/httpd 指定配置文件路径;
--enable-so  apache核心装载DSO,但实际不编译任何动态模块;
--enable-ssl 支持ssl模块;
--enable-cgi支持cgi模块;
--enable-rewrite 支持url重写;
--with-zlib支持zlib库文件;
--with-pcre 包含pcre函数;
--with-apr=/usr/local/apr 指定apr的路径;
--with-apr-util=/usr/local/apr-util 指明apr-util路径;
--enable-modules=most 支持模块;支持共享模块;
--with-mpm=event加载模块event
[root@centfils httpd-2.4.23]# make && make install

5.修改httpd的主配置文件
[root@centfils ~]# vim /etc/httpd/httpd.conf
#加入PidFile,修改用户与组
PidFile "/var/run/httpd.pid"
User apache
Group apache

6.提供sysv服务脚本/etc/rc.d/init.d/httpd,内容如下:
[root@centfils ~]# vim /etc/rc.d/init.d/httpd
#!/bin/bash
#
# httpd        Startup script for the Apache HTTP Server
#
# chkconfig: - 85 15
# description: Apache is a World Wide Web server.  It is used to serve \
#        HTML files and CGI.
# processname: httpd
# config: /etc/httpd/conf/httpd.conf
# config: /etc/sysconfig/httpd
# pidfile: /var/run/httpd.pid

# Source function library.
. /etc/rc.d/init.d/functions

if [ -f /etc/sysconfig/httpd ]; then
. /etc/sysconfig/httpd
fi

# Start httpd in the C locale by default.
HTTPD_LANG=${HTTPD_LANG-"C"}

# This will prevent initlog from swallowing up a pass-phrase prompt if
# mod_ssl needs a pass-phrase from the user.
INITLOG_ARGS=""

# Set HTTPD=/usr/sbin/httpd.worker in /etc/sysconfig/httpd to use a server
# with the thread-based "worker" MPM; BE WARNED that some modules may not
# work correctly with a thread-based MPM; notably PHP will refuse to start.

# Path to the apachectl script, server binary, and short-form for messages.
apachectl=/usr/local/apache/bin/apachectl
httpd=${HTTPD-/usr/local/apache/bin/httpd}
prog=httpd
pidfile=${PIDFILE-/var/run/httpd.pid}
lockfile=${LOCKFILE-/var/lock/subsys/httpd}
RETVAL=0

start() {
echo -n $"Starting $prog: "
LANG=$HTTPD_LANG daemon --pidfile=${pidfile} $httpd $OPTIONS
RETVAL=$?
echo
[ $RETVAL = 0 ] && touch ${lockfile}
return $RETVAL
}

stop() {
echo -n $"Stopping $prog: "
killproc -p ${pidfile} -d 10 $httpd
RETVAL=$?
echo
[ $RETVAL = 0 ] && rm -f ${lockfile} ${pidfile}
}
reload() {
echo -n $"Reloading $prog: "
if ! LANG=$HTTPD_LANG $httpd $OPTIONS -t >&/dev/null; then
RETVAL=$?
echo $"not reloading due to configuration syntax error"
failure $"not reloading $httpd due to configuration syntax error"
else
killproc -p ${pidfile} $httpd -HUP
RETVAL=$?
fi
echo
}

# See how we were called.
case "$1" in
start)
start
;;
stop)
stop
;;
status)
status -p ${pidfile} $httpd
RETVAL=$?
;;
restart)
stop
start
;;
condrestart)
if [ -f ${pidfile} ] ; then
stop
start
fi
;;
reload)
reload
;;
graceful|help|configtest|fullstatus)
$apachectl $@
RETVAL=$?
;;
*)
echo $"Usage: $prog {start|stop|restart|condrestart|reload|status|fullstatus|graceful|help|configtest}"
exit 1
esac

exit $RETVAL

7.赋予脚本执行权限
[root@centfils ~]# chmod +x /etc/rc.d/init.d/httpd

8.加入服务列表
[root@centfils ~]# chkconfig --add httpd

9.启动服务
[root@centfils ~]# service httpd start

10.如有老版本,更改path路径,并清除缓存
[root@centfils ~]# vim /etc/profile.d/httpd.sh
export PATH=/usr/local/apache/bin:$PATH
[root@centfils ~]# . /etc/profile.d/httpd.sh
[root@centfils ~]# . /etc/profile.d/httpd.sh
[root@centfils ~]# hash -r
###########编辑虚拟主机配置文件#################
#编辑配置文件
[root@centfils ~]# vim /etc/httpd/httpd.conf
# Virtual hosts
Include /etc/httpd/extra/httpd-vhosts.conf #启用虚拟主机
#禁用主站的目录
#DocumentRoot "/usr/local/apache/htdocs"
#添加虚拟主机访问权限
<Directory "/web/vhosts/www1">
options none
allowoverride none
Require all granted
</Directory>
<Directory "/web/vhosts/www2">
options none
allowoverride none
Require all granted
</Directory>
#编辑虚拟主机配置
[root@centfils ~]# vim /etc/httpd/extra/httpd-vhosts.conf
<VirtualHost 192.168.101.131:80>
ServerName www1.stuX.com #虚拟主机名
DocumentRoot "/web/vhosts/www1" #根目录
CustomLog "/var/log/httpd/www1.access" common #访问日志
ErrorLog "/var/log/httpd/www1.err" #错误日志
</VirtualHost>
<VirtualHost 192.168.101.131:80>
ServerName www2.stuX.com
DocumentRoot "/web/vhosts/www2"
CustomLog "/var/log/httpd/www2.access" common
ErrorLog "/var/log/httpd/www2.err"
</VirtualHost>
#创建目录与文件
[root@centfils ~]# cd /var/log/httpd/
[root@centfils httpd]# touch {www1,www2}.{access,err}
[root@centfils ~]# mkdir -pv /web/vhosts/{www1,www2}
mkdir: 已创建目录 "/web"
mkdir: 已创建目录 "/web/vhosts"
mkdir: 已创建目录 "/web/vhosts/www1"
mkdir: 已创建目录 "/web/vhosts/www2"
#导入文本
[root@centfils ~]# echo www1.stuX.com > /web/vhosts/www1/index.html
[root@centfils ~]# echo www2.stuX.com > /web/vhosts/www2/index.html
#修改本机的hosts文件,使VirtualHost与hosts文件的对应一直。
[root@centfils ~]# vim /etc/hosts
127.0.0.1 localhost localhost.localdomain localhost4 localhost4.localdomain4
::1 localhost localhost.localdomain localhost6 localhost6.localdomain6
192.168.101.131 www1.stuX.com
192.168.101.131 www2.stuX.com
#测试
[root@centfils ~]# curl http://www1.stuX.com www1.stuX.com
[root@centfils ~]# curl http://www2.stuX.com www2.stuX.com
#www1.stuX.com/server-status输出httpd工作状态相关信息
#在/etc/httpd/extra/httpd-vhosts.conf中
<VirtualHost 192.168.101.131:80>
ServerName www1.stuX.com
DocumentRoot "/web/vhosts/www1"
CustomLog "/var/log/httpd/www1.access" common
ErrorLog "/var/log/httpd/www1.err"
<Location /server-status>
SetHandler server-status
AuthType Basic
AuthName "Server-Status"
AuthUserFile "/etc/httpd/.htpasswd"
Require valid-user
</Location>
</VirtualHost>
#生成密码验证文件
[root@centfils ~]# htpasswd -c -m .htpasswd status
New password:
Re-type new password:
Adding password for user status7、为第6题中的第2个虚拟主机提供https服务,使得用户可以通过https安全的访问此web站点;
(1)要求使用证书认证,证书中要求使用的国家(CN)、州(HA)、城市(ZZ)和组织(MageEdu);
(2)设置部门为Ops,主机名为www2.stuX.com,邮件为admin@stuX.com;
#创建所需文件
[root@centfils ~]# cd /etc/pki/CA/
[root@centfils CA]# touch index.txt
[root@centfils CA]# echo 01 > serial

#创建私有CA
[root@centfils ~]# cd /etc/pki/CA
[root@centfils CA]# (umask 077; openssl genrsa -out private/cakey.pem 2048)
Generating RSA private key, 2048 bit long modulus
........+++
.............................+++
e is 65537 (0x10001)
[root@centfils CA]# openssl req -new -x509 -key private/cakey.pem -days 7300 -out cacert.pem
You are about to be asked to enter information that will be incorporated
into your certificate request.
What you are about to enter is what is called a Distinguished Name or a DN.
There are quite a few fields but you can leave some blank
For some fields there will be a default value,
If you enter '.', the field will be left blank.
-----
Country Name (2 letter code) [XX]:CN
State or Province Name (full name) []:HA
Locality Name (eg, city) [Default City]:ZZ
Organization Name (eg, company) [Default Company Ltd]:MageEdu
Organizational Unit Name (eg, section) []:Ops
Common Name (eg, your name or your server's hostname) []:www2.stuX.com
Email Address []:admin.stuX.com

#web主机请求CA
[root@centfils CA]# cd /etc/httpd/
[root@centfils httpd]# mkdir ssl
[root@centfils httpd]# cd ssl
[root@centfils ssl]# (umask 077; openssl genrsa -out httpd.key 2048)
Generating RSA private key, 2048 bit long modulus
...........................................................................................................................................................................................................................................+++
..........+++
e is 65537 (0x10001))
[root@centfils ssl]# openssl req -new -key httpd.key -days 365 -out httpd.csr
You are about to be asked to enter information that will be incorporated
into your certificate request.
What you are about to enter is what is called a Distinguished Name or a DN.
There are quite a few fields but you can leave some blank
For some fields there will be a default value,
If you enter '.', the field will be left blank.
-----
Country Name (2 letter code) [XX]:CN
State or Province Name (full name) []:HA
Locality Name (eg, city) [Default City]:ZZ
Organization Name (eg, company) [Default Company Ltd]:MageEdu
Organizational Unit Name (eg, section) []:Ops
Common Name (eg, your name or your server's hostname) []:www2.stuX.com
Email Address []:jym.stuX.com

Please enter the following 'extra' attributes
to be sent with your certificate request
A challenge password []:
An optional company name []:

#CA审核后签署证书
root@centfils ssl]# openssl ca -in httpd.csr -out httpd.crt -days 365
Using configuration from /etc/pki/tls/openssl.cnf
Check that the request matches the signature
Signature ok
Certificate Details:
Serial Number: 1 (0x1)
Validity
Not Before: Nov  5 08:28:25 2016 GMT
Not After : Nov  5 08:28:25 2017 GMT
Subject:
countryName               = CN
stateOrProvinceName       = HA
organizationName          = MageEdu
organizationalUnitName    = Ops
commonName                = www2.stuX.com
emailAddress              = jym.stuX.com
X509v3 extensions:
X509v3 Basic Constraints:
CA:FALSE
Netscape Comment:
OpenSSL Generated Certificate
X509v3 Subject Key Identifier:
01:36:B9:A9:B7:29:8C:3E:08:75:75:4D:B3:F7:4C:F2:BB:EF:77:95
X509v3 Authority Key Identifier:
keyid:37:AC:65:4A:5A:38:A4:CD:43:61:42:BE:03:FE:D1:84:45:29:F9:CC

Certificate is to be certified until Nov  5 08:28:25 2017 GMT (365 days)
Sign the certificate? [y/n]:y

1 out of 1 certificate requests certified, commit? [y/n]y
Write out database with 1 new entries
Data Base Updated

#查看签署记录
[root@centfils CA]# cat index.txt
V	171105082825Z		01	unknown	/C=CN/ST=HA/O=MageEdu/OU=Ops/CN=www2.stuX.com/emailAddress=jym.stuX.com

#配置httpd使用SSL认证,修改或注释SSL文件位置等信息
[root@centfils CA]# yum install mod_ssl -y
[root@centfils CA]# cd /etc/httpd/conf.d/
[root@centfils conf.d]# vim ssl.conf
<VirtualHost 192.168.101.131:443>
ServerName www2.stuX.com:443
DocumentRoot "/web/vhosts/www2"
CustomLog "/var/log/httpd/www2.ssl.access"  common
ErrorLog "/var/log/httpd/www2.ssl.err"
SSLEngine on
SSLCertificateFile "/etc/httpd/ssl/httpd.crt"
SSLCertificateKeyFile "/etc/httpd/ssl/httpd.key"
</VirtualHost>
8、建立samba共享,共享目录为/data,要求:(描述完整的过程)
1)共享名为shared,工作组为magedu;
2)添加组develop,添加用户gentoo,centos和ubuntu,其中gentoo和centos以develop为附加组,ubuntu不属于develop组;密码均为用户名;
3)添加samba用户gentoo,centos和ubuntu,密码均为“mageedu”;
4)此samba共享shared仅允许develop组具有写权限,其他用户只能以只读方式访问;
5)此samba共享服务仅允许来自于172.16.0.0/16网络的主机访问;
1.安装samba服务
[root@centfils ~]# yum install samba samba-client -y

2.创建组与用户
[root@centfils ~]# groupadd develop
[root@centfils ~]# useradd -G develop gentoo
[root@centfils ~]# useradd -G develop centos
[root@centfils ~]# useradd ubuntu
[root@centfils ~]# echo "gentoo" | passwd --stdin gentoo
更改用户 gentoo 的密码 。
passwd: 所有的身份验证令牌已经成功更新。
[root@centfils ~]# echo "centos" | passwd --stdin centos
更改用户 centos 的密码 。
passwd: 所有的身份验证令牌已经成功更新。
[root@centfils ~]# echo "ubuntu" | passwd --stdin ubuntu
更改用户 ubuntu 的密码 。
passwd: 所有的身份验证令牌已经成功更新。

3.添加samba用户
[root@centfils ~]# smbpasswd -a centos
[root@centfils ~]# smbpasswd -a ubuntu
[root@centfils ~]# smbpasswd -a gentoo

4.配置文件
[root@centfils ~]# vim /etc/samba/smb.conf
workgroup = magedu                        #工作组
hosts allow = 127. 192.168.12. 192.168.13.172.16.
[shared]
comment = night text
path = /data
write list = +develop

5.启动服务
[root@centfils ~]# service nmb start
启动 NMB 服务:                                            [确定]
[root@centfils ~]# service smb start
启动 SMB 服务:                                            [确定]
9、搭建一套文件vsftp文件共享服务,共享目录为/ftproot,要求:(描述完整的过程)
1)基于虚拟用户的访问形式;
2)匿名用户只允许下载,不允许上传;
3)禁锢所有的用户于其家目录当中;
4)限制最大并发连接数为200:;
5)匿名用户的最大传输速率512KB/s
6)虚拟用户的账号存储在mysql数据库当中。
7)数据库通过NFS进行共享。
1.安装ftp
[root@192 ~]# yum install vsftpd

2.修改配置
[root@192 vsftpd]# vim vsftpd.conf
#允许匿名用户
anonymous_enable=YES
#允许系统用户
local_enable=YES
#本地用户写权限
write_enable=YES
#ftp访问文件的默认权限
local_umask=022
#匿名用户创建目录
#anon_mkdir_write_enable=YES
#允许匿名用户上传
anon_upload_enable=NO
#锁定所有ftp本地用户与文件中的指定的用户在其家目录
chroot_local_user=YES
chroot_list_enable=YES
# (default follows)
chroot_list_file=/etc/vsftpd/chroot_list
#家目录
local_root=/ftproot
anon_root=/ftproot
