深入理解layout_weight属性
2016-10-31 21:08
239 查看
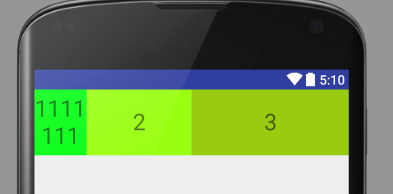
1.最常见用法:如下布局代码所示,子控件的宽度比是1:2:3
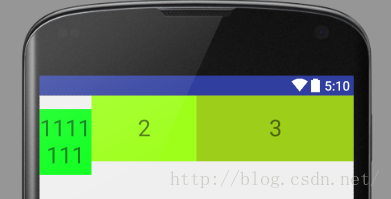
假如没有android:baselineAligned="false" ,则如下图,(baseline的意识是基线,是英文中的字体对齐方式,仔细看下图会发现1111,和2,3在同一条水平线上)
2.注意:子控件的显示尺寸不是简单的按照权重进行显示:减去子控件声明的宽度或高度的尺寸,将剩下的尺寸按照比例加上声明的尺寸分配给子控件:
比如我们将第一个textview的宽android:layout_width="wrap_content",则结果如下图

<?xml version="1.0" encoding="utf-8"?>
<LinearLayout xmlns:android="http://schemas.android.com/apk/res/android"
android:orientation="horizontal"
android:layout_width="match_parent"
android:layout_height="match_parent"
android:baselineAligned="false">

<TextView
android:id="@+id/text1"
android:background="#00ff11"
android:layout_width="0dp"
android:layout_height="80dp"
android:textSize="28dp"
android:text="1111111"
android:gravity="center"
android:layout_weight="1"/>
<TextView
android:id="@+id/text2"
android:background="#99ff11"
android:layout_width="0dp"
android:layout_height="80dp"
android:textSize="28dp"
android:text="2"
android:gravity="center"
android:layout_weight="2"/>

<TextView
android:id="@+id/text3"
android:background="#99cc11"
android:layout_width="0dp"
android:layout_height="80dp"
android:textSize="28dp"
android:text="3"
android:gravity="center"
android:layout_weight="3"/>
</LinearLayout>
假如没有android:baselineAligned="false" ,则如下图,(baseline的意识是基线,是英文中的字体对齐方式,仔细看下图会发现1111,和2,3在同一条水平线上)
2.注意:子控件的显示尺寸不是简单的按照权重进行显示:减去子控件声明的宽度或高度的尺寸,将剩下的尺寸按照比例加上声明的尺寸分配给子控件:
比如我们将第一个textview的宽android:layout_width="wrap_content",则结果如下图

相关文章推荐
- 安卓开发技巧一:深入理解Android布局中Layout_weight的属性
- 对android的layout_weight属性的理解
- 深入了解layout_weight属性
- Android知识点剖析系列:深入了解layout_weight属性
- 深入理解Layout_weight
- android 深入了解layout_weight属性
- android:layout_weight属性你真的理解吗
- 对android的layout_weight属性的理解
- android属性之layout_weight深入研究
- Android实习收获:UI细节bug引发的layout_weight深入理解
- android:layout_weight深入理解
- 不可忽视的布局属性layout_weight,彻底纠正网上很多对于该属性的片面理解
- Android知识点剖析系列:深入了解layout_weight属性
- Android中layout_weight的属性理解
- Android知识点剖析系列:深入了解layout_weight属性
- android之LinearLayout中android:layout_weight属性理解
- 不可忽视的布局属性layout_weight,彻底纠正网上很多对于该属性的片面理解
- Android布局之LinearLayout weight属性的理解
- Android手机开发:android:layout_weight属性的使用
- Android中 android:layout_weight 属性