自定义相机、相册(相机篇)
2016-10-31 18:05
351 查看
工作之余,研究了一下相机与相册的自定义,在这里整理成篇仅供参考学习,希望可以给大家带来些许帮助,也期待大家的批评指正。
GIF 示例:
DEMO下载地址:https://github.com/IMCCP/CCPCustomCamera
iOS开发中调用相机来获取照片时,如果对相机样式没有过多的要求,通常我们会调用UIImagePickerController这个系统封装好的控件。但是有时UIImagePickerController无法满足项目的需求,例如我们需要自定义的相机样式,此时则需要自己构造一个相机控件,因此需要使用AVFoundation框架进行相机的自定义。
首先导入 AVFoundation.framework
一、创建相机相关的属性
二、相机界面的布局
1.图片示意图
2.布局代码
三、主要功能介绍
1.拍照按钮
这里需要注意的是拍照完成后的照片显示的方向问题。
屏幕的方向大致可以分为以下6中:
home键盘朝下/home键朝右/home键朝上/home键朝左,还有两种就是屏幕朝上和屏幕朝下。因此需要根据不同屏幕方向进行照片的旋转,否则照片的显示将会出现问题,解决方法见下文介绍。
2.自定义截图功能
通过使用第三方截图框架(TOCropViewController),实现自定义截图。
框架地址:TOCropViewController
3.聚焦功能、镜头切换功能、闪光灯功能以及镜头缩放功能
这些功能在DEMO中都做了详细的注释,就不在这里展开了,详见DEMO。
https://github.com/IMCCP/CCPCustomCamera
四、下一步将要完善的功能
1.图片浏览器功能;
2.图片的美化以及滤镜功能;
感谢您的阅读,期待您的 Star,如果在使用中您有任何问题,可以在 github issue,我会尽自己能力给您答复 。
GIF 示例:
DEMO下载地址:https://github.com/IMCCP/CCPCustomCamera
iOS开发中调用相机来获取照片时,如果对相机样式没有过多的要求,通常我们会调用UIImagePickerController这个系统封装好的控件。但是有时UIImagePickerController无法满足项目的需求,例如我们需要自定义的相机样式,此时则需要自己构造一个相机控件,因此需要使用AVFoundation框架进行相机的自定义。
首先导入 AVFoundation.framework
#import <AVFoundation/AVFoundation.h>
一、创建相机相关的属性
/**
*  用来获取相机设备的一些属性
*/
@property (nonatomic,strong)AVCaptureDevice *device;

/**
*  用来执行输入设备和输出设备之间的数据交换
*/
@property(nonatomic,strong)AVCaptureSession * session;

/**
*  输入设备,调用所有的输入硬件,例如摄像头、麦克风
*/
@property (nonatomic,strong)AVCaptureDeviceInput *deviceInput;

/**
*  照片流输出,用于输出图像
*/
@property (nonatomic,strong)AVCaptureStillImageOutput *imageOutput;

/**
*  镜头扑捉到的预览图层
*/
@property (nonatomic,strong)AVCaptureVideoPreviewLayer *previewLayer;

/**
*  session通过AVCaptureConnection连接AVCaptureStillImageOutput进行图片输出
*/
@property (nonatomic,strong) AVCaptureConnection *connection;

#以下属性只是在本DEMO中有用到,大家可以按照自己项目的需求进行添加。
/**
*  记录屏幕的旋转方向
*/
@property (nonatomic,assign) UIDeviceOrientation deviceOrientation;

/**
*  给自定义相机添加(UIPinchGestureRecognizer)手势 ->记录开始的缩放比例
*/
@property(nonatomic,assign)CGFloat beginGestureScale;

/**
*  记录最后的缩放比例
*/
@property(nonatomic,assign)CGFloat effectiveScale;

/**
*  自定义闪光灯功能 ->闪光灯按钮
*/
@property(nonatomic,weak)UIButton *lightButton;

/**
*  闪光灯状态
*/
@property (nonatomic,assign) NSInteger lightCameraState;

/**
*  遮照View,主要用来自定义相机界面的显示效果
*/
@property (nonatomic,weak) CCPCameraView *caramView;
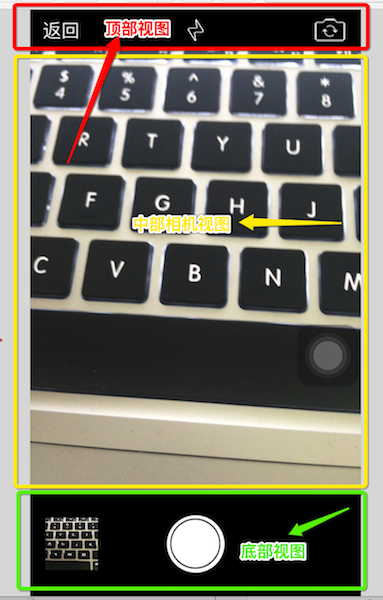
二、相机界面的布局
1.图片示意图
2.布局代码
- (void) makeUI {
//设置图层的frame
CGFloat ScreenW = self.view.frame.size.width;
CGFloat ScreenH = self.view.frame.size.height;
#顶部视图
UIView *headView = [[UIView alloc] initWithFrame:CGRectMake(0, 0, ScreenW, 40)];
headView.backgroundColor = [UIColor blackColor];
//返回按钮
UIButton *backButton = [[UIButton alloc] initWithFrame:CGRectMake(0, 0, 60, 40)];
[backButton addTarget:self action:@selector(clickBackButton) forControlEvents:UIControlEventTouchUpInside];
[backButton setTitle:@"返回" forState:UIControlStateNormal];
[backButton setTintColor:[UIColor whiteColor]];
[headView addSubview:backButton];
//切换镜头按钮
UIButton *changeButton = [[UIButton alloc] initWithFrame:CGRectMake(ScreenW - 60, 0, 60, 40)];
[changeButton addTarget:self action:@selector(clickchangeButton) forControlEvents:UIControlEventTouchUpInside];
[changeButton setImage:[UIImage imageNamed:@"camera-switch"] forState:UIControlStateNormal];
[headView addSubview:changeButton];
//闪光灯
UIButton *lightButton = [[UIButton alloc] initWithFrame:CGRectMake(ScreenW / 2 - 30, 0, 60, 40)];
[lightButton addTarget:self action:@selector(clickLightButton:) forControlEvents:UIControlEventTouchUpInside];
[lightButton setImage:[UIImage imageNamed:@"flashOffIcon"] forState:UIControlStateNormal];
self.lightButton = lightButton;
[headView addSubview:lightButton];
[self.view addSubview:headView];

#中部相机视图
NSError *error;
//创建会话层
self.device = [AVCaptureDevice defaultDeviceWithMediaType:AVMediaTypeVideo];
//初始化session
self.session = [[AVCaptureSession alloc] init];
if ([self.session canSetSessionPreset:AVCaptureSessionPresetPhoto]) {
self.session.sessionPreset = AVCaptureSessionPresetPhoto;
}
//初始化输入设备
self.deviceInput = [AVCaptureDeviceInput deviceInputWithDevice:self.device error:&error];
//初始化照片输出对象
self.imageOutput = [[AVCaptureStillImageOutput alloc] init];
//输出设置,AVVideoCodecJPEG 输出jpeg格式图片
NSDictionary * outputSettings = [[NSDictionary alloc] initWithObjectsAndKeys:AVVideoCodecJPEG,AVVideoCodecKey, nil];
[self.imageOutput setOutputSettings:outputSettings];
//判断输入输出设备是否可用
if ([self.session canAddInput:self.deviceInput]) {
[self.session addInput:self.deviceInput];
}
if ([self.session canAddOutput:self.imageOutput]) {
[self.session addOutput:self.imageOutput];
}
//初始化预览图层
self.previewLayer = [[AVCaptureVideoPreviewLayer alloc] initWithSession:self.session];

/** 设置图层的填充样式
*  AVLayerVideoGravityResize,       // 非均匀模式。两个维度完全填充至整个视图区域
AVLayerVideoGravityResizeAspect,  // 等比例填充,直到一个维度到达区域边界
AVLayerVideoGravityResizeAspectFill, // 等比例填充,直到填充满整个视图区域,其中一个维度的部分区域会被裁剪
*/
self.previewLayer.videoGravity = AVLayerVideoGravityResizeAspectFill;
self.previewLayer.frame = CGRectMake(0, 40,ScreenW, ScreenW * 4 / 3);
[self.view.layer insertSublayer:self.previewLayer atIndex:0];
CGFloat previewLayerY = CGRectGetMaxY(self.previewLayer.frame);
//遮照view
CCPCameraView *caramView = [[CCPCameraView alloc] init];
caramView.frame = self.previewLayer.frame;
caramView.backgroundColor = [UIColor clearColor];
caramView.delegate = self;
self.caramView = caramView;
//添加捏合手势
UIPinchGestureRecognizer *pinch = [[UIPinchGestureRecognizer alloc] initWithTarget:self action:@selector(handlePinchGesture:)];
pinch.delegate = self;
[caramView addGestureRecognizer:pinch];
[self.view addSubview:caramView];

#底部视图
CGRect rect = CGRectMake(0, previewLayerY , ScreenW, ScreenH - previewLayerY);
UIView *bottomView = [[UIView alloc] initWithFrame:rect];
bottomView.backgroundColor = [UIColor blackColor];
[self.view addSubview:bottomView];
UIButton *button = [[UIButton alloc] init];
[button setImage:[UIImage imageNamed:@"btn_prisma_takephoto"] forState:UIControlStateNormal];
button.frame = CGRectMake(0, 0, 60, 60);
button.centerX = bottomView.centerX;
button.centerY = bottomView.height / 2;
[button addTarget:self action:@selector(clickPHOTO) forControlEvents:UIControlEventTouchUpInside];
[bottomView addSubview:button];
UIImageView *imageView = [[UIImageView alloc] initWithFrame:CGRectMake(15, 0, bottomView.height/2, bottomView.height/2)];
imageView.layer.cornerRadius = 1.0f;
imageView.layer.masksToBounds = YES;
imageView.centerY = bottomView.height / 2;
imageView.backgroundColor = [UIColor redColor];
[bottomView addSubview:imageView];
self.bottomImageView = imageView;
}
三、主要功能介绍
1.拍照按钮
这里需要注意的是拍照完成后的照片显示的方向问题。
屏幕的方向大致可以分为以下6中:
home键盘朝下/home键朝右/home键朝上/home键朝左,还有两种就是屏幕朝上和屏幕朝下。因此需要根据不同屏幕方向进行照片的旋转,否则照片的显示将会出现问题,解决方法见下文介绍。
- (void)clickPHOTO {
self.connection = [self.imageOutput connectionWithMediaType:AVMediaTypeVideo];
/**
*   UIDeviceOrientation 获取机器硬件的当前旋转方向
需要注意的是如果手机手动锁定了屏幕,则不能判断旋转方向
*/
UIDeviceOrientation curDeviceOrientation = [[UIDevice currentDevice] orientation];
NSLog(@"-------%ld",(long)curDeviceOrientation);
/**
*  UIInterfaceOrientation 获取视图的当前旋转方向
需要注意的是只有项目支持横竖屏切换才能监听到旋转方向
*/
UIInterfaceOrientation sataus=[UIApplication sharedApplication].statusBarOrientation;
NSLog(@"+++++++%ld",(long)sataus);
/**
*  为了实现在锁屏状态下能够获取屏幕的旋转方向,这里通过使用 CoreMotion 框架(加速计)进行屏幕方向的判断
self.deviceOrientation = [MotionOrientation sharedInstance].deviceOrientation
在这里用到了第三方开源框架 MotionOrientation 对作者表示衷心的感谢
框架地址: GitHub:https://github.com/tastyone/MotionOrientation
*/
NSLog(@"********%ld",(long)self.deviceOrientation);
//获取输出视图的展示方向
AVCaptureVideoOrientation avcaptureOrientation = [self avOrientationForDeviceOrientation: self.deviceOrientation];
[self.connection setVideoOrientation:avcaptureOrientation];
[self.connection setVideoScaleAndCropFactor:self.effectiveScale];
[self.imageOutput captureStillImageAsynchronouslyFromConnection:self.connection completionHandler:^(CMSampleBufferRef imageDataSampleBuffer, NSError *error) {
NSData *jpegData = [AVCaptureStillImageOutput jpegStillImageNSDataRepresentation:imageDataSampleBuffer];
//原图
UIImage *image = [UIImage imageWithData:jpegData];
#pragma mark - 图片的截取,通过对不同属性的设置获取目标的截图样式
if (self.isCanCut) {
TOCropViewController *cropController = [[TOCropViewController alloc] initWithImage:image];
cropController.delegate = self;
//隐藏比例选择按钮
cropController.aspectRatioPickerButtonHidden = YES;
//重置后缩小到当前设置的长宽比
cropController.resetAspectRatioEnabled = NO;
//截图的展示样式
cropController.aspectRatioPreset = TOCropViewControllerAspectRatioPresetSquare;
//是否可以手动拖动
cropController.cropView.cropBoxResizeEnabled = NO;
[self presentViewController:cropController animated:NO completion:nil];
}
ALAuthorizationStatus author = [ALAssetsLibrary authorizationStatus];
if (author == ALAuthorizationStatusRestricted || author == ALAuthorizationStatusDenied){
//无权限
return ;
}
UIImageWriteToSavedPhotosAlbum(image, self, nil, NULL);
self.bottomImageView.image = image;
}];
}
2.自定义截图功能
通过使用第三方截图框架(TOCropViewController),实现自定义截图。
框架地址:TOCropViewController
TOCropViewController *cropController = [[TOCropViewController alloc] initWithImage:image];
cropController.delegate = self;
//截图的展示样式
cropController.aspectRatioPreset = TOCropViewControllerAspectRatioPresetSquare;
//隐藏比例选择按钮
cropController.aspectRatioPickerButtonHidden = YES;
cropController.aspectRatioLockEnabled = YES;
//重置后缩小到当前设置的长宽比
cropController.resetAspectRatioEnabled = NO;

//是否可以手动拖动
cropController.cropView.cropBoxResizeEnabled = NO;

[self presentViewController:cropController animated:NO completion:nil];

# pragma mark -TOCropViewControllerDelegate 图片裁剪
- (void)cropViewController:(TOCropViewController *)cropViewController didCropToImage:(UIImage *)image withRect:(CGRect)cropRect angle:(NSInteger)angle{

UIImageWriteToSavedPhotosAlbum(image, self, nil, NULL);
[self dismissViewControllerAnimated:NO completion:nil];
[self dismissViewControllerAnimated:YES completion:nil];

}
3.聚焦功能、镜头切换功能、闪光灯功能以及镜头缩放功能
这些功能在DEMO中都做了详细的注释,就不在这里展开了,详见DEMO。
https://github.com/IMCCP/CCPCustomCamera
四、下一步将要完善的功能
1.图片浏览器功能;
2.图片的美化以及滤镜功能;
感谢您的阅读,期待您的 Star,如果在使用中您有任何问题,可以在 github issue,我会尽自己能力给您答复 。

相关文章推荐
- 保存图片到【相机胶卷】和【自定义相册】
- 手机相机和相册:仿微信自定义相册
- iOS获取相册/相机图片-------自定义获取图片小控件
- JS 使用 Android + IOS 相册 + 相机 进行自定义头像 + 限制裁剪后图片尺寸 + base64 string 与 图片互相转换
- iOS图片处理(一)————调用系统相机和相册获取图片,给相机添加自定义覆盖物
- iOS--相机(自定义相机) 保存照片到相册
- iOS图片处理(一)调用系统相机和相册获取图片,给相机添加自定义覆盖物
- swift3.0 自定义相册相机
- 项目工程中 ios 相册和相机
- 启动相机功能拍照之后刷新相册
- iOS调用相册、相机、上传等问题
- 使用RecyclerView自定义相册选择器闪烁bug解决
- Android自定义相机实现N连拍
- iOS10相册相机闪退bug
- android 相机、相册、剪切
- swift开发笔记26 使用xib自定义相机界面
- 【Ios】 Unity for iOS 打开相册、相机及保存图片到相册
- Android调用系统相机和相册
- 从相机or相册获取图片并显示
- 打开相机拍照和从本地相册获取图片以及图片的剪切