重复造轮子---使用RecyclerView实现联系人首字母导航
2016-10-26 00:16
441 查看
轮子就算使用的在熟练也是他人的轮子,所以准备做一个重复造轮子系列,丰富自己的知识储备!
这一篇讲述的是怎么用RecyclerView实现联系人首字母导航,这个也是很多在项目中也会需要用到的;
本文demo源码
创建SideBar
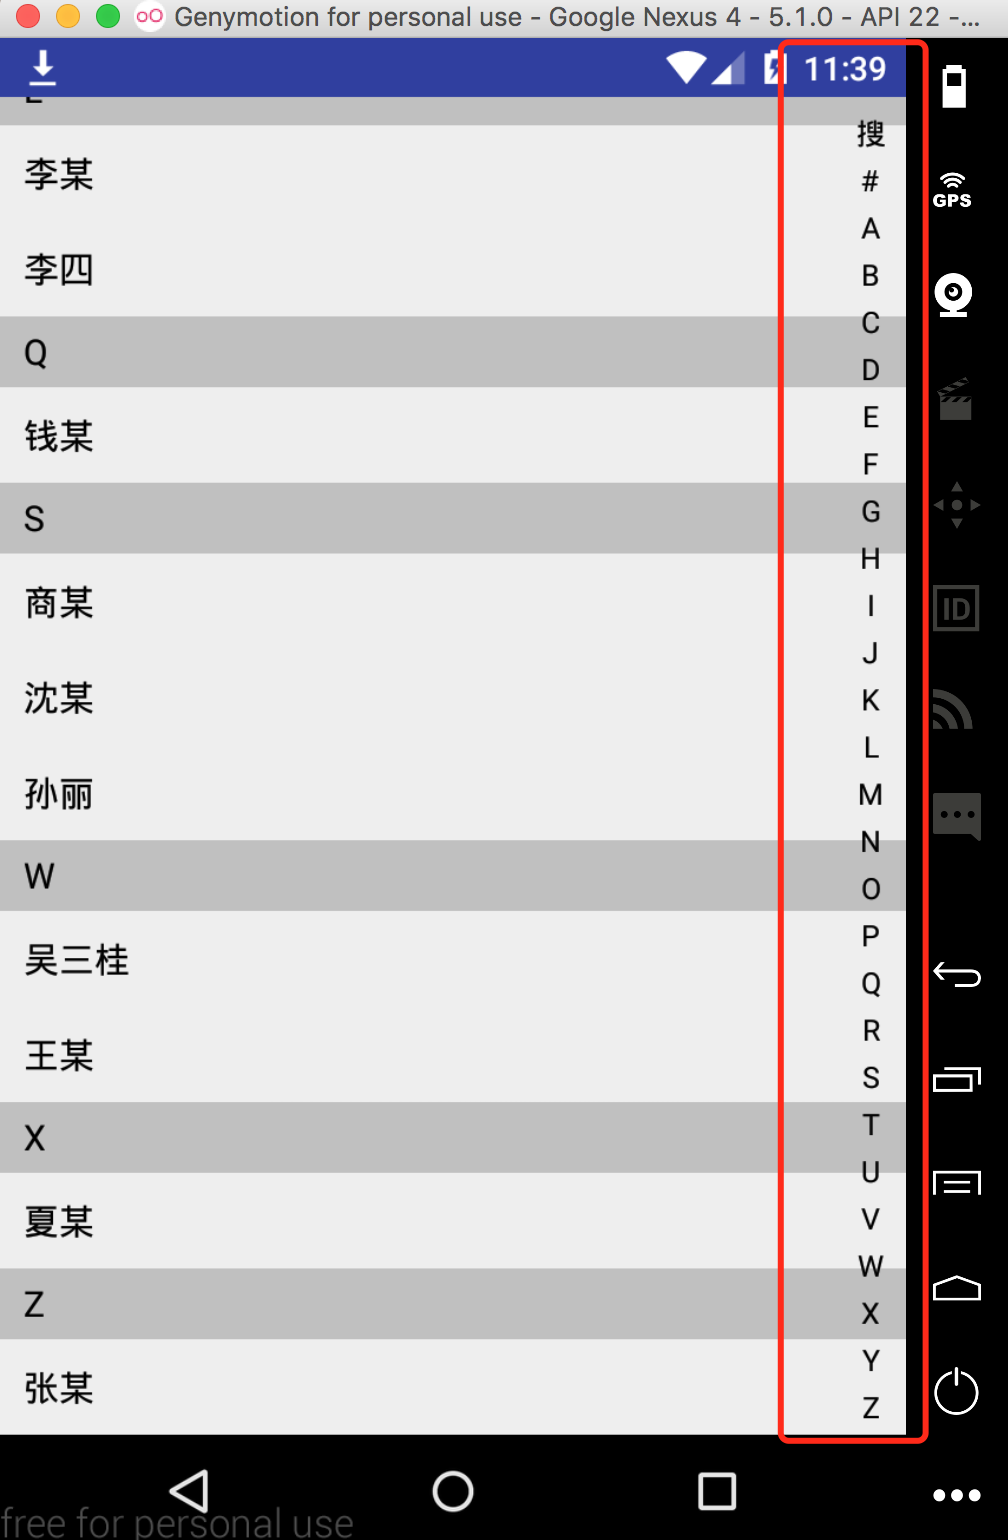
首先自定义View来实现如下图的右边的字母导航SideBar控件:
代码如下:
代码很简单,主要实现了:
画出所有的字母导航
提供外界接口(
OnChooseLetterChangedListener
接口
使用
这样主要的就完成了,然后在xml里添加sideBar和recyclerView就可以了:
然后就是使用了,主要有下面几点:
首先使用工具对联系人的首字母排序(本demo里使用的工具是HanziToPinyin.java by 环信,可在源码里查看)
然后根据首字母排序
然后创建一个
代码如下:(略长…)
效果:

这一篇讲述的是怎么用RecyclerView实现联系人首字母导航,这个也是很多在项目中也会需要用到的;
本文demo源码
创建SideBar
首先自定义View来实现如下图的右边的字母导航SideBar控件:
代码如下:
/**
* Created by JokAr on 2016/10/24.
*/
public class SideBar extends View {

private Paint paint = new Paint();

private int choose = -1;

private boolean showBackground;
public static String[] letters = {"搜", "#", "A", "B", "C", "D", "E", "F", "G", "H",
"I", "J", "K", "L", "M", "N", "O", "P", "Q", "R", "S", "T", "U",
"V", "W", "X", "Y", "Z"};

private OnChooseLetterChangedListener onChooseLetterChangedListener;

public SideBar(Context context) {
this(context, null);
}

public SideBar(Context context, AttributeSet attrs) {
this(context, attrs, 0);
}

public SideBar(Context context, AttributeSet attrs, int defStyleAttr) {
super(context, attrs, defStyleAttr);
}

protected void onDraw(Canvas canvas) {
super.onDraw(canvas);
if (showBackground) {
setBackgroundResource(R.drawable.bg_sidebar_press);
}else {
setBackgroundColor(Color.TRANSPARENT);
}
int height = getHeight();
int width = getWidth();
//平均每个字母占的高度
int singleHeight = height / letters.length;
for (int i = 0; i < letters.length; i++) {
paint.setColor(Color.BLACK);
paint.setAntiAlias(true);
paint.setTextSize(25);
if (i == choose) {
paint.setColor(Color.parseColor("#FF2828"));
paint.setFakeBoldText(true);
}
float x = width / 2 - paint.measureText(letters[i]) / 2;
float y = singleHeight * i + singleHeight;
canvas.drawText(letters[i], x, y, paint);
paint.reset();
}
}

@Override
public boolean dispatchTouchEvent(MotionEvent event) {
int action = event.getAction();
float y = event.getY();
int oldChoose = choose;
int c = (int) (y / getHeight() * letters.length);
switch (action) {
case MotionEvent.ACTION_DOWN:
showBackground = true;
if (oldChoose != c && onChooseLetterChangedListener != null) {
if (c > -1 && c < letters.length) {
//获取触摸位置的字符
onChooseLetterChangedListener.onChooseLetter(letters[c]);
choose = c;
invalidate();
}
}
break;
case MotionEvent.ACTION_MOVE:
if (oldChoose != c && onChooseLetterChangedListener != null) {
if (c > -1 && c < letters.length) {
//获取触摸位置的字符
onChooseLetterChangedListener.onChooseLetter(letters[c]);
choose = c;
invalidate();
}
}
break;
case MotionEvent.ACTION_UP:
showBackground = false;
choose = -1;
if (onChooseLetterChangedListener != null) {
//手指离开
onChooseLetterChangedListener.onNoChooseLetter();
}
invalidate();
break;
}
return true;
}

@Override
public boolean onTouchEvent(MotionEvent event) {
return super.onTouchEvent(event);
}

public void setOnTouchingLetterChangedListener(OnChooseLetterChangedListener onChooseLetterChangedListener) {
this.onChooseLetterChangedListener = onChooseLetterChangedListener;
}
}代码很简单,主要实现了:
画出所有的字母导航
提供外界接口(
OnChooseLetterChangedListener),来获取滑动的状态和当前滑动位置下的字母
OnChooseLetterChangedListener
接口
OnChooseLetterChangedListener内容如下:
/**
* Created by JokAr on 2016/10/24.
*/
public interface OnChooseLetterChangedListener {
/**
* 滑动时
* @param s
*/
void onChooseLetter(String s);

/**
* 手指离开
*/
void onNoChooseLetter();
}
使用
这样主要的就完成了,然后在xml里添加sideBar和recyclerView就可以了:
<?xml version="1.0" encoding="utf-8"?>
<RelativeLayout
xmlns:android="http://schemas.android.com/apk/res/android"
xmlns:tools="http://schemas.android.com/tools"
android:id="@+id/activity_main"
android:layout_width="match_parent"
android:layout_height="match_parent"
tools:context="org.jokar.myapplication.MainActivity">

<android.support.v7.widget.RecyclerView
android:id="@+id/recyclerView"
android:layout_width="match_parent"
android:layout_height="match_parent"
/>

<org.jokar.myapplication.widget.SideBar
android:id="@+id/sideBar"
android:layout_width="30dp"
android:layout_height="wrap_content"
android:layout_alignParentRight="true"/>
<TextView
android:id="@+id/tv_hint"
android:layout_width="100dp"
android:layout_height="100dp"
android:layout_centerHorizontal="true"
android:layout_centerVertical="true"
android:gravity="center"
android:background="@mipmap/show_head_toast_bg"
android:textColor="@android:color/white"
android:visibility="gone"
android:textSize="20dp"/>
</RelativeLayout>
然后就是使用了,主要有下面几点:
首先使用工具对联系人的首字母排序(本demo里使用的工具是HanziToPinyin.java by 环信,可在源码里查看)
然后根据首字母排序
然后创建一个
ArrayMap<String,Integer>来存储每个字母下第一个联系人在数据中的位置
代码如下:(略长…)
MainActivity

/**
* Created by JokAr on 2016/10/24.
*/
public class MainActivity extends AppCompatActivity {
private static final String TAG = "MainActivity";
private SideBar sideBar;
private RecyclerView recyclerView;
private TextView tv_hint;
private List<Contant> mContantList;
private ArrayMap<String,Integer> lettes;

@Override
protected void onCreate(Bundle savedInstanceState) {
super.onCreate(savedInstanceState);
setContentView(R.layout.activity_main);
sideBar = (SideBar) findViewById(R.id.sideBar);
tv_hint = (TextView) findViewById(R.id.tv_hint);
recyclerView = (RecyclerView) findViewById(R.id.recyclerView);
sideBar.setOnTouchingLetterChangedListener(new OnChooseLetterChangedListener() {
@Override
public void onChooseLetter(String s) {
if (!tv_hint.isShown())
tv_hint.setVisibility(View.VISIBLE);
tv_hint.setText(s);
selectRecyclerView(s);
}

@Override
public void onNoChooseLetter() {
tv_hint.setVisibility(View.GONE);
}
});

recyclerView.setLayoutManager(new LinearLayoutManager(this));

setData();

}

private void selectRecyclerView(String s) {
if (s.equals("搜") || s.equals("#")) {
recyclerView.scrollToPosition(0);
} else {
if(lettes.containsKey(s)){
recyclerView.scrollToPosition(lettes.get(s));
}
}
}

private void setData() {
lettes = new ArrayMap<>();
mContantList = new ArrayList<>();
mContantList.add(new Contant("张某"));
mContantList.add(new Contant("李某"));
mContantList.add(new Contant("韩某"));
mContantList.add(new Contant("左某"));
mContantList.add(new Contant("汉某"));
mContantList.add(new Contant("顾某"));
mContantList.add(new Contant("焦某"));
mContantList.add(new Contant("孔某"));
mContantList.add(new Contant("商某"));
mContantList.add(new Contant("沈某"));
mContantList.add(new Contant("夏某"));
mContantList.add(new Contant("赵四"));
mContantList.add(new Contant("钱某"));
mContantList.add(new Contant("孙丽"));
mContantList.add(new Contant("李四"));
mContantList.add(new Contant("吴三桂"));
mContantList.add(new Contant("王某"));
mContantList.add(new Contant("冯某"));
mContantList.add(new Contant("陈某"));
mContantList.add(new Contant("诸某"));

//获取名字首字母-大写
for (Contant contant : mContantList) {
String cahr = HanziToPinyin.getInstance().get(contant.getName().trim()
.substring(0, 1)).get(0).target.substring(0, 1).toUpperCase().toUpperCase();
contant.setFirstChar(cahr);

}
//根据首字母排序
Collections.sort(mContantList, new Comparator<Contant>() {
@Override
public int compare(Contant contant, Contant t1) {
return contant.getFirstChar().compareTo(t1.getFirstChar());
}
});
//保存每个字母下的联系人在数据中的位置
for (int i = 0; i < mContantList.size(); i++) {
mContantList.get(i).setHeadIndex(i);
if(!lettes.containsKey(mContantList.get(i).getFirstChar())){
lettes.put(mContantList.get(i).getFirstChar(),i);
}
}

//加载数据
recyclerView.setAdapter(new MyAdapter(mContantList, this,lettes));
}
}
MyAdapter
/**
* Created by JokAr on 2016/10/24.
*/
public class MyAdapter extends RecyclerView.Adapter<MyAdapter.ViewHolder> {
private List<Contant> mContantList;
private Context mContext;
private LayoutInflater mInflater;
private ArrayMap<String, Integer> lettes;
public MyAdapter(List<Contant> contantList, Context context,
ArrayMap<String, Integer> lettes) {
mContantList = contantList;
mContext = context;
mInflater = LayoutInflater.from(mContext);
this.lettes = lettes;
}
@Override
public ViewHolder onCreateViewHolder(ViewGroup parent, int viewType) {
switch (viewType) {
case 0:
return new ViewHolder(mInflater.inflate(R.layout.item, parent, false), false);
case 1:
return new ViewHolder(mInflater.inflate(R.layout.item, parent, false), true);
}
return null;
}
@Override
public void onBindViewHolder(ViewHolder holder, int position) {
holder.tv_name.setText(mContantList.get(position).getName());
holder.tvHead.setText(mContantList.get(position).getFirstChar());
}
@Override
public int getItemCount() {
return mContantList.size();
}
@Override
public int getItemViewType(int position) {
//根据每个字母下第一个联系人在数据中的位置,来显示headView
Contant contant = mContantList.get(position);
if (lettes.get(contant.getFirstChar()) == position) {
return 1;
}
return 0;
}
class ViewHolder extends RecyclerView.ViewHolder {
private TextView tv_name;
private TextView tvHead;
public ViewHolder(View itemView, boolean show) {
super(itemView);
tv_name = (TextView) itemView.findViewById(R.id.tv_name);
tvHead = (TextView) itemView.findViewById(R.id.tvHead);
if (!show) {
tvHead.setVisibility(View.GONE);
} else {
tvHead.setVisibility(View.VISIBLE);
}
}
}
}效果:

相关文章推荐
- Android 使用RecyclerView实现(仿微信)的联系人A-Z字母排序和过滤搜索功能
- Android 仿联系人菜单,带字母索引,顶部挤压动画,recyclerview实现联系人页面
- Android使用RecyclerView实现仿微信联系人列表
- indexablerecyclerview 的使用体验(实现选择城市,选择联系人等需要索引的功能)
- 使用RecyclerView实现多行水平分页的GridView效果和ViewPager效果
- MVVMLight Toolkit在Windows Phone中的使用扩展之一:在ViewModel中实现导航,并传递参数
- Android中使用RecyclerView和CardView实现瀑布流效果(StaggeredGrid)
- 如何在Fragment中使用ViewPager,并实现导航随手势滑动效果
- Android viewpager+fragment实现动态加载碎片(fragment重复使用)
- Android学习笔记:超能RecyclerView组件使用(下)--实现监听事件
- 使用ViewPager实现导航页
- 使用ViewPager和Fragment实现滑动导航
- AutoCompleteTextView输入汉字拼音首字母实现过滤提示(支持多音字,Filterable的使用)
- 使用RecyclerView实现滚动控件
- RecyclerView的使用方法和瀑布流的实现
- Material Design 实现之 RecyclerView使用
- 使用ViewPager实现导航
- Andorid使用自定义View实现通讯录,媒体文件等等的ListView的字母索引
- 【android】使用RecyclerView和CardView,实现知乎日报精致布局
- 使用ViewPager和Fragment实现滑动导航