图解Android View的scrollTo(),scrollBy(),getScrollX(), getScrollY()
2016-10-25 01:13
483 查看
转自:http://blog.csdn.net/bigconvience/article/details/26697645
https://my.oschina.net/u/1376187/blog/172792
Android系统手机屏幕的左上角为坐标系,同时y轴方向与笛卡尔坐标系的y轴方向想反。通过提供的api如getLeft , getTop, getBottom, getRight可以获得控件在parent中的相对位置。同时,也可以获得控件在屏幕中的绝对位置,详细用法可参考android应用程序中获取view的位置
当我们编写一些自定义的滑动控件时,会用到一些api如scrollTo(),scrollBy(),getScrollX(), getScrollY()。由于常常会对函数getScrollX(), getScrollY()返回的值的含义产生混淆,尤其是正负关系,因此本文将使用几幅图来对这些函数进行讲解以方便大家记忆。
注意:调用View的scrollTo()和scrollBy()是用于滑动View中的内容,而不是把某个View的位置进行改变。如果想改变莫个View在屏幕中的位置,可以使用如下的方法。
调用public void offsetLeftAndRight(int offset)用于左右移动方法或public void offsetTopAndBottom(int
offset)用于上下移动。
如:button.offsetLeftAndRignt(300)表示将button控件向左移动300个像素。
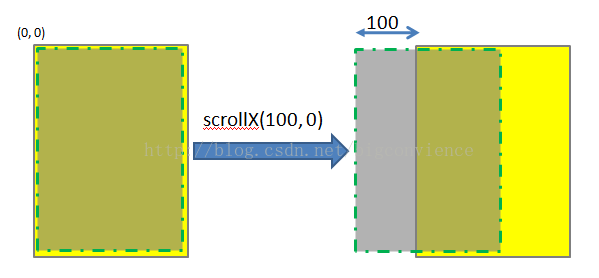
scrollTo(int x, int y) 是将View中内容滑动到相应的位置,参考的坐标系原点为parent View的左上角。
调用scrollTo(100, 0)表示将View中的内容移动到x = 100, y = 0的位置,如下图所示。注意,图中黄色矩形区域表示的是一个parent View,绿色虚线矩形为parent view中的内容。一般情况下两者的大小一致,本文为了显示方便,将虚线框画小了一点。图中的黄色区域的位置始终不变,发生位置变化的是显示的内容。
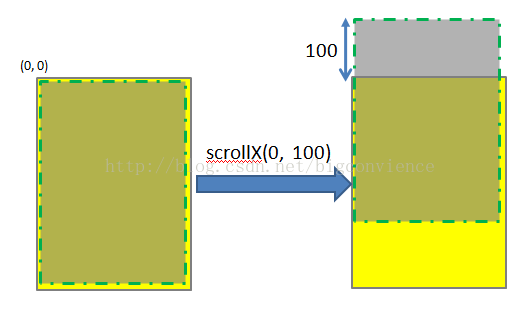
同理,scrollTo(0, 100)的效果如下图所示:
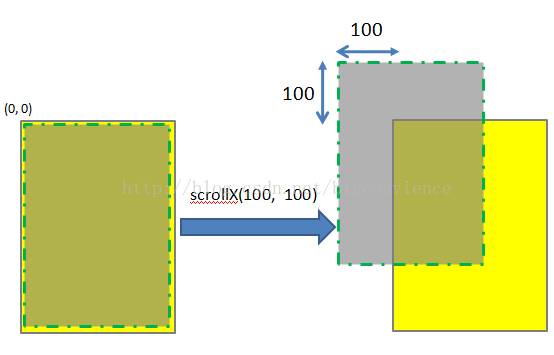
scrollTo(100, 100)的效果图如下:
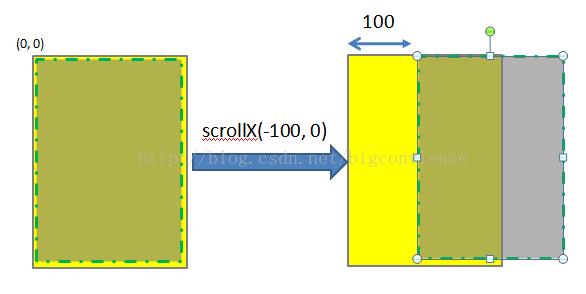
若函数中参数为负值,则子View的移动方向将相反。
scrollBy(int x, int y)其实是对scrollTo的包装,移动的是相当位置。 scrollTo(int x, int y)的源码和scrollBy(int x, int y)源码如下所示.
[java] view
plain copy


/**
* Move the scrolled position of your view. This will cause a call to
* {@link #onScrollChanged(int, int, int, int)} and the view will be
* invalidated.
* @param x the amount of pixels to scroll by horizontally<pre name="code" class="java"> /**
* Set the scrolled position of your view. This will cause a call to
* {@link #onScrollChanged(int, int, int, int)} and the view will be
* invalidated.
* @param x the x position to scroll to
* @param y the y position to scroll to
*/
public void scrollTo(int x, int y) {
if (mScrollX != x || mScrollY != y) {
int oldX = mScrollX;
int oldY = mScrollY;
mScrollX = x;
mScrollY = y;
invalidateParentCaches();
onScrollChanged(mScrollX, mScrollY, oldX, oldY);
if (!awakenScrollBars()) {
postInvalidateOnAnimation();
}
}
}
[java] view
plain copy
/* @param y the amount of pixels to scroll by vertically */
[java] view
plain copy
public void scrollBy(int x, int y) { scrollTo(mScrollX + x, mScrollY + y); }
可见,mScrollX和mScrollY是View类中专门用于记录滑动位置的变量。这两个函数最终调用onScrollChanged()函数,感兴趣者可以参考他们的源代码。
理解了scrollTo(int x, int y)和scrollBy(int x, int y)的用法,就不难理解getScrollX() 和getScrollY()。这两个函数的源码如下所示:
[java] view
plain copy
/**
* Return the scrolled left position of this view. This is the left edge of
* the displayed part of your view. You do not need to draw any pixels
* farther left, since those are outside of the frame of your view on
* screen.
*
* @return The left edge of the displayed part of your view, in pixels.
*/
public final int getScrollX() {
return mScrollX;
}
[java] view
plain copy
/**
* Return the scrolled top position of this view. This is the top edge of
* the displayed part of your view. You do not need to draw any pixels above
* it, since those are outside of the frame of your view on screen.
*
* @return The top edge of the displayed part of your view, in pixels.
*/
public final int getScrollY() {
return mScrollY;
}
----------------------------------------------------------------------------------------------------------------------------------------------------------------------------------------------
获取View类界面控件的位置,有助于添加新的控件。
获取在parent里的相对坐标位置
这个比较简单,不用多说,直接调用View的方法:getLeft , getTop, getBottom, getRight 获得。
获取在屏幕中的绝对位置
getLocalVisibleRect
getGlobalVisibleRect
getLocationOnScreen
getLocationInWindow
有一遍写得不错的文章,转帖如下:(原文地址:http://www.fengfly.com/plus/view-209439-1.html)
=======================================================================
我们重点在获取view的y坐标,你懂的...
依次介绍以下四个方法:
1.getLocationInWindow
int[] position = new int[2];
textview.getLocationInWindow(position);
System.out.println("getLocationInWindow:" + position[0] + "," + position[1]);
这个方法是将view的左上角坐标存入数组中.此坐标是相对当前activity而言.
若是普通activity,则y坐标为可见的状态栏高度+可见的标题栏高度+view左上角到标题栏底部的距离.
可见的意思是:在隐藏了状态栏/标题栏的情况下,它们的高度以0计算.
若是对话框式的activity,则y坐标为可见的标题栏高度+view到标题栏底部的距离.
此时是无视状态栏的有无的.
2.getLocationOnScreen
int[] position = new int[2];
textview.getLocationOnScreen(position);
System.out.println("getLocationOnScreen:" + position[0] + "," + position[1]);
这个方法跟上面的差不多,也是将view的左上角坐标存入数组中.但此坐标是相对整个屏幕而言.
y坐标为view左上角到屏幕顶部的距离.
3.getGlobalVisibleRect
Rect viewRect = new Rect();
textview.getGlobalVisibleRect(viewRect);
System.out.println(viewRect);
这个方法是构建一个Rect用来"套"这个view.此Rect的坐标是相对当前activity而言.
若是普通activity,则Rect的top为可见的状态栏高度+可见的标题栏高度+Rect左上角到标题栏底部的距离.
若是对话框式的activity,则y坐标为Rect的top为可见的标题栏高度+Rect左上角到标题栏底部的距离.
此时是无视状态栏的有无的.
4.getLocalVisibleRect
Rect globeRect = new Rect();
button.getLocalVisibleRect(globeRect);
注意:
以上方法在OnCreate方法中调用,都会返回0,这是因为View还未加载完毕.
建议在onWindowFocusChanged方法中进行获取,有些情况下onWindowFocusChanged不好用的时候(比如ActivityGroup),可以这样写:
mTextView.post(new Runnable() {
@Override
public void run() {
Rect viewRect = new Rect();
mTextView.getLocalVisibleRect(viewRect);
mTreeScrollView.setRect(viewRect);
}
});
这样在View加载完毕之后会执行获取位置的方法.
=======================================================================
PS:如何动态创建一个View类控件:
1、通过new方法来创建一个界面对象;
2、通过Layout xml资源来创建,利用LayoutInflater提供的方法。
https://my.oschina.net/u/1376187/blog/172792
Android系统手机屏幕的左上角为坐标系,同时y轴方向与笛卡尔坐标系的y轴方向想反。通过提供的api如getLeft , getTop, getBottom, getRight可以获得控件在parent中的相对位置。同时,也可以获得控件在屏幕中的绝对位置,详细用法可参考android应用程序中获取view的位置
当我们编写一些自定义的滑动控件时,会用到一些api如scrollTo(),scrollBy(),getScrollX(), getScrollY()。由于常常会对函数getScrollX(), getScrollY()返回的值的含义产生混淆,尤其是正负关系,因此本文将使用几幅图来对这些函数进行讲解以方便大家记忆。
注意:调用View的scrollTo()和scrollBy()是用于滑动View中的内容,而不是把某个View的位置进行改变。如果想改变莫个View在屏幕中的位置,可以使用如下的方法。
调用public void offsetLeftAndRight(int offset)用于左右移动方法或public void offsetTopAndBottom(int
offset)用于上下移动。
如:button.offsetLeftAndRignt(300)表示将button控件向左移动300个像素。
scrollTo(int x, int y) 是将View中内容滑动到相应的位置,参考的坐标系原点为parent View的左上角。
调用scrollTo(100, 0)表示将View中的内容移动到x = 100, y = 0的位置,如下图所示。注意,图中黄色矩形区域表示的是一个parent View,绿色虚线矩形为parent view中的内容。一般情况下两者的大小一致,本文为了显示方便,将虚线框画小了一点。图中的黄色区域的位置始终不变,发生位置变化的是显示的内容。
同理,scrollTo(0, 100)的效果如下图所示:
scrollTo(100, 100)的效果图如下:
若函数中参数为负值,则子View的移动方向将相反。
scrollBy(int x, int y)其实是对scrollTo的包装,移动的是相当位置。 scrollTo(int x, int y)的源码和scrollBy(int x, int y)源码如下所示.
[java] view
plain copy
/**
* Move the scrolled position of your view. This will cause a call to
* {@link #onScrollChanged(int, int, int, int)} and the view will be
* invalidated.
* @param x the amount of pixels to scroll by horizontally<pre name="code" class="java"> /**
* Set the scrolled position of your view. This will cause a call to
* {@link #onScrollChanged(int, int, int, int)} and the view will be
* invalidated.
* @param x the x position to scroll to
* @param y the y position to scroll to
*/
public void scrollTo(int x, int y) {
if (mScrollX != x || mScrollY != y) {
int oldX = mScrollX;
int oldY = mScrollY;
mScrollX = x;
mScrollY = y;
invalidateParentCaches();
onScrollChanged(mScrollX, mScrollY, oldX, oldY);
if (!awakenScrollBars()) {
postInvalidateOnAnimation();
}
}
}
[java] view
plain copy
/* @param y the amount of pixels to scroll by vertically */
[java] view
plain copy
public void scrollBy(int x, int y) { scrollTo(mScrollX + x, mScrollY + y); }
可见,mScrollX和mScrollY是View类中专门用于记录滑动位置的变量。这两个函数最终调用onScrollChanged()函数,感兴趣者可以参考他们的源代码。
理解了scrollTo(int x, int y)和scrollBy(int x, int y)的用法,就不难理解getScrollX() 和getScrollY()。这两个函数的源码如下所示:
[java] view
plain copy
/**
* Return the scrolled left position of this view. This is the left edge of
* the displayed part of your view. You do not need to draw any pixels
* farther left, since those are outside of the frame of your view on
* screen.
*
* @return The left edge of the displayed part of your view, in pixels.
*/
public final int getScrollX() {
return mScrollX;
}
[java] view
plain copy
/**
* Return the scrolled top position of this view. This is the top edge of
* the displayed part of your view. You do not need to draw any pixels above
* it, since those are outside of the frame of your view on screen.
*
* @return The top edge of the displayed part of your view, in pixels.
*/
public final int getScrollY() {
return mScrollY;
}
----------------------------------------------------------------------------------------------------------------------------------------------------------------------------------------------
获取View类界面控件的位置,有助于添加新的控件。
获取在parent里的相对坐标位置
这个比较简单,不用多说,直接调用View的方法:getLeft , getTop, getBottom, getRight 获得。
获取在屏幕中的绝对位置
getLocalVisibleRect
getGlobalVisibleRect
getLocationOnScreen
getLocationInWindow
有一遍写得不错的文章,转帖如下:(原文地址:http://www.fengfly.com/plus/view-209439-1.html)
=======================================================================
我们重点在获取view的y坐标,你懂的...
依次介绍以下四个方法:
1.getLocationInWindow
int[] position = new int[2];
textview.getLocationInWindow(position);
System.out.println("getLocationInWindow:" + position[0] + "," + position[1]);
这个方法是将view的左上角坐标存入数组中.此坐标是相对当前activity而言.
若是普通activity,则y坐标为可见的状态栏高度+可见的标题栏高度+view左上角到标题栏底部的距离.
可见的意思是:在隐藏了状态栏/标题栏的情况下,它们的高度以0计算.
若是对话框式的activity,则y坐标为可见的标题栏高度+view到标题栏底部的距离.
此时是无视状态栏的有无的.
2.getLocationOnScreen
int[] position = new int[2];
textview.getLocationOnScreen(position);
System.out.println("getLocationOnScreen:" + position[0] + "," + position[1]);
这个方法跟上面的差不多,也是将view的左上角坐标存入数组中.但此坐标是相对整个屏幕而言.
y坐标为view左上角到屏幕顶部的距离.
3.getGlobalVisibleRect
Rect viewRect = new Rect();
textview.getGlobalVisibleRect(viewRect);
System.out.println(viewRect);
这个方法是构建一个Rect用来"套"这个view.此Rect的坐标是相对当前activity而言.
若是普通activity,则Rect的top为可见的状态栏高度+可见的标题栏高度+Rect左上角到标题栏底部的距离.
若是对话框式的activity,则y坐标为Rect的top为可见的标题栏高度+Rect左上角到标题栏底部的距离.
此时是无视状态栏的有无的.
4.getLocalVisibleRect
Rect globeRect = new Rect();
button.getLocalVisibleRect(globeRect);
注意:
以上方法在OnCreate方法中调用,都会返回0,这是因为View还未加载完毕.
建议在onWindowFocusChanged方法中进行获取,有些情况下onWindowFocusChanged不好用的时候(比如ActivityGroup),可以这样写:
mTextView.post(new Runnable() {
@Override
public void run() {
Rect viewRect = new Rect();
mTextView.getLocalVisibleRect(viewRect);
mTreeScrollView.setRect(viewRect);
}
});
这样在View加载完毕之后会执行获取位置的方法.
=======================================================================
PS:如何动态创建一个View类控件:
1、通过new方法来创建一个界面对象;
2、通过Layout xml资源来创建,利用LayoutInflater提供的方法。

相关文章推荐
- 图解Android View的scrollTo(),scrollBy(),getScrollX(), getScrollY()
- 图解Android View的scrollTo(),scrollBy(),getScrollX(), getScrollY()
- 图解Android View的scrollTo(),scrollBy(),getScrollX(), getScrollY()
- 图解Android View的scrollTo(),scrollBy(),getScrollX(), getScrollY()
- 图解Android View的scrollTo(),scrollBy(),getScrollX(), getScrollY()
- 图解Android View的scrollTo(),scrollBy(),getScrollX(), getScrollY()
- 图解Android View的scrollTo(),scrollBy(),getScrollX(), getScrollY()
- 图解Android View的scrollTo(),scrollBy(),getScrollX(), getScrollY()
- 图解Android View的scrollTo(),scrollBy(),getScrollX(), getScrollY()
- 图解Android View的scrollTo(),scrollBy(),getScrollX(), getScrollY()
- 图解Android View的scrollTo(),scrollBy(),getScrollX(), getScrollY()
- 图解Android View的scrollTo(),scrollBy(),getScrollX(), getScrollY()
- 图解Android View的scrollTo(),scrollBy(),getScrollX(), getScrollY()
- Android View api - scrollTo(),scrollBy(),getScrollX(), getScrollY()
- Android View的scrollTo(),scrollBy(),getScrollX(), getScrollY()
- Android中View中的scrollTo(),scrollBy(),getScrollX(), getScrollY()详解
- View.scrollBy(),View.scrollTo() ,getScrollX() 和 getScrollY()的使用
- View的scrollTo(),scrollBy(),getScrollX(),getScrollY()坐标理解
- scrollTo、scrollBy、getScrollX、getScrollY这4个方法的含义android视图、坐标原理
- 图解Android View的scrollTo(),scrollBy()