深入探索spring技术内幕(三): 剖析spring IoC工作原理和配置依赖注入
2016-10-21 00:00
911 查看
一、前言
IOC (Inverse of control) - 控制反转,spring的IOC实现原理为利用Java的反射机制并充当工厂的角色完成对象的装配和注入。
二、实现细节
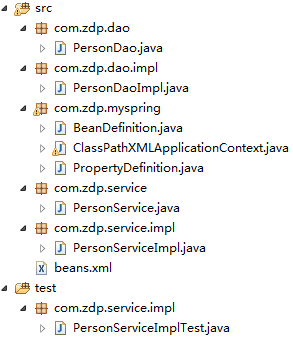
类结构:
该例子需要导入以下jar包

① Dao接口类: PersonDao
② Dao实现类: PersonDaoImpl
③ Service接口类: PersonService
④ Service实现类: PersonServiceImpl
⑤ Bean定义类: BeanDefinition
⑥ 属性定义类: PropertyDefinition
⑦ Bean工厂类: ClassPathXMLApplicationContext
这里为核心代码,当然在实际情况中,这一块要复杂的多, 例如:可以一个bean引用另一个bean,还可以有多个配置文件、通过多种方式载入配置文件等等,
不过原理还是采用Java的反射机制。
⑧ beans.xml
⑨ 单元测试
上文仅仅是简单地模拟了spring的IOC的实现,虽然只是完成了spring中依赖注入的一小部分,但还是很好地展现了Java反射机制在spring中的应用,对于初学者理解IOC应该会有一点帮助。
源码下载地址: http://download.csdn.net/detail/zdp072/7330769
三、spring的依赖注入
1. 使用构造函数注入:
2. setter方法注入:
注入对象, 基本属性, 集合
对应Java类:
3. 使用注解注入:
具体内容见第四章: http://blog.csdn.net/zdp072/article/details/25558563
IOC (Inverse of control) - 控制反转,spring的IOC实现原理为利用Java的反射机制并充当工厂的角色完成对象的装配和注入。
二、实现细节
类结构:
该例子需要导入以下jar包
① Dao接口类: PersonDao
public interface PersonDao {
public void save();
}
② Dao实现类: PersonDaoImpl
import com.zdp.dao.PersonDao;

public class PersonDaoImpl implements PersonDao {
public void save(){
System.out.println("执行PersonDaoImpl中的save()方法");
}
}
③ Service接口类: PersonService
public interface PersonService {
public void save();
}
④ Service实现类: PersonServiceImpl
import com.zdp.dao.PersonDao;
import com.zdp.service.PersonService;

public class PersonServiceImpl implements PersonService {
private PersonDao personDao;
private String name;
private Integer id;

public Integer getId() {
return id;
}

public void setId(Integer id) {
this.id = id;
}

public String getName() {
return name;
}

public void setName(String name) {
this.name = name;
}

public PersonDao getPersonDao() {
return personDao;
}

public void setPersonDao(PersonDao personDao) {
this.personDao = personDao;
}

public void save() {
System.out.println("id: " + id + ", name: " + name);
personDao.save();
}
}
⑤ Bean定义类: BeanDefinition
import java.util.ArrayList;
import java.util.List;

/**
* 封装Bean
* @author zhangjim
*/
public class BeanDefinition {
private String id;
private String className;
private List<PropertyDefinition> propertys = new ArrayList<PropertyDefinition>();

public BeanDefinition(String id, String className) {
this.id = id;
this.className = className;
}
public String getId() {
return id;
}
public void setId(String id) {
this.id = id;
}
public String getClassName() {
return className;
}
public void setClassName(String className) {
this.className = className;
}
public List<PropertyDefinition> getPropertys() {
return propertys;
}
public void setPropertys(List<PropertyDefinition> propertys) {
this.propertys = propertys;
}
}
⑥ 属性定义类: PropertyDefinition
/**
* 封装属性
* @author zhangjim
*/
public class PropertyDefinition {
private String name;
private String ref;
private String value;

public String getValue() {
return value;
}

public void setValue(String value) {
this.value = value;
}

public PropertyDefinition(String name, String ref, String value) {
this.name = name;
this.ref = ref;
this.value = value;
}

public String getName() {
return name;
}
public void setName(String name) {
this.name = name;
}
public String getRef() {
return ref;
}
public void setRef(String ref) {
this.ref = ref;
}
}
⑦ Bean工厂类: ClassPathXMLApplicationContext
import java.beans.Introspector;
import java.beans.PropertyDescriptor;
import java.lang.reflect.Method;
import java.net.URL;
import java.util.ArrayList;
import java.util.HashMap;
import java.util.List;
import java.util.Map;

import org.apache.commons.beanutils.ConvertUtils;
import org.dom4j.Document;
import org.dom4j.Element;
import org.dom4j.XPath;
import org.dom4j.io.SAXReader;

/**
* Spring Bean Factory
*/
public class ClassPathXMLApplicationContext {
private List<BeanDefinition> beanDefines = new ArrayList<BeanDefinition>();
private Map<String, Object> sigletons = new HashMap<String, Object>();

public ClassPathXMLApplicationContext(String filename) {
this.readXML(filename);
this.instanceBeans();
this.injectObject();
}

/**
* 为bean对象的属性注入值
*/
private void injectObject() {
for (BeanDefinition beanDefinition : beanDefines) {
Object bean = sigletons.get(beanDefinition.getId());
if (bean != null) {
try {
PropertyDescriptor[] ps = Introspector.getBeanInfo(bean.getClass()).getPropertyDescriptors();
for (PropertyDefinition propertyDefinition : beanDefinition.getPropertys()) {
for (PropertyDescriptor properdesc : ps) {
if (propertyDefinition.getName().equals(properdesc.getName())) {
Method setter = properdesc.getWriteMethod(); // 获取属性的setter方法
if (setter != null) {
Object injectBean = null;
if (propertyDefinition.getRef() != null && !"".equals(propertyDefinition.getRef().trim())) {
injectBean = sigletons.get(propertyDefinition.getRef());
} else {
injectBean = ConvertUtils.convert(propertyDefinition.getValue(), properdesc.getPropertyType());
}
setter.setAccessible(true); // private method
setter.invoke(bean, injectBean); // 把引用对象注入到属性
}
break;
}
}
}
} catch (Exception e) {
e.printStackTrace();
}
}
}
}

/**
* 完成bean的实例化
*/
private void instanceBeans() {
for (BeanDefinition beanDefinition : beanDefines) {
try {
if (beanDefinition.getClassName() != null && !"".equals(beanDefinition.getClassName().trim()))
sigletons.put(beanDefinition.getId(), Class.forName(beanDefinition.getClassName()).newInstance());
} catch (Exception e) {
e.printStackTrace();
}
}

}

/**
* 读取xml配置文件
*
* @param filename
*/
private void readXML(String filename) {
SAXReader saxReader = new SAXReader();
Document document = null;
try {
URL xmlpath = this.getClass().getClassLoader().getResource(filename);
document = saxReader.read(xmlpath);
Map<String, String> nsMap = new HashMap<String, String>();
nsMap.put("ns", "http://www.springframework.org/schema/beans");// 加入命名空间
XPath xsub = document.createXPath("//ns:beans/ns:bean");// 创建beans/bean查询路径
xsub.setNamespaceURIs(nsMap);// 设置命名空间
List<Element> beans = xsub.selectNodes(document);// 获取文档下所有bean节点
for (Element element : beans) {
String id = element.attributeValue("id");// 获取id属性值
String clazz = element.attributeValue("class"); // 获取class属性值
BeanDefinition beanDefine = new BeanDefinition(id, clazz);
XPath propertysub = element.createXPath("ns:property");
propertysub.setNamespaceURIs(nsMap);// 设置命名空间
List<Element> propertys = propertysub.selectNodes(element);
for (Element property : propertys) {
String propertyName = property.attributeValue("name");
String propertyRef = property.attributeValue("ref");
String propertyValue = property.attributeValue("value");
PropertyDefinition propertyDefinition = new PropertyDefinition(propertyName, propertyRef, propertyValue);
beanDefine.getPropertys().add(propertyDefinition);
}
beanDefines.add(beanDefine);
}
} catch (Exception e) {
e.printStackTrace();
}
}

/**
* 获取bean实例
*
* @param beanName
* @return
*/
public Object getBean(String beanName) {
return this.sigletons.get(beanName);
}
}
这里为核心代码,当然在实际情况中,这一块要复杂的多, 例如:可以一个bean引用另一个bean,还可以有多个配置文件、通过多种方式载入配置文件等等,
不过原理还是采用Java的反射机制。
⑧ beans.xml
<?xml version="1.0" encoding="UTF-8"?>
<beans xmlns="http://www.springframework.org/schema/beans"
xmlns:xsi="http://www.w3.org/2001/XMLSchema-instance"
xsi:schemaLocation="http://www.springframework.org/schema/beans http://www.springframework.org/schema/beans/spring-beans-2.5.xsd">
<bean id="personDao" class="com.zdp.dao.impl.PersonDaoImpl"></bean>
<bean id="personService" class="com.zdp.service.impl.PersonServiceImpl">
<property name="personDao" ref="personDao"/>
<property name="name" value="zhangsan"/>
<property name="id" value="123"/>
</bean>
</beans>
⑨ 单元测试
import org.junit.Test;
import com.zdp.myspring.ClassPathXMLApplicationContext;
import com.zdp.service.PersonService;

public class PersonServiceImplTest {
@Test
public void testSave() {
ClassPathXMLApplicationContext ctx = new ClassPathXMLApplicationContext("beans.xml");
PersonService personService = (PersonService)ctx.getBean("personService");
personService.save();
}
}
上文仅仅是简单地模拟了spring的IOC的实现,虽然只是完成了spring中依赖注入的一小部分,但还是很好地展现了Java反射机制在spring中的应用,对于初学者理解IOC应该会有一点帮助。
源码下载地址: http://download.csdn.net/detail/zdp072/7330769
三、spring的依赖注入
1. 使用构造函数注入:
<bean id="personDao" class="com.zdp.dao.impl.PersonDaoImpl" />
<bean id="personService" class="com.zdp.service.impl.PersonServiceImpl">
<constructor-arg index="0" ref="personDao" />
</bean>
public class PersonServiceImpl implements PersonService {
private PersonDao personDao;
public PersonServiceImpl(PersonDao personDao) {
this.personDao = personDao;
}
public void save() {
personDao.save();
}
}
2. setter方法注入:
注入对象, 基本属性, 集合
<bean id="personDao" class="com.zdp.dao.impl.PersonDaoImpl" />
<bean id="personService" class="com.zdp.service.impl.PersonServiceImpl">
<!--
<property name="personDao">
<ref bean="personDao"/>
</property>
-->
<property name="personDao" ref="personDao" />
<property name="name" value="zhangsan" />
<property name="id" value="123" />
<property name="sets">
<set>
<value>1</value>
<value>2</value>
</set>
</property>
<property name="lists">
<list>
<value>1</value>
<value>2</value>
<value>3</value>
</list>
</property>
<property name="maps">
<map>
<entry key="1" value="1"></entry>
<entry key="2" value="2"></entry>
<entry key="3" value="3"></entry>
<entry key="4" value="4"></entry>
</map>
</property>
</bean>
对应Java类:
import java.util.List;
import java.util.Map;
import java.util.Set;

import com.zdp.dao.PersonDao;
import com.zdp.service.PersonService;

public class PersonServiceImpl implements PersonService {
private PersonDao personDao;
private String name;
private Integer id;
private Set<String> sets;
private List<String> lists;
private Map<String, String> maps;

// 省略get set方法

public void save() {
System.out.println("id: " + id + ", name: " + name);
System.out.println("sets: " + sets.size() + ", lists: " + lists.size() + ", maps: " + maps.size());
personDao.save();
}
}
3. 使用注解注入:
具体内容见第四章: http://blog.csdn.net/zdp072/article/details/25558563

相关文章推荐
- 深入探索spring技术内幕(三): 剖析spring IoC工作原理和配置依赖注入
- 深入探索spring技术内幕(三): 剖析spring IoC工作原理和配置依赖注入
- 深入探索spring技术内幕(五): 剖析spring AOP工作原理
- 深入探索spring技术内幕(四): 剖析@Resource注解实现原理与注解注入
- 深入探索spring技术内幕(五): 剖析spring AOP工作原理
- 深入探索spring技术内幕(四): 剖析@Resource注解实现原理与注解注入
- 深入探索spring技术内幕(二): 剖析spring管理Bean的原理与配置
- 深入探索spring技术内幕(四): 剖析@Resource注解实现原理与注解注入
- 深入探索spring技术内幕(四): 剖析@Resource注解实现原理与注解注入
- spring技术内幕笔记:IoC容器的依赖注入
- 深入探索spring技术内幕(七): 配置Spring AOP面向切面编程
- 深入探索spring技术内幕(五): 剖析spring AOP工作原理
- spring技术内幕5-IoC容器的依赖注入
- 深入探索spring技术内幕(七): 配置Spring AOP面向切面编程
- 8-spring源码3.2.18解读+spring技术内幕(IOC容器的依赖注入(反射+递归调用))
- Spring技术内幕——深入解析Spring架构与设计原理(一)IOC实现原理
- 【SSH进阶之路】Spring的IOC逐层深入——依赖注入的两种实现类型(四)
- spring 技术内幕--IOC初始化过程深入之BeanDefinition的载入和解析1
- Spring的IOC逐层深入——依赖注入的两种实现类型
- 转:Spring技术内幕——深入解析Spring架构与设计原理(二)IOC实现原理