SpringBoot 快速搭建
2016-10-12 18:43
429 查看
Maven手工构建
1、新建空的Maven项目

2、修改pom.xml
1) 添加SpringBoot父级依赖,这样当前的项目就是SpringBoot项目了。spring-boot-starter-parent是一个特殊的starter,使用它之后,常用的包依赖可以省去version标签。
2)添加 Web支持的starter pom ,这样就添加了web 依赖
3)添加SpringBoot编译插件
至此,完整的pom文件如下:
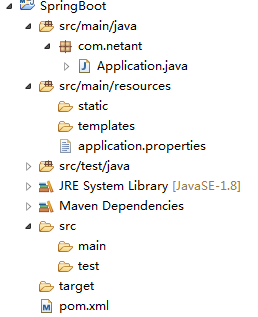
项目的目录结构:
Application.java
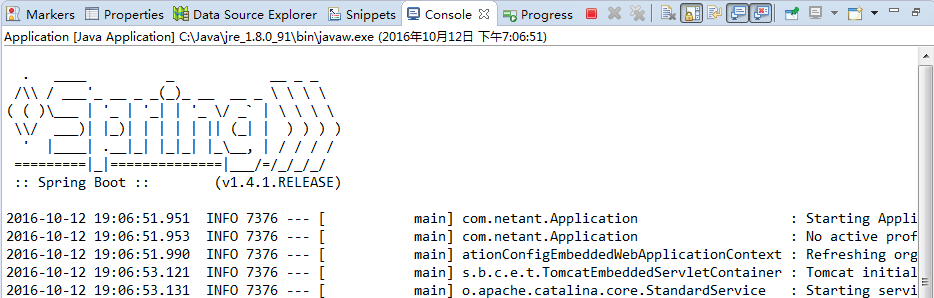
Run AS 启动项目:
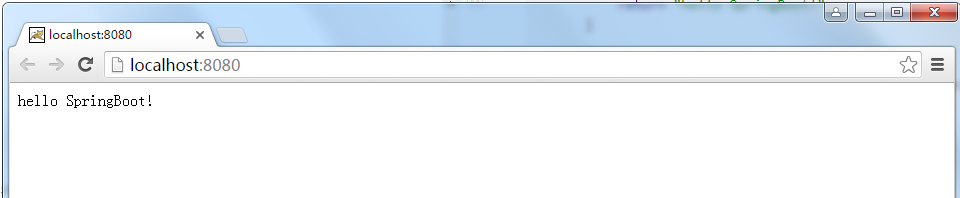
使用浏览器访问:
完毕!
1、新建空的Maven项目
2、修改pom.xml
1) 添加SpringBoot父级依赖,这样当前的项目就是SpringBoot项目了。spring-boot-starter-parent是一个特殊的starter,使用它之后,常用的包依赖可以省去version标签。
<!--
添加SpringBoot父级依赖,这样当前的项目就是SpringBoot项目了。
spring-boot-starter-parent是一个特殊的starter,使用它之后,常用的包依赖可以省去version标签
-->
<parent>
<groupId>org.springframework.boot</groupId>
<artifactId>spring-boot-starter-parent</artifactId>
<version>1.4.1.RELEASE</version>
<relativePath/> <!-- lookup parent from repository -->
</parent>
2)添加 Web支持的starter pom ,这样就添加了web 依赖
<!-- 添加 Web支持的starter pom ,这样就添加了web 依赖-->
<dependency>
<groupId>org.springframework.boot</groupId>
<artifactId>spring-boot-starter-web</artifactId>
</dependency>
3)添加SpringBoot编译插件
<!-- 添加SpringBoot编译插件 -->
<plugin>
<groupId>org.springframework.boot</groupId>
<artifactId>spring-boot-maven-plugin</artifactId>
</plugin>
至此,完整的pom文件如下:
<?xml version="1.0" encoding="UTF-8"?>
<project xmlns="http://maven.apache.org/POM/4.0.0" xmlns:xsi="http://www.w3.org/2001/XMLSchema-instance"
xsi:schemaLocation="http://maven.apache.org/POM/4.0.0 http://maven.apache.org/xsd/maven-4.0.0.xsd"> <modelVersion>4.0.0</modelVersion>

<groupId>com.netant</groupId>
<artifactId>SpringBoot</artifactId>
<version>0.0.1-SNAPSHOT</version>
<packaging>jar</packaging>

<name>SpringBoot</name>
<description>Demo project for Spring Boot</description>

<!--
添加SpringBoot父级依赖,这样当前的项目就是SpringBoot项目了。
spring-boot-starter-parent是一个特殊的starter,使用它之后,常用的包依赖可以省去version标签
-->
<parent>
<groupId>org.springframework.boot</groupId>
<artifactId>spring-boot-starter-parent</artifactId>
<version>1.4.1.RELEASE</version>
<relativePath/> <!-- lookup parent from repository -->
</parent>

<properties>
<project.build.sourceEncoding>UTF-8</project.build.sourceEncoding>
<project.reporting.outputEncoding>UTF-8</project.reporting.outputEncoding>
<java.version>1.8</java.version>
</properties>

<dependencies>
<!-- 添加 Web支持的starter pom ,这样就添加了web 依赖-->
<dependency>
<groupId>org.springframework.boot</groupId>
<artifactId>spring-boot-starter-web</artifactId>
</dependency>

<dependency>
<groupId>org.springframework.boot</groupId>
<artifactId>spring-boot-starter-test</artifactId>
<scope>test</scope>
</dependency>
</dependencies>

<build>
<plugins>
<!-- 添加SpringBoot编译插件 -->
<plugin>
<groupId>org.springframework.boot</groupId>
<artifactId>spring-boot-maven-plugin</artifactId>
</plugin>
</plugins>
</build>

</project>
项目的目录结构:
Application.java
/**
* @SpringBootApplication 是SpringBoot项目的核心注解,主要目的是开启自动配置。
*/
@RestController
@SpringBootApplication
public class Application {

@RequestMapping("/")
public String index(){
return "hello SpringBoot!";
}

public static void main(String[] args) {
SpringApplication.run(Application.class, args);
}
}
Run AS 启动项目:
使用浏览器访问:
完毕!

相关文章推荐
- spring boot 快速搭建 基于 Restful 风格的微服务
- springboot与RabbitMQ的快速搭建
- Spring Boot+JPA+Mysql+ThymeLeaf快速构建CURD系统(二)搭建SpringBoot工程
- Spring Boot+JPA+Mysql+ThymeLeaf快速构建CURD系统(二)搭建SpringBoot工程
- Spring Boot+JPA+Mysql+ThymeLeaf快速构建CURD系统(二)搭建SpringBoot工程
- springboot快速搭建
- Spring Boot+JPA+Mysql+ThymeLeaf快速构建CURD系统(二)搭建SpringBoot工程
- Spring Boot+JPA+Mysql+ThymeLeaf快速构建CURD系统(二)搭建SpringBoot工程
- Spring Boot+JPA+Mysql+ThymeLeaf快速构建CURD系统(二)搭建SpringBoot工程
- Spring Boot+JPA+Mysql+ThymeLeaf快速构建CURD系统(二)搭建SpringBoot工程
- SpringBoot-快速搭建WEB工程
- Spring Boot+JPA+Mysql+ThymeLeaf快速构建CURD系统(二)搭建SpringBoot工程
- 用Spring Boot & Cloud,Angular2快速搭建微服务web应用 - 实现RESTful CRUD
- Spring Boot+JPA+Mysql+ThymeLeaf快速构建CURD系统(二)搭建SpringBoot工程
- 使用SpringBoot快速搭建服务器
- Spring Boot+JPA+Mysql+ThymeLeaf快速构建CURD系统(二)搭建SpringBoot工程
- 【SpringBoot教程二】:RESTfull API简单项目的快速搭建
- Spring Boot+JPA+Mysql+ThymeLeaf快速构建CURD系统(二)搭建SpringBoot工程
- Spring Boot+JPA+Mysql+ThymeLeaf快速构建CURD系统(二)搭建SpringBoot工程
- Spring Boot+JPA+Mysql+ThymeLeaf快速构建CURD系统(二)搭建SpringBoot工程