Fragment使用简单示例
2016-10-11 16:17
267 查看
Fragment即碎片,使用它可以减少Activity的代码量,降低耦合,使代码更清爽,更易于读懂。它和Activity具有类似的生命周期,连主要使用的方法也一样。
Fragment添加到Activity的FragmetLayout:
Fragment的切换:
添加使用add方法。替换使用replace方法。
下面是简单的实现:
java代码
Activity部分:
Fragment部分:
Fragment1:
Fragment2:
xml布局
activity_main.xml
fragment_1.xml
fragment_2
Fragment添加到Activity的FragmetLayout:
FragmentTransaction transaction = getSupportFragmentManager().beginTransaction();
transaction.add(R.id.fragment_content, Fragment1.getInstance(),"fragmentTag");
transaction.commit();
Fragment的切换:
transaction.replace(R.id.fragment_content, Fragment2.getInstance(),"fragmentTag");
添加使用add方法。替换使用replace方法。
下面是简单的实现:
java代码
Activity部分:
package com.example.Activity;

import com.example.R;
import com.example.Fragment.Fragment1;
import com.example.Fragment.Fragment2;

import android.os.Bundle;
import android.support.v4.app.Fragment;
import android.support.v4.app.FragmentActivity;
import android.support.v4.app.FragmentManager;
import android.support.v4.app.FragmentTransaction;
import android.view.View;
import android.view.View.OnClickListener;
import android.widget.Button;

public class MainActivity extends FragmentActivity {

private Button btn_qiehuan;

@Override
protected void onCreate(Bundle savedInstanceState) {
super.onCreate(savedInstanceState);
setContentView(R.layout.activity_main);
initView();
setDefaultFragment(savedInstanceState);
}

/**
* 初始化视图
*/
private void initView() {
btn_qiehuan = (Button)findViewById(R.id.button_qiehuan);
viewListen();
}

/**
* 设置默认的Fragment
* @param savedInstanceState
*/
private void setDefaultFragment(Bundle savedInstanceState) {
if (savedInstanceState==null) {
FragmentTransaction transaction = getSupportFragmentManager().beginTransaction();
//将fragment对象add添加到FrameLayout中。而FrameLayout是在Activity中,所以也即绑定到Activity
transaction.add(R.id.fragment_content, Fragment1.getInstance(),"fragmentTag");//添加
transaction.commit();
}
}

/**
* 切换Fragment
*/
public void switchFragment(){
FragmentManager fm = getSupportFragmentManager();//Fragment管理器
FragmentTransaction transaction = fm.beginTransaction();//fragment事务

/*
* 每次添加与切换Fragment都共用一个标志:"fragmentTag",因此通过该标识能获取当前fragment
*/
Fragment currFragment = fm.findFragmentByTag("fragmentTag");

if (currFragment instanceof Fragment1) {//如果当前Fragment 是Fragment1的对象
//replace替换
transaction.replace(R.id.fragment_content, Fragment2.getInstance(),"fragmentTag");//replace替换

}else{
transaction.replace(R.id.fragment_content, Fragment1.getInstance(),"fragmentTag");//replace替换
}

transaction.commit();//提交
}

/**
* 设置监听
*/
private void viewListen() {
btn_qiehuan.setOnClickListener(new OnClickListener() {

@Override
public void onClick(View v) {
switchFragment();
}
});

}

}
Fragment部分:
Fragment1:
package com.example.Fragment;

import com.example.R;

import android.os.Bundle;
import android.support.v4.app.Fragment;
import android.view.LayoutInflater;
import android.view.View;
import android.view.ViewGroup;

public class Fragment1 extends Fragment {
private static Fragment1 instance;
private Fragment1() {

}
public static Fragment1 getInstance(){
if (instance == null) {
instance = new Fragment1();
}
return instance;
}
@Override
public View onCreateView(LayoutInflater inflater, ViewGroup container,
Bundle savedInstanceState) {
View rootView = inflater.inflate(R.layout.fragment_1, container,false);
return rootView;
}
}
Fragment2:
package com.example.Fragment;

import com.example.R;

import android.os.Bundle;
import android.support.v4.app.Fragment;
import android.view.LayoutInflater;
import android.view.View;
import android.view.ViewGroup;

public class Fragment2 extends Fragment {
private static Fragment2 instance;
private Fragment2() {

}
public static Fragment2 getInstance(){
if (instance == null) {
instance = new Fragment2();
}
return instance;
}
@Override
public View onCreateView(LayoutInflater inflater, ViewGroup container,
Bundle savedInstanceState) {
View rootView = inflater.inflate(R.layout.fragment_2, container,false);
return rootView;
}
}
xml布局
activity_main.xml
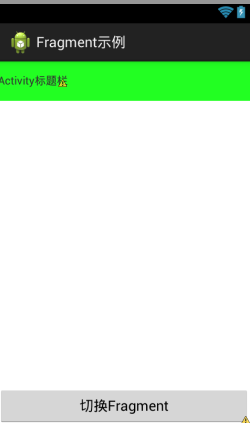
<RelativeLayout xmlns:android="http://schemas.android.com/apk/res/android"
xmlns:tools="http://schemas.android.com/tools"
android:layout_width="match_parent"
android:layout_height="match_parent" >

<LinearLayout
android:id="@+id/titleBar"
android:layout_width="match_parent"
android:layout_height="50dp"
android:layout_alignParentTop="true"
android:background="#22ff22"
android:gravity="center_vertical" >

<TextView
android:layout_width="wrap_content"
android:layout_height="wrap_content"
android:text="Activity标题栏" />
</LinearLayout>

<Button
android:id="@+id/button_qiehuan"
android:layout_width="match_parent"
android:layout_height="wrap_content"
android:layout_alignParentBottom="true"
android:layout_alignParentRight="true"
android:text="切换Fragment" />

<FrameLayout
android:id="@+id/fragment_content"
android:layout_width="match_parent"
android:layout_height="wrap_content"
android:layout_above="@+id/button_qiehuan"
android:layout_below="@+id/titleBar" >
</FrameLayout>

</RelativeLayout>
fragment_1.xml
<?xml version="1.0" encoding="utf-8"?>
<LinearLayout xmlns:android="http://schemas.android.com/apk/res/android"
android:layout_width="match_parent"
android:layout_height="match_parent"
android:orientation="vertical" >

<TextView
android:layout_width="wrap_content"
android:layout_height="wrap_content"
android:text="Fragment1"
android:textSize="25sp" />

</LinearLayout>
fragment_2
<?xml version="1.0" encoding="utf-8"?>
<LinearLayout xmlns:android="http://schemas.android.com/apk/res/android"
android:layout_width="match_parent"
android:layout_height="match_parent"
android:orientation="vertical" >

<TextView
android:layout_width="wrap_content"
android:layout_height="wrap_content"
android:text="Fragment2"
android:textSize="25sp"
/>

</LinearLayout>

相关文章推荐
- fragment使用的简单示例
- 如何使用DOTMSN开发简单的MSN机器人示例(附示例源码)
- 使用MD5加密注册用户密码的简单示例
- 在c#多线程使用IOCP(完成端口)的简单示例
- 使用annotations注解的hibernate的简单示例
- C#中使用Windows消息队列服务(MSMQ)简单示例
- 在C#中使用IOCP简单示例
- 对MSNP9协议的简单使用示例
- 使用E4X来过滤XML简单示例
- flex 整合 struts 的一个简单示例(使用Httpservice)
- 线程池(简单介绍及使用示例)
- checkedListBox控件的使用简单示例
- 对MSNP9协议的简单使用示例
- SPQuery简单使用示例
- flex 与 java交互 的一个简单示例 (使用RemoteObject)
- 使用MD5加密注册用户密码的简单示例
- Erlang中使用变量的简单示例
- 用Php扩展实现的简单框架 - 6 - 使用示例
- 在c#使用IOCP(完成端口)的简单示例
- flex 整合 struts 的一个简单示例(使用Httpservice)