QT皮肤编程(QT style sheet)总结
2016-10-08 17:54
549 查看
QT皮肤编程(QT style sheet)总结
QT style sheet的基本原理就是利用QSS语言对软件的外观进行定制。QSS可以直接在代码中输入,也可以保存在一个文本文件中,利用文件读取函数在软件运行时读入到一个文本串中,再利用QApplication类的函数setStyleSheet(&QString)使其生效。实例代码:#include <QTextStream>
#include <QFile>
QFile file("./styles/default.qss");
file.o
4000
pen(QFile::ReadOnly);
QString styleSheet = file.readAll();//QLatin1String(file.readAll());
a.setStyleSheet(styleSheet);
//-----------------------------------------------------------------------------------------------使用的例子:
#ifndef DIALOG_H
#define DIALOG_H
#include <QDialog>
#include <QGridLayout>
#include <QLabel>
#include <QPushButton>
#include <QLineEdit>
namespace Ui {class Dialog;
}
class Dialog : public QDialog
{Q_OBJECT
public:
explicit Dialog(QWidget *parent = 0);
~Dialog();
private:
Ui::Dialog *ui;
QGridLayout *layout1;
QPushButton *btn1;
QPushButton *btn2;
QPushButton *btn3;
QPushButton *btn4;
QLineEdit *edit1;
};
#endif // DIALOG_H
#include "dialog.h"
#include "ui_dialog.h"
Dialog::Dialog(QWidget *parent) :
QDialog(parent),
ui(new Ui::Dialog)
{ui->setupUi(this);
this->setWindowFlags(this->windowFlags()&Qt::WindowMaximizeButtonHint&Qt::WindowMinimizeButtonHint); //为对话框添加上最大化和最小化按钮
//layout=new QBoxLayout(this);
layout1=new QGridLayout(this);
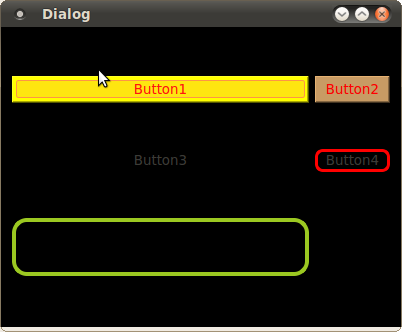
btn1=new QPushButton(this);
btn1->setStyleSheet("QPushButton{color:red;background:yellow}"); //设定前景颜色,就是字体颜色//btn1->setStyleSheet("QPushButton{background:yellow}");btn1->setText("Button1");btn2=new QPushButton(this);
btn2->setStyleSheet("QPushButton{color:red;background-color:rgb(200,155,100)}"); //使用rgb来设定背景颜色btn2->setText("Button2");btn3=new QPushButton(this);
btn3->setStyleSheet("QPushButton{background-image:url(image/1.png);background-repeat: repeat-xy;background-position: center;background-attachment: fixed;background-attachment: fixed;background-attachment: fixed;;background-clip: padding}");//设定按钮的背景图片,background-repeat可以设定背景图片的重复规则,这里设定仅在xy方向都重复,所以图片会被重复一次
//background-position用来设定图片的位置,是左(left)还是右(right),还是在中间(center),是上(top)还是底部(bottom)
//background-attachment用来这定背景图片是否卷动或者和窗口大小相匹配,默认是卷动的
btn3->setText("Button3");bt
1cfa4
n4=new QPushButton(this);
btn4->setStyleSheet("QPushButton{border: 3px solid red;border-radius:8px}"); //设定边框宽度以及颜色//可以使用border-top,border-right,border-bottom,border-left分别设定按钮的上下左右边框,
//同样有border-left-color, border-left-style, border-left-width.等分别来设定他们的颜色,样式和宽度
//border-image用来设定边框的背景图片。
//border-radius用来设定边框的弧度。可以设定圆角的按钮
btn4->setText("Button4");//字体设定
//font-family来设定字体所属家族,
//font-size来设定字体大小
//font-style来设定字体样式
//font-weight来设定字体深浅
//height用来设定其高低
//selection-color用来设定选中时候的颜色
edit1=new QLineEdit(this);
edit1->setStyleSheet("QLineEdit{font: bold italic large \"Times New Roman\";font-size:25px;color:rgb(55,100,255);height:50px;border:4px solid rgb(155,200,33);border-radius:15px;selection-color:pink}");//父窗口的设定
//icon-size来设定图片大小
this->setWindowIcon(QIcon("image/1.png")); this->setStyleSheet("QWidget{background:write url(image/2.png);icon-size:20px 5px}"); //设定整个对话框的背景颜色// this->setStyleSheet("QWidget{icon-size:20px 5px}");layout1->addWidget(btn1,0,0);
layout1->addWidget(btn2,0,1);
layout1->addWidget(btn3,1,0);
layout1->addWidget(btn4,1,1);
layout1->addWidget(edit1,2,0);
setLayout(layout1);
}
Dialog::~Dialog()
{delete ui;
}
//-----------------------------------------------
qt4 StyleSheet的总结 (2008-05-07 15:27)
分类: qt
QApplication::setStyleSheet(QString);
QWidget::setStyleSheet(QString);
1. 程序级的外观:(作用于整个程序的器件)
如:
QLineEdit { background: yellow }
QCheckBox { color: red }
2. 器件级的外观:(作用于本器件及其子器件)
如:
textViewer->
setStyleSheet("background-color: #FFFFBB;"
"color: #000099;"
"margin: 10px;"
"padding: 5px;"
"padding-left: 15px;"
"padding-right: 15px;"
"border-radius: 5px;" // 圆角边框(只用IE的人就不知道了吧:D)
"border: 3px solid #abc;");
"background-color: #FFFFBB;"
"color: #000099;"
"margin: 10px;"
"padding: 5px;"
"padding-left: 15px;"
"padding-right: 15px;"
"border-radius: 5px;" // 圆角边框(只用IE的人就不知道了吧:D)
"border: 3px solid #abc;"
这只是基础,其他的可根据实际情况,按帮助asstiant上的说明写
//---------------------------------------------------------------------------
(原创)QT Creator的style sheet的几种用法(QT Creator)(StyleSheet)(样式)(QT4.7)(用法)
作者:liu_xf 来源:博客园 发布时间:2011-06-2821:05 阅读:908 次 原文链接 [收藏]
摘要:
QT Create中,对button或者window等部件设置背景、颜色、透明等样式时,需要用到style sheet,可以直接在代码里写,也可以在ui设计师里通过右键change style sheet的方法来设置,本人是使用的后面的方式,下面介绍几种常见的用法。
介绍:
作者使用的开发环境为:qt creator 201005, qt4.7。
1、利用style sheet给窗体设置背景
使用stylesheet设置背景图片还是有一些要注意的,如果是在mainwindow和dialog中,直接右键change style sheet在add resource中选择background-image或者border-image,选择资源文件中的图片就行了(前者是按像素显示图片,后者可根据窗体大小来自动缩放图片),如下图:

但在widget中就不行,你会发现,用同样的方法,背景并没有发生改变,而仅仅是它的子窗体背景图片发生了改变。
那么在widget中要如何做呢,我们在widget中放置一个frame,然后对frame通过stylesheet设置背景,后面窗体里所有的部件都放在这个frame里。
我们知道,子窗体会继承父窗体的属性,也就是说,父窗体的背景,在子窗体中也会有,那如何让子窗体不继承父窗体的背景呢,同样的,还是在Edit Style Sheet里,需下输入如下代码:
#desktop {
border-image: url(:/images/desktop.jpg);
}
#desktop * {
border-image:url();
}
desktop是你的窗体名。
2、menubar设置透明
我想做一个菜单按钮,像ubuntu的应用程序菜单一样,能在点击时弹出一个下拉框,我选择了用mainwindow来实现,但我如现menuba显示在顶层很难看,如何才能不让它显示呢。
设置menuba的stylesheet,
background-color:transparent |

3、tool button不显示边框
当我们设置button的icon时,发现icon的形状并不与button完全一致,如下图:

设置stylesheet
border-style: flat; |

注意,一定要选择tool button,而不要选择push button,因为push button活动的时候会有一个虚线框。
要达到上图的效果,除了设置border-style:flat,可不可以将style设置为transparent呢?设置成transparent后,显示上看,效果是和上图的一样,但当按下时,button没有被图片覆盖的地方就会显示被按下时的颜色。
4、在父窗体的stylesheet中设置子部件的属性
假设有多个button,且它们的样式是一样的,那是不是需要一个个设置呢?不需要的,我们可以在父窗体中进行设置,那么子部件都会继承它的属性。
如果某个button的样式特殊,再单独修改就行了,下面举个实例,在父窗体的stylesheet中设置如下
QDialog{background:rgb(229,
255, 239)} |
QMenuBar{background:url(:/image/header.bmp)} |
QStatusBar{background:url(:/image/header.bmp)} |
QPushButton{background:url(:/image/header.bmp)} |
QLCDNumber{background:url(:/image/lcd.bmp)} |
QLabel{color:
rgb(0, 0, 255)} |
QDial{background-color:
rgb(67, 67, 67)} |
QGroupBox
{ |
border-width:2px; |
border-style:solid; |
border-color:#FFFFFF; |
} |
source
print?
QGroupBox{color:
rgb(255,255, 255)} |
QToolButton{border-style:
flat;} |
结语:
style sheet用起来很方便,以上是总结的几种用法,后面会继续补充。
参考资料:
------------------------------------------------------------------------------------
Qt中设置widget背景颜色/图片的注意事项(使用样式表 setStyleSheet())
2010-05-07 00:31 6546人阅读 评论(11) 收藏 举报在Qt中设置widget背景颜色或者图片方法很多种:重写paintEvent() , 调色板QPalette , 样式表setStyleSheet等等。
但是各种方法都有其注意事项,如果不注意则很容易陷入麻烦中。
1:setStyleSheet()
这个函数我一直很喜欢使用,因为只要写一句就可以实现效果,比其他方法都简单,但是其却有一个很值得注意的地方,也就是这个地方让我大吃苦头。
亦即:①:该函数只能用于设置有父窗口的子窗口的背景!如果一个窗口没有子窗口,则无法使用该函数来设置背景颜色或图 片!!
②:同时:对于一个父窗口而言:如果我们用setStyleShette设置了其样式,而对于其子窗口:如果没有用同样的函数来设 置的话, 则其子窗口的样式和其父窗口完全一致,亦即:其集成了自己父窗口的样式!
③:延伸:对顶层窗口(没有父窗口),其有若干个子窗口,则当我们用setStyleShette来设置这个顶层窗口的样式后,依据①可知:该父窗口本身没有任何变化,亦即设置没有生效;而其子窗口:只要子窗口本身没有用setStyleShette来设置自己的样式表,则其就是用的自己父窗口的样式表!!
例如:
主窗口(没有父类)为MainWin
MainWin::MainWin()
{
this->setStyleSheet("background-image:url(:/bmp/IMG_0345.JPG)");
iButton = new QPushButton(this);
iLabel = new QLabel(iButton);
}
运行一下,效果如下:

亦即:虽然我们设置的是顶层的父窗口,但是该样式却是在其子窗口中生效,而顶层父窗口没有任何变化! 这验证了①。
修改一下上例代码:
MainWin::MainWin()
{
this->setStyleSheet("background-image:url(:/bmp/IMG_0345.JPG)");
iButton = new QPushButton(this);
iLabel = new QLabel(iButton);
iLabel->setStyleSheet("background-image:url(:/bmp/1257253475842.jpg)");
}
则运行效果如下:

可见:子窗口只有调用setStyleSheet()设置了自己的样式后才可以隔断父窗口的样式,否则其将是用父窗口的样式。
再修改一下代码:
MainWin::MainWin()
{
iButton = new QPushButton(this);
iButton ->setStyleSheet("background-image:url(:/bmp/IMG_0345.JPG)");
iLabel = new QLabel(iButton);
}
运行一下,效果如下:
可见:设置有父窗口的子窗口时:setStyleSheet()一定生效!!!
后来我又思考了一个问题,那就是:对于顶层父窗口,如果我setStyleSheet()设置了样式表,而对其子窗口,我用其他方法,比如用QPalette调色板来设置背景图片/颜色,这时子窗口的背景到底是由继承自父窗口的样式表决定呢还是由子窗口本身的QPalette调色板决定呢?
再次修改代码:
MainWin::MainWin()
{
this->setStyleSheet("background-image:url(:/bmp/IMG_0345.JPG)");
iButton = new QPushButton(this);
iLabel = new QLabel(iButton);
QPalette palette;
palette.setBrush(iLabel->backgroundRole(),QBrush(QImage(":/bmp/1257253475842.jpg")));
iLabel->setPalette(palette);
iLabel->setAutoFillBackground(true);
}
此段代码中我用QPalette来设置子窗口的背景图片,看下到底是样式表还是调色板生效,效果如下:
由此可见:一旦顶层窗口设置了样式表,则其子窗口无论用什么方法来设置背景,都会不生效!!!
那如果不是顶层窗口而仅仅是一般窗口设置了样式表呢?再次修改代码:
MainWin::MainWin()
{
iButton = new QPushButton(this);
iButton ->setStyleSheet("background-image:url(:/bmp/IMG_0345.JPG)");
iLabel = new QLabel(iButton);
QPalette palette;
palette.setBrush(iLabel->backgroundRole(),QBrush(QImage(":/bmp/1257253475842.jpg")));
iLabel->setPalette(palette);
iLabel->setAutoFillBackground(true);
}
运行效果同上,这说明:不管是顶层窗口还是一般窗口,只要用setStyleSheet设置了样式表,则其子窗口用其它方式设置背景颜色/图片均不生效,只能用同样方式setStyleSheet来设置更改!!!
为了验证上边的结论,再次修改代码:
MainWin::MainWin()
iButton = new QPushButton(this);
iLabel = new QLabel(iButton);
QPalette palette;
palette.setBrush(iLabel->backgroundRole(),QBrush(QImage(":/bmp/1257253475842.jpg")));
iLabel->setPalette(palette);
iLabel->setAutoFillBackground(true);
}
运行一下:

此时调色板才生效,这也间接证明了上述结论。
==========================================================================
总结:
1:不要在顶层窗口(无父类的窗口)中使用setStyleSheet() ,否则其一父窗口的背景不会改变,其次其子窗口的背景设置方法变得局限唯一,不能再使用其它方法!
2:如果一个一般窗口(非顶层窗口)还有子窗口,那最好不要使用setStyleSheet()来设置其背景颜色,因为虽然此时该窗口的背景设置是生效的,但是其子窗口的背景设置也变得局限唯一,只能使用setStyleSheet,而不能使用其它方法! 当然:你如果就是只想使用这种方法,那也完全可以!!
说白了就是:不要再MainWindow中使用setStyleSheet()!
而上边之所以强调拓宽子窗口设置背景的方法范围,这是因为:如果只能用setStyleSheet样式表来设置背景图片的话,该图片是无法缩放的,如果其大小与widget窗口大小不相符,则我们无法用程序来实现图片的缩放,除非我们直接处理图片使其大小与widget窗口相符; 而如果不局限于用setStyleSheet样式表来设置的话,我们可以选择用QPalette调色版,其内部setBrush()之前,我们完全可以先对图片进行scale缩放再刷到窗口上,这样就避免直接去处理图片,灵活性强一点!
==========================================================================
注意:该文只针对QWidget体系,并不适用用QGraphicsWidget体系!关于这两种体系之间的区分,详见文章http://blog.csdn.net/NRC_DouNingBo/archive/2010/05/09/5571149.aspx

相关文章推荐
- QT皮肤编程(QT style sheet)总结
- Qt的皮肤设计(Style Sheet)
- Qt的皮肤设计(Style Sheet)
- Qt的皮肤设计(Style Sheet)
- QT (QSS) 编程, QSS语法概述。。setstylesheet
- Qt的皮肤设计(Style Sheet)
- Qt的皮肤设计(Style Sheet)
- Qt的皮肤设计(Style Sheet)
- Qt的皮肤设计(Style Sheet)
- Qt StyleSheet皮肤css源码
- Qt的皮肤设计(Style Sheet)
- Qt的皮肤设计(Style Sheet)
- QT (QSS) 编程, QSS语法概述。。setstylesheet
- Qt的皮肤设计(Style Sheet)
- Qt的皮肤设计(Style Sheet)
- Qt StyleSheet皮肤css源码(黑色,超详细) 乌合之众 good
- qt 中stylesheet设置背景继承问题的解决
- QT StyleSheet(3)--QSS示例
- 使用Qt Style Sheet(2)--QSS语法
- Qt stylesheet 源码学习