搭建spring工程配置数据源连接池
2016-09-29 09:57
405 查看
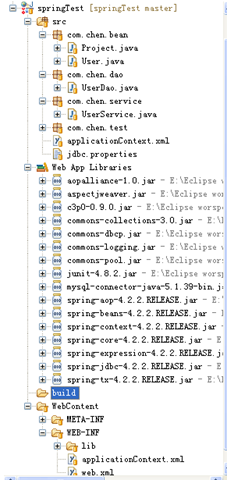
Spring作为一个优秀的开源框架,越来越为大家所熟知,前段时间用搭了个spring工程来管理数据库连接池,没有借助Eclipse纯手工搭建,网上此类文章不多,这里给大家分享一下,也作为一个手记。 工程结构:

注意:src目录下的applicationContext.xml是单元测试用的,作为web工程的话就使用WEB-INF下的applicationContext.xml。
1、下载jar包
这里需要下载很多spring的jar包,推荐去官网下载,很多人会说官网只提供maven和gradle下载,没有jar下载,那是你没有认真解读spring官网,同意是专注于web开源项目,spring的官网就有很多地方值得我们学习,别管英语水平高低,不行就借助翻译工具,扯远了。这里介绍一下如何从spring官网下载spring框架jar包。
百度spring官网或者直接进入spring框架的网页http://projects.spring.io/spring-framework/
在maven依赖包的上面有这么一段话“All avaible features and modules are described in the Modules section of the reference documentation. Their maven/gradle coordinates are also described there.”
有2个链接地址,点进去第一个链接地址“the Modules section of the reference documentation“里面都是spring的介绍,
往下拉,找到”Distribution Zip Files“就找到了压缩包下载地址http://repo.spring.io/release/org/springframework/spring,
进去就可以下载各个版本的spring框架jar包了。这里我们使用4.2.2
这个工程中用到这些spring的jar包:
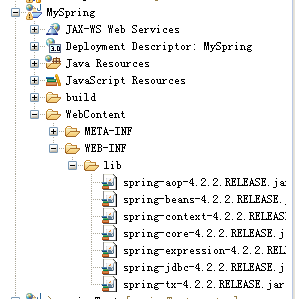
2、创建web工程
1)把下载的spring的zip压缩包解压,把以下jar包复制到工程的lib目录下。

2) WEB-INF下创建web.xml
作为web工程,容器启动时会先加载web.xml,我们就把spring的加载放到web.xml里:
注册spring的中央控制器listener—ContextLoaderListener;
注册spring配置文件的位置;
3) WEB-INF下创建spring的配置文件 applicationContext.xml
主要是装配bean,依赖注入和数据库连接池配置、事务等。
4)spring配置文件详解
装配bean:
首先配置bean userDao
<bean id="userDao" class="com.chen.dao.UserDao"></bean>
再配置bean userService
<bean id="userService" class="com.chen.service.UserService"> <property name="userDao" ref="userDao"></property> </bean>
property元素就是把userDao注入给userService,当然在代码中也要注入,在UserService中
private UserDao userDao;
public void setUserDao(UserDao userDao)
{
this.userDao = userDao;
}
这样在UserService中就可以使用userDao了。
数据库连接
配置数据库连接有几种方式,其实就是配置dataSource,然后注入给jdbcTemplate
a、spring jdbc方式,
这用方式每次都创建连接,效率低资源消耗大:
b、dbcp 连接池
c、c3p0 连接池
配置事务
个人觉得采用注解方式更好用
java代码
userDao
UserService
在src下创建jdbc.properties数据源文件
注意:src目录下的applicationContext.xml是单元测试用的,作为web工程的话就使用WEB-INF下的applicationContext.xml。
1、下载jar包
这里需要下载很多spring的jar包,推荐去官网下载,很多人会说官网只提供maven和gradle下载,没有jar下载,那是你没有认真解读spring官网,同意是专注于web开源项目,spring的官网就有很多地方值得我们学习,别管英语水平高低,不行就借助翻译工具,扯远了。这里介绍一下如何从spring官网下载spring框架jar包。
百度spring官网或者直接进入spring框架的网页http://projects.spring.io/spring-framework/
在maven依赖包的上面有这么一段话“All avaible features and modules are described in the Modules section of the reference documentation. Their maven/gradle coordinates are also described there.”
有2个链接地址,点进去第一个链接地址“the Modules section of the reference documentation“里面都是spring的介绍,
往下拉,找到”Distribution Zip Files“就找到了压缩包下载地址http://repo.spring.io/release/org/springframework/spring,
进去就可以下载各个版本的spring框架jar包了。这里我们使用4.2.2
这个工程中用到这些spring的jar包:
2、创建web工程
1)把下载的spring的zip压缩包解压,把以下jar包复制到工程的lib目录下。
2) WEB-INF下创建web.xml
作为web工程,容器启动时会先加载web.xml,我们就把spring的加载放到web.xml里:
注册spring的中央控制器listener—ContextLoaderListener;
注册spring配置文件的位置;
<?xml version="1.0" encoding="UTF-8"?>
<web-app xmlns:xsi="http://www.w3.org/2001/XMLSchema-instance"
xmlns="http://java.sun.com/xml/ns/javaee"
xmlns:web="http://java.sun.com/xml/ns/javaee/web-app_2_5.xsd"
xsi:schemaLocation="http://java.sun.com/xml/ns/javaee http://java.sun.com/xml/ns/javaee/web-app_2_5.xsd" version="2.5">
<!-- 注册用于加载spring框架的中央控制器 listener ContextLoaderListener
原理:由于该监听器实现自ServletContextListener,因此它监听的是整个web容器(web.xml) -->
<listener>
<listener-class>
org.springframework.web.context.ContextLoaderListener
</listener-class>
</listener>

<!-- contextConfigLocation是spring框架中指定spring配置文件
找到spring配置文件后,创建一个ioc对象加载、解析配置文件,解析的同时实例化所有bean对象
监听器将其实例化的WebApplicationContext保存在web容器中,即保存在ServletContext中
-->
<context-param>
<param-name>contextConfigLocation</param-name>
<param-value>/WEB-INF/applicationContext.xml</param-value>
</context-param>

<welcome-file-list>
<welcome-file>index.jsp</welcome-file>
</welcome-file-list>
</web-app>
3) WEB-INF下创建spring的配置文件 applicationContext.xml
主要是装配bean,依赖注入和数据库连接池配置、事务等。
<?xml version="1.0" encoding="UTF-8"?>
<beans xmlns="http://www.springframework.org/schema/beans"
xmlns:xsi="http://www.w3.org/2001/XMLSchema-instance"
xmlns:context="http://www.springframework.org/schema/context"
xmlns:tx="http://www.springframework.org/schema/tx"
xmlns:aop="http://www.springframework.org/schema/aop"
xsi:schemaLocation="http://www.springframework.org/schema/beans  http://www.springframework.org/schema/beans/spring-beans-4.2.xsd http://www.springframework.org/schema/context  http://www.springframework.org/schema/context/spring-context-4.2.xsd http://www.springframework.org/schema/tx  http://www.springframework.org/schema/tx/spring-tx-2.5.xsd http://www.springframework.org/schema/aop  http://www.springframework.org/schema/aop/spring-aop-3.0.xsd">
<bean id="jdbcTemplate" class="org.springframework.jdbc.core.JdbcTemplate">
<property name="dataSource" ref="dataSource"></property>
</bean>
<!-- 注册properties类 -->
<bean id="jdbcConfigurer"  class="org.springframework.beans.factory.config.PropertyPlaceholderConfigurer">
<property name="locations" value="classpath:jdbc.properties"/>
</bean>

<!-- spring jdbc -->
<!--
<bean id="dataSource" class="org.springframework.jdbc.datasource.DriverManagerDataSource">
<property name="url" value="${jdbc.url}"></property>
<property name="username" value="${jdbc.username}"></property>
<property name="password" value="${jdbc.password}"></property>
<property name="driverClassName" value="${jdbc.driverClassName}"></property>
</bean>
-->

<!-- DBCP
BasicDataSource提供了close()方法关闭数据源,所以必须设定destroy-method=”close”属性,以便Spring容器关闭时,数据源能够正常关闭-->
<!--
<bean id="dataSource" class="org.apache.commons.dbcp.BasicDataSource" destroy-method="close">
<property name="url" value="${jdbc.url}"></property>
<property name="username" value="${jdbc.username}"></property>
<property name="password" value="${jdbc.password}"></property>
<property name="driverClassName" value="${jdbc.driverClassName}"></property>
</bean>
-->

<!-- c3p0
-->
<bean id="dataSource" class="com.mchange.v2.c3p0.ComboPooledDataSource" destroy-method="close">
<!-- 注意name和dbcp不同 -->
<property name="jdbcUrl" value="${jdbc.url}"></property>
<property name="user" value="${jdbc.username}"></property>
<property name="password" value="${jdbc.password}"></property>
<property name="driverClass" value="${jdbc.driverClassName}"></property>
<!--连接池中保留的最大连接数。默认值: 15 -->
<property name="maxPoolSize" value="20"/>
<!-- 连接池中保留的最小连接数,默认为:3-->
<property name="minPoolSize" value="2"/>
<!-- 初始化连接池中的连接数,取值应在minPoolSize与maxPoolSize之间,默认为3-->
<property name="initialPoolSize" value="2"/>

<!--最大空闲时间,60秒内未使用则连接被丢弃。若为0则永不丢弃。默认值: 0 -->
<property name="maxIdleTime" value="60"></property>

<!-- 当连接池连接耗尽时,客户端调用getConnection()后等待获取新连接的时间,超时后将抛出SQLException,如设为0则无限期等待。单位毫秒。默认: 0 -->
<property name="checkoutTimeout" value="3000"/>

<!--当连接池中的连接耗尽的时候c3p0一次同时获取的连接数。默认值: 3 -->
<property name="acquireIncrement" value="2"/>

<!--定义在从数据库获取新连接失败后重复尝试的次数。默认值: 30 ;小于等于0表示无限次-->
<property name="acquireRetryAttempts" value="0"/>

<!--重新尝试的时间间隔,默认为:1000毫秒-->
<property name="acquireRetryDelay" value="1000" />

<!--关闭连接时,是否提交未提交的事务,默认为false,即关闭连接,回滚未提交的事务 -->
<property name="autoCommitOnClose" value="false"></property>

<!--c3p0将建一张名为Test的空表,并使用其自带的查询语句进行测试。如果定义了这个参数那么属性preferredTestQuery将被忽略。你不能在这张Test表上进行任何操作,它将只供c3p0测试使用。默认值: null -->
<property name="automaticTestTable" value="c3p0testtable"></property>

<!--如果为false,则获取连接失败将会引起所有等待连接池来获取连接的线程抛出异常,但是数据源仍有效保留,并在下次调用getConnection()的时候继续尝试获取连接。如果设为true,那么在尝试获取连接失败后该数据源将申明已断开并永久关闭。默认: false-->
<property name="breakAfterAcquireFailure" value="false"></property>

<!--每60秒检查所有连接池中的空闲连接。默认值: 0,不检查 -->
<property name="idleConnectionTestPeriod" value="60"></property>
<!--c3p0全局的PreparedStatements缓存的大小。如果maxStatements与maxStatementsPerConnection均为0,则缓存不生效,只要有一个不为0,则语句的缓存就能生效。如果默认值: 0-->
<property name="maxStatements" value="100"></property>
<!--maxStatementsPerConnection定义了连接池内单个连接所拥有的最大缓存statements数。默认值: 0 -->
<property name="maxStatementsPerConnection" value="0"></property>

</bean>

<!-- 事务配置在service层,dao层的异常要抛出来事务才生效,可以通过配置切面或者用注解的方法使用事务 -->
<!-- 配置事务管理器 -->
<bean id="transactionManager"
class="org.springframework.jdbc.datasource.DataSourceTransactionManager">
<property name="dataSource" ref="dataSource" />
</bean>

<!-- 使用事务有2种方式,
1、可以通过配置通知+切面的方式
可以配置一类方法使用事务
开发时不用考虑事务
2、 使用注解@Transactional
可以精准的配置要使用事务的方法
开发是需要考虑事务
-->
<!-- 配置通知 -->
<tx:advice id="serviceAdvice" transaction-manager="transactionManager">
<tx:attributes>
<tx:method name="save*" propagation="REQUIRED"/>
<tx:method name="del*" propagation="REQUIRED"/>
<tx:method name="update*" propagation="REQUIRED"/>
<tx:method name="add*" propagation="REQUIRED"/>
<tx:method name="find*" propagation="REQUIRED"/>
<tx:method name="get*" propagation="REQUIRED"/>
<tx:method name="query*" propagation="REQUIRED"/>
</tx:attributes>
</tx:advice>
<!-- 配置切面 -->
<aop:config>
<!-- 切入点 -->
<aop:pointcut id="servicePointcut" expression="execution(* com.chen.service.*.*(..))" />
<aop:advisor advice-ref="serviceAdvice" pointcut-ref="servicePointcut"/>
</aop:config>

<!--采用@Transactional注解方式使用事务 --><!--
<tx:annotation-driven transaction-manager="transactionManager" /> -->

<bean id="userDao" class="com.chen.dao.UserDao">
<property name="jdbcTemplate" ref="jdbcTemplate"></property>
</bean>

<bean id="userService" class="com.chen.service.UserService">
<property name="userDao" ref="userDao"></property>
</bean>

</beans>
4)spring配置文件详解
装配bean:
首先配置bean userDao
<bean id="userDao" class="com.chen.dao.UserDao"></bean>
再配置bean userService
<bean id="userService" class="com.chen.service.UserService"> <property name="userDao" ref="userDao"></property> </bean>
property元素就是把userDao注入给userService,当然在代码中也要注入,在UserService中
private UserDao userDao;
public void setUserDao(UserDao userDao)
{
this.userDao = userDao;
}
这样在UserService中就可以使用userDao了。
数据库连接
配置数据库连接有几种方式,其实就是配置dataSource,然后注入给jdbcTemplate
a、spring jdbc方式,
这用方式每次都创建连接,效率低资源消耗大:
<bean id="dataSource" class="org.springframework.jdbc.datasource.DriverManagerDataSource">
<property name="url" value="${jdbc.url}"></property>
<property name="username" value="${jdbc.username}"></property>
<property name="password" value="${jdbc.password}"></property>
<property name="driverClassName" value="${jdbc.driverClassName}"></property>
</bean>
b、dbcp 连接池
<!-- BasicDataSource提供了close()方法关闭数据源,所以必须设定destroy-method=”close”属性,以便Spring容器关闭时,数据源能够正常关闭-->
<bean id="dataSource" class="org.apache.commons.dbcp.BasicDataSource" destroy-method="close">
<property name="url" value="${jdbc.url}"></property>
<property name="username" value="${jdbc.username}"></property>
<property name="password" value="${jdbc.password}"></property>
<property name="driverClassName" value="${jdbc.driverClassName}"></property>
</bean>
c、c3p0 连接池
<bean id="dataSource" class="com.mchange.v2.c3p0.ComboPooledDataSource" destroy-method="close">
<!-- 注意name和dbcp不同 -->
<property name="jdbcUrl" value="${jdbc.url}"></property>
<property name="user" value="${jdbc.username}"></property>
<property name="password" value="${jdbc.password}"></property>
<property name="driverClass" value="${jdbc.driverClassName}"></property>
<!--连接池中保留的最大连接数。默认值: 15 -->
<property name="maxPoolSize" value="20"/>
<!-- 连接池中保留的最小连接数,默认为:3-->
<property name="minPoolSize" value="2"/>
<!-- 初始化连接池中的连接数,取值应在minPoolSize与maxPoolSize之间,默认为3-->
<property name="initialPoolSize" value="2"/>

<!--最大空闲时间,60秒内未使用则连接被丢弃。若为0则永不丢弃。默认值: 0 -->
<property name="maxIdleTime" value="60"></property>

<!-- 当连接池连接耗尽时,客户端调用getConnection()后等待获取新连接的时间,超时后将抛出SQLException,如设为0则无限期等待。单位毫秒。默认: 0 -->
<property name="checkoutTimeout" value="3000"/>

<!--当连接池中的连接耗尽的时候c3p0一次同时获取的连接数。默认值: 3 -->
<property name="acquireIncrement" value="2"/>

<!--定义在从数据库获取新连接失败后重复尝试的次数。默认值: 30 ;小于等于0表示无限次-->
<property name="acquireRetryAttempts" value="0"/>

<!--重新尝试的时间间隔,默认为:1000毫秒-->
<property name="acquireRetryDelay" value="1000" />

<!--关闭连接时,是否提交未提交的事务,默认为false,即关闭连接,回滚未提交的事务 -->
<property name="autoCommitOnClose" value="false"></property>

<!--c3p0将建一张名为Test的空表,并使用其自带的查询语句进行测试。如果定义了这个参数那么属性preferredTestQuery将被忽略。你不能在这张Test表上进行任何操作,它将只供c3p0测试使用。默认值: null -->
<property name="automaticTestTable" value="c3p0testtable"></property>

<!--如果为false,则获取连接失败将会引起所有等待连接池来获取连接的线程抛出异常,但是数据源仍有效保留,并在下次调用getConnection()的时候继续尝试获取连接。如果设为true,那么在尝试获取连接失败后该数据源将申明已断开并永久关闭。默认: false-->
<property name="breakAfterAcquireFailure" value="false"></property>

<!--每60秒检查所有连接池中的空闲连接。默认值: 0,不检查 -->
<property name="idleConnectionTestPeriod" value="60"></property>
<!--c3p0全局的PreparedStatements缓存的大小。如果maxStatements与maxStatementsPerConnection均为0,则缓存不生效,只要有一个不为0,则语句的缓存就能生效。如果默认值: 0-->
<property name="maxStatements" value="100"></property>
<!--maxStatementsPerConnection定义了连接池内单个连接所拥有的最大缓存statements数。默认值: 0 -->
<property name="maxStatementsPerConnection" value="0"></property>

</bean>
配置事务
个人觉得采用注解方式更好用
<!-- 事务配置在service层,dao层的异常要抛出来事务才生效,可以通过配置切面或者用注解的方法使用事务 -->
<!-- 配置事务管理器 -->
<bean id="transactionManager"
class="org.springframework.jdbc.datasource.DataSourceTransactionManager">
<property name="dataSource" ref="dataSource" />
</bean>

<!-- 使用事务有2种方式,
1、可以通过配置通知+切面的方式
可以配置一类方法使用事务
开发时不用考虑事务
2、 使用注解@Transactional
可以精准的配置要使用事务的方法
开发时需要考虑事务
-->
<!-- 配置通知 -->
<tx:advice id="serviceAdvice" transaction-manager="transactionManager">
<tx:attributes>
<tx:method name="save*" propagation="REQUIRED"/>
<tx:method name="del*" propagation="REQUIRED"/>
<tx:method name="update*" propagation="REQUIRED"/>
<tx:method name="add*" propagation="REQUIRED"/>
<tx:method name="find*" propagation="REQUIRED"/>
<tx:method name="get*" propagation="REQUIRED"/>
<tx:method name="query*" propagation="REQUIRED"/>
</tx:attributes>
</tx:advice>
<!-- 配置切面 -->
<aop:config>
<!-- 切入点 -->
<aop:pointcut id="servicePointcut" expression="execution(* com.chen.service.*.*(..))" />
<aop:advisor advice-ref="serviceAdvice" pointcut-ref="servicePointcut"/>
</aop:config>

<!--采用@Transactional注解方式使用事务 -->
<tx:annotation-driven transaction-manager="transactionManager" />
java代码
userDao
package com.chen.dao;

import org.springframework.jdbc.core.JdbcTemplate;

public class UserDao
{
private JdbcTemplate jdbcTemplate;

public void setJdbcTemplate(JdbcTemplate jdbcTemplate) {
this.jdbcTemplate = jdbcTemplate;
}

public Map queryMap(String projectId)
{
Map map = null;
try
{
String sql = "select * from t_fw_um_project where id = "+projectId;
String [] args = {projectId};
map = jdbcTemplate.queryForMap(sql);
}
catch(Exception e)
{
e.printStackTrace();
}
return map;
}

public List queryList()
{
List list = null;
try
{
String sql = "select * from t_fw_um_project";
list = jdbcTemplate.queryForList(sql);
}
catch(Exception e)
{
e.printStackTrace();
}
return list;
}

public List<Map<String,Object>> queryChildren(String permissionId)
{
List<Map<String, Object>> list = null;
try
{
String sql = "select * from t_fw_um_permission t where t.project_id = '111' and t.parent_id in ( " + permissionId +" )";
list = jdbcTemplate.queryForList(sql);
}
catch(Exception e)
{
e.printStackTrace();
}
return list;
}
//删权限依赖
public int deleteDependPermissions(String permissionIds)
{
int result = 0;
try
{
String sql = "delete from t_fw_um_permission_depend where c_id in ( " + permissionIds +" ) or d_id in ( " + permissionIds +" )";
result = jdbcTemplate.update(sql);
}
catch(Exception e)
{
e.printStackTrace();
throw e;
}
return result;
}

//删权限角色关联表
public int deleteRolePermissions(String permissionIds)
{
int result = 0;
try
{
String sql = "delete from t_fw_um_role_permission_map where PERMISSION_ID in ( " + permissionIds +" )";
result = jdbcTemplate.update(sql);
}
catch(Exception e)
{
e.printStackTrace();
throw e;
}
return result;
}

//删权限
public int deletePermissions(String permissionIds)
{
int result = 0;
try
{
String sql = "delete from t_fw_um_permission where id in ( " + permissionIds +" )";
int i = 1/0;
result = jdbcTemplate.update(sql);
}
catch(Exception e)
{
e.printStackTrace();
throw e;
}
return result;
}
}
UserService
package com.chen.service;

import java.util.List;
import java.util.Map;

import org.springframework.context.ApplicationContext;
import org.springframework.context.support.ClassPathXmlApplicationContext;
import org.springframework.transaction.annotation.Transactional;

import com.chen.dao.UserDao;

public class UserService
{
//注入dao 否则无法使用事务
private UserDao userDao;
public void setUserDao(UserDao userDao)
{
this.userDao = userDao;
}

//@Test
public void createUser()
{
ApplicationContext ctx = new ClassPathXmlApplicationContext("applicationContext.xml");
UserDao userDao = (UserDao) ctx.getBean("userDao");
//System.out.println(userDao.queryMap("666"));
System.out.println(userDao.queryChildren("3622d013-dadd-4d63-9930-4b7859f2e0d9"));

}

//@Test
//这里可以使用注解,或者配置的方式使用事务
//@Transactional
public void deletePermission()
{
//ApplicationContext ctx = new ClassPathXmlApplicationContext("applicationContext.xml");
//UserDao userDao = (UserDao) ctx.getBean("userDao");
String permissionId = "'09073677-64e0-4932-85f1-65fe3137e108'";
StringBuilder delPermissions = new StringBuilder();
delPermissions.append(permissionId).append(",");
List<Map<String,Object>> list = userDao.queryChildren(permissionId);
while(list.size() > 0)
{
//每次查出来的children,作为下次查询的父类
StringBuilder queryPermissions = new StringBuilder();
//把权限id取出来
for(Map<String,Object> m : list)
{
delPermissions.append("'").append(m.get("id")).append("',");
queryPermissions.append("'").append(m.get("id")).append("',");
}
String queryPs = queryPermissions.toString();
queryPs = queryPs.substring(0, queryPs.length()-1);
list = userDao.queryChildren(queryPs);
}
String delPermission = delPermissions.toString();
delPermission = delPermission.substring(0, delPermission.length()-1);
p(delPermission);
//p("删依赖关系="+userDao.deleteDependPermissions(delPermission));
//p("删角色权限关联="+userDao.deleteRolePermissions(delPermission));
//p("删权限="+userDao.deletePermissions(delPermission));
p("删依赖关系="+userDao.deleteDependPermissions(delPermission));
p("删权限="+userDao.deletePermissions(delPermission));
}
public void p(Object o)
{
System.out.println(o);
}
}在src下创建jdbc.properties数据源文件
jdbc.driverClassName = com.mysql.jdbc.Driver
jdbc.url = jdbc:mysql://localhost:3306/数据库名
jdbc.username = root
jdbc.password = 000000

相关文章推荐
- 用Spring管理Hibernate连接多个数据源配置文件
- Mongodb3.0.5副本集搭建及spring和java连接副本集配置
- spring 连接各种数据源的配置(转载)
- 单个工程中Spring+Mybatis连接多个数据库的配置(个人分享版本)
- 单个工程中Spring+Mybatis连接多个数据库的配置(个人研究版本)
- 【笔记】Spring配置文件中注册三种数据源及从属性文件中读取DB连接四要素
- 【spring in action 学习--springMVC搭建】在不使用web.xml的情况下,配置Srping MVC工程
- Spring远程数据源JTA事务连接配置
- 单个工程中Spring+Mybatis连接多个数据库的配置(个人分享版本)
- Mongodb3.0.5 副本集搭建及spring和java连接副本集配置详细介绍
- Mongodb3.0.5 副本集搭建及spring和java连接副本集配置详细介绍
- spring中配置不可见的数据源连接方式!
- 单个工程中Spring+Mybatis连接多个数据库的配置
- Spring 多数据源连接配置 解决方案
- 使用spring 配置数据源,并用数据源得到连接,操作sql
- spring配置数据源连接池
- Spring配置文件中的数据源的几种连接
- 使用spring 配置数据源,并用数据源得到连接,操作sql
- 使用Maven搭建ssm(spring+springmvc+mybatis)工程(多数据源)
- 使用Spring的JndiObjectFactoryBean配置数据源时需要注意的问题