Android Contacts之二根据4.4实现的联系人列表特效
2016-09-23 14:07
393 查看
Contacts系列文章
Android Contacts之一联系人列表特效Android Contacts之二根据4.4实现的联系人列表特效
Android Contacts之三自定义的联系人列表特效
简介
Android 4.4的原生Contacts源码的研究,写了一个仿原生的联系人列表并加了比较酷炫的字母索引表,实现效果如下图: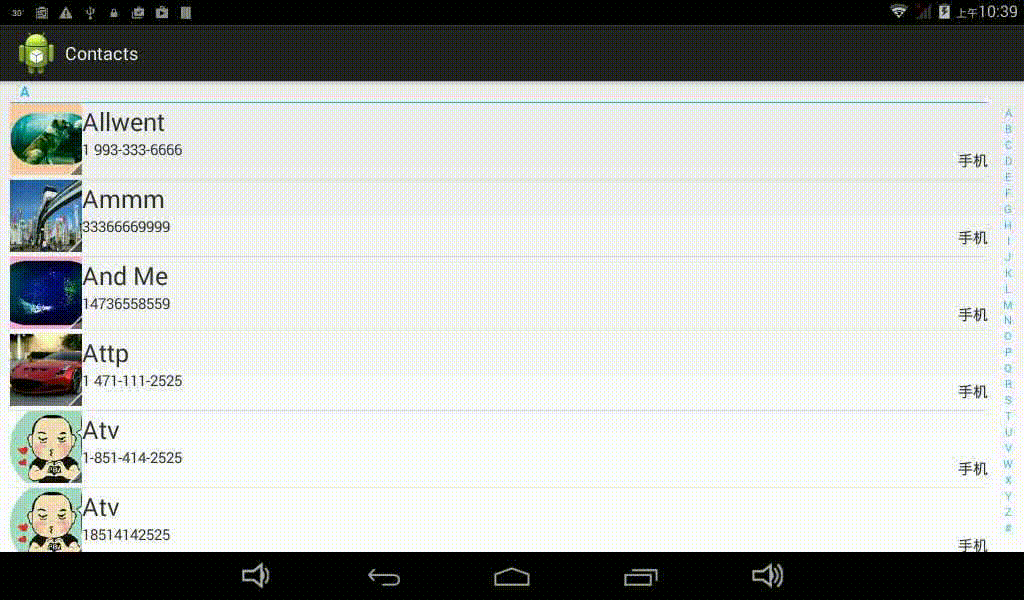
接下来介绍下实现这个联系人需要的关键部分的代码
重要知识点
查询系统联系人电话号码,名字,头像等String[] projection = {
Phone._ID,
Phone.DISPLAY_NAME,
Phone.NUMBER,
Phone.SORT_KEY_PRIMARY,
Phone.CONTACT_ID,
Phone.PHOTO_ID,
Phone.LOOKUP_KEY };
//按sort_key升序查询
queryHandler.startQuery(0, null, Phone.CONTENT_URI, projection, null,
null, "sort_key COLLATE LOCALIZED asc");
//所需权限
<uses-permission android:name="android.permission.READ_CONTACTS" />获取系统联系人头像
//获取系统联系人的photoid和contactid,如果photoid不为0就可以得到其头像图片
Uri uri = ContentUris.withAppendedId(ContactsContract.Contacts.CONTENT_URI, contactid);
InputStream input = ContactsContract.Contacts.openContactPhotoInputStream(context.getContentResolver(), uri);
Bitmap contactPhoto = BitmapFactory.decodeStream(input);
获取索引
//原生的4.4系统就是使用下面这个uri获取联系人数据的
public static final Uri CONTENT_CALLABLES_URI = Uri.withAppendedPath(ContactsContract.Data.CONTENT_URI, "callables").buildUpon()
.appendQueryParameter(ContactsContract.DIRECTORY_PARAM_KEY, "0")
.appendQueryParameter("address_book_index_extras", "true")
.appendQueryParameter("remove_duplicate_entries", "true")
.build();

//cursor来自于CONTENT_CALLABLES_URI请求后获取到的cursor,由于这个是原生的方法,所以在第三方固件可能不适用,需要自己做相应的处理
Bundle bundle = cursor.getExtras();
if (bundle.containsKey("address_book_index_titles")) {
String sections[] = bundle.getStringArray("address_book_index_titles");
int counts[] = bundle.getIntArray("address_book_index_counts");
sectionIndexer = new ContactsSectionIndexer(sections, counts);
}ContactsSectionIndexer.java这个类从原生的Contacts中提取出来的做了部分修改。
public class ContactsSectionIndexer implements SectionIndexer {

private String[] mSections;
private int[] mPositions;
private int mCount;
private static final String BLANK_HEADER_STRING = " ";

/**
* Constructor.
*
* @param sections a non-null array
* @param counts a non-null array of the same size as <code>sections</code>
*/
public ContactsSectionIndexer(String[] sections, int[] counts) {
if (sections == null || counts == null) {
throw new NullPointerException();
}

if (sections.length != counts.length) {
throw new IllegalArgumentException(
"The sections and counts arrays must have the same length");
}

this.mSections = sections;
mPositions = new int[counts.length];
int position = 0;
for (int i = 0; i < counts.length; i++) {
if (TextUtils.isEmpty(mSections[i])) {
mSections[i] = BLANK_HEADER_STRING;
} else if (!mSections[i].equals(BLANK_HEADER_STRING)) {
mSections[i] = mSections[i].trim();
}

mPositions[i] = position;
position += counts[i];
}
mCount = position;
}

public Object[] getSections() {
return mSections;
}

public int getPositionForSection(int section) {
if (section < 0 || section >= mSections.length) {
return -1;
}

return mPositions[section];
}

public int getSectionForPosition(int position) {
if (position < 0 || position >= mCount) {
return -1;
}

int index = Arrays.binarySearch(mPositions, position);

/*
* Consider this example: section positions are 0, 3, 5; the supplied
* position is 4. The section corresponding to position 4 starts at
* position 3, so the expected return value is 1. Binary search will not
* find 4 in the array and thus will return -insertPosition-1, i.e. -3.
* To get from that number to the expected value of 1 we need to negate
* and subtract 2.
*/
return index >= 0 ? index : -index - 2;
}

public int getPositionForSections(String s) {
int position = -1;
for (int i = 0; i < mSections.length; i++) {
if (mSections[i].equals(s)) {
position = getPositionForSection(i);
break;
}
}

return position;
}
}
字母索引的特效
Sidebar这个就不多说了,直接看源码就好了。
总结
重要的知识点就是上面这几个了,如果对于联系人特效感兴趣可以看这篇文章Android Contacts之一联系人列表特效,这里介绍了一些博主写的特效可供参考。当然,本文给的获取联系人的数据是4.4原生的方式,好像对于中文索引这一块也不支持,所以在国内使用的话,还要做中文转拼音的操作,再做一个字母索引,而不是使用系统的方式获取索引。
源码下载

相关文章推荐
- Android Developer官网API指南uses-sdk
- Android ListView
- 二. JNI编程与Android NDK - 安卓程序中调用C写的库
- 收集Android 开发工具
- android studio so文件冲突问题解决方案
- [Android知识体系]之四大组件:service(完全解析下)
- SimpleArrayMap源码解析
- Android:改变 Toolbar 的文字和溢出图标颜色
- android smartpointer
- MaterialProgressDrawable , 实现SwipeRefreshLayout的下拉效果的旋转动画效果
- Android 项目实战--手机卫士(实现splash)
- Android的事件分发
- android ListView下拉刷新
- YRecyclerView自定义下拉刷新上拉加载更多的RecyclerView
- Android自定义View——饼图
- Android Studio error: Expected resource of type raw
- Android Touch事件传递机制通俗讲解
- Android动画RotateAnimation(fromDegrees, toDegrees, pivotX,pivotY)参数
- Android自定义优惠券解析
- Android Studio提示缺少翻译语言