自定义流式布局FlowLayout
描述:
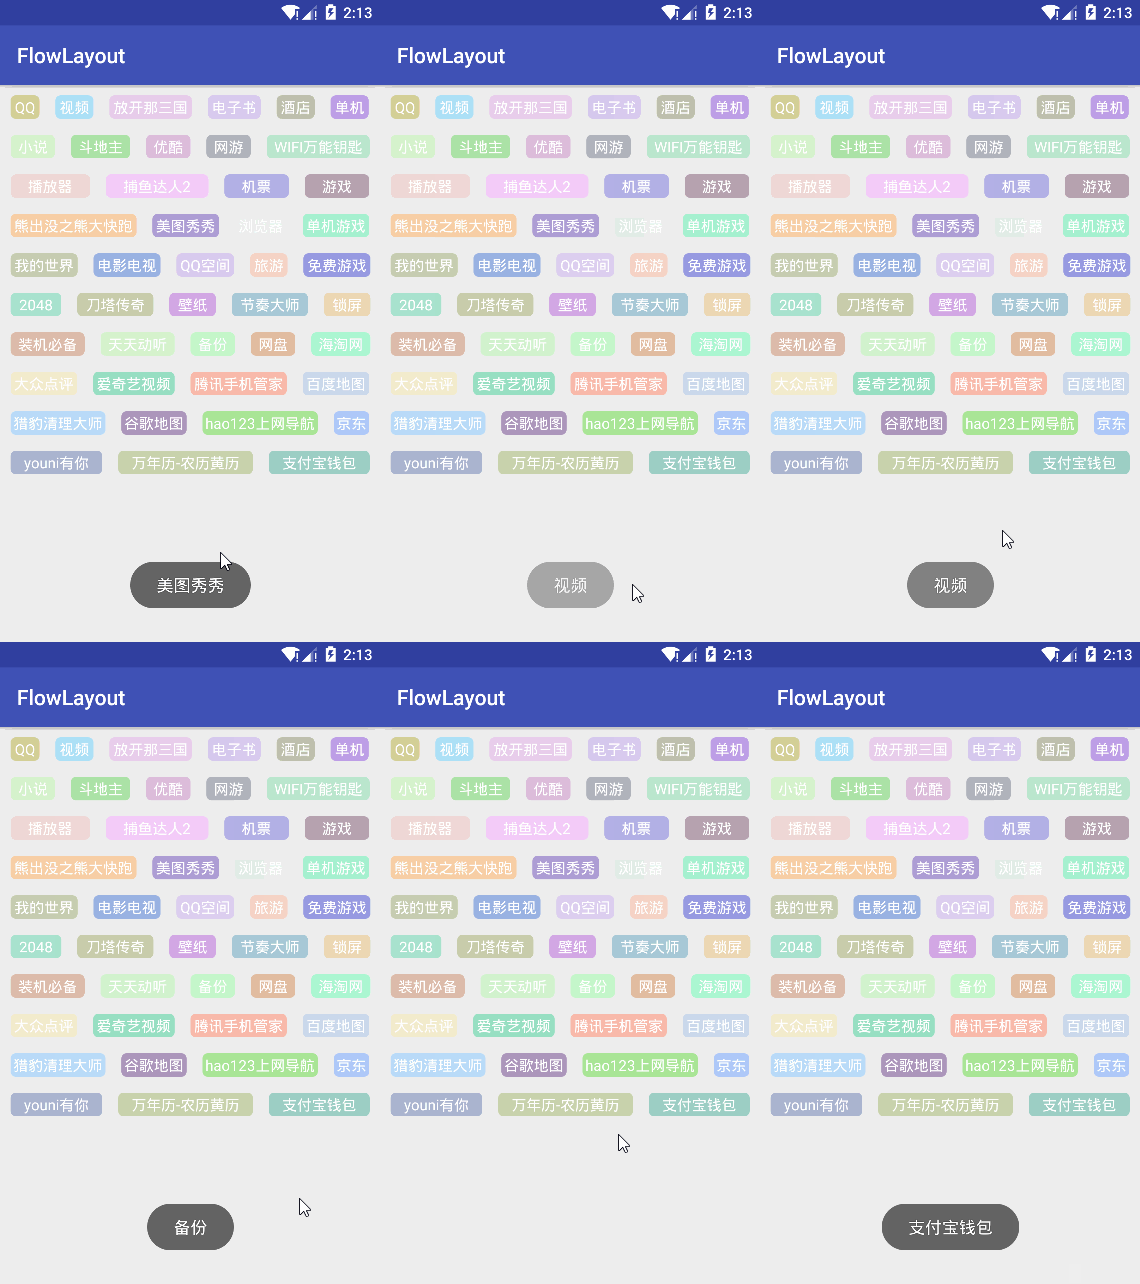
每一行摆放多个子View时,因为每个View的宽度和高度可能不同,需要在摆放之时按实际剩余宽度布置子View的摆放,如果当前行不够空间摆放,则需要新创建一行摆放它,而父容器FlowLayout的高度需要计算出所有行Line的高度之和来确定.
效果图:

实现要点:
- onMeasure()方法中计算出每一行的最大可用宽度
//1,计算宽高
int width = MeasureSpec.getSize(widthMeasureSpec);
int maxWidth = width - getPaddingLeft() - getPaddingRight();//最大可用宽度
2, 定义个管理类Line: a,用于管理新进来的子View是否可添加进当前行canAddView(),如果可以添加,则添加进集合addView(),同时记录已使用了的宽度usedWidth,及当前最高的子View的高度mHeight(用于确定该行Line的高度); b,布局最终添加进集合的每一个子View在当前行的摆放位置onLayout();
public class Line {
private int usedWidth;
private int paddingWidth;
private int mMaxWidth;
private List<View> mViews = new ArrayList<>();
private int mHeight;
public Line(int paddingWidth, int maxWidth) {
this.paddingWidth = paddingWidth;
mMaxWidth = maxWidth;
}
public boolean canAddView(View child) {
if (mViews.size() == 0) {
return true;
}
return usedWidth + child.getMeasuredWidth() + paddingWidth <= mMaxWidth;
}
public void addView(View child) {
int childWidth = child.getMeasuredWidth();
if (mViews.size() > 0) {
usedWidth += paddingWidth;    //当添加进一个子View后,就需要加上每个子View间的间距了
}
mViews.add(child);
usedWidth += childWidth;
mHeight = mHeight > child.getMeasuredHeight() ? mHeight : child.getMeasuredHeight();    //用于确定每一行的高度
}
.......

}
3, 创建成员变量mCurrentLine记录当前行Line的引用(相当于指针),及集合mLines用于存储每一个new出来的Line, 在onMeasure()方法中遍历每一个孩子,循环判断mCurrentLine是否为空,如果为空就创建Line,并addView(child),如果不为空,则分两种情况判断:mCurrentLine.canAddView(child)返回为true,则直接添加;返回为false,需要重新 new Line(),同时当前行的引用mCurrentLine指向新创建的Line,再addView(child),同时添加进集合mLines中 , 每次添加完成后,再测量一下孩子,给孩子的宽高赋值:
//3,测量孩子,并添加到Line中
for (int i = 0; i < getChildCount(); i++) {
View child = getChildAt(i);
//将孩子添加到Line中
if (mCurrentLine == null) {
mCurrentLine = new Line(getResources().getDimensionPixelSize(R.dimen.flow_line_padding), maxWidth);
mCurrentLine.addView(child);
mLines.add(mCurrentLine);
} else {
if (mCurrentLine.canAddView(child)) {
mCurrentLine.addView(child);
} else {
mCurrentLine = new Line(getResources().getDimensionPixelSize(R.dimen.flow_line_padding), maxWidth);
mCurrentLine.addView(child);
mLines.add(mCurrentLine);
}
}
//测量孩子
measureChild(child, widthMeasureSpec, heightMeasureSpec);    //对孩子的宽高不做限制,
}
4, 测量自己
宽度使用期望的宽度width, 高度需要遍历mLines集合,累加每一Line的mHeight:
//4,测量自己
int measuredHeight = getPaddingTop() + getPaddingBottom();//将高度的内边距计算在内
for (int i = 0; i < mLines.size(); i++) {
measuredHeight += mLines.get(i).mHeight + mVerticalSpace;    //将每一行的垂直间距计算在内
}
setMeasuredDimension(width, measuredHeight);
5, 根据 left 和 top 布局每一行,及每一行的中的孩子的位置:
@Override
protected void onLayout(boolean changed, int l, int t, int r, int b) {
int top = t + getPaddingTop();    //将内边距计算在内
int left = l + getPaddingLeft();
for (int i = 0; i < mLines.size(); i++) {
Line line = mLines.get(i);
line.onLayout(left, top);
top += line.mHeight + mVerticalSpace;    //每循环一次将top增加line.mHeight 及 每行的垂直间距 的高度
}
}
Line类中的onLayout,需要根据已使用的宽度usedWidth计算出最终剩余使用不了的宽度, 将这部分宽度按照mViews.size()的个数(即每一行的孩子个数)平均分配到每一个child的宽度上去,调用child.measure()方法按照指定的宽度重新测量后,再对孩子布局位置child.layout();
public void onLayout(int l, int t) {
int left = l;
for (int i = 0; i < mViews.size(); i++) {
View child = mViews.get(i);
//计算出平均添加到每个child上的多余宽度
int avg = (mMaxWidth - usedWidth) / mViews.size();
//按照指定的值重新测量孩子
child.measure(MeasureSpec.makeMeasureSpec(child.getMeasuredWidth() + avg,MeasureSpec.EXACTLY),
MeasureSpec.makeMeasureSpec(child.getMeasuredHeight(),MeasureSpec.EXACTLY));
int right = left + child.getMeasuredWidth();
int bottom = t + child.getMeasuredHeight();
child.layout(left, t, right, bottom);
left = right + paddingWidth;
}
}
6, 因为onMeasure()方法会被重复调用多次, 所以需要在onMeasure()方法每次被调用之前将集合清空, 不然会出现大片空白的区域:
@Override
protected void onMeasure(int widthMeasureSpec, int heightMeasureSpec) {
//因为会多次调用measure()方法,所以方法开始前先清除child
mLines.clear();
mCurrentLine = null;
.......
}
效果图实现代码
FlowLayout flowLayout = (FlowLayout) findViewById(R.id.flowlayout);
mRandom = new Random();
for (int i = 0; i < mDatas.length; i++) {
TextView view = new TextView(this);
view.setText(mDatas[i]);
//创建正常情况下背景
GradientDrawable gradientDrawable = new GradientDrawable();
gradientDrawable.setCornerRadius(getResources().getDimensionPixelSize(R.dimen.flow_gradient_radius));
int a = 255;
int r = 150 + mRandom.nextInt(100);
int g= 150 + mRandom.nextInt(100);
int b= 150 + mRandom.nextInt(100);
gradientDrawable.setColor(Color.argb(a, r, g, b));
//创建被点击时的背景
GradientDrawable gradientDrawable2 = new GradientDrawable();
gradientDrawable2.setCornerRadius(getResources().getDimensionPixelSize(R.dimen.flow_gradient_radius));
gradientDrawable2.setColor(Color.GRAY);
//设置图片选择器
StateListDrawable stateListDrawable = new StateListDrawable();
stateListDrawable.addState(new int[]{android.R.attr.state_pressed},gradientDrawable2);
stateListDrawable.addState(new int[]{},gradientDrawable);

view .setOnClickListener(new View.OnClickListener() {
@Override
public void onClick(View v) {
Toast.makeText(MainActivity.this, ((TextView) v).getText(), Toast.LENGTH_SHORT).show();
}
});
//将背景设置到TextView中
view.setBackgroundDrawable(stateListDrawable);
view.setTextColor(Color.WHITE);
view.setPadding(5, 5, 5, 5);
view.setGravity(Gravity.CENTER);
view.setTextSize(14);

flowLayout.addView(view);//触发重绘
}
- 自定义流式布局FlowLayout
- <android>自己写一个流式布局吧(FlowLayout)
- java例程练习(布局管理器[FlowLayout])
- Java图形化界面设计——布局管理器之FlowLayout(流式布局)
- 100行Android代码自定义一个流式布局-FlowLayout
- TagFlowLayout(新手搬运完整版) 简单的多选tag布局
- 源码推荐(12.01B):一行代码搞定自动布局,自定义UICollectionViewFlowLayout
- Java图形化界面设计——布局管理器之FlowLayout(流式布局)
- FlowLayout 自定义布局
- Android TagFlowLayout完全解析 一款针对Tag的布局
- 自定义流式布局 --动态的添加数据
- Java FlowLayout布局的时候换行的问题
- iOS开发 - UICollectionViewFlowLayout 流水布局
- Android TagFlowLayout完全解析 一款针对Tag的布局(转)
- 【Android】自定义FlowLayout,支持多种布局优化--android-flowlayout
- Java从入门到精通13-FlowLayout布局
- 自定义控件之-流式布局FlowLayout
- swing 类似于文档流的界面布局器:改进版的FlowLayout
- JAVA--编写一个JFrame,标题为“计算的窗口”,在该窗口中组件的布局是FlowLayout。窗口中添加两个文本区,当我们在一个文本区中输入若干个数时,另一个文本区同时对输入的数进行求和运算并求
- 【Java布局】FlowLayout布局时设定组件大小
