Secure USB debugging in Android 4.2.2
2016-09-14 17:51
393 查看
refs:
https://nelenkov.blogspot.tw/2013/02/secure-usb-debugging-in-android-422.html
It seems we somehow managed to let two months slip by without a single post. Time to get back on track, and the recently unveiled Android maintenance release provides a nice opportunity to jump start things. Official
release notes for Android 4.2.2 don't seem to be available at this time, but it made its way into
AOSP quite promptly, so you can easily compile your own changelog based on git log messages. Or, you can simply check the now traditional one over at
Funky Android. As you can see, there are quite a few changes, and if you want a higher level overview your time would probably be better spent reading some of the related
posts by the usual
suspects. Deviating from our usually somewhat obscure topics, we will focus on a new security feature that is quite visible and has received a fair bit of attention already. It was even
introduced on the official
Android Developers Blog, fortunately for us only in brief. As usual, we like to dig a little deeper, so if you are interested in more details about the shiny new secure debugging feature, read on.
data to log files, universal root access and other scary, but necessary activities. It is hard enough without having to bother with security, so why further complicate things by making developers jump through security hoops? As it turns out, Android debugging,
as provided by the
Android Debug Bridge (ADB), is quite versatile and gives you almost complete control over a device when enabled. This is, of course, is very welcome if you are developing or testing an application (or the OS itself), but can also be used for other purposes.
Before we give an overview of those, here is a (non-exhaustive) list of things ADB lets you do:
debug apps running on the device (using
JWDP)
install and remove apps
copy files to and from the device
execute shell commands on the device
get the system and apps logs
If debugging is enabled on a device, you can do all of the above and more simply by connecting the device to a computer with an USB cable. If you think that's not much of a problem because the device is locked, here's some bad news: you don't have to unlock
the device in order to execute ADB commands. And it gets worse -- if the device is rooted (as are many developer devices), you can access and change every single file, including system files and password databases. Of course, that is not the end of it: you
don't actually need a computer with development tools in order to do this: another Android device and an
OTG USB cable are sufficient. Security researchers, most notably Kyle Osborn, have build
tools (there's even a
GUI) that automate this and try very hard to extract as much data as possible from the device in a very short time. As we mentioned, if the device is rooted all bets are off -- it is trivial to lift
all of your credentials, disable or crack the device lock and even log into your Google account(s). But even without root, anything on external storage (SD card) is accessible (for example your precious photos), as are your contacts and text messages. See
Kyle's presentations for details and other attack vectors.
By now you should be at least concerned about leaving ADB access wide open, so let's see what are some ways to secure it.
let's briefly review those before introducing the one implemented in the core OS. Two of the more popular apps that allow you to control USB debugging are
ADB Toggle and AdbdSecure. They automatically disable ADB debugging when the device is locked or unplugged, and enable it again when you unlock it or plug
in the USB cable. This is generally sufficient protection, but has one major drawback -- starting and stopping the
access to flash a new ROM version (or at least it makes it much easier) and some of the apps shipping with those ROMs take advantage of root access to give you extra features not available in the stock OS (full backup, tethering, firewalls, etc.). As a result
of this, custom ROMs have traditionally shipped with root access enabled (typically in the form of a SUID
CyanogenMod (which has over a million users and growing) changed this almost a year ago by disabling root access in their ROMs and giving you the option to enable it for apps only, for ADB of for both.
This is not a bad compromise -- you can both run root apps and have ADB enabled without exposing your device too much, and it can be used in combination with an app that automates toggling ADB for even more control. Of course, these solutions don't apply to
the majority of Android users -- those running stock OS versions.
The first step in making ADB access harder to reach was taken in Android 4.2 which hid the 'Developer options' settings screen, requiring you to use a
secret knock in order to enable it. While this is mildly annoying for developers, it makes sure that most users cannot enable ADB access by accident. This is, of course, only a stop-gap measure, and once you manage to turn USB debugging on, your device
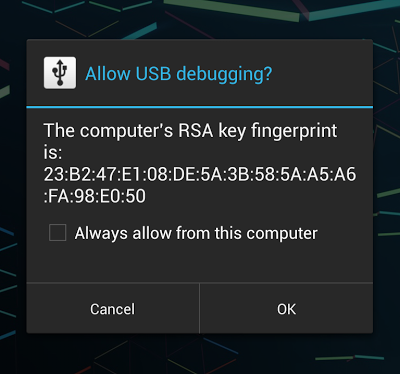
is once again vulnerable. A proper solution was introduced in the 4.2.2 maintenance release with the so called 'secure USB debugging' (it was actually commited almost a year ago, but for some reason didn't make it into the original JB release). 'Secure' here
refers to the fact that only hosts explicitly authorized by the user can now connect to the
'OK' in the confirmation dialog shown below. You can make your decision persistent by checking the 'Always allow from this computer' and debugging will work just as before, as long as you are on the same machine. One thing to note is that on tablets with multi-user
support the confirmation dialog is only shown to the primary (administrator) user, so you will need to switch to it in order to enable debugging. Naturally this 'secure debugging' is only effective if you have a reasonably secure lock screen password in place,
but everyone has on of those, right? That's pretty much all you need to know in order to secure your developer device, but if you are interested in how all of this is implemented under the hood, proceed to the next sections. We will first a give a very brief
overview of the ADB architecture and then show how it has been extended in order to support authenticated debugging.
ADB daemon (
state appropriately (
and process commands from it. Finally,
The client talks to the local ADB server via TCP (typically via
Device access is generally accomplished by forwarding input and output streams to/from the host. The transport layer that implements this uses simple messages with a 24 byte header and an optional payload to exchange commands and responses. We will not go
into further details about those, but will only note the newly added authentication commands in the next section. For more details refer to the protocol description in
presentation which features quite a few helpful diagrams and examples.
After a host tries to connect, the device sends and
The host responds with a
The device tries to verify the received signature, and if signature verification succeeds, it responds with a
Signature verification typically fails the first time you connect the device to a new host because it doesn't yet have the host key. In that case the host sends its public key in an
listens to the 'adbd' socket is started. When it receives a message starting with
next time you connect to the same host. The allow/deny debugging functionality, along with starting/stopping the
We've described the ADB authentication protocol in some detail, but haven't said much about the actual keys used in the process. Those are 2048-bit RSA keys and are generated by the local ADB server. They are typically stored in
directory can be overridden by setting the
user identifier doesn't seem to be used at the moment and is only meaningful on Unix-based OS'es, on Windows it is always 'unknown@unknown'.
While the USB debugging confirmation dialog helpfully displays a key fingerprint to let you verify you are connected to the expected host, the
can get a little fuzzy. Here's one of way of displaying the host key's fingerprint in the same format the confirmation dialog uses (run in
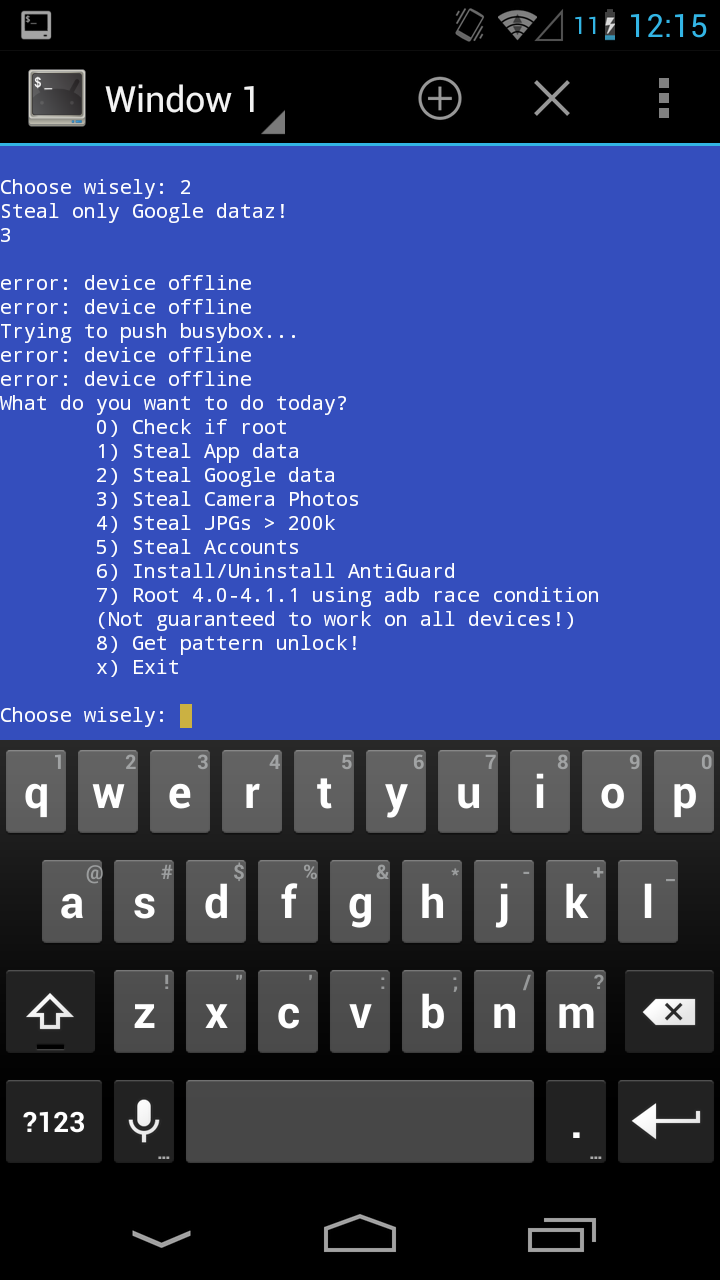
We've reviewed how secure ADB debugging is implemented and have shown why it is needed, but just to show that all of this solves a real problem, we'll finish off with a screenshot of what a failed ADB attack against an 4.2.2 device from another Android device
looks like:

access and has been demonstrated to be quite effective. While secure debugging is not a feature most users will ever use directly, along with full disk encryption and a good screen lock password, it goes a long way towards making developer devices more secure.
Posted
20th February 2013 by
Nikolay Elenkov
https://nelenkov.blogspot.tw/2013/02/secure-usb-debugging-in-android-422.html
It seems we somehow managed to let two months slip by without a single post. Time to get back on track, and the recently unveiled Android maintenance release provides a nice opportunity to jump start things. Official
release notes for Android 4.2.2 don't seem to be available at this time, but it made its way into
AOSP quite promptly, so you can easily compile your own changelog based on git log messages. Or, you can simply check the now traditional one over at
Funky Android. As you can see, there are quite a few changes, and if you want a higher level overview your time would probably be better spent reading some of the related
posts by the usual
suspects. Deviating from our usually somewhat obscure topics, we will focus on a new security feature that is quite visible and has received a fair bit of attention already. It was even
introduced on the official
Android Developers Blog, fortunately for us only in brief. As usual, we like to dig a little deeper, so if you are interested in more details about the shiny new secure debugging feature, read on.
Why bother securing debugging?
If you have done development in any programming environment, you know that 'debugging' is usually the exact opposite of 'secure'. Debugging typically involves inspecting (and sometimes even changing) internal program state, dumping encrypted communicationdata to log files, universal root access and other scary, but necessary activities. It is hard enough without having to bother with security, so why further complicate things by making developers jump through security hoops? As it turns out, Android debugging,
as provided by the
Android Debug Bridge (ADB), is quite versatile and gives you almost complete control over a device when enabled. This is, of course, is very welcome if you are developing or testing an application (or the OS itself), but can also be used for other purposes.
Before we give an overview of those, here is a (non-exhaustive) list of things ADB lets you do:
debug apps running on the device (using
JWDP)
install and remove apps
copy files to and from the device
execute shell commands on the device
get the system and apps logs
If debugging is enabled on a device, you can do all of the above and more simply by connecting the device to a computer with an USB cable. If you think that's not much of a problem because the device is locked, here's some bad news: you don't have to unlock
the device in order to execute ADB commands. And it gets worse -- if the device is rooted (as are many developer devices), you can access and change every single file, including system files and password databases. Of course, that is not the end of it: you
don't actually need a computer with development tools in order to do this: another Android device and an
OTG USB cable are sufficient. Security researchers, most notably Kyle Osborn, have build
tools (there's even a
GUI) that automate this and try very hard to extract as much data as possible from the device in a very short time. As we mentioned, if the device is rooted all bets are off -- it is trivial to lift
all of your credentials, disable or crack the device lock and even log into your Google account(s). But even without root, anything on external storage (SD card) is accessible (for example your precious photos), as are your contacts and text messages. See
Kyle's presentations for details and other attack vectors.
By now you should be at least concerned about leaving ADB access wide open, so let's see what are some ways to secure it.
Securing ADB
Despite some innovative attacks, none of the above is particularly new, but it has remained mostly unaddressed, probably because debugging is a developer feature regular users don't even know about. There have been some third-party solutions though, solet's briefly review those before introducing the one implemented in the core OS. Two of the more popular apps that allow you to control USB debugging are
ADB Toggle and AdbdSecure. They automatically disable ADB debugging when the device is locked or unplugged, and enable it again when you unlock it or plug
in the USB cable. This is generally sufficient protection, but has one major drawback -- starting and stopping the
adbddaemon requires root access. If you want to develop and test apps on a device with stock firmware, you still have to disable debugging manually. Root access typically goes hand-in-hand with running custom firmware -- you usually need root
access to flash a new ROM version (or at least it makes it much easier) and some of the apps shipping with those ROMs take advantage of root access to give you extra features not available in the stock OS (full backup, tethering, firewalls, etc.). As a result
of this, custom ROMs have traditionally shipped with root access enabled (typically in the form of a SUID
subinary and an accompanying 'Superuser' app). Thus, once you installed your favourite custom ROM you were automatically 'rooted'.
CyanogenMod (which has over a million users and growing) changed this almost a year ago by disabling root access in their ROMs and giving you the option to enable it for apps only, for ADB of for both.
This is not a bad compromise -- you can both run root apps and have ADB enabled without exposing your device too much, and it can be used in combination with an app that automates toggling ADB for even more control. Of course, these solutions don't apply to
the majority of Android users -- those running stock OS versions.
The first step in making ADB access harder to reach was taken in Android 4.2 which hid the 'Developer options' settings screen, requiring you to use a
secret knock in order to enable it. While this is mildly annoying for developers, it makes sure that most users cannot enable ADB access by accident. This is, of course, only a stop-gap measure, and once you manage to turn USB debugging on, your device
is once again vulnerable. A proper solution was introduced in the 4.2.2 maintenance release with the so called 'secure USB debugging' (it was actually commited almost a year ago, but for some reason didn't make it into the original JB release). 'Secure' here
refers to the fact that only hosts explicitly authorized by the user can now connect to the
adbddaemon on the device and execute debugging commands. Thus if someone tries to connect a device to another one via USB in order to access ADB, they need to first unlock the target device and authorize access from the debug host by clicking
'OK' in the confirmation dialog shown below. You can make your decision persistent by checking the 'Always allow from this computer' and debugging will work just as before, as long as you are on the same machine. One thing to note is that on tablets with multi-user
support the confirmation dialog is only shown to the primary (administrator) user, so you will need to switch to it in order to enable debugging. Naturally this 'secure debugging' is only effective if you have a reasonably secure lock screen password in place,
but everyone has on of those, right? That's pretty much all you need to know in order to secure your developer device, but if you are interested in how all of this is implemented under the hood, proceed to the next sections. We will first a give a very brief
overview of the ADB architecture and then show how it has been extended in order to support authenticated debugging.

ADB overview
The Android Debug Bridge serves two main purposes: it keeps track of all devices (or emulators) connected to a host, and it offers various services to its clients (command line clients, IDEs, etc.). It consists of three main components: the ADB server, theADB daemon (
adbd) and the default command line client (
adb). The ADB server runs on the host machine as a background process and decouples clients from the actual devices or emulators. It monitors device connectivity and sets their
state appropriately (
CONNECTED,
OFFLINE,
RECOVERY, etc.). The ADB daemon runs on an Android device (or emulator) and provides the actual services client use. It connects to the ADB server through USB or TCP/IP, and receives
and process commands from it. Finally,
adbis the command line client that lets you send commands to a particular device. In practice it is implemented in the same binary as the ADB server and thus shares much of its code.
The client talks to the local ADB server via TCP (typically via
localhost:5037) using text based commands, and receives
OKor
FAILresponses in return. Some commands, like enumerating devices, port forwarding or daemon restart are handled by the local daemon, and some (e.g., shell or log access) naturally require a connection to the target Android device.
Device access is generally accomplished by forwarding input and output streams to/from the host. The transport layer that implements this uses simple messages with a 24 byte header and an optional payload to exchange commands and responses. We will not go
into further details about those, but will only note the newly added authentication commands in the next section. For more details refer to the protocol description in
system/core/adb/protocol.txtand this
presentation which features quite a few helpful diagrams and examples.
Secure ADB implementation
The ADB host authentication functionality is enabled by default when thero.adb.securesystem property is set to 1, and there is no way to disable it via the system settings interface (which is a good thing). The device is initially in the
OFFLINEstate and only goes into the
ONLINEstate once the host has authenticated. As you may already know, hosts use RSA keys in order to authenticate to the ADB daemon on the device. Authentication is typically a three step process:
After a host tries to connect, the device sends and
AUTHmessage of type
TOKENthat includes a 20 byte random value (read from
/dev/urandom).
The host responds with a
SIGNATUREpacket that includes a SHA1withRSA signature of the random token with one of its private keys.
The device tries to verify the received signature, and if signature verification succeeds, it responds with a
CONNECTmessage and goes into the
ONLINEstate. If verification fails, either because the signature value doesn't match or because there is no corresponding public key to verify with, the device sends another
AUTH TOKENwith a new random value, so that the host can try authenticating again (slowing down if the number of failures goes over a certain threshold).
Signature verification typically fails the first time you connect the device to a new host because it doesn't yet have the host key. In that case the host sends its public key in an
AUTH RSAPUBLICKEYmessage. The device takes the MD5 hash of that key and displays it in the 'Allow USB debugging' confirmation dialog. Since
adbdis a native daemon, the key needs to be passed to the main Android OS. This is accomplished by simply writing the key to a local socket (aptly named, 'adbd'). When you enable ADB debugging from the developer settings screen, a thread that
listens to the 'adbd' socket is started. When it receives a message starting with
"PK"it treats it as a public key, parses it, calculates the MD5 hash and displays the confirmation dialog (an activity actually, part of the
SystemUIpackage). If you tap 'OK', it sends a simple simple
"OK"response and
adbduses the key to verify the authentication message (otherwise it just stays offline). In case you check the 'Always allow from this computer' checkbox, the public key is written to disk and automatically used for signature verification the
next time you connect to the same host. The allow/deny debugging functionality, along with starting/stopping the
adbddaemon, is exposed as public methods of the
UsbDeviceManagersystem service.
We've described the ADB authentication protocol in some detail, but haven't said much about the actual keys used in the process. Those are 2048-bit RSA keys and are generated by the local ADB server. They are typically stored in
$HOME/.androidas
adbkeyand
adbkey.pub. On Windows that usually translates to
%USERPOFILE%\.android, but keys might end up in
C:\Windows\System32\config\systemprofile\.androidin some cases (see issue 49465). The default key
directory can be overridden by setting the
ANDROID_SDK_HOMEenvironment variable. If the
ADB_VENDOR_KEYSenvironment variable is set, the directory it points to is also searched for keys. If no keys are found in any of the above locations, a new key pair is generated and saved. On the device, keys are stored in the
/data/misc/adb/adb_keysfile, and new authorized keys are appended to the same file as you accept them. Read-only 'vendor keys' are stored in the
/adb_keysfile, but it doesn't seem to exist on current Nexus devices. The private key is in standard OpenSSL PEM format, while the public one consists of the Base 64 encoded key followed by a `user@host` user identifier, separated by space. The
user identifier doesn't seem to be used at the moment and is only meaningful on Unix-based OS'es, on Windows it is always 'unknown@unknown'.
While the USB debugging confirmation dialog helpfully displays a key fingerprint to let you verify you are connected to the expected host, the
adbclient doesn't have a handy command to print the fingerprint of the host key. You might think that there is little room for confusion: after all there is only one cable plugged to a single machine, but if you are running a couple of VMs, thing
can get a little fuzzy. Here's one of way of displaying the host key's fingerprint in the same format the confirmation dialog uses (run in
$HOME/.androidor specify the full path to the public key file):
awk '{print $1}' < adbkey.pub|openssl base64 -A -d -a \
|openssl md5 -c|awk '{print $2}'|tr '[:lower:]' '[:upper:]'
We've reviewed how secure ADB debugging is implemented and have shown why it is needed, but just to show that all of this solves a real problem, we'll finish off with a screenshot of what a failed ADB attack against an 4.2.2 device from another Android device
looks like:
Summary
Android 4.2.2 finally adds a means to control USB access to the ADB daemon by requiring debug hosts to be explicitly authorized by the user and added to a whitelist. This helps prevent information extraction via USB which requires only brief physicalaccess and has been demonstrated to be quite effective. While secure debugging is not a feature most users will ever use directly, along with full disk encryption and a good screen lock password, it goes a long way towards making developer devices more secure.
Posted
20th February 2013 by
Nikolay Elenkov

相关文章推荐
- 【Android Debug】 Skipping insecure file ...
- Android USB debugging 功能失效
- 转载:Setting Up ADB/USB Drivers for Android Devices in Linux (Ubuntu)
- Android 4.2.2 开机默认开启USB调试
- CVE-2016-2502-drivers/usb/gadget/f_serial.c in the Qualcomm USB driver in Android. Buffer Overflow Vulnerability reported by #plzdonthackme, Soctt.
- How to Enable USB Debugging Mode on Android
- 红米怎么打开USB调试(Android4.2.2),系统中隐藏开发者选项(红米,MTK6589,三星i9500 /S4打开开发者选项)
- 【Android Debug】 Skipping insecure file ...
- (OK) Use Android Code to Enable USB Debugging
- How to enter deep idle with USB plugged in (Used For Debugging)
- How to Enable USB-Debugging with Nexus 5 for Android Studio
- android 蓝牙 这个createRfcommSocketToServiceRecord 是安卓2.3系统及以下用的,新的安卓要用createInsecureRfcommSocketToSer
- MTP模式与USB存储模式(MTP in Android)
- Debugging JavaScript in Visual Studio
- Debugging in .NET
- The USB Webcam driver in Windows CE
- JavaScript debugging in VS.NET 2003
- Debugging Python in VIM
- Debugging JavaScript in Your Applications
- Multi-threaded Debugging in Visual Studio 2008