基于OEL5安装Oracle10g
2016-09-12 21:03
501 查看
操作系统:OracleLinux-R5-U11-x86_64
数据库版本:oracle10g (10.2.0.1.0)
····································安装前准备····································
关闭防火墙、selinux
修改selinux不可用
修改/etc/hosts文件
网卡配置
欺骗oracle软件确认本机版本
(oracle10g只支持linux4的系统,出oracle10g的时候linux只出到4,故在这部要欺骗让数据库以为这是个linux4的系统)
安装rpm包
创建组以及用户
添加内核参数
修改用户限制
修改/etc/pam.d/login
修改/etc/profile
创建目录,赋权
oracle用户环境变量
····································解压文件····································
····································安装数据库软件····································
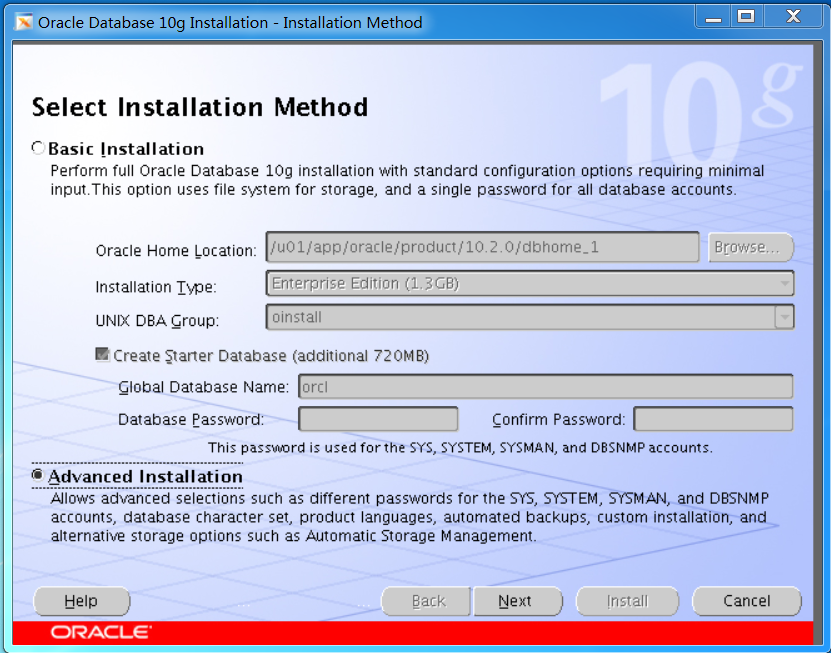
选择高级安装“Advanced Installation”
Oracle产品目录路径

安装企业版

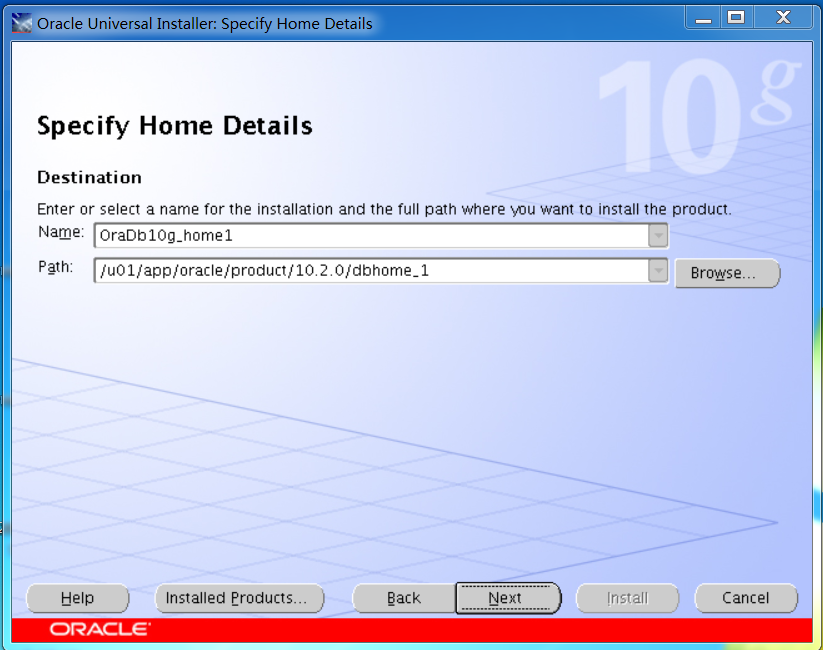
Oracle家目录
开始检查

只安装数据库软件(1.安装数据库并安装数据库 2.配置ASM 3.只安装数据库软件)


执行脚本
····································安装数据库····································

选择“Create a Database”

选择创建数据库的类型

设定数据库名和SID

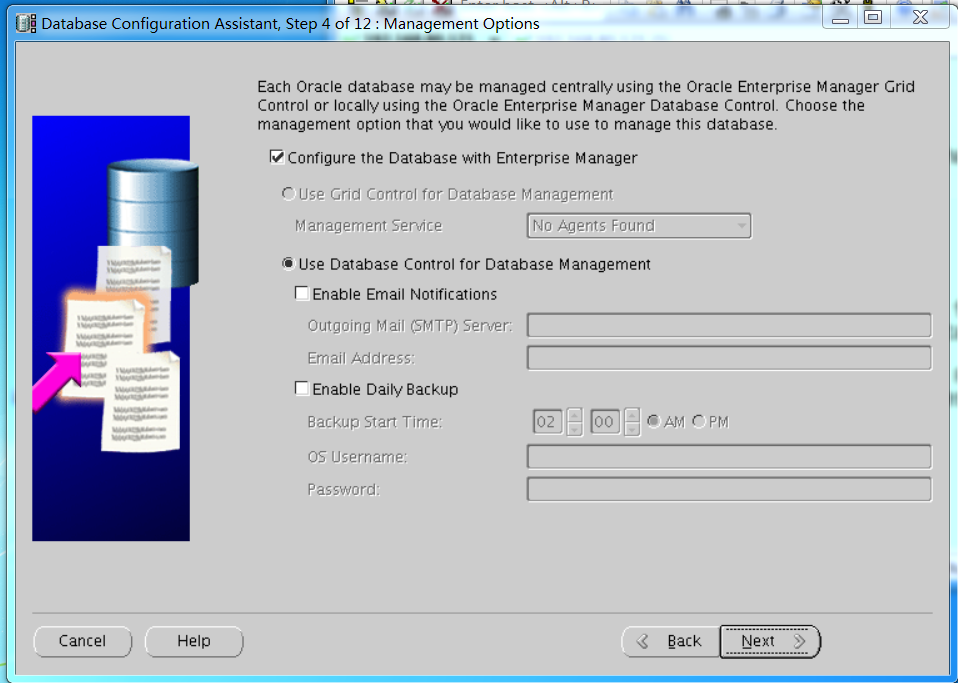
配置EM(这一步可选也可不选,EM也可在之后创建)
设定sys、system用户密码

选择文件系统


配置快速恢复区路径以及大小

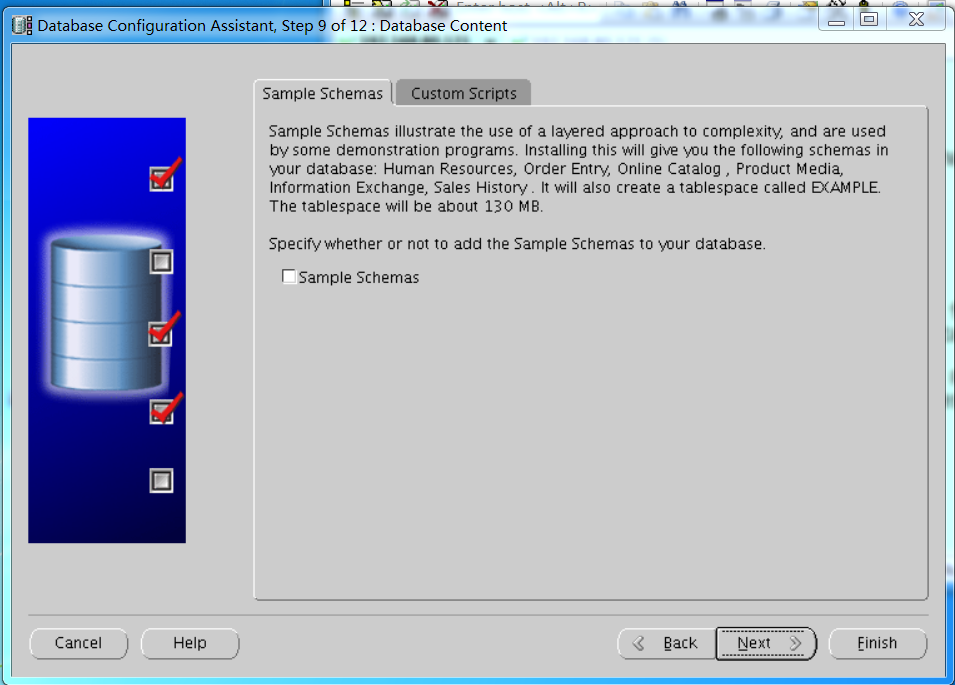
选择是否需要样例(可选可不选)
Oracle内存大小设定,默认是40,但是也可以自己设定


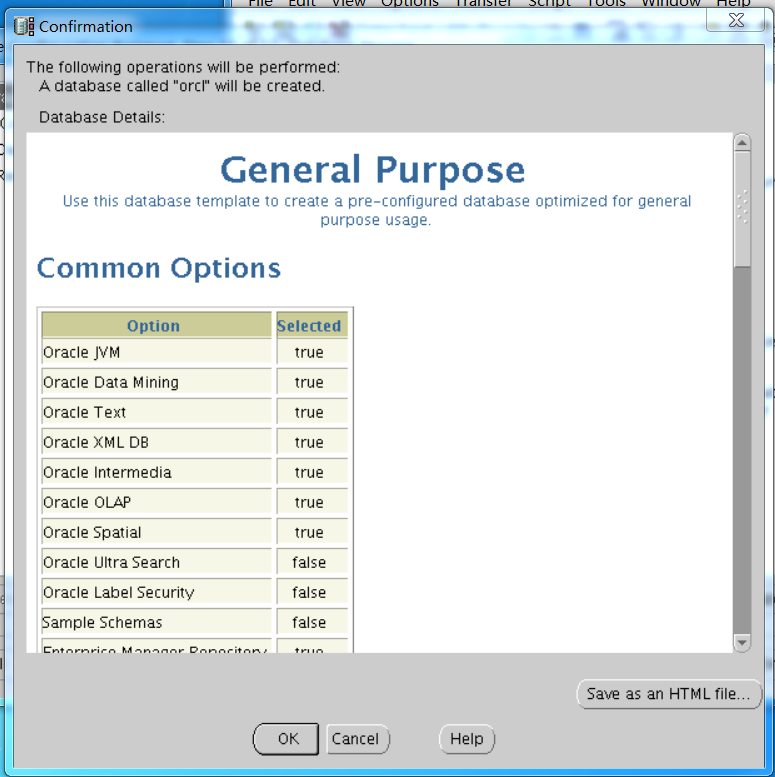
查看配置参数

这里可以看到一些信息,并可以重新设定用户的密码

数据库版本:oracle10g (10.2.0.1.0)
····································安装前准备····································
关闭防火墙、selinux
service iptables stop
setenforce 0
chkconfig iptables off
修改selinux不可用
vi /etc/selinux/config
修改SELINUX=disabled
修改/etc/hosts文件
vi /etc/hosts
192.168.80.111 vast.vastdata
网卡配置
DEVICE=eth0
HWADDR=00:0C:29:2E:FD:DD
ONBOOT=yes         #开启启动这块网卡
BOOTPROTO=static   #指定为静态ip*这部不设置安装时会报DHCP错误
IPADDR=192.168.80.111
NETMASK=255.255.255.0
GATEWAY=192.168.80.1
欺骗oracle软件确认本机版本
(oracle10g只支持linux4的系统,出oracle10g的时候linux只出到4,故在这部要欺骗让数据库以为这是个linux4的系统)
vi /etc/redhat-release
Red Hat Enterprise Linux Server release 4.11 (Tikanga)
安装rpm包
使用rpm -ivh 包名  安装在需要的软件包
例如:rpm -ivh binutils-2.15.92.0.2-10.EL4.rpm或rpm -ivh binutils-*
binutils-2.15.92.0.2-10.EL4
compat-db-4.1.25-9
control-center-2.8.0-12
gcc-3.4.3-9.EL4
gcc-c++-3.4.3-9.EL4
glibc-2.3.4-2
glibc-common-2.3.4-2
gnome-libs-1.4.1.2.90-44.1
libstdc++-3.4.3-9.EL4
libstdc++-devel-3.4.3-9.EL4
make-3.80-5
pdksh-5.2.14-30
sysstat-5.0.5-1
xscreensaver-4.18-5.rhel4.2
创建组以及用户
groupadd oinstall
groupadd dba
groupadd oper
useradd -g oinstall -G dba,oper oracle
passwd oracle
添加内核参数
[root@vast ~]# vim /etc/sysctl.conf
kernel.shmall = 2097152
kernel.shmmax = 2147483648
kernel.shmmni = 4096
kernel.sem = 250 32000 100 128
fs.file-max = 65536
net.ipv4.ip_local_port_range = 1024 65000
net.core.rmem_default = 262144
net.core.rmem_max = 262144
net.core.wmem_default = 262144
net.core.wmem_max = 262144
使参数生效 sysctl -p
修改用户限制
[root@oracle ~]# vim /etc/security/limits.conf
oracle              soft    nproc   2047
oracle              hard    nproc   16384
oracle              soft    nofile  1024
oracle              hard    nofile  65536
修改/etc/pam.d/login
[root@oracle ~]# vim /etc/pam.d/login
session    required     /lib/security/pam_limits.so
session    required     pam_limits.so
修改/etc/profile
[root@oracle ~]# vim /etc/profile
if [ $USER = "oracle" ]; then

if [ $SHELL = "/bin/ksh" ]; then

ulimit -p 16384
ulimit -n 65536
else
ulimit -u 16384 -n 65536
fi
fi
创建目录,赋权
mkdir /u01/app/oracle -p
chmod 775 /u01 -R
chown oracle:oinstall /u01 -R
oracle用户环境变量
export ORACLE_BASE=/u01/app/oracle
export ORACLE_HOME=$ORACLE_BASE/product/10.2.0/dbhome_1
export ORACLE_SID=orcl
export PATH=$ORACLE_HOME/bin:$PAT
使环境变量生效
source .bash_profile
····································解压文件····································
我将安装文件放在了/tmp路径下
[root@vast ~]$ cd /tmp/
[root@vast tmp]$ ls
10201_database_linux_x86_64.cpio.gz  p8202632_10205_Linux-x86-64.zip
gconfd-root                          rpm.txt
keyring-KqS6j0                       ssh-TPBNPv3831
mapping-root                         virtual-root.KGIV2G
orbit-root

解压缩10201_database_linux_x86_64.cpio.gz文件

[root@vast tmp]# gunzip 10201_database_linux_x86_64.cpio.gz
[root@vast tmp]# ls
10201_database_linux_x86_64.cpio  p8202632_10205_Linux-x86-64.zip
gconfd-root                       rpm.txt
keyring-KqS6j0                    ssh-TPBNPv3831
mapping-root                      virtual-root.KGIV2G
orbit-root

使用cpio导出文件

[root@vast tmp]# cpio -idmv < 10201_database_linux_x86_64.cpio
database/stage/prereq/db/refhost_Custom.xml
database/stage/prereq/db/refhost.xml
database/stage/prereq/db/db_prereq.xml
.
.
.
database/doc/server.102/b15658/toc.htm
database/doc/server.102/b15658/tuning.htm
database/doc/server.102/b15658
database/doc/server.102/b15658.pdf
database/doc/server.102
database/doc
database/welcome.html
database
1565626 blocks

查看导出的文件 database

[root@vast tmp]# ls
10201_database_linux_x86_64.cpio  orbit-root
database                          p8202632_10205_Linux-x86-64.zip
gconfd-root                       rpm.txt
keyring-KqS6j0                    ssh-TPBNPv3831
mapping-root                      virtual-root.KGIV2G
[root@vast tmp]# su - oracle
[oracle@vast ~]$ cd /tmp/database/
[oracle@vast database]$ ls
doc  install  response  runInstaller  stage  welcome.html

开启图形化
xhost +

执行文件./runInstaller开始安装

[oracle@vast database]$ ./runInstaller
Starting Oracle Universal Installer...
Checking installer requirements...
Checking operating system version: must be redhat-3, SuSE-9, redhat-4, UnitedLinux-1.0, asianux-1 or asianux-2
Passed
All installer requirements met.
Preparing to launch Oracle Universal Installer from /tmp/OraInstall2016-09-12_06-48-28PM. Please wait ...[oracle@vast database]$ Starting Installer in advanced mode ...
Oracle Universal Installer, Version 10.2.0.1.0 Production
Copyright (C) 1999, 2005, Oracle. All rights reserved.
····································安装数据库软件····································
选择高级安装“Advanced Installation”
Oracle产品目录路径
安装企业版
Oracle家目录
开始检查
只安装数据库软件(1.安装数据库并安装数据库 2.配置ASM 3.只安装数据库软件)
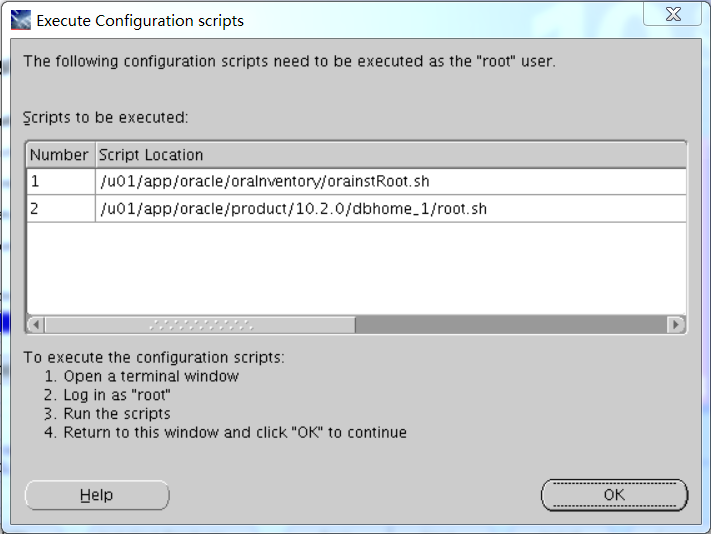
执行脚本
[root@vast ~]# /u01/app/oracle/oraInventory/orainstRoot.sh
Changing permissions of /u01/app/oracle/oraInventory to 770.
Changing groupname of /u01/app/oracle/oraInventory to oinstall.
The execution of the script is complete
[root@vast ~]# /u01/app/oracle/product/10.2.0/dbhome_1/root.sh
Running Oracle10 root.sh script...
The following environment variables are set as:
ORACLE_OWNER= oracle
ORACLE_HOME=  /u01/app/oracle/product/10.2.0/dbhome_1
Enter the full pathname of the local bin directory: [/usr/local/bin]:
Copying dbhome to /usr/local/bin ...
Copying oraenv to /usr/local/bin ...
Copying coraenv to /usr/local/bin ...
Creating /etc/oratab file...
Entries will be added to the /etc/oratab file as needed by
Database Configuration Assistant when a database is created
Finished running generic part of root.sh script.
Now product-specific root actions will be performed.
[root@vast ~]#
····································安装数据库····································
[oracle@vast database]$
[oracle@vast database]$
[oracle@vast database]$ dbca
选择“Create a Database”
选择创建数据库的类型
设定数据库名和SID
配置EM(这一步可选也可不选,EM也可在之后创建)
设定sys、system用户密码
选择文件系统
配置快速恢复区路径以及大小
选择是否需要样例(可选可不选)
Oracle内存大小设定,默认是40,但是也可以自己设定
查看配置参数
这里可以看到一些信息,并可以重新设定用户的密码
开启数据库
[oracle@vast database]$ sqlplus / as sysdba
SQL*Plus: Release 10.2.0.1.0 - Production on Mon Sep 12 19:22:42 2016
Copyright (c) 1982, 2005, Oracle.  All rights reserved.
Connected to an idle instance.
SQL> startup
ORACLE instance started.
Total System Global Area  901775360 bytes
Fixed Size                  2024944 bytes
Variable Size             230689296 bytes
Database Buffers          666894336 bytes
Redo Buffers                2166784 bytes
Database mounted.
Database opened.
SQL> Disconnected from Oracle Database 10g Enterprise Edition Release 10.2.0.1.0 - 64bit Production
With the Partitioning, OLAP and Data Mining options
SQL> exit

相关文章推荐
- Oracle CASE WHEN 用法介绍
- Oracle 手工清除回滚段的几种方法
- @maohoo Oracle 函数使用之Decode
- oracle中序列的使用
- @maohoo Oracle两个函数的比较:nvl和nvl2
- 使用navicat连接oracle时,解决报错listener does not currently know of service
- 使用Oracle显式游标及for循环
- Java连接Oracle数据库开发银行管理系统【一、需求篇】
- Oracle 一次 锁表 处理小记
- oracle linux 5.8安装oracle 11g rac环境之grid安装
- Oracle百万记录sql语句优化技巧
- oracle数据处理需求02
- oracle SCN问题详解
- Oracle数据库的impdp导入操作以及dba_directories使用方法
- 如何彻底卸载Oracle?
- 手工生成段顾问建议
- Oracle错误:ORA-01843:无效月份的问题
- win7 64位上oracle 11g安装
- Oracle 完全卸载的方法
- Oracle分页查询排序数据重复问题