OK6410之蜂鸣器buzzer字符驱动
2016-09-11 11:39
561 查看
夕阳的谢幕,随之而出的明月,虽然刚刚回过家,但是还是想念,想念大海,想念妈妈烧的菜,也许真的是一个人久了吧。双休日,连个说话的人都没有,只是自己一个人,闷闷地看着书,写着Blog,天气太热,也懒得出去逛。收拾收拾心情,开始继续OK6410吧。
昨天把led灯实现了,今天就玩个蜂鸣器吧,然后那些小的,简单的外围就告一段落了,接着再好好看看ldd3,linux内核等吧。打好基础再来写下自己之所学。
好了,开始蜂鸣器吧。还是一样,先上驱动的代码:
[html] view
plain copy
#include <linux/module.h>
#include <linux/kernel.h>
#include <linux/fs.h>
#include <linux/init.h>
#include <linux/miscdevice.h>
#include <linux/delay.h>
#include <asm/uaccess.h>
#include <linux/device.h>
#include <linux/cdev.h>
#include <asm/irq.h>
#include <mach/gpio.h>
#include <plat/regs-gpio.h>
#include <plat/gpio-cfg.h>
#include <mach/hardware.h>
#include <linux/io.h>
#define BUZZER_MAJOR 240
int buzzer_open(struct inode *inode, struct file *filp)
{
unsigned int tmp;
tmp = readl(S3C64XX_GPFCON);
tmp = (tmp & ~(0xc0000000) | (0x40000000)); //set the GPIO output mode
writel(tmp, S3C64XX_GPFCON);
printk("[Math
Processing Error][Math
Processing Error][Math
Processing Error][Math
Processing Error]$$$\n");
return 0;
}
ssize_t buzzer_read(struct file *filp, char __user *buf, size_t count, loff_t *f_pos)
{
printk("[Math
Processing Error][Math
Processing Error][Math
Processing Error][Math
Processing Error]$$$\n");
return count;
}
ssize_t buzzer_write(struct file *filp, char __user *buf, size_t count, loff_t *f_pos)
{
char mbuf[10];
unsigned int tmp;
copy_from_user(mbuf,buf,count);
switch(mbuf[0])
{
case 0:
tmp = readl(S3C64XX_GPFDAT);
tmp |= (0x8000);
writel(tmp, S3C64XX_GPFDAT);
break;
case 1:
tmp = readl(S3C64XX_GPFDAT);
tmp &= ~(0x8000);
writel(tmp, S3C64XX_GPFDAT);
break;
default:
break;
}
printk("[Math
Processing Error][Math
Processing Error][Math
Processing Error][Math
Processing Error]$$$\n");
return count;
}
int buzzer_release(struct inode *inode, struct file *filp)
{
printk("[Math
Processing Error][Math
Processing Error][Math
Processing Error][Math
Processing Error]$$$\n");
return 0;
}
struct file_operations my_fops = {
.owner = THIS_MODULE,
.open = buzzer_open,
.read = buzzer_read,
.write = buzzer_write,
.release = buzzer_release,
};
static int buzzer_init(void)
{
int rc;
printk("Test buzzer dev\n");
rc = register_chrdev(BUZZER_MAJOR, "buzzer", &my_fops);
if(rc < 0)
{
printk("register %s dev error\n", "buzzer");
return -1;
}
printk("[Math
Processing Error][Math
Processing Error]$ register buzzer dev OK\n");
return 0;
}
static void buzzer_exit(void)
{
unregister_chrdev(BUZZER_MAJOR, "buzzer");
printk("Good Bye!\n");
}
MODULE_LICENSE("GPL");
module_init(buzzer_init);
module_exit(buzzer_exit);

和led灯一样,蜂鸣器也是通过控制GPIO口来控制的。原理图如下:
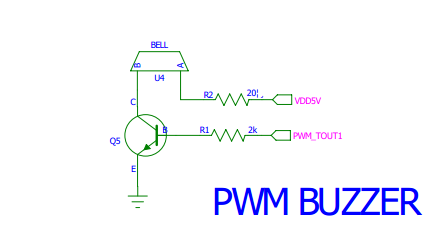
那么pwm_tout1对应的GPIO口是那一个呢?再看原理图:

是GPF15,那么就只要控制GPF15这个GPIO口就好了,详细看看他的寄存器吧

控制寄存器是31-30这两位,因为输出,所以设置为01就好了,具体代码就是:
[html] view
plain copy
tmp = readl(S3C64XX_GPFCON);
tmp = (tmp & ~(0xc0000000) | (0x40000000)); //set the GPIO output mode
writel(tmp, S3C64XX_GPFCON);
然后看看他的数据寄存器吧。和led一样的。好了。

代码基本和led没啥区别。
接着就是makefile了:
[html] view
plain copy
obj-m :=buzzer.o
然后建个makemod,代码如下
[html] view
plain copy
make -C /home/eastmoon/work/linux2.6.28/ M=`pwd` modules
然后只要source makemod就可以编译成buzzer.ko了
好了,驱动部分搞定了,那么接着就是要写应用程序了
[html] view
plain copy
#include <stdio.h>
#include <sys/types.h>
#include <sys/stat.h>
#include <fcntl.h>
#define DEVICE "/dev/mybuzzer"
int main(void)
{
int fd, i;
char buf[10] = {0, 1};
fd = open(DEVICE, O_RDWR);
if(fd < 0)
{
printf("Open /dev/mybuzzer file error\n");
return -1;
}
while(1)
{
write(fd, &buf[0], 1);
usleep(10000);
write(fd, &buf[1], 1);
usleep(10000);
}
close(fd);
return 0;
}
接着makefile
[html] view
plain copy
CC = /usr/local/arm/4.2.2-eabi/usr/bin/arm-linux-gcc
buzzerapp:buzzerapp.o
$(CC) -o buzzerapp buzzerapp.o
buzzerapp.o:buzzerapp.c
$(CC) -c buzzerapp.c
clean :
rm buzzerapp.o
完成,也不知道可不可以成功,那么就下载到板子上看看结果吧:

注册成功。然后接着mknod设备文件

节点也出来了/dev/mybuzzer。就这就运行下应用程序好了
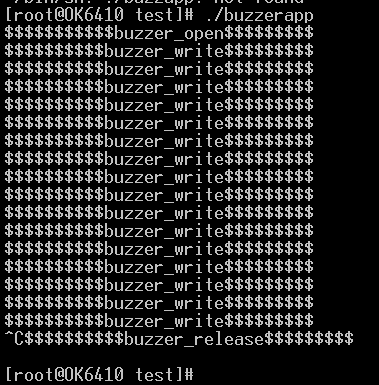
蜂鸣器也发出声音了,OK,搞定了。这样,OK6410,嵌入式linux也算是入了小门了。剩下的就是什么SPI啊,I2C啊,USB,那些总线了,有点小难度的那些。接下里好好看看书吧还是。。。。。。
顶
0
昨天把led灯实现了,今天就玩个蜂鸣器吧,然后那些小的,简单的外围就告一段落了,接着再好好看看ldd3,linux内核等吧。打好基础再来写下自己之所学。
好了,开始蜂鸣器吧。还是一样,先上驱动的代码:
[html] view
plain copy
#include <linux/module.h>
#include <linux/kernel.h>
#include <linux/fs.h>
#include <linux/init.h>
#include <linux/miscdevice.h>
#include <linux/delay.h>
#include <asm/uaccess.h>
#include <linux/device.h>
#include <linux/cdev.h>
#include <asm/irq.h>
#include <mach/gpio.h>
#include <plat/regs-gpio.h>
#include <plat/gpio-cfg.h>
#include <mach/hardware.h>
#include <linux/io.h>
#define BUZZER_MAJOR 240
int buzzer_open(struct inode *inode, struct file *filp)
{
unsigned int tmp;
tmp = readl(S3C64XX_GPFCON);
tmp = (tmp & ~(0xc0000000) | (0x40000000)); //set the GPIO output mode
writel(tmp, S3C64XX_GPFCON);
printk("[Math
Processing Error][Math
Processing Error][Math
Processing Error][Math
Processing Error]$$$\n");
return 0;
}
ssize_t buzzer_read(struct file *filp, char __user *buf, size_t count, loff_t *f_pos)
{
printk("[Math
Processing Error][Math
Processing Error][Math
Processing Error][Math
Processing Error]$$$\n");
return count;
}
ssize_t buzzer_write(struct file *filp, char __user *buf, size_t count, loff_t *f_pos)
{
char mbuf[10];
unsigned int tmp;
copy_from_user(mbuf,buf,count);
switch(mbuf[0])
{
case 0:
tmp = readl(S3C64XX_GPFDAT);
tmp |= (0x8000);
writel(tmp, S3C64XX_GPFDAT);
break;
case 1:
tmp = readl(S3C64XX_GPFDAT);
tmp &= ~(0x8000);
writel(tmp, S3C64XX_GPFDAT);
break;
default:
break;
}
printk("[Math
Processing Error][Math
Processing Error][Math
Processing Error][Math
Processing Error]$$$\n");
return count;
}
int buzzer_release(struct inode *inode, struct file *filp)
{
printk("[Math
Processing Error][Math
Processing Error][Math
Processing Error][Math
Processing Error]$$$\n");
return 0;
}
struct file_operations my_fops = {
.owner = THIS_MODULE,
.open = buzzer_open,
.read = buzzer_read,
.write = buzzer_write,
.release = buzzer_release,
};
static int buzzer_init(void)
{
int rc;
printk("Test buzzer dev\n");
rc = register_chrdev(BUZZER_MAJOR, "buzzer", &my_fops);
if(rc < 0)
{
printk("register %s dev error\n", "buzzer");
return -1;
}
printk("[Math
Processing Error][Math
Processing Error]$ register buzzer dev OK\n");
return 0;
}
static void buzzer_exit(void)
{
unregister_chrdev(BUZZER_MAJOR, "buzzer");
printk("Good Bye!\n");
}
MODULE_LICENSE("GPL");
module_init(buzzer_init);
module_exit(buzzer_exit);
和led灯一样,蜂鸣器也是通过控制GPIO口来控制的。原理图如下:
那么pwm_tout1对应的GPIO口是那一个呢?再看原理图:
是GPF15,那么就只要控制GPF15这个GPIO口就好了,详细看看他的寄存器吧
控制寄存器是31-30这两位,因为输出,所以设置为01就好了,具体代码就是:
[html] view
plain copy
tmp = readl(S3C64XX_GPFCON);
tmp = (tmp & ~(0xc0000000) | (0x40000000)); //set the GPIO output mode
writel(tmp, S3C64XX_GPFCON);
然后看看他的数据寄存器吧。和led一样的。好了。
代码基本和led没啥区别。
接着就是makefile了:
[html] view
plain copy
obj-m :=buzzer.o
然后建个makemod,代码如下
[html] view
plain copy
make -C /home/eastmoon/work/linux2.6.28/ M=`pwd` modules
然后只要source makemod就可以编译成buzzer.ko了
好了,驱动部分搞定了,那么接着就是要写应用程序了
[html] view
plain copy
#include <stdio.h>
#include <sys/types.h>
#include <sys/stat.h>
#include <fcntl.h>
#define DEVICE "/dev/mybuzzer"
int main(void)
{
int fd, i;
char buf[10] = {0, 1};
fd = open(DEVICE, O_RDWR);
if(fd < 0)
{
printf("Open /dev/mybuzzer file error\n");
return -1;
}
while(1)
{
write(fd, &buf[0], 1);
usleep(10000);
write(fd, &buf[1], 1);
usleep(10000);
}
close(fd);
return 0;
}
接着makefile
[html] view
plain copy
CC = /usr/local/arm/4.2.2-eabi/usr/bin/arm-linux-gcc
buzzerapp:buzzerapp.o
$(CC) -o buzzerapp buzzerapp.o
buzzerapp.o:buzzerapp.c
$(CC) -c buzzerapp.c
clean :
rm buzzerapp.o
完成,也不知道可不可以成功,那么就下载到板子上看看结果吧:
注册成功。然后接着mknod设备文件
节点也出来了/dev/mybuzzer。就这就运行下应用程序好了
蜂鸣器也发出声音了,OK,搞定了。这样,OK6410,嵌入式linux也算是入了小门了。剩下的就是什么SPI啊,I2C啊,USB,那些总线了,有点小难度的那些。接下里好好看看书吧还是。。。。。。
顶
0

相关文章推荐
- 和菜鸟一起学OK6410之蜂鸣器buzzer字符驱动
- 和菜鸟一起学OK6410之蜂鸣器buzzer字符驱动
- OK6410之蜂鸣器驱动软件分析---PWM定时器
- ok6410学习笔记(5.阻塞字符驱动)
- Linux驱动开发-OK6410-LED字符设备驱动实现过程
- OK6410字符设备驱动点亮LED
- linux-3.0.1下ok6410的led字符设备驱动
- OK6410之ADC驱动程序 字符设备驱动
- 和菜鸟一起学OK6410之最简单字符驱动
- 和菜鸟一起学OK6410之Led字符驱动
- OK6410之蜂鸣器驱动硬件分析---PWM定时器
- 和菜鸟一起学OK6410之最简单字符驱动
- 和菜鸟一起学OK6410之Led字符驱动
- OK6410之ADC驱动软件分析---阻塞与非阻塞IO
- 基于ok6410的韦东山驱动视频简要分析--USB驱动 .
- ok6410开发板android底层驱动模块编写,出现insmod:init_module ‘hello.ko’ failed (Exec format error)
- 【OK6410裸机程序】LCD驱动
- OK6410裸机简单的NAND FLASH驱动
- OK6410、2.6.36内核移植,dm9000 驱动移植,详细!
- Linux字符设备驱动之Tiny6410 LED驱动分析