第一行代码酷欧天气开发(四)
2016-09-10 21:09
344 查看
首先来创建布局文件,布局文件的控件就要根据服务器返回的天气数据来决定了
然后在res/layout目录中新建weather_layout.xml
布局格式整体观如图
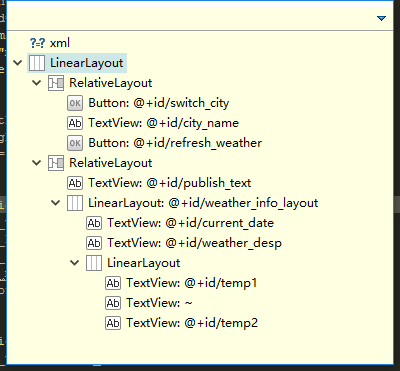
这个布局很简单,就是嵌套的LinearLayout和RelativeLayout来控制TextView的显示位置
那么,我们还需要在Utility类里面添加几个方法,用于解析和处理服务器返回的JSON数据
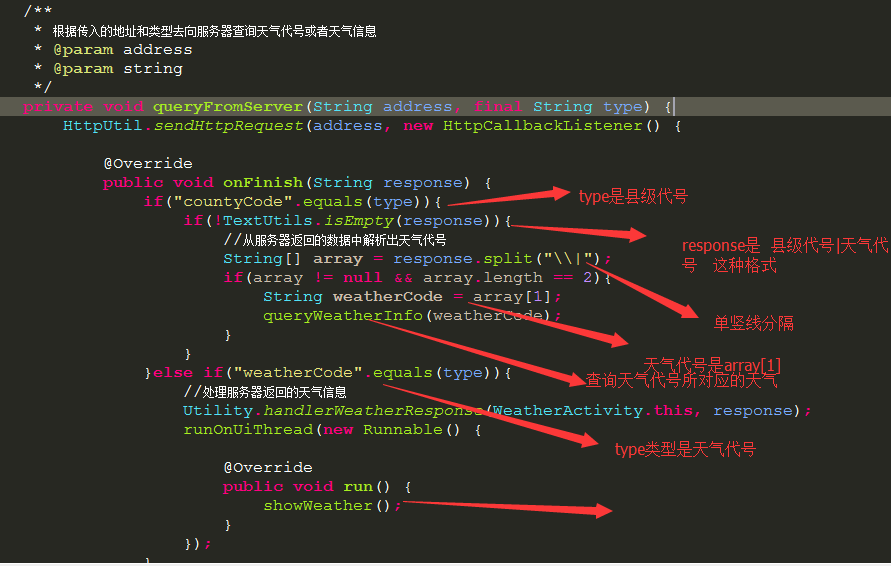
handleWeatherResponse()方法用于将JSON格式的天气信息全部解析出来,saveWeatherInfo()方法用于将这些数据都存储到SharedPreferences文件中,接下来我们要创建活动WeatherActivity了,逻辑如下,现在onCreate()方法中先获取一些控件的实例,然后会尝试从intent中取出县级代号,如果可以取到就会调用queryWeatherCode()方法,如果不能取到则会调用showWeather()方法,我们先看可以取到的情况,queryWeatherCode()方法仅仅就是拼接了一个address,然后调用queryFromServer()方法来查询天气代号所对应的天气代号,服务器返回的数据仍然会回调到onFinish()方法中,这里对返回的数据进行解析,然后将解析出来的天气代号传入到queryWeatherInfo()方法中。
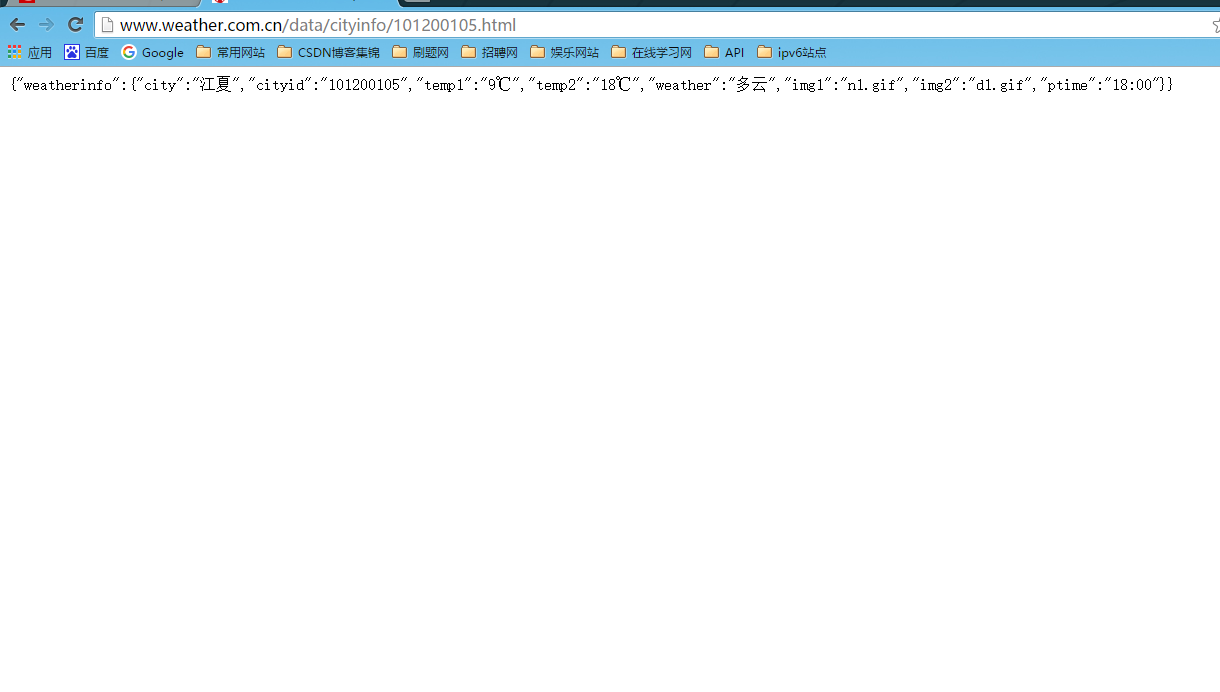
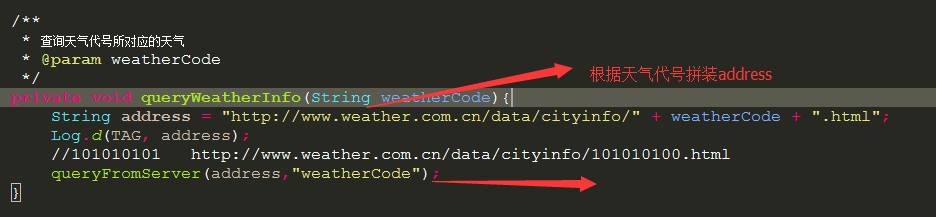
queryWeatherInfo()方法也很简单,同样是拼装了一个address,然后调用queryFromServer()方法来查询天气代号所对应的天气信息,由于天气信息是以JSON格式返回的,因此我们在handleWeatherResponse()方法中使用JSONObject将数据全部解析出来,然后调用saveWeatherInfo()方法将所有的天气信息都存储到SharedPreferences文件中,注意除了天气信息之外,我们还存储了一个city_selected标志位,以此来辨别当前是否已经选中了一个城市,最后会去调用showWeather()方法来将所有的天气信息显示到界面上,其中showWeather()方法很简单,就是从SharedPreferences文件中将数据读取出来,然后显示到界面上。
然后,别忘了在xml文件中注册新增的活动
下面一些截图简要降序相关方法


好了,到这里,这一阶段完成了,下一阶段,自动更新天气
第一行代码酷欧天气开发(五)
然后在res/layout目录中新建weather_layout.xml
<?xml version="1.0" encoding="utf-8"?>
<LinearLayout xmlns:android="http://schemas.android.com/apk/res/android"
android:layout_width="match_parent"
android:layout_height="match_parent"
android:orientation="vertical" >

<RelativeLayout
android:layout_width="match_parent"
android:layout_height="50dp"
android:background="#484E61" >

<Button
android:id="@+id/switch_city"
android:layout_width="30dp"
android:layout_height="30dp"
android:layout_centerVertical="true"
android:layout_marginLeft="10dp"
android:background="@drawable/home" />

<TextView
android:id="@+id/city_name"
android:layout_width="wrap_content"
android:layout_height="wrap_content"
android:layout_centerInParent="true"
android:textColor="#fff"
android:textSize="24sp" />

<Button
android:id="@+id/refresh_weather"
android:layout_width="30dp"
android:layout_height="30dp"
android:layout_alignParentRight="true"
android:layout_centerVertical="true"
android:layout_marginRight="10dp"
android:background="@drawable/refresh" />
</RelativeLayout>

<RelativeLayout
android:layout_width="match_parent"
android:layout_height="0dp"
android:layout_weight="1"
android:background="#27A5F9" >

<TextView
android:id="@+id/publish_text"
android:layout_width="wrap_content"
android:layout_height="wrap_content"
android:layout_alignParentRight="true"
android:layout_marginRight="10dp"
android:layout_marginTop="10dp"
android:textColor="#FFF"
android:textSize="18sp" />

<LinearLayout
android:id="@+id/weather_info_layout"
android:layout_width="wrap_content"
android:layout_height="wrap_content"
android:layout_centerInParent="true"
android:orientation="vertical" >

<TextView
android:id="@+id/current_date"
android:layout_width="wrap_content"
android:layout_height="40dp"
android:gravity="center"
android:textColor="#FFF"
android:textSize="18sp" />

<TextView
android:id="@+id/weather_desp"
android:layout_width="wrap_content"
android:layout_height="60dp"
android:layout_gravity="center_horizontal"
android:gravity="center"
android:textColor="#FFF"
android:textSize="40sp" />

<LinearLayout
android:layout_width="wrap_content"
android:layout_height="60dp"
android:layout_gravity="center_horizontal"
android:orientation="horizontal" >

<TextView
android:id="@+id/temp1"
android:layout_width="wrap_content"
android:layout_height="wrap_content"
android:layout_gravity="center_vertical"
android:textColor="#FFF"
android:textSize="40sp" />

<TextView
android:layout_width="wrap_content"
android:layout_height="wrap_content"
android:layout_gravity="center_vertical"
android:layout_marginLeft="10dp"
android:layout_marginRight="10dp"
android:text="~"
android:textColor="#FFF"
android:textSize="40sp" />

<TextView
android:id="@+id/temp2"
android:layout_width="wrap_content"
android:layout_height="wrap_content"
android:layout_gravity="center_vertical"
android:textColor="#FFF"
android:textSize="40sp" />
</LinearLayout>
</LinearLayout>
</RelativeLayout>

</LinearLayout>
布局格式整体观如图
这个布局很简单,就是嵌套的LinearLayout和RelativeLayout来控制TextView的显示位置
那么,我们还需要在Utility类里面添加几个方法,用于解析和处理服务器返回的JSON数据
/**
* 解析和处理服务返回的JSON数据,并将解析出的数据存储到本地
* @param context
* @param response
*/
public static void handlerWeatherResponse(Context context,String response){
try {
JSONObject jsonObject = new JSONObject(response);
JSONObject weatherInfo = jsonObject.getJSONObject("weatherinfo");
String cityName = weatherInfo.getString("city");
String weatherCode = weatherInfo.getString("cityid");
String temp1 = weatherInfo.getString("temp1");
String temp2 = weatherInfo.getString("temp2");
String weatherDesp = weatherInfo.getString("weather");
String publishTime = weatherInfo.getString("ptime");
saveWeatherInfo(context,cityName,weatherCode,temp1,temp2,weatherDesp,publishTime);
} catch (Exception e) {
// TODO: handle exception
}
}

/**
* 将服务器返回的所有天气信息存储到shared Preferences中
* @param context
* @param cityName
* @param weatherCode
* @param temp1
* @param temp2
* @param weatherDesp
* @param publishTime
*/
private static void saveWeatherInfo(Context context, String cityName,
String weatherCode, String temp1, String temp2, String weatherDesp,
String publishTime) {
SimpleDateFormat simpleDateFormat = new SimpleDateFormat("yyyy年M月d日",Locale.CHINA);
SharedPreferences.Editor editor = PreferenceManager.getDefaultSharedPreferences(context).edit();
editor.putBoolean("city_selected", true);
editor.putString("city_name", cityName);
editor.putString("weather_code", weatherCode);
editor.putString("temp1", temp1);
editor.putString("temp2", temp2);
editor.putString("weather_Desp", weatherDesp);
editor.putString("publish_time", publishTime);
editor.putString("current_date", simpleDateFormat.format(new Date()));
editor.commit();

}
handleWeatherResponse()方法用于将JSON格式的天气信息全部解析出来,saveWeatherInfo()方法用于将这些数据都存储到SharedPreferences文件中,接下来我们要创建活动WeatherActivity了,逻辑如下,现在onCreate()方法中先获取一些控件的实例,然后会尝试从intent中取出县级代号,如果可以取到就会调用queryWeatherCode()方法,如果不能取到则会调用showWeather()方法,我们先看可以取到的情况,queryWeatherCode()方法仅仅就是拼接了一个address,然后调用queryFromServer()方法来查询天气代号所对应的天气代号,服务器返回的数据仍然会回调到onFinish()方法中,这里对返回的数据进行解析,然后将解析出来的天气代号传入到queryWeatherInfo()方法中。
queryWeatherInfo()方法也很简单,同样是拼装了一个address,然后调用queryFromServer()方法来查询天气代号所对应的天气信息,由于天气信息是以JSON格式返回的,因此我们在handleWeatherResponse()方法中使用JSONObject将数据全部解析出来,然后调用saveWeatherInfo()方法将所有的天气信息都存储到SharedPreferences文件中,注意除了天气信息之外,我们还存储了一个city_selected标志位,以此来辨别当前是否已经选中了一个城市,最后会去调用showWeather()方法来将所有的天气信息显示到界面上,其中showWeather()方法很简单,就是从SharedPreferences文件中将数据读取出来,然后显示到界面上。
package com.coolweather.app.activity;
import com.coolweather.app.R;
import com.coolweather.app.service.AutoUpdateService;
import com.coolweather.app.util.HttpCallbackListener;
import com.coolweather.app.util.HttpUtil;
import com.coolweather.app.util.Utility;
import android.app.Activity;
import android.content.Intent;
import android.content.SharedPreferences;
import android.os.Bundle;
import android.preference.PreferenceManager;
import android.text.TextUtils;
import android.util.Log;
import android.view.KeyEvent;
import android.view.View;
import android.view.View.OnClickListener;
import android.view.Window;
import android.widget.Button;
import android.widget.LinearLayout;
import android.widget.TextView;
import android.widget.Toast;
/**
* @author aiyuan
*
*/
public class WeatherActivity extends Activity implements OnClickListener{
String TAG = "WeatherActivity";
//上次按下返回键的系统时间
private long lastBackTime = 0;
//当前按下返回键的系统时间
private long currentBackTime = 0;
private LinearLayout weatherInfoLayout;
/*
* 用于显示城市名
*/
private TextView cityNameText;
/*
* 用于显示发布时间
*/
private TextView publishText;
/*
* 用于显示天气描述小心
*/
private TextView weatherdesptext;
/*
* 用于显示气温1
*/
private TextView temp1Text;
/*
* 用于显示气温2
*/
private TextView temp2Text;
/*
* 用于显示当前日期
*/
private TextView currentDateText;
private Button switchCity;
private Button refreshWeather;
@Override
protected void onCreate(Bundle savedInstanceState) {
super.onCreate(savedInstanceState);
requestWindowFeature(Window.FEATURE_NO_TITLE);
setContentView(R.layout.weather_layout);
//初始化各控件
weatherInfoLayout = (LinearLayout) findViewById(R.id.weather_info_layout);
cityNameText = (TextView) findViewById(R.id.city_name);
publishText = (TextView) findViewById(R.id.publish_text);
weatherdesptext = (TextView) findViewById(R.id.weather_desp);
temp1Text = (TextView) findViewById(R.id.temp1);
temp2Text = (TextView) findViewById(R.id.temp2);
currentDateText = (TextView) findViewById(R.id.current_date);
switchCity = (Button) findViewById(R.id.switch_city);
refreshWeather = (Button) findViewById(R.id.refresh_weather);
switchCity.setOnClickListener(this);
refreshWeather.setOnClickListener(this);
Log.d(TAG, "hello");
String countyCode = getIntent().getStringExtra("county_code");
Log.d(TAG, "haha" + countyCode + "haha");
if(!countyCode.isEmpty()){
//有县级代号时就去查询天气
publishText.setText("同步中");
weatherInfoLayout.setVisibility(View.INVISIBLE);
cityNameText.setVisibility(View.INVISIBLE);
queryWeathercode(countyCode);
}else {
//没有县级代码所就直接显示本地天气
showWeather();
}
}
/*
* 从sharedPreferences文件中读取存储的天气信息,并显示到界面上
*/
private void showWeather() {
SharedPreferences sharedPreferences = PreferenceManager.getDefaultSharedPreferences(this);
cityNameText.setText(sharedPreferences.getString("city_name", ""));
temp1Text.setText(sharedPreferences.getString("temp1", ""));
temp2Text.setText(sharedPreferences.getString("temp2", ""));
weatherdesptext.setText(sharedPreferences.getString("weather_Desp", ""));
publishText.setText("今天" + sharedPreferences.getString("publish_time", "") + "发布");
currentDateText.setText(sharedPreferences.getString("current_date", ""));
weatherInfoLayout.setVisibility(View.VISIBLE);
cityNameText.setVisibility(View.VISIBLE);
Intent intent = new Intent(this, AutoUpdateService.class);
startService(intent);
}
/*
* 查询县级代码所对应的天气代号
*/
private void queryWeathercode(String countyCode) {
String address = "http://www.weather.com.cn/data/list3/city" + countyCode + ".xml";
queryFromServer(address,"countyCode");
}
/**
* 根据传入的地址和类型去向服务器查询天气代号或者天气信息
* @param address
* @param string
*/
private void queryFromServer(String address, final String type) {
HttpUtil.sendHttpRequest(address, new HttpCallbackListener() {
c90f
@Override
public void onFinish(String response) {
if("countyCode".equals(type)){
if(!TextUtils.isEmpty(response)){
//从服务器返回的数据中解析出天气代号
String[] array = response.split("\\|");
if(array != null && array.length == 2){
String weatherCode = array[1];
queryWeatherInfo(weatherCode);
}
}
}else if("weatherCode".equals(type)){
//处理服务器返回的天气信息
Utility.handlerWeatherResponse(WeatherActivity.this, response);
runOnUiThread(new Runnable() {
@Override
public void run() {
showWeather();
}
});
}
}
@Override
public void onError(Exception e) {
runOnUiThread(new Runnable() {
@Override
public void run() {
publishText.setText("同步失败");
}
});
}
});
}
/**
* 查询天气代号所对应的天气
* @param weatherCode
*/
private void queryWeatherInfo(String weatherCode){
String address = "http://www.weather.com.cn/data/cityinfo/" + weatherCode + ".html";
Log.d(TAG, address);
//101010101 http://www.weather.com.cn/data/cityinfo/101010100.html queryFromServer(address,"weatherCode");
}
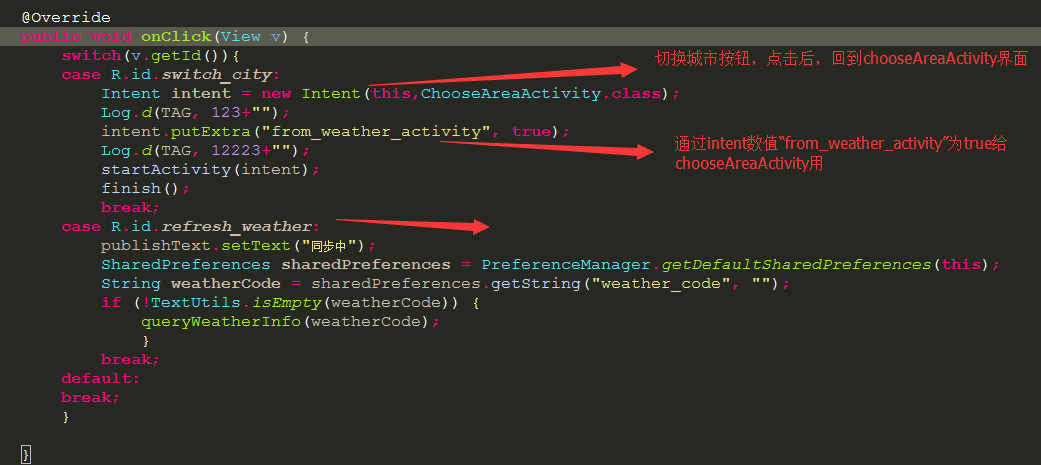
@Override
public void onClick(View v) {
switch(v.getId()){
case R.id.switch_city:
Intent intent = new Intent(this,ChooseAreaActivity.class);
Log.d(TAG, 123+"");
intent.putExtra("from_weather_activity", true);
Log.d(TAG, 12223+"");
startActivity(intent);
finish();
break;
case R.id.refresh_weather:
publishText.setText("同步中");
SharedPreferences sharedPreferences = PreferenceManager.getDefaultSharedPreferences(this);
String weatherCode = sharedPreferences.getString("weather_code", "");
if (!TextUtils.isEmpty(weatherCode)) {
queryWeatherInfo(weatherCode);
}
break;
default:
break;
}
}
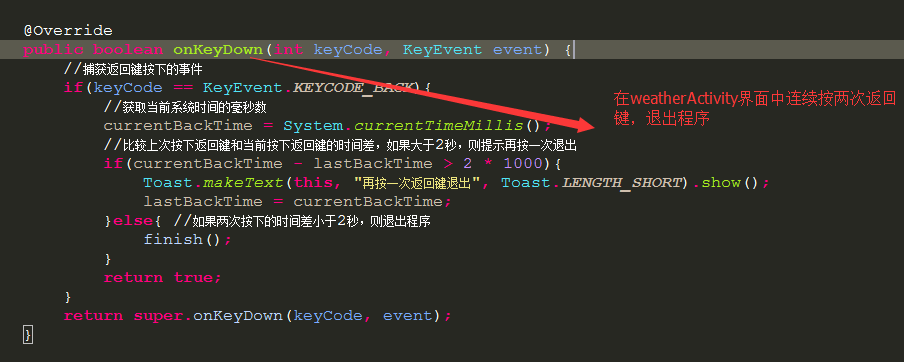
//按两次返回键退出程序
@Override
public boolean onKeyDown(int keyCode, KeyEvent event) {
//捕获返回键按下的事件
if(keyCode == KeyEvent.KEYCODE_BACK){
//获取当前系统时间的毫秒数
currentBackTime = System.currentTimeMillis();
//比较上次按下返回键和当前按下返回键的时间差,如果大于2秒,则提示再按一次退出
if(currentBackTime - lastBackTime > 2 * 1000){
Toast.makeText(this, "再按一次返回键退出", Toast.LENGTH_SHORT).show();
lastBackTime = currentBackTime;
}else{ //如果两次按下的时间差小于2秒,则退出程序
finish();
}
return true;
}
return super.onKeyDown(keyCode, event);
}
}然后,别忘了在xml文件中注册新增的活动
<activity android:name=".activity.WeatherActivity"></activity>
下面一些截图简要降序相关方法
好了,到这里,这一阶段完成了,下一阶段,自动更新天气
第一行代码酷欧天气开发(五)

相关文章推荐
- 第一行代码酷欧天气开发(五)
- 用kotlin方式打开《第一行代码:Android》之开发酷欧天气(最终版)
- 第一行代码酷欧天气开发详细总结
- 第一行代码酷欧天气开发(三)
- 第一行代码酷欧天气开发(一)
- 第一行代码酷欧天气APP开发(一)
- 用kotlin方式打开《第一行代码:Android》之开发酷欧天气(1)
- 用kotlin方式打开《第一行代码:Android》之开发酷欧天气(2)
- 第一行代码酷欧天气开发(二)
- SBO二次开发中点击Matrix第一行的排序功能代码
- 第一行代码:以太坊(2)-使用Solidity语言开发和测试智能合约
- Silverlight C# 游戏开发:Flyer02 从第一行代码写起
- kotlin版的酷欧天气 (郭林大神的第一行代码第二版)
- 【项目开发】Discuz在搜索栏右边加个天气代码
- CoolWeather项目实战(第二部分:显示天气信息)--->第一行代码-Android(第2版)
- 天气开发1——第二行代码(酷欧天气)
- [零基础学软件开发3]第一行c代码
- CoolWeather天气个人学习笔记1(第一行代码实战)
- 微信公众平台开发应用(天气预报、股票查询、手机归属地查询、在线听音乐、翻译、成绩查询等功能)代码分享如下
- 第一行代码,UI开发部分<一>