iOS 自定义UITabBarController
2016-09-09 14:02
369 查看
AppDelegate.m#application:didFinishLaunchingWithOptions主要分为三步:
1. 创建窗体
2. 设置窗体的根视图控制器
3. 显示窗体
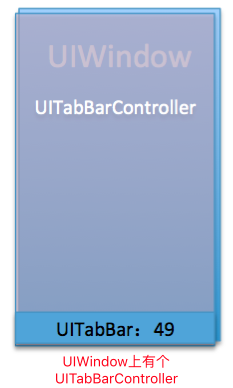
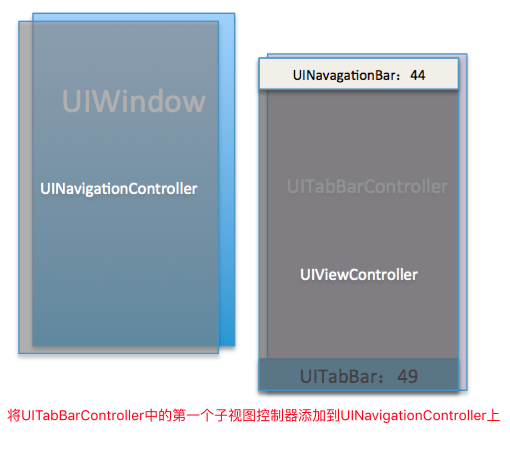
父子控制器:当控制器的view互为父子关系,那么控制器最好也互为父子关系
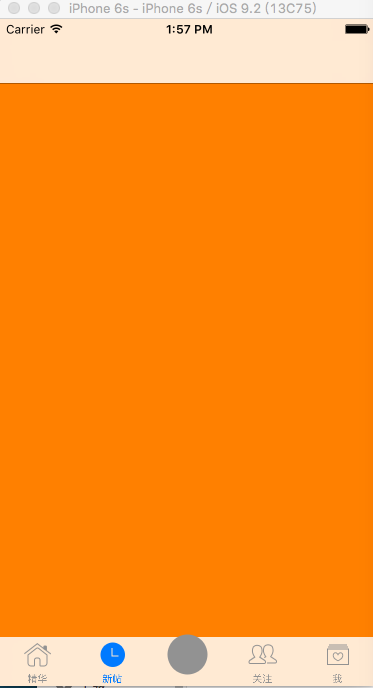
问题:所有代码写到AppDelegate中不够简介,方法太臃肿,而且①:UITabBarController默认会对tabBarItem选中状态的图片进行渲染成蓝色,②:标题的字体的颜色也是蓝色,③:发布图片显示也有问题
AppDelegate
AppDelegate代码变得简洁了,但是上述三个问题还没有解决
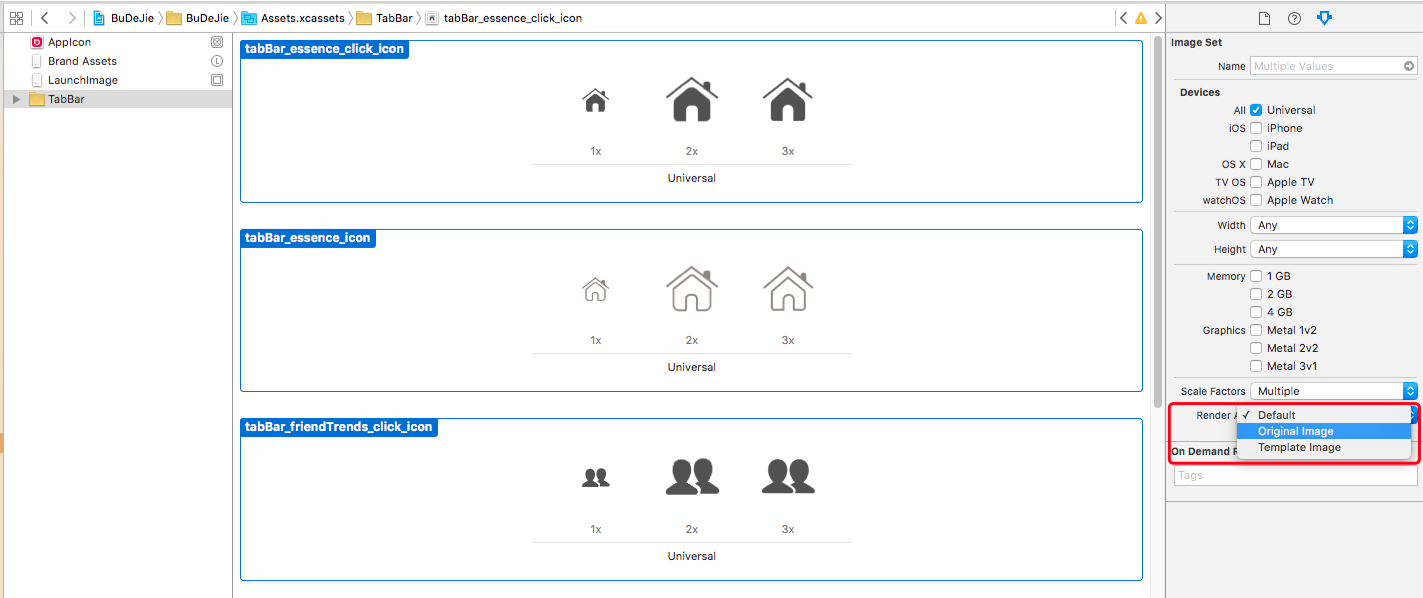
具体操作:全选tabBar所有的图片并设置Render As:Original Image
可以提供一个类别
两种方式比较:
方式一简单,方式二稍微麻烦,但是方式一有可能美工换图后,忘记设置渲染方式而使用代码方式就没有这种顾虑
每个都要设置太麻烦,可以在load中统一设置一下
UIAppearance是一个协议,是用于全局一次性统一设置外貌的,只能在控件显示之前使用
[UIXxx appearance]; // 调用该方法会统一对App中所有的UIXxx 的外观进行设置, App中所有的,一般不用
[UITabBarItem appearanceWhenContainedIn:self, nil]; // 该方法设置只对当前类有效,一般使用这种方式
publishViewController.tabBarItem.imageInsets = UIEdgeInsetsMake(6, 0, -6, 0);
但这种方式一但选中就一直处于选中状态,当选中别的按钮,此时发布按钮还是选中状态,这是有问题的
然后在自定义的UITabBar的layoutSubviews中调整这4个按钮的横坐标位置,将发布的中间位置预先空着,然后在再创建一个UIButton作为发布按钮添加到UITabBar的中间位置即可,这样由于是UIButton这样按钮就会有正常和选中两种状态,这样当点击发布按钮后,按钮状态能从选中状态自动回到正常状态 。
该方式 发布的子视图控制器就不用再添加了
额外话题:.pch文件用于定义公用的宏、公用的头文件、用于定于Log(发布时不打印),定义好需要在Build Setting中设置一下对应的路径
BWTabBarController
BWTabBar
UITabBar内部结构:
UITabBar
UITabBarButton
UITabBarSwappableImageView
UITabBarButtonLabel
UITabBarButton
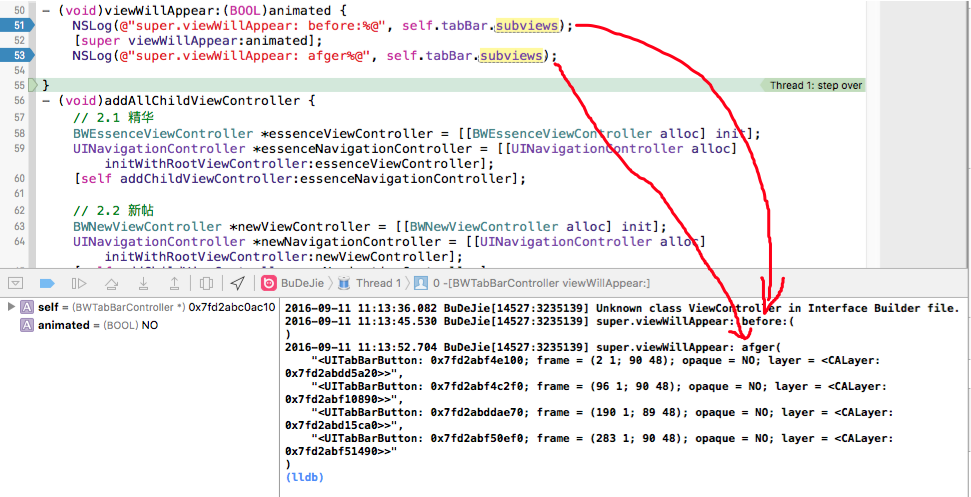
就是setupTabBar的方法实现,该方法直接实例化就赋值,然后BWTabBar中也没有重写初始化操作将其他几个UITabBarButton添加到BWTabBar,就直接在layoutSubviews中进行布局,而且self.subviews还能拿到子视图,那么这些子视图代码没有显式去添加,一定是系统自动添加的了,那么系统是什么时候添加的,经研究是在调用[super viewWillAppear:animated]中将其他UITabBarButton添加到tabBar上,而我们调用setUpTabBar 方法是在viewDidLoad 中调用的, 也就是说按照调用顺序,我们是先将系统的UITabBar替换成自己的BWTabBar,然后系统接着调用viewWillAppear:方法,然后将其他UIBarButton添加到tabBar上,然而此时的tabBar已经不是系统的UITabBar了而是我们自己的BWTabBar了,所以BWTabBar上就有其他4个按钮,接着就可以在layoutSubviews中对这四个UITabBarButton进行布局操作了;
CYLTabBarController :最低只需传两个数组即可完成主流App框架搭建 https://github.com/ChenYilong/CYLTabBarControllerr
1. 创建窗体
2. 设置窗体的根视图控制器
3. 显示窗体
父子控制器:当控制器的view互为父子关系,那么控制器最好也互为父子关系
问题:所有代码写到AppDelegate中不够简介,方法太臃肿,而且①:UITabBarController默认会对tabBarItem选中状态的图片进行渲染成蓝色,②:标题的字体的颜色也是蓝色,③:发布图片显示也有问题
自定义UITabBarController
将创建子控制器的代码封住到自定义的类中, 将创建子控制器和给子控制器的属性赋值的代码进一步抽取#import "BWTabBarController.h"
#import "BWEssenceViewController.h"
#import "BWFriendTrendViewController.h"
#import "BWMeViewController.h"
#import "BWNewViewController.h"
#import "BWPublishViewController.h"
@interface BWTabBarController ()
@end
@implementation BWTabBarController
- (void)viewDidLoad {
[super viewDidLoad];
[self addAllChildViewController];
[self setupAllTabBarItemTitleAndImage];
}
// 添加子视图控制器
- (void)addAllChildViewController {
// 2.1 精华
BWEssenceViewController *essenceViewController = [[BWEssenceViewController alloc] init];
UINavigationController *essenceNavigationController = [[UINavigationController alloc] initWithRootViewController:essenceViewController];
[self addChildViewController:essenceNavigationController];
// 2.2 新帖
BWNewViewController *newViewController = [[BWNewViewController alloc] init];
UINavigationController *newNavigationController = [[UINavigationController alloc] initWithRootViewController:newViewController];
[self addChildViewController:newNavigationController];
// 2.3 发布
BWPublishViewController *publishViewController = [[BWPublishViewController alloc] init];
[self addChildViewController:publishViewController];
// 2.4 关注
BWFriendTrendViewController *friendTrendViewController = [[BWFriendTrendViewController alloc] init];
UINavigationController *friendTrendNavigationController = [[UINavigationController alloc] initWithRootViewController:friendTrendViewController];
[self addChildViewController:friendTrendNavigationController];
// 2.5 我
BWMeViewController *meViewController = [[BWMeViewController alloc] init];
UINavigationController *meNavigationController = [[UINavigationController alloc] initWithRootViewController:meViewController];
[self addChildViewController:meNavigationController];
}
- (void)stupAllTabBarItemTitleAndImage {
// 1. 精华
UINavigationController *essenceNavigationController = self.childViewControllers[0];
essenceNavigationController.tabBarItem.title = @"精华";
essenceNavigationController.tabBarItem.image = [UIImage imageNamed:@"tabBar_essence_icon"];
essenceNavigationController.tabBarItem.selectedImage = [UIImage imageNamed:@"tabBar_essence_click_icon"];
// 2. 新帖
UINavigationController *newNavigationController = self.childViewControllers[1];
newNavigationController.tabBarItem.title = @"新帖";
newNavigationController.tabBarItem.image = [UIImage imageNamed:@"tabBar_new_icon"];
newNavigationController.tabBarItem.selectedImage = [UIImage imageNamed:@"tabBar_new_click_icon"];
// 3. 发布
BWPublishViewController *publishViewController = self.childViewControllers[2];
publishViewController.tabBarItem.image = [UIImage imageNamed:@"tabBar_publish_icon"];
publishViewController.tabBarItem.selectedImage = [UIImage imageNamed:@"tabBar_publish_click_icon"];
// 关注
UINavigationController *friendTrendNavigationController = self.childViewControllers[3];
friendTrendNavigationController.tabBarItem.title = @"关注";
friendTrendNavigationController.tabBarItem.image = [UIImage imageNamed:@"tabBar_friendTrends_icon"];
friendTrendNavigationController.tabBarItem.selectedImage = [UIImage imageNamed:@"tabBar_friendTrends_click_icon"];
// 我
UINavigationController *meNavigationController = self.childViewControllers[4];
meNavigationController.tabBarItem.title = @"我";
meNavigationController.tabBarItem.image = [UIImage imageNamed:@"tabBar_me_icon"];
meNavigationController.tabBarItem.selectedImage = [UIImage imageNamed:@"tabBar_me_click_icon"];
}
@endAppDelegate
- (BOOL)application:(UIApplication *)application didFinishLaunchingWithOptions:(NSDictionary *)launchOptions {
// 1. 创建窗口
self.window = [[UIWindow alloc] initWithFrame:[UIScreen mainScreen].bounds];

// 2. 设置窗口的根试图控制器
BWTabBarController *tabBarController = [[BWTabBarController alloc] init];
self.window.rootViewController = tabBarController;

// 3. 显示窗口
[self.window makeKeyAndVisible];

return YES;
}
AppDelegate代码变得简洁了,但是上述三个问题还没有解决
UITabBarItem选中的图片展示有问题是因为图片被系统渲染了
方式一: 通过Xcode修改图片的渲染方式
原因: UITabBarItem中Image的图片的默认的渲染方式是:Default方式,这样通过[UIImage imageNamed:]方式是获取渲染后的图片,将渲染后的图片赋值给UITabBarItem.selectedImage,所以才会出现这种问题; 修改图片的渲染方式为原始图片即可: Render As:Original Image具体操作:全选tabBar所有的图片并设置Render As:Original Image
方式二:使用代码方式
方式一分析了问题出现的根本原因是将渲染后的图片赋值给了tabBarItem.selectedImage, 所以解决办法就是 从UIImage对象中获取原始图片,然后直接赋值即可// 获取Default 渲染模式Render Mode的图片 UIImage *image = [UIImage imageNamed:@"tabBar_essence_click_icon"]; // 获取图片的原始图片 image = [image imageWithRenderingMode:UIImageRenderingModeAlwaysOriginal]; essenceNavigationController.tabBarItem.selectedImage = image;
可以提供一个类别
@implementation UIImage (Image)

+ (UIImage *)imageOriginalWithName:(NSString *)name {
UIImage *image = [UIImage imageNamed:name];
return [image imageWithRenderingMode:UIImageRenderingModeAlwaysOriginal];
}
@end

essenceNavigationController.tabBarItem.selectedImage = [UIImage imageOriginalWithName:@"tabBar_essence_click_icon"];
两种方式比较:
方式一简单,方式二稍微麻烦,但是方式一有可能美工换图后,忘记设置渲染方式而使用代码方式就没有这种顾虑
设置每个UITabBarItem选中状态的标题颜色
设置UITabBarItem选中状态下的标题颜色即可NSMutableDictionary *attrs = [NSMutableDictionary dictionary]; attrs[NSForegroundColorAttributeName] = [UIColor blackColor]; [essenceNavigationController.tabBarItem setTitleTextAttributes:attrs forState:UIControlStateSelected];
每个都要设置太麻烦,可以在load中统一设置一下
+ (void)load {
[super load];
// 统一设置当前类的所有UITabBarItem的外观 (外观当包含在的时候)
UITabBarItem *tabBarItem = [UITabBarItem appearanceWhenContainedIn:self, nil];
// Selected State
NSMutableDictionary *attrs = [NSMutableDictionary dictionary];
attrs[NSForegroundColorAttributeName] = [UIColor blackColor];
[tabBarItem setTitleTextAttributes:attrs forState:UIControlStateSelected];

// Normal State
NSMutableDictionary *attrsNormal = [NSMutableDictionary dictionary];
attrsNormal[NSFontAttributeName] = [UIFont systemFontOfSize:13];
[tabBarItem setTitleTextAttributes:attrsNormal forState:UIControlStateNormal];
}
UIAppearance是一个协议,是用于全局一次性统一设置外貌的,只能在控件显示之前使用
[UIXxx appearance]; // 调用该方法会统一对App中所有的UIXxx 的外观进行设置, App中所有的,一般不用
[UITabBarItem appearanceWhenContainedIn:self, nil]; // 该方法设置只对当前类有效,一般使用这种方式
发布按钮显式不出来
发布按钮显示不出来是因为图片的尺寸太大了,从而系统在渲染的图片的时候渲染有问题,解决办法是:将图片对应的原始图片赋值给UITabBarItem.selectedImage即可publishViewController.tabBarItem.image = [UIImage imageOriginalWithName:@"tabBar_publish_icon"];
发布图片的位置居中:
方式一:调整图片的内边距imageInsets
图片不居中修改图片对应的内边距即可,左右内边距不变,上下内边距下调即可居中publishViewController.tabBarItem.imageInsets = UIEdgeInsetsMake(6, 0, -6, 0);
但这种方式一但选中就一直处于选中状态,当选中别的按钮,此时发布按钮还是选中状态,这是有问题的
方式二:自定义发布按钮UIButton,即自定义UITabBar
实现思路:在自定义的UITabBarController中先将发布控制器不添加到UITabBarController中,然后在自定义的UITabBar的layoutSubviews中调整这4个按钮的横坐标位置,将发布的中间位置预先空着,然后在再创建一个UIButton作为发布按钮添加到UITabBar的中间位置即可,这样由于是UIButton这样按钮就会有正常和选中两种状态,这样当点击发布按钮后,按钮状态能从选中状态自动回到正常状态 。
该方式 发布的子视图控制器就不用再添加了
// 去掉发布的子视图控制器
- (void)addAllChildViewController {
// 1 精华
BWEssenceViewController *essenceViewController = [[BWEssenceViewController alloc] init];
UINavigationController *essenceNavigationController = [[UINavigationController alloc] initWithRootViewController:essenceViewController];
[self addChildViewController:essenceNavigationController];

// 2 新帖
BWNewViewController *newViewController = [[BWNewViewController alloc] init];
UINavigationController *newNavigationController = [[UINavigationController alloc] initWithRootViewController:newViewController];
[self addChildViewController:newNavigationController];

// 4 关注
BWFriendTrendViewController *friendTrendViewController = [[BWFriendTrendViewController alloc] init];
UINavigationController *friendTrendNavigationController = [[UINavigationController alloc] initWithRootViewController:friendTrendViewController];
[self addChildViewController:friendTrendNavigationController];

// 5 我
BWMeViewController *meViewController = [[BWMeViewController alloc] init];
UINavigationController *meNavigationController = [[UINavigationController alloc] initWithRootViewController:meViewController];
[self addChildViewController:meNavigationController];
}

// 去掉发布的子视图控制器对应的tabBarItem 设置
- (void)stupAllTabBarItemTitleAndImage {
// 1. 精华
UINavigationController *essenceNavigationController = self.childViewControllers[0];
essenceNavigationController.tabBarItem.title = @"精华";
essenceNavigationController.tabBarItem.image = [UIImage imageNamed:@"tabBar_essence_icon"];
essenceNavigationController.tabBarItem.selectedImage = [UIImage imageOriginalWithName:@"tabBar_essence_click_icon"];

// 2. 新帖
UINavigationController *newNavigationController = self.childViewControllers[1];
newNavigationController.tabBarItem.title = @"新帖";
newNavigationController.tabBarItem.image = [UIImage imageNamed:@"tabBar_new_icon"];
newNavigationController.tabBarItem.selectedImage = [UIImage imageOriginalWithName:@"tabBar_new_click_icon"];

// 4. 关注
UINavigationController *friendTrendNavigationController = self.childViewControllers[2];
friendTrendNavigationController.tabBarItem.title = @"关注";
friendTrendNavigationController.tabBarItem.image = [UIImage imageNamed:@"tabBar_friendTrends_icon"];
friendTrendNavigationController.tabBarItem.selectedImage = [UIImage imageOriginalWithName:@"tabBar_friendTrends_click_icon"];

// 5. 我
UINavigationController *meNavigationController = self.childViewControllers[3];
meNavigationController.tabBarItem.title = @"我";
meNavigationController.tabBarItem.image = [UIImage imageNamed:@"tabBar_me_icon"];
meNavigationController.tabBarItem.selectedImage = [UIImage imageOriginalWithName:@"tabBar_me_click_icon"];
}

- (void)viewDidLoad {
[super viewDidLoad];

[self addAllChildViewController];

[self stupAllTabBarItemTitleAndImage];

[self setUpTabBar];  // 初始化tabBar
}

- (void)setupTabBar {
BWTabBar *tabBar = [[BWTabBar alloc] init];
[self setValue:tabBar forKey:@"tabBar"];  //该属性是私有属性,只能通过KVC方式赋值 将系统的tabBar替换成BWTabBar
}
@interface BWTabBar ()
@property (weak, nonatomic) UIButton *plusButton;
@end
@implementation BWTabBar
// 重新调整其他4个按钮的x坐标,并将中间的发布按钮位置暂时空出来
- (void)layoutSubviews {
[super layoutSubviews];
NSInteger count = self.items.count;
CGFloat buttonWidth = self.bounds.size.width / (count + 1);
CGFloat buttonHeight = self.bounds.size.height;
CGFloat x = 0;
int i = 0;
for (UIView *tabBarButton in self.subviews) {
if ([tabBarButton isKindOfClass:NSClassFromString(@"UITabBarButton")]) {
if (i == 2) {
i += 1;
}
x = i * buttonWidth;
tabBarButton.frame = CGRectMake(x, 0, buttonWidth, buttonHeight);
i++;
}
}
// 将发布按钮添加到tabBar的中间位置
self.plusButton.center = CGPointMake(self.bounds.size.width * 0.5, self.bounds.size.height * 0.5);
}
// 发布按钮:懒加载
- (UIButton *)plusButton {
if (_plusButton == nil) {
UIButton *btn = [UIButton buttonWithType:UIButtonTypeCustom];
[btn setImage:[UIImage imageNamed:@"tabBar_publish_icon"] forState:UIControlStateNormal];
[btn setImage:[UIImage imageNamed:@"tabBar_publish_click_icon"] forState:UIControlStateSelected];
[btn sizeToFit];
[self addSubview:btn];
_plusButton = btn;
}
return _plusButton;
}
@end额外话题:.pch文件用于定义公用的宏、公用的头文件、用于定于Log(发布时不打印),定义好需要在Build Setting中设置一下对应的路径
完整代码
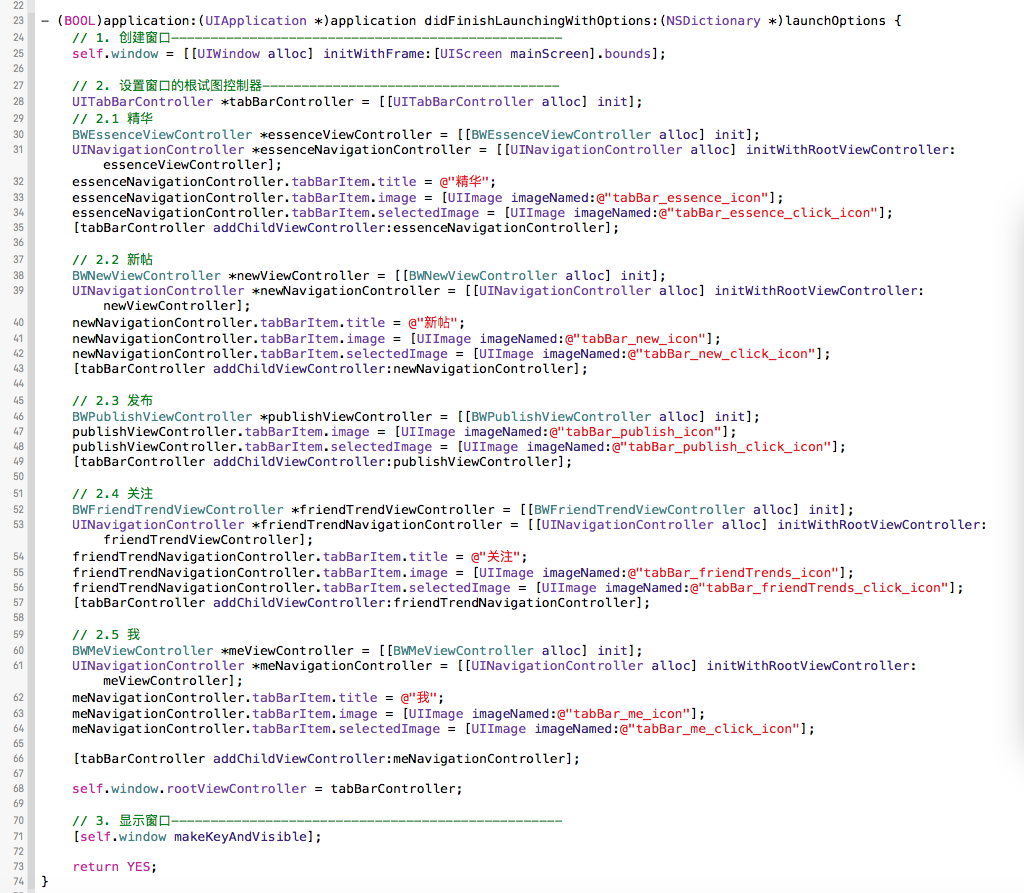
AppDelegate.m- (BOOL)application:(UIApplication *)application didFinishLaunchingWithOptions:(NSDictionary *)launchOptions {
// 1. 创建窗口--------------------------------------------------
self.window = [[UIWindow alloc] initWithFrame:[UIScreen mainScreen].bounds];
// 2. 设置窗口的根试图控制器--------------------------------------
BWTabBarController *tabBarController = [[BWTabBarController alloc] init];
self.window.rootViewController = tabBarController;
// 3. 显示窗口--------------------------------------------------
[self.window makeKeyAndVisible];
return YES;
}BWTabBarController
#import "BWTabBarController.h"

#import "BWEssenceViewController.h"
#import "BWFriendTrendViewController.h"
#import "BWMeViewController.h"
#import "BWNewViewController.h"
#import "BWPublishViewController.h"

#import "BWTabBar.h"
#import "UIImage+Image.h"

@interface BWTabBarController ()

@end

@implementation BWTabBarController

+ (void)load {
[super load];
UITabBarItem *tabBarItem = [UITabBarItem appearanceWhenContainedIn:self, nil];
// Selected
NSMutableDictionary *attrs = [NSMutableDictionary dictionary];
attrs[NSForegroundColorAttributeName] = [UIColor blackColor];
[tabBarItem setTitleTextAttributes:attrs forState:UIControlStateSelected];

// normal
NSMutableDictionary *attrsNormal = [NSMutableDictionary dictionary];
attrsNormal[NSFontAttributeName] = [UIFont systemFontOfSize:13];
[tabBarItem setTitleTextAttributes:attrsNormal forState:UIControlStateNormal];
}

- (void)viewDidLoad {
[super viewDidLoad];

[self addAllChildViewController];

[self stupAllTabBarItemTitleAndImage];

[self setupTabBar];
}

- (void)addAllChildViewController {
// 2.1 精华
BWEssenceViewController *essenceViewController = [[BWEssenceViewController alloc] init];
UINavigationController *essenceNavigationController = [[UINavigationController alloc] initWithRootViewController:essenceViewController];
[self addChildViewController:essenceNavigationController];

// 2.2 新帖
BWNewViewController *newViewController = [[BWNewViewController alloc] init];
UINavigationController *newNavigationController = [[UINavigationController alloc] initWithRootViewController:newViewController];
[self addChildViewController:newNavigationController];

// 2.4 关注
BWFriendTrendViewController *friendTrendViewController = [[BWFriendTrendViewController alloc] init];
UINavigationController *friendTrendNavigationController = [[UINavigationController alloc] initWithRootViewController:friendTrendViewController];
[self addChildViewController:friendTrendNavigationController];

// 2.5 我
BWMeViewController *meViewController = [[BWMeViewController alloc] init];
UINavigationController *meNavigationController = [[UINavigationController alloc] initWithRootViewController:meViewController];
[self addChildViewController:meNavigationController];
}
- (void)stupAllTabBarItemTitleAndImage {
// 精华
UINavigationController *essenceNavigationController = self.childViewControllers[0];
essenceNavigationController.tabBarItem.title = @"精华";
essenceNavigationController.tabBarItem.image = [UIImage imageNamed:@"tabBar_essence_icon"];
essenceNavigationController.tabBarItem.selectedImage = [UIImage imageOriginalWithName:@"tabBar_essence_click_icon"];

// 新帖
UINavigationController *newNavigationController = self.childViewControllers[1];
newNavigationController.tabBarItem.title = @"新帖";
newNavigationController.tabBarItem.image = [UIImage imageNamed:@"tabBar_new_icon"];
newNavigationController.tabBarItem.selectedImage = [UIImage imageOriginalWithName:@"tabBar_new_click_icon"];

// 关注
UINavigationController *friendTrendNavigationController = self.childViewControllers[2];
friendTrendNavigationController.tabBarItem.title = @"关注";
friendTrendNavigationController.tabBarItem.image = [UIImage imageNamed:@"tabBar_friendTrends_icon"];
friendTrendNavigationController.tabBarItem.selectedImage = [UIImage imageOriginalWithName:@"tabBar_friendTrends_click_icon"];

// 我
UINavigationController *meNavigationController = self.childViewControllers[3];
meNavigationController.tabBarItem.title = @"我";
meNavigationController.tabBarItem.image = [UIImage imageNamed:@"tabBar_me_icon"];
meNavigationController.tabBarItem.selectedImage = [UIImage imageOriginalWithName:@"tabBar_me_click_icon"];

}

- (void)setupTabBar {
BWTabBar *tabBar = [[BWTabBar alloc] init];
[self setValue:tabBar forKey:@"tabBar"];  // 将系统的tabBar替换成BWTabBar
}

@end
BWTabBar
#import "BWTabBar.h"

@interface BWTabBar ()
@property (weak, nonatomic) UIButton *plusButton;
@end

@implementation BWTabBar

- (void)layoutSubviews {
[super layoutSubviews];

NSInteger count = self.items.count;
CGFloat buttonWidth = self.bounds.size.width / (count + 1);
CGFloat buttonHeight = self.bounds.size.height;
CGFloat x = 0;
int i = 0;

for (UIView *tabBarButton in self.subviews) {
if ([tabBarButton isKindOfClass:NSClassFromString(@"UITabBarButton")]) {
if (i == 2) {
i += 1;
}

x = i * buttonWidth;
tabBarButton.frame = CGRectMake(x, 0, buttonWidth, buttonHeight);
i++;
}
}

// 调整发布按钮居中
self.plusButton.center = CGPointMake(self.bounds.size.width * 0.5, self.bounds.size.height * 0.5);
}

- (UIButton *)plusButton {
if (_plusButton == nil) {
UIButton *btn = [UIButton buttonWithType:UIButtonTypeCustom];
[btn setImage:[UIImage imageNamed:@"tabBar_publish_icon"] forState:UIControlStateNormal];
[btn setImage:[UIImage imageNamed:@"tabBar_publish_click_icon"] forState:UIControlStateSelected];
[btn sizeToFit];

[self addSubview:btn];
_plusButton = btn;
}

return _plusButton;
}
@end
UITabBar内部结构:
UITabBar
UITabBarButton
UITabBarSwappableImageView
UITabBarButtonLabel
UITabBarButton
UITabBar的UITabBarButton是什么时候添加到UITabBar上的???
上面代码有一点疑惑:就是setupTabBar的方法实现,该方法直接实例化就赋值,然后BWTabBar中也没有重写初始化操作将其他几个UITabBarButton添加到BWTabBar,就直接在layoutSubviews中进行布局,而且self.subviews还能拿到子视图,那么这些子视图代码没有显式去添加,一定是系统自动添加的了,那么系统是什么时候添加的,经研究是在调用[super viewWillAppear:animated]中将其他UITabBarButton添加到tabBar上,而我们调用setUpTabBar 方法是在viewDidLoad 中调用的, 也就是说按照调用顺序,我们是先将系统的UITabBar替换成自己的BWTabBar,然后系统接着调用viewWillAppear:方法,然后将其他UIBarButton添加到tabBar上,然而此时的tabBar已经不是系统的UITabBar了而是我们自己的BWTabBar了,所以BWTabBar上就有其他4个按钮,接着就可以在layoutSubviews中对这四个UITabBarButton进行布局操作了;
- (void)setUpTabBar {
BWTabBar *tabBar = [[BWTabBar alloc] init];
[self setValue:tabBar forKey:@"tabBar"];
}

- (void)viewDidLoad {
[super viewDidLoad];

[self addAllChildViewController];

[self stupAllTabBarItemTitleAndImage];

[self setupTabBar];
}
最终解决方案
上述代码虽解决了所有问题,但是耦合度还是太高,UITabBarController 和其他几个视图控制器,包括图片名字都写死在自定义的UITabBarController了,要将该自定义的UITabBarController 移植到其他项目中还要修改,最好的办法是将这些作为方法的参数继续重构代码,保证移植时不修改UITabBarController中的代码, 可以自己对以上代码进行重构,也可以使用github上的开源项目,别人已经做的很完美了,直接使用即可CYLTabBarController :最低只需传两个数组即可完成主流App框架搭建 https://github.com/ChenYilong/CYLTabBarControllerr

相关文章推荐
- IOS总结_无需自定义UITabbar也可改变UITabbarController的背景和点击和的颜色
- iOS开发:自定义UITabBarController标签控制栏
- iOS 关于自定义转场动画,以UITabBarController为例
- iOS自定义控件 - 自定义UITabBarController中的TabBar
- 从0开始架构一个IOS程序 ——04— UITabBarController和自定义TabBar 搭建主页面
- [iOS]系统UITabBarController详解及自定义
- IOS快速自定义UITabBarController内的TabBar控件
- IOS开发之自定义UITabBarController
- iOS中 UITabBarController中自定义UITabBar
- iOS-快速自定义UITabBarController内的tabbar控件
- iOS 自定义UITabbarController中的item (swift)
- iOS UITabBarController 的 UITabBar 自定义
- iOS 自定义UITabBarController的tabBar
- iOS--UITabbarController自定义
- IOS 自定义UITabBarController的高度处理
- ios开发之自定义UITabBarController
- IOS开发之自定义UITabBarController
- iOS中 UITabBarController中自定义UITabBar
- iOS--自定义UITabBarController
- IOS自定义UITabBarController