纯手工打造linux路由器
2016-09-06 12:40
393 查看
对由器比较了解的朋友都知道,很多专业级的路由器,也就是用linux系统来做的,那既然如此,如何使用linux主机打造一个路由器了。其实也不难,但我们得首先搞楚路由器的工作原理,说白了路由器也就是两个不同的网络之间转发数据之用的。如果没有路由器,只能在各自的网络内互相通信,跨网络就访问不了了。因为它们之间是相互隔离的,必须要有一个桥梁才能让它们之间正常来往。今天就给大家分享如何使用两台linux主机来打造一台路由器。
一、环境需求
1、两台双网卡主机
2、操作系统:安装Centos7.2
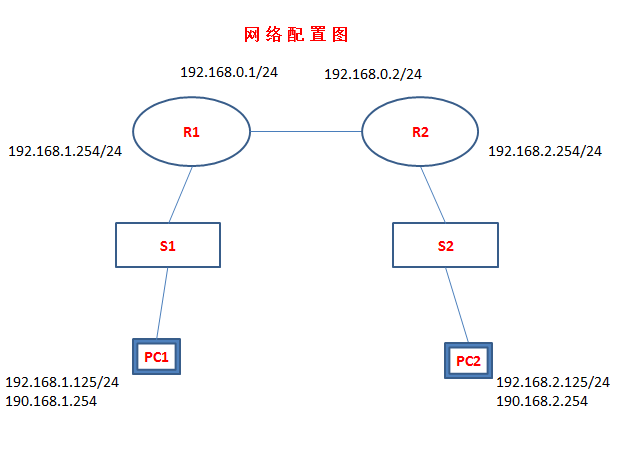
二、路由要求:实现A网络和B网络的通信
A网络:192.168.1.0/24
B网络:192.168.2.0/24
路由器的网络:192.168.0.0/24
三、配置思路
第一台linux主机(R1):
第一块网卡——A网络的网关(内网接口):192.168.1.254
第二块网卡——A网络的出口(外网接口):192.168.0.1
第二台linux主机(R2):
第一块网卡——B网络的网关(内网接口):192.168.2.254
第二块网卡——B网络的出口(外网接口):192.168.0.2
四、具体配置步骤
第一步:配置两台主机的网卡(每台主机两张网卡,需要配置四次)
(一)R1的网卡配置
[root@Router1 network-scripts]# ip link
1: lo: <LOOPBACK,UP,LOWER_UP> mtu 65536 qdisc noqueue state UNKNOWN mode DEFAULT
link/loopback 00:00:00:00:00:00 brd 00:00:00:00:00:00
2: eno16777728: <BROADCAST,MULTICAST,UP,LOWER_UP> mtu 1500 qdisc pfifo_fast state UP mode DEFAULT qlen 1000
link/ether 00:0c:29:13:4b:5f brd ff:ff:ff:ff:ff:ff
3: eno33554960: <BROADCAST,MULTICAST,UP,LOWER_UP> mtu 1500 qdisc pfifo_fast state UP mode DEFAULT qlen 1000
link/ether 00:0c:29:13:4b:69 brd ff:ff:ff:ff:ff:ff
4: virbr0: <NO-CARRIER,BROADCAST,MULTICAST,UP> mtu 1500 qdisc noqueue state DOWN mode DEFAULT
link/ether 52:54:00:3a:39:12 brd ff:ff:ff:ff:ff:ff
5: virbr0-nic: <BROADCAST,MULTICAST> mtu 1500 qdisc pfifo_fast master virbr0 state DOWN mode DEFAULT qlen 500
link/ether 52:54:00:3a:39:12 brd ff:ff:ff:ff:ff:ff
[root@Router1 network-scripts]# vim ifcfg-eno16777728
[root@Router1 network-scripts]# cat ifcfg-eno16777728
DEVICE=eno16777728
BOOTPROTO=none
IPADDR=192.168.1.254
PREFIX=24
[root@Router1 network-scripts]# vim ifcfg-eno33554960
[root@Router1 network-scripts]# cat ifcfg-eno33554960
DEVICE=eno33554960
BOOTPROTO=none
IPADDR=192.168.0.1
PREFIX=24
[root@Router1 network-scripts]#
(二)R2的网卡配置
[root@Router2 network-scripts]# ip link
1: lo: <LOOPBACK,UP,LOWER_UP> mtu 65536 qdisc noqueue state UNKNOWN mode DEFAULT
link/loopback 00:00:00:00:00:00 brd 00:00:00:00:00:00
2: eno16777728: <BROADCAST,MULTICAST,UP,LOWER_UP> mtu 1500 qdisc pfifo_fast state UP mode DEFAULT qlen 1000
link/ether 00:0c:29:6f:d4:c5 brd ff:ff:ff:ff:ff:ff
3: eno33554960: <BROADCAST,MULTICAST,UP,LOWER_UP> mtu 1500 qdisc pfifo_fast state UP mode DEFAULT qlen 1000
link/ether 00:0c:29:6f:d4:cf brd ff:ff:ff:ff:ff:ff
4: virbr0: <NO-CARRIER,BROADCAST,MULTICAST,UP> mtu 1500 qdisc noqueue state DOWN mode DEFAULT
link/ether 52:54:00:3a:39:12 brd ff:ff:ff:ff:ff:ff
5: virbr0-nic: <BROADCAST,MULTICAST> mtu 1500 qdisc pfifo_fast master virbr0 state DOWN mode DEFAULT qlen 500
link/ether 52:54:00:3a:39:12 brd ff:ff:ff:ff:ff:ff
[root@Router2 network-scripts]# vim ifcfg-eno16777728
[root@Router2 network-scripts]# cat ifcfg-eno16777728
DEVICE=eno16777728
BOOTPROTO=none
IPADDR=192.168.2.254
PREFIX=24
[root@Router2 network-scripts]# vim ifcfg-eno33554960
[root@Router2 network-scripts]# cat ifcfg-eno33554960
DEVICE=eno33554960
BOOTPROTO=none
IPADDR=192.168.0.2
PREFIX=24
[root@Router2 network-scripts]#
第二步:配置两台主机的路由表
(一)R1的路由表配置
[root@Router1 network-scripts]# echo "192.168.2.0/24 via 192.168.0.2" > route-eno33554960
[root@Router1 network-scripts]# cat route-eno33554960
192.168.2.0/24 via 192.168.0.2
[root@Router1 network-scripts]#
(二)R2的路由表配置
[root@Router2 network-scripts]# echo "192.168.1.0/24 via 192.168.0.1" > route-eno33554960
[root@Router2 network-scripts]# cat route-eno33554960
192.168.1.0/24 via 192.168.0.1
[root@Router2 network-scripts]#
第三步:开启两台主机的路由转发功能
(一)开启R1的路由转发功能
[root@Router1 network-scripts]# cat /proc/sys/net/ipv4/ip_forward
0
[root@Router1 network-scripts]# echo 1 > /proc/sys/net/ipv4/ip_forward
[root@Router1 network-scripts]#
(二)开启R2的路由转发功能
[root@Router2 network-scripts]# cat /proc/sys/net/ipv4/ip_forward
0
[root@Router2 network-scripts]# echo 1 > /proc/sys/net/ipv4/ip_forward
[root@Router2 network-scripts]#
第四步:重启两台已经配置好的路由器,并验证两台路由器之间的通信
(一)重启R1
[root@Router1 network-scripts]# systemctl restart network
[root@Router1 network-scripts]# ifconfig
eno16777728: flags=4163<UP,BROADCAST,RUNNING,MULTICAST> mtu 1500
inet 192.168.1.254 netmask 255.255.255.0 broadcast 192.168.1.255
inet6 fe80::20c:29ff:fe13:4b5f prefixlen 64 scopeid 0x20<link>
ether 00:0c:29:13:4b:5f txqueuelen 1000 (Ethernet)
RX packets 21778 bytes 1755783 (1.6 MiB)
RX errors 0 dropped 0 overruns 0 frame 0
TX packets 1569 bytes 206822 (201.9 KiB)
TX errors 0 dropped 0 overruns 0 carrier 0 collisions 0
eno33554960: flags=4163<UP,BROADCAST,RUNNING,MULTICAST> mtu 1500
inet 192.168.0.1 netmask 255.255.255.0 broadcast 192.168.0.255
inet6 fe80::20c:29ff:fe13:4b69 prefixlen 64 scopeid 0x20<link>
ether 00:0c:29:13:4b:69 txqueuelen 1000 (Ethernet)
RX packets 19431 bytes 1527793 (1.4 MiB)
RX errors 0 dropped 0 overruns 0 frame 0
TX packets 94 bytes 10757 (10.5 KiB)
TX errors 0 dropped 0 overruns 0 carrier 0 collisions 0
lo: flags=73<UP,LOOPBACK,RUNNING> mtu 65536
inet 127.0.0.1 netmask 255.0.0.0
inet6 ::1 prefixlen 128 scopeid 0x10<host>
loop txqueuelen 0 (Local Loopback)
RX packets 8 bytes 688 (688.0 B)
RX errors 0 dropped 0 overruns 0 frame 0
TX packets 8 bytes 688 (688.0 B)
TX errors 0 dropped 0 overruns 0 carrier 0 collisions 0
virbr0: flags=4099<UP,BROADCAST,MULTICAST> mtu 1500
inet 192.168.122.1 netmask 255.255.255.0 broadcast 192.168.122.255
ether 52:54:00:3a:39:12 txqueuelen 0 (Ethernet)
RX packets 0 bytes 0 (0.0 B)
RX errors 0 dropped 0 overruns 0 frame 0
TX packets 0 bytes 0 (0.0 B)
TX errors 0 dropped 0 overruns 0 carrier 0 collisions 0
[root@Router1 network-scripts]#
(二)重启R2
[root@Router2 network-scripts]# systemctl restart network
[root@Router2 network-scripts]# ifconfig
eno16777728: flags=4163<UP,BROADCAST,RUNNING,MULTICAST> mtu 1500
inet 192.168.2.254 netmask 255.255.255.0 broadcast 192.168.2.255
inet6 fe80::20c:29ff:fe6f:d4c5 prefixlen 64 scopeid 0x20<link>
ether 00:0c:29:6f:d4:c5 txqueuelen 1000 (Ethernet)
RX packets 20833 bytes 1658328 (1.5 MiB)
RX errors 0 dropped 0 overruns 0 frame 0
TX packets 1372 bytes 217031 (211.9 KiB)
TX errors 0 dropped 0 overruns 0 carrier 0 collisions 0
eno33554960: flags=4163<UP,BROADCAST,RUNNING,MULTICAST> mtu 1500
inet 192.168.0.2 netmask 255.255.255.0 broadcast 192.168.0.255
inet6 fe80::20c:29ff:fe6f:d4cf prefixlen 64 scopeid 0x20<link>
ether 00:0c:29:6f:d4:cf txqueuelen 1000 (Ethernet)
RX packets 18938 bytes 1480549 (1.4 MiB)
RX errors 0 dropped 0 overruns 0 frame 0
TX packets 81 bytes 9518 (9.2 KiB)
TX errors 0 dropped 0 overruns 0 carrier 0 collisions 0
lo: flags=73<UP,LOOPBACK,RUNNING> mtu 65536
inet 127.0.0.1 netmask 255.0.0.0
inet6 ::1 prefixlen 128 scopeid 0x10<host>
loop txqueuelen 0 (Local Loopback)
RX packets 8 bytes 688 (688.0 B)
RX errors 0 dropped 0 overruns 0 frame 0
TX packets 8 bytes 688 (688.0 B)
TX errors 0 dropped 0 overruns 0 carrier 0 collisions 0
virbr0: flags=4099<UP,BROADCAST,MULTICAST> mtu 1500
inet 192.168.122.1 netmask 255.255.255.0 broadcast 192.168.122.255
ether 52:54:00:3a:39:12 txqueuelen 0 (Ethernet)
RX packets 0 bytes 0 (0.0 B)
RX errors 0 dropped 0 overruns 0 frame 0
TX packets 0 bytes 0 (0.0 B)
TX errors 0 dropped 0 overruns 0 carrier 0 collisions 0
[root@Router2 network-scripts]#
(三)用R1 ping R2
[root@Router1 network-scripts]# ping -c3 192.168.0.2
PING 192.168.0.2 (192.168.0.2) 56(84) bytes of data.
64 bytes from 192.168.0.2: icmp_seq=1 ttl=64 time=15.4 ms
64 bytes from 192.168.0.2: icmp_seq=2 ttl=64 time=1.23 ms
64 bytes from 192.168.0.2: icmp_seq=3 ttl=64 time=1.31 ms
--- 192.168.0.2 ping statistics ---
3 packets transmitted, 3 received, 0% packet loss, time 2018ms
rtt min/avg/max/mdev = 1.238/6.003/15.453/6.682 ms
[root@Router1 network-scripts]# ping -c3 192.168.2.254
PING 192.168.2.254 (192.168.2.254) 56(84) bytes of data.
64 bytes from 192.168.2.254: icmp_seq=1 ttl=64 time=0.912 ms
64 bytes from 192.168.2.254: icmp_seq=2 ttl=64 time=1.27 ms
64 bytes from 192.168.2.254: icmp_seq=3 ttl=64 time=1.90 ms
--- 192.168.2.254 ping statistics ---
3 packets transmitted, 3 received, 0% packet loss, time 2022ms
rtt min/avg/max/mdev = 0.912/1.364/1.903/0.409 ms
[root@Router1 network-scripts]#
(四)用R2 ping R1
[root@Router2 network-scripts]# ping -c3 192.168.0.1
PING 192.168.0.1 (192.168.0.1) 56(84) bytes of data.
64 bytes from 192.168.0.1: icmp_seq=1 ttl=64 time=0.572 ms
64 bytes from 192.168.0.1: icmp_seq=2 ttl=64 time=0.951 ms
64 bytes from 192.168.0.1: icmp_seq=3 ttl=64 time=0.822 ms
--- 192.168.0.1 ping statistics ---
3 packets transmitted, 3 received, 0% packet loss, time 2029ms
rtt min/avg/max/mdev = 0.572/0.781/0.951/0.160 ms
[root@Router2 network-scripts]# ping -c3 192.168.1.254
PING 192.168.1.254 (192.168.1.254) 56(84) bytes of data.
64 bytes from 192.168.1.254: icmp_seq=1 ttl=64 time=6.78 ms
64 bytes from 192.168.1.254: icmp_seq=2 ttl=64 time=0.962 ms
64 bytes from 192.168.1.254: icmp_seq=3 ttl=64 time=1.14 ms
--- 192.168.1.254 ping statistics ---
3 packets transmitted, 3 received, 0% packet loss, time 2026ms
rtt min/avg/max/mdev = 0.962/2.963/6.785/2.703 ms
[root@Router2 network-scripts]#
第五步:配置windows主机做为A网络的PC1,配置另一台liunx主机做为B网络的PC2,分别用测试路由效果
(一)PC1-->A网络的windows7
C:\Users\Administrator>ipconfig
Windows IP 配置
以太网适配器 本地连接:
连接特定的 DNS 后缀 . . . . . . . :
IPv4 地址 . . . . . . . . . . . . : 192.168.1.125
子网掩码 . . . . . . . . . . . . : 255.255.255.0
默认网关. . . . . . . . . . . . . : 192.168.1.254
隧道适配器 isatap.{CCC82E88-7D5E-4564-B569-27B6A5DE9C48}:
媒体状态 . . . . . . . . . . . . : 媒体已断开
连接特定的 DNS 后缀 . . . . . . . :
C:\Users\Administrator>
(二)PC2-->B网络的Centos7.2
[root@centos7 ~]# cat /etc/sysconfig/network-scripts/
cat: /etc/sysconfig/network-scripts/: Is a directory
[root@centos7 ~]# cat /etc/sysconfig/network-scripts/ifcfg-eno16777728
DEVICE=eno16777728
BOOTPROTO=none
IPADDR=192.168.2.125
PREFIX=24
GATEWAY=192.168.2.254
[root@centos7 ~]# ifconfig
eno16777728: flags=4163<UP,BROADCAST,RUNNING,MULTICAST> mtu 1500
inet 192.168.2.125 netmask 255.255.255.0 broadcast 192.168.2.255
inet6 fe80::20c:29ff:fe06:f987 prefixlen 64 scopeid 0x20<link>
ether 00:0c:29:06:f9:87 txqueuelen 1000 (Ethernet)
RX packets 1359 bytes 98258 (95.9 KiB)
RX errors 0 dropped 0 overruns 0 frame 0
TX packets 136 bytes 12455 (12.1 KiB)
TX errors 0 dropped 0 overruns 0 carrier 0 collisions 0
lo: flags=73<UP,LOOPBACK,RUNNING> mtu 65536
inet 127.0.0.1 netmask 255.0.0.0
inet6 ::1 prefixlen 128 scopeid 0x10<host>
loop txqueuelen 0 (Local Loopback)
RX packets 16 bytes 1072 (1.0 KiB)
RX errors 0 dropped 0 overruns 0 frame 0
TX packets 16 bytes 1072 (1.0 KiB)
TX errors 0 dropped 0 overruns 0 carrier 0 collisions 0
[root@centos7 ~]#
(三)现在用A网络的PC1(192.168.1.125/24) ping B网络的PC2(192.168.2.125/24)
C:\Users\Administrator>ping 192.168.2.125
正在 Ping 192.168.2.125 具有 32 字节的数据:
来自 192.168.2.125 的回复: 字节=32 时间=1ms TTL=62
来自 192.168.2.125 的回复: 字节=32 时间=2ms TTL=62
来自 192.168.2.125 的回复: 字节=32 时间=3ms TTL=62
来自 192.168.2.125 的回复: 字节=32 时间=2ms TTL=62
192.168.2.125 的 Ping 统计信息:
数据包: 已发送 = 4,已接收 = 4,丢失 = 0 (0% 丢失),
往返行程的估计时间(以毫秒为单位):
最短 = 1ms,最长 = 3ms,平均 = 2ms
C:\Users\Administrator>
经过两个路由器,所以TTL变成62(64-2)
(四)再用B网络的PC2(192.168.2.125/24)ping A网络的PC1(192.168.1.125/24)
[root@centos7 ~]# ping -c4 192.168.1.125
PING 192.168.1.125 (192.168.1.125) 56(84) bytes of data.
64 bytes from 192.168.1.125: icmp_seq=1 ttl=62 time=1.39 ms
64 bytes from 192.168.1.125: icmp_seq=2 ttl=62 time=1.19 ms
64 bytes from 192.168.1.125: icmp_seq=3 ttl=62 time=2.03 ms
64 bytes from 192.168.1.125: icmp_seq=4 ttl=62 time=2.12 ms
--- 192.168.1.125 ping statistics ---
4 packets transmitted, 4 received, 0% packet loss, time 3008ms
rtt min/avg/max/mdev = 1.198/1.689/2.126/0.402 ms
[root@centos7 ~]#
经过两个路由器,所以TTL同样的是62
原本属于两个不同网络的PC1和PC2是不能通信的,现在有了刚才搭建的路由器(R1+R2),它们就可以正常通信了。
传说中的路由器也就是这么工作的,当然这只是给大家展示了一下路由器的工作原理,同时这也只是静态路由的情况,动态路由就比静态路由要复杂的多了。
一、环境需求
1、两台双网卡主机
2、操作系统:安装Centos7.2
二、路由要求:实现A网络和B网络的通信
A网络:192.168.1.0/24
B网络:192.168.2.0/24
路由器的网络:192.168.0.0/24
三、配置思路
第一台linux主机(R1):
第一块网卡——A网络的网关(内网接口):192.168.1.254
第二块网卡——A网络的出口(外网接口):192.168.0.1
第二台linux主机(R2):
第一块网卡——B网络的网关(内网接口):192.168.2.254
第二块网卡——B网络的出口(外网接口):192.168.0.2
四、具体配置步骤
第一步:配置两台主机的网卡(每台主机两张网卡,需要配置四次)
(一)R1的网卡配置
[root@Router1 network-scripts]# ip link
1: lo: <LOOPBACK,UP,LOWER_UP> mtu 65536 qdisc noqueue state UNKNOWN mode DEFAULT
link/loopback 00:00:00:00:00:00 brd 00:00:00:00:00:00
2: eno16777728: <BROADCAST,MULTICAST,UP,LOWER_UP> mtu 1500 qdisc pfifo_fast state UP mode DEFAULT qlen 1000
link/ether 00:0c:29:13:4b:5f brd ff:ff:ff:ff:ff:ff
3: eno33554960: <BROADCAST,MULTICAST,UP,LOWER_UP> mtu 1500 qdisc pfifo_fast state UP mode DEFAULT qlen 1000
link/ether 00:0c:29:13:4b:69 brd ff:ff:ff:ff:ff:ff
4: virbr0: <NO-CARRIER,BROADCAST,MULTICAST,UP> mtu 1500 qdisc noqueue state DOWN mode DEFAULT
link/ether 52:54:00:3a:39:12 brd ff:ff:ff:ff:ff:ff
5: virbr0-nic: <BROADCAST,MULTICAST> mtu 1500 qdisc pfifo_fast master virbr0 state DOWN mode DEFAULT qlen 500
link/ether 52:54:00:3a:39:12 brd ff:ff:ff:ff:ff:ff
[root@Router1 network-scripts]# vim ifcfg-eno16777728
[root@Router1 network-scripts]# cat ifcfg-eno16777728
DEVICE=eno16777728
BOOTPROTO=none
IPADDR=192.168.1.254
PREFIX=24
[root@Router1 network-scripts]# vim ifcfg-eno33554960
[root@Router1 network-scripts]# cat ifcfg-eno33554960
DEVICE=eno33554960
BOOTPROTO=none
IPADDR=192.168.0.1
PREFIX=24
[root@Router1 network-scripts]#
(二)R2的网卡配置
[root@Router2 network-scripts]# ip link
1: lo: <LOOPBACK,UP,LOWER_UP> mtu 65536 qdisc noqueue state UNKNOWN mode DEFAULT
link/loopback 00:00:00:00:00:00 brd 00:00:00:00:00:00
2: eno16777728: <BROADCAST,MULTICAST,UP,LOWER_UP> mtu 1500 qdisc pfifo_fast state UP mode DEFAULT qlen 1000
link/ether 00:0c:29:6f:d4:c5 brd ff:ff:ff:ff:ff:ff
3: eno33554960: <BROADCAST,MULTICAST,UP,LOWER_UP> mtu 1500 qdisc pfifo_fast state UP mode DEFAULT qlen 1000
link/ether 00:0c:29:6f:d4:cf brd ff:ff:ff:ff:ff:ff
4: virbr0: <NO-CARRIER,BROADCAST,MULTICAST,UP> mtu 1500 qdisc noqueue state DOWN mode DEFAULT
link/ether 52:54:00:3a:39:12 brd ff:ff:ff:ff:ff:ff
5: virbr0-nic: <BROADCAST,MULTICAST> mtu 1500 qdisc pfifo_fast master virbr0 state DOWN mode DEFAULT qlen 500
link/ether 52:54:00:3a:39:12 brd ff:ff:ff:ff:ff:ff
[root@Router2 network-scripts]# vim ifcfg-eno16777728
[root@Router2 network-scripts]# cat ifcfg-eno16777728
DEVICE=eno16777728
BOOTPROTO=none
IPADDR=192.168.2.254
PREFIX=24
[root@Router2 network-scripts]# vim ifcfg-eno33554960
[root@Router2 network-scripts]# cat ifcfg-eno33554960
DEVICE=eno33554960
BOOTPROTO=none
IPADDR=192.168.0.2
PREFIX=24
[root@Router2 network-scripts]#
第二步:配置两台主机的路由表
(一)R1的路由表配置
[root@Router1 network-scripts]# echo "192.168.2.0/24 via 192.168.0.2" > route-eno33554960
[root@Router1 network-scripts]# cat route-eno33554960
192.168.2.0/24 via 192.168.0.2
[root@Router1 network-scripts]#
(二)R2的路由表配置
[root@Router2 network-scripts]# echo "192.168.1.0/24 via 192.168.0.1" > route-eno33554960
[root@Router2 network-scripts]# cat route-eno33554960
192.168.1.0/24 via 192.168.0.1
[root@Router2 network-scripts]#
第三步:开启两台主机的路由转发功能
(一)开启R1的路由转发功能
[root@Router1 network-scripts]# cat /proc/sys/net/ipv4/ip_forward
0
[root@Router1 network-scripts]# echo 1 > /proc/sys/net/ipv4/ip_forward
[root@Router1 network-scripts]#
(二)开启R2的路由转发功能
[root@Router2 network-scripts]# cat /proc/sys/net/ipv4/ip_forward
0
[root@Router2 network-scripts]# echo 1 > /proc/sys/net/ipv4/ip_forward
[root@Router2 network-scripts]#
第四步:重启两台已经配置好的路由器,并验证两台路由器之间的通信
(一)重启R1
[root@Router1 network-scripts]# systemctl restart network
[root@Router1 network-scripts]# ifconfig
eno16777728: flags=4163<UP,BROADCAST,RUNNING,MULTICAST> mtu 1500
inet 192.168.1.254 netmask 255.255.255.0 broadcast 192.168.1.255
inet6 fe80::20c:29ff:fe13:4b5f prefixlen 64 scopeid 0x20<link>
ether 00:0c:29:13:4b:5f txqueuelen 1000 (Ethernet)
RX packets 21778 bytes 1755783 (1.6 MiB)
RX errors 0 dropped 0 overruns 0 frame 0
TX packets 1569 bytes 206822 (201.9 KiB)
TX errors 0 dropped 0 overruns 0 carrier 0 collisions 0
eno33554960: flags=4163<UP,BROADCAST,RUNNING,MULTICAST> mtu 1500
inet 192.168.0.1 netmask 255.255.255.0 broadcast 192.168.0.255
inet6 fe80::20c:29ff:fe13:4b69 prefixlen 64 scopeid 0x20<link>
ether 00:0c:29:13:4b:69 txqueuelen 1000 (Ethernet)
RX packets 19431 bytes 1527793 (1.4 MiB)
RX errors 0 dropped 0 overruns 0 frame 0
TX packets 94 bytes 10757 (10.5 KiB)
TX errors 0 dropped 0 overruns 0 carrier 0 collisions 0
lo: flags=73<UP,LOOPBACK,RUNNING> mtu 65536
inet 127.0.0.1 netmask 255.0.0.0
inet6 ::1 prefixlen 128 scopeid 0x10<host>
loop txqueuelen 0 (Local Loopback)
RX packets 8 bytes 688 (688.0 B)
RX errors 0 dropped 0 overruns 0 frame 0
TX packets 8 bytes 688 (688.0 B)
TX errors 0 dropped 0 overruns 0 carrier 0 collisions 0
virbr0: flags=4099<UP,BROADCAST,MULTICAST> mtu 1500
inet 192.168.122.1 netmask 255.255.255.0 broadcast 192.168.122.255
ether 52:54:00:3a:39:12 txqueuelen 0 (Ethernet)
RX packets 0 bytes 0 (0.0 B)
RX errors 0 dropped 0 overruns 0 frame 0
TX packets 0 bytes 0 (0.0 B)
TX errors 0 dropped 0 overruns 0 carrier 0 collisions 0
[root@Router1 network-scripts]#
(二)重启R2
[root@Router2 network-scripts]# systemctl restart network
[root@Router2 network-scripts]# ifconfig
eno16777728: flags=4163<UP,BROADCAST,RUNNING,MULTICAST> mtu 1500
inet 192.168.2.254 netmask 255.255.255.0 broadcast 192.168.2.255
inet6 fe80::20c:29ff:fe6f:d4c5 prefixlen 64 scopeid 0x20<link>
ether 00:0c:29:6f:d4:c5 txqueuelen 1000 (Ethernet)
RX packets 20833 bytes 1658328 (1.5 MiB)
RX errors 0 dropped 0 overruns 0 frame 0
TX packets 1372 bytes 217031 (211.9 KiB)
TX errors 0 dropped 0 overruns 0 carrier 0 collisions 0
eno33554960: flags=4163<UP,BROADCAST,RUNNING,MULTICAST> mtu 1500
inet 192.168.0.2 netmask 255.255.255.0 broadcast 192.168.0.255
inet6 fe80::20c:29ff:fe6f:d4cf prefixlen 64 scopeid 0x20<link>
ether 00:0c:29:6f:d4:cf txqueuelen 1000 (Ethernet)
RX packets 18938 bytes 1480549 (1.4 MiB)
RX errors 0 dropped 0 overruns 0 frame 0
TX packets 81 bytes 9518 (9.2 KiB)
TX errors 0 dropped 0 overruns 0 carrier 0 collisions 0
lo: flags=73<UP,LOOPBACK,RUNNING> mtu 65536
inet 127.0.0.1 netmask 255.0.0.0
inet6 ::1 prefixlen 128 scopeid 0x10<host>
loop txqueuelen 0 (Local Loopback)
RX packets 8 bytes 688 (688.0 B)
RX errors 0 dropped 0 overruns 0 frame 0
TX packets 8 bytes 688 (688.0 B)
TX errors 0 dropped 0 overruns 0 carrier 0 collisions 0
virbr0: flags=4099<UP,BROADCAST,MULTICAST> mtu 1500
inet 192.168.122.1 netmask 255.255.255.0 broadcast 192.168.122.255
ether 52:54:00:3a:39:12 txqueuelen 0 (Ethernet)
RX packets 0 bytes 0 (0.0 B)
RX errors 0 dropped 0 overruns 0 frame 0
TX packets 0 bytes 0 (0.0 B)
TX errors 0 dropped 0 overruns 0 carrier 0 collisions 0
[root@Router2 network-scripts]#
(三)用R1 ping R2
[root@Router1 network-scripts]# ping -c3 192.168.0.2
PING 192.168.0.2 (192.168.0.2) 56(84) bytes of data.
64 bytes from 192.168.0.2: icmp_seq=1 ttl=64 time=15.4 ms
64 bytes from 192.168.0.2: icmp_seq=2 ttl=64 time=1.23 ms
64 bytes from 192.168.0.2: icmp_seq=3 ttl=64 time=1.31 ms
--- 192.168.0.2 ping statistics ---
3 packets transmitted, 3 received, 0% packet loss, time 2018ms
rtt min/avg/max/mdev = 1.238/6.003/15.453/6.682 ms
[root@Router1 network-scripts]# ping -c3 192.168.2.254
PING 192.168.2.254 (192.168.2.254) 56(84) bytes of data.
64 bytes from 192.168.2.254: icmp_seq=1 ttl=64 time=0.912 ms
64 bytes from 192.168.2.254: icmp_seq=2 ttl=64 time=1.27 ms
64 bytes from 192.168.2.254: icmp_seq=3 ttl=64 time=1.90 ms
--- 192.168.2.254 ping statistics ---
3 packets transmitted, 3 received, 0% packet loss, time 2022ms
rtt min/avg/max/mdev = 0.912/1.364/1.903/0.409 ms
[root@Router1 network-scripts]#
(四)用R2 ping R1
[root@Router2 network-scripts]# ping -c3 192.168.0.1
PING 192.168.0.1 (192.168.0.1) 56(84) bytes of data.
64 bytes from 192.168.0.1: icmp_seq=1 ttl=64 time=0.572 ms
64 bytes from 192.168.0.1: icmp_seq=2 ttl=64 time=0.951 ms
64 bytes from 192.168.0.1: icmp_seq=3 ttl=64 time=0.822 ms
--- 192.168.0.1 ping statistics ---
3 packets transmitted, 3 received, 0% packet loss, time 2029ms
rtt min/avg/max/mdev = 0.572/0.781/0.951/0.160 ms
[root@Router2 network-scripts]# ping -c3 192.168.1.254
PING 192.168.1.254 (192.168.1.254) 56(84) bytes of data.
64 bytes from 192.168.1.254: icmp_seq=1 ttl=64 time=6.78 ms
64 bytes from 192.168.1.254: icmp_seq=2 ttl=64 time=0.962 ms
64 bytes from 192.168.1.254: icmp_seq=3 ttl=64 time=1.14 ms
--- 192.168.1.254 ping statistics ---
3 packets transmitted, 3 received, 0% packet loss, time 2026ms
rtt min/avg/max/mdev = 0.962/2.963/6.785/2.703 ms
[root@Router2 network-scripts]#
第五步:配置windows主机做为A网络的PC1,配置另一台liunx主机做为B网络的PC2,分别用测试路由效果
(一)PC1-->A网络的windows7
C:\Users\Administrator>ipconfig
Windows IP 配置
以太网适配器 本地连接:
连接特定的 DNS 后缀 . . . . . . . :
IPv4 地址 . . . . . . . . . . . . : 192.168.1.125
子网掩码 . . . . . . . . . . . . : 255.255.255.0
默认网关. . . . . . . . . . . . . : 192.168.1.254
隧道适配器 isatap.{CCC82E88-7D5E-4564-B569-27B6A5DE9C48}:
媒体状态 . . . . . . . . . . . . : 媒体已断开
连接特定的 DNS 后缀 . . . . . . . :
C:\Users\Administrator>
(二)PC2-->B网络的Centos7.2
[root@centos7 ~]# cat /etc/sysconfig/network-scripts/
cat: /etc/sysconfig/network-scripts/: Is a directory
[root@centos7 ~]# cat /etc/sysconfig/network-scripts/ifcfg-eno16777728
DEVICE=eno16777728
BOOTPROTO=none
IPADDR=192.168.2.125
PREFIX=24
GATEWAY=192.168.2.254
[root@centos7 ~]# ifconfig
eno16777728: flags=4163<UP,BROADCAST,RUNNING,MULTICAST> mtu 1500
inet 192.168.2.125 netmask 255.255.255.0 broadcast 192.168.2.255
inet6 fe80::20c:29ff:fe06:f987 prefixlen 64 scopeid 0x20<link>
ether 00:0c:29:06:f9:87 txqueuelen 1000 (Ethernet)
RX packets 1359 bytes 98258 (95.9 KiB)
RX errors 0 dropped 0 overruns 0 frame 0
TX packets 136 bytes 12455 (12.1 KiB)
TX errors 0 dropped 0 overruns 0 carrier 0 collisions 0
lo: flags=73<UP,LOOPBACK,RUNNING> mtu 65536
inet 127.0.0.1 netmask 255.0.0.0
inet6 ::1 prefixlen 128 scopeid 0x10<host>
loop txqueuelen 0 (Local Loopback)
RX packets 16 bytes 1072 (1.0 KiB)
RX errors 0 dropped 0 overruns 0 frame 0
TX packets 16 bytes 1072 (1.0 KiB)
TX errors 0 dropped 0 overruns 0 carrier 0 collisions 0
[root@centos7 ~]#
(三)现在用A网络的PC1(192.168.1.125/24) ping B网络的PC2(192.168.2.125/24)
C:\Users\Administrator>ping 192.168.2.125
正在 Ping 192.168.2.125 具有 32 字节的数据:
来自 192.168.2.125 的回复: 字节=32 时间=1ms TTL=62
来自 192.168.2.125 的回复: 字节=32 时间=2ms TTL=62
来自 192.168.2.125 的回复: 字节=32 时间=3ms TTL=62
来自 192.168.2.125 的回复: 字节=32 时间=2ms TTL=62
192.168.2.125 的 Ping 统计信息:
数据包: 已发送 = 4,已接收 = 4,丢失 = 0 (0% 丢失),
往返行程的估计时间(以毫秒为单位):
最短 = 1ms,最长 = 3ms,平均 = 2ms
C:\Users\Administrator>
经过两个路由器,所以TTL变成62(64-2)
(四)再用B网络的PC2(192.168.2.125/24)ping A网络的PC1(192.168.1.125/24)
[root@centos7 ~]# ping -c4 192.168.1.125
PING 192.168.1.125 (192.168.1.125) 56(84) bytes of data.
64 bytes from 192.168.1.125: icmp_seq=1 ttl=62 time=1.39 ms
64 bytes from 192.168.1.125: icmp_seq=2 ttl=62 time=1.19 ms
64 bytes from 192.168.1.125: icmp_seq=3 ttl=62 time=2.03 ms
64 bytes from 192.168.1.125: icmp_seq=4 ttl=62 time=2.12 ms
--- 192.168.1.125 ping statistics ---
4 packets transmitted, 4 received, 0% packet loss, time 3008ms
rtt min/avg/max/mdev = 1.198/1.689/2.126/0.402 ms
[root@centos7 ~]#
经过两个路由器,所以TTL同样的是62
原本属于两个不同网络的PC1和PC2是不能通信的,现在有了刚才搭建的路由器(R1+R2),它们就可以正常通信了。
传说中的路由器也就是这么工作的,当然这只是给大家展示了一下路由器的工作原理,同时这也只是静态路由的情况,动态路由就比静态路由要复杂的多了。

相关文章推荐
- 用 Linux 打造路由器
- 用Linux打造路由器
- 用 Linux 打造路由器
- 用Zebra打造Linux下小型路由器
- 用 Linux 打造路由器 zebra
- 用Zebra打造Linux下小型路由器
- 用 Linux 打造路由器
- 用Zebra打造Linux下小型路由器
- 用 Linux 打造路由器
- 用 Linux 打造路由器
- LINUX下打造论坛全过程之第3天!
- 10004.自己动手打造嵌入式Linux软硬件开发环境
- 【转载】自己动手打造嵌入式Linux软硬件开发环境
- 如何用Linux做一个功能完备的路由器(一)
- 用Iptables+Red Hat Linux 9.0 做ADSL 路由器
- 打造Linux下超级安全的LAMP服务器
- 如何用Linux做一个功能完备的路由器(二)
- LINUX下打造论坛全过程之第1天!
- [转]自己动手打造嵌入式Linux软硬件开发环境
- 用Linux实现路由器和包过滤防火墙