关于android-Ultra-Pull-To-Refresh的下拉刷新和上拉加载更多
2016-08-31 09:46
519 查看
概述
今天我会给大家介绍两个比较流行的框架来实现下拉刷新和上拉加载更多功能,然后是使用的方法,废话不多说,先给出两个项目的地址下拉刷新
https://github.com/liaohuqiu/android-Ultra-Pull-To-Refresh
上拉加载更多
https://github.com/captainbupt/android-Ultra-Pull-To-Refresh-With-Load-More
使用
我们先来完成下拉刷新的功能代码
布局文件
<in.srain.cube.views.ptr.PtrClassicFrameLayout
xmlns:android="http://schemas.android.com/apk/res/android"
xmlns:cube_ptr="http://schemas.android.com/apk/res-auto"
android:id="@+id/prtframelayout"
android:layout_width="match_parent"
android:layout_height="match_parent"
cube_ptr:ptr_resistance="1.7"
cube_ptr:ptr_ratio_of_header_height_to_refresh="1.2"
>
<LinearLayout
android:layout_width="match_parent"
android:layout_height="match_parent"
android:gravity="center"
android:background="#aa939393"
android:orientation="vertical"
android:clickable="true"
>
<TextView
android:layout_width="wrap_content"
android:layout_height="wrap_content"
android:text="I am a TextView \n in LinearLayout"
android:textSize="20sp"
android:textColor="@android:color/white"
/>
</LinearLayout>
</in.srain.cube.views.ptr.PtrClassicFrameLayout>
然后在代码中我们对下拉刷新进行监听,有两种方式
ptrFrameLayout.setPtrHandler(new PtrHandler() {
@Override
//控制是否可以下拉刷新
public boolean checkCanDoRefresh(PtrFrameLayout frame, View content, View header) {
//包裹的布局
Log.d(TAG, "checkCanDoRefresh:content "+content);
//如果没设置头布局,默认.PtrClassicDefaultHeader
Log.d(TAG, "checkCanDoRefresh:header "+header);
return true;
}

@Override
public void onRefreshBegin(PtrFrameLayout frame) {
ptrFrameLayout.postDelayed(new Runnable() {
@Override
public void run() {
Toast.makeText(MainActivity.this, "刷新结束", Toast.LENGTH_SHORT).show();
ptrFrameLayout.refreshComplete();
}
},1000);
}
});
或者简单一点
//默认是可以刷新的
ptrFrameLayout.setPtrHandler(new PtrDefaultHandler() {
@Override
public void onRefreshBegin(PtrFrameLayout frame) {
ptrFrameLayout.postDelayed(new Runnable() {
@Override
public void run() {
Toast.makeText(MainActivity.this, "刷新结束", Toast.LENGTH_SHORT).show();
ptrFrameLayout.refreshComplete();
}
},1000);
}
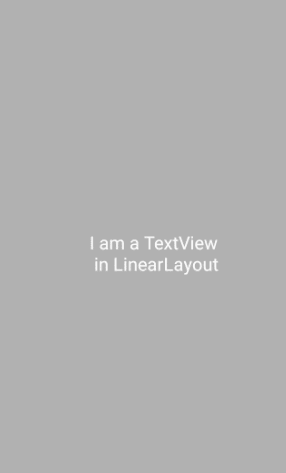
});效果图
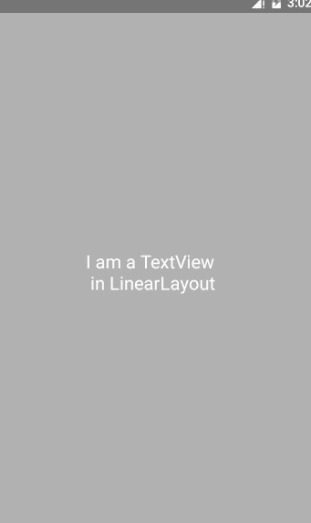
上面就是最简单的实现了,接下来我们来看看配置。
//刷新时是否保持头部
cube_ptr:ptr_keep_header_when_refresh="true"
//下拉刷新还是释放刷新,默认释放刷新
cube_ptr:ptr_pull_to_fresh="true"
保持头部
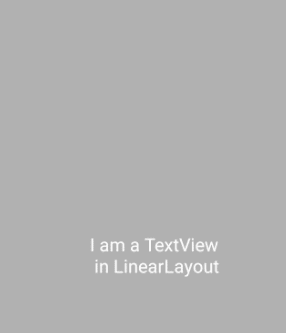
不保持头部

下拉刷新

释放刷新

接下来我哦们看看如何对头部的一些布局效果进行定制
更改头布局
如何定制我们的头布局呢,通过查看源码发现,定制头布局需要实现PtrUIHandler这个接口,并且实现其中的某些方法**
* 自定义的下拉刷新头部
*/
public class CustomHeader extends View implements PtrUIHandler {
private static final String TAG = "CustomHeader";
private ProgressBar progressBar;
public CustomHeader(Context context) {
this(context,null);
}
public CustomHeader(Context context, AttributeSet attrs) {
super(context, attrs);
initView();
}
public void initView(){
View headrView = LayoutInflater.from(getContext()).inflate(R.layout.header_view,null);
progressBar = (ProgressBar) headrView.findViewById(R.id.pb_progress);
}
@Override
public void onUIReset(PtrFrameLayout frame) {
}
@Override
public void onUIRefreshPrepare(PtrFrameLayout frame) {
}
@Override
public void onUIRefreshBegin(PtrFrameLayout frame) {
progressBar.setProgress(50);
}
@Override
public void onUIRefreshComplete(PtrFrameLayout frame) {
}
@Override
public void onUIPositionChange(PtrFrameLayout frame, boolean isUnderTouch, byte status, PtrIndicator ptrIndicator) {
float currentPercent = ptrIndicator.getCurrentPercent();
Log.d(TAG, "onUIPositionChange: "+currentPercent);
progressBar.setProgress((int) ((currentPercent/0.1f)*progressBar.getMax()));
invalidate();
}
}有一点需要注意:这里我们继承的是View而不是ViewGroup,如果你集成ViewGroup,则ptrIndicator.getCurrentPercent()这句代码获取到的值永远为0,这里坑里我好久,在此重点讲一下。
经过测试,当getCurrentPercent这个方法的返回值是不断增大的,当值达到0.1的时候,就是进行刷新的时机,我们可以利用这个临界值进行操作。
效果图
实现代码
/**
* 自定义的下拉刷新头部,需要实现PtrUIHandler接口
* 整个下拉刷新过程中方法的调用顺序为
* onUIRefreshPrepare-->onUIRefreshBegin--->onUIRefreshComplete-->onUIReset
*/
public class CustomHeader extends View implements PtrUIHandler {
private static final String TAG = "CustomHeader";
private Paint paint = new Paint(Paint.ANTI_ALIAS_FLAG);
private int widthSize;
private int heightSize;
private int arcRadius = 40;
private float sweepAngle;
public CustomHeader(Context context) {
this(context,null);
}

public CustomHeader(Context context, AttributeSet attrs) {
super(context, attrs);
initView();
}

public void initView(){
paint.setColor(Color.WHITE);
paint.setStyle(Paint.Style.FILL);
}

@Override
protected void onMeasure(int widthMeasureSpec, int heightMeasureSpec) {
float density = getResources().getDisplayMetrics().density;
//头部高度设置为80dp
heightMeasureSpec = MeasureSpec.makeMeasureSpec((int) (80*density+0.5f), MeasureSpec.EXACTLY);
widthSize = MeasureSpec.getSize(widthMeasureSpec);
heightSize = MeasureSpec.getSize(heightMeasureSpec);
setBackgroundColor(getResources().getColor(R.color.colorAccent));//设置头部背景颜色
setMeasuredDimension(widthSize, heightSize);
}

@Override
protected void onDraw(Canvas canvas) {
super.onDraw(canvas);
RectF rectF  = new RectF(widthSize/2 - arcRadius,heightSize/2 - arcRadius,widthSize/2 + arcRadius,heightSize/2 + arcRadius);
canvas.drawArc(rectF,-90,sweepAngle,true,paint);
}

@Override//刷新完成回到原位调用,在onUIRefreshComplete之后调用
public void onUIReset(PtrFrameLayout frame) {
}

@Override//下拉时调用
public void onUIRefreshPrepare(PtrFrameLayout frame) {
}

@Override//刷新时调用
public void onUIRefreshBegin(PtrFrameLayout frame) {
}

@Override//刷新完成后调用
public void onUIRefreshComplete(PtrFrameLayout frame) {
}

@Override
public void onUIPositionChange(PtrFrameLayout frame, boolean isUnderTouch, byte status, PtrIndicator ptrIndicator) {
float currentPercent = ptrIndicator.getCurrentPercent();//获取当前百分比,当为1时开始刷新
sweepAngle = 360*currentPercent;
invalidate();
}
}
public class MainActivity extends AppCompatActivity{
private static final String TAG = "MainActivity";
private PtrFrameLayout ptrFrameLayout;
private View linearContent;
@Override
protected void onCreate(Bundle savedInstanceState) {
super.onCreate(savedInstanceState);
setContentView(R.layout.activity_main);
ptrFrameLayout = (PtrFrameLayout) findViewById(R.id.prtframelayout);
linearContent = findViewById(R.id.ll_header);
CustomHeader customHeader = new CustomHeader(this);
ptrFrameLayout.setHeaderView(customHeader);
ptrFrameLayout.addPtrUIHandler(customHeader);
ptrFrameLayout.setPtrHandler(new PtrHandler() {
@Override
public boolean checkCanDoRefresh(PtrFrameLayout frame, View content, View header) {
return PtrDefaultHandler.checkContentCanBePulledDown(frame, linearContent,header);
// return true;
}
@Override
public void onRefreshBegin(PtrFrameLayout frame) {
//这里可以获取头部高度
// int headerHeight = frame.getHeaderHeight();
// Log.d(TAG, "onRefreshBegin: "+headerHeight);
ptrFrameLayout.postDelayed(new Runnable() {
@Override
public void run() {
ptrFrameLayout.refreshComplete();
}
},2000);
}
});
}
}最后给出布局文件
<in.srain.cube.views.ptr.PtrFrameLayout
xmlns:android="http://schemas.android.com/apk/res/android"
android:id="@+id/prtframelayout"
android:layout_width="match_parent"
android:layout_height="match_parent"
>
<LinearLayout
android:id="@+id/ll_header"
android:layout_width="match_parent"
android:layout_height="match_parent"
android:gravity="center"
android:background="#aa939393"
android:orientation="vertical"
android:clickable="true"
>
<TextView
android:layout_width="wrap_content"
android:layout_height="wrap_content"
android:text="I am a TextView \n in LinearLayout"
android:textSize="20sp"
android:textColor="@android:color/white"
/>

</LinearLayout>
</in.srain.cube.views.ptr.PtrFrameLayout>

相关文章推荐
- android-Ultra-Pull-To-Refresh既可以实现下拉刷新又可以上拉加载的国人写的优秀库
- 【Android开发笔记】pulltorefresh实现下拉刷新和上拉加载更多
- android 使用PullToRefresh实现下拉刷新和上拉加载更多
- android下拉刷新和上拉加载更多的框架pulltoreflesh
- Android项目:使用pulltorefresh开源项目扩展为下拉刷新上拉加载更多的处理方法,监听listview滚动方向
- 《android》下拉刷新上拉加载更多控件 PullToRefreshView
- Android-PullToRefresh:下拉刷新和加载更多
- Android项目:使用pulltorefresh开源项目扩展为下拉刷新上拉加载更多的处理方法,监听listview滚动方向 推荐
- android ListView上拉加载更多 下拉刷新功能实现(采用pull-to-refresh)
- PullToRefresh实现简单的下拉刷新和上拉加载更多
- PullToRefreshListView实现下拉刷新和上拉加载更多
- PullToRefresh实现下拉刷新和上拉加载更多的ListView
- Android程序开发之使用PullToRefresh实现下拉刷新和上拉加载
- 使用SwipeRefreshLayout和自定义的PullToReFreshListView实现下拉刷新和上拉加载更多
- Android项目:使用pulltorefresh开源项目扩展为下拉刷新上拉加载更多的处理方法,监听listview滚动方向
- android使用PullToRefresh实现下拉刷新和上拉加载
- 安卓开发笔记——关于开源组件PullToRefresh实现下拉刷新和上拉加载(一分钟搞定,超级简单)
- [Android]Ultra-Pull-To-Refresh之listview下拉刷新、上拉加载的用例-已更新
- [置顶] Android-PullToRefresh上拉下拉刷新加载更多,以及gridview刷新功能的Library下载地址
- Android - 框架】之刷新加载框架Ultra-Pull-To-Refresh的使用,及其自定义头部刷新和底部加载更多