lvs+keepalived健康检查
2016-08-25 10:34
459 查看
lvs+keepalived健康检查一、 LVS简介
LVS是Linux Virtual Server的简称,即Linux虚拟服务器。使用LVS技术要达到的目标是:通过LVS提供的负载均衡技术和Linux操作系统实现一个高性能、高可用的服务器群集,它具有良好可靠性、可扩展性和可操作性。从而以低廉的成本实现最优的服务性能。
[root@localhost ~]# yum install -ykeepalived ipvsadm
2,同样在Slave上安装ipvsadm和keepalived
[root@localhost ~]# yum install -ykeepalived ipvsadm
3,在rs1和rs2安装测试服务,这里安装httpd服务,具体服务配置请参考官方配置文档。
[root@localhost htdocs]# yum install -yhttpd
访问192.168.230.12服务:

访问192.168.230.13服务:

2,http健康检查配置
[root@localhost keepalived]# servicekeepalived restart

2,抓包查看,每5s发送一次重传检查报文。
3,http健康检查报文,每6秒发送一次请求。
LVS是Linux Virtual Server的简称,即Linux虚拟服务器。使用LVS技术要达到的目标是:通过LVS提供的负载均衡技术和Linux操作系统实现一个高性能、高可用的服务器群集,它具有良好可靠性、可扩展性和可操作性。从而以低廉的成本实现最优的服务性能。
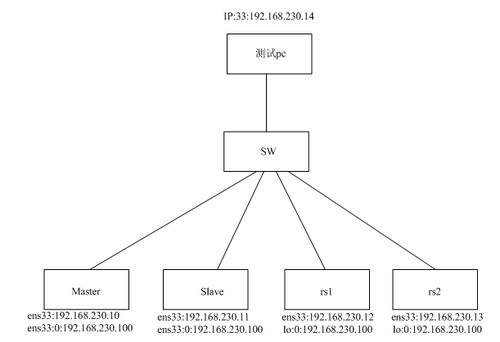
二、网络拓扑
三、接口IP及属性配置
1,在Master配置接口IP如下:[root@localhost network-scripts]# ifconfig ens33:flags=4163<UP,BROADCAST,RUNNING,MULTICAST> mtu 1500 inet 192.168.230.10 netmask255.255.255.0 broadcast 192.168.230.255 inet6 fe80::250:56ff:fe9a:55c5 prefixlen 64 scopeid0x20<link> ether 00:50:56:9a:55:c5 txqueuelen 1000 (Ethernet) RX packets 1201 bytes 94251 (92.0KiB) RX errors 0 dropped 0 overruns 0 frame 0 TX packets 5964 bytes 390181(381.0 KiB) TX errors 0 dropped 0 overruns0 carrier 0 collisions 0 ens33:0:flags=4163<UP,BROADCAST,RUNNING,MULTICAST> mtu 1500 inet 192.168.230.100 netmask255.255.255.255 broadcast192.168.230.100 ether 00:50:56:9a:55:c5 txqueuelen 1000 (Ethernet)2,在Slave配置接口IP如下:
[root@localhost ~]# ifconfig
ens33:flags=4163<UP,BROADCAST,RUNNING,MULTICAST>  mtu 1500
inet 192.168.230.11  netmask255.255.255.0  broadcast 192.168.230.255
inet6 fe80::250:56ff:fe9a:62e8 prefixlen 64  scopeid0x20<link>
ether 00:50:56:9a:62:e8 txqueuelen 1000  (Ethernet)
RX packets 3  bytes 620 (620.0 B)
RX errors 0  dropped 0  overruns 0 frame 0
TX packets 50  bytes 7844 (7.6KiB)
TX errors 0  dropped 0 overruns0  carrier 0  collisions 0

ens33:0:flags=4163<UP,BROADCAST,RUNNING,MULTICAST>  mtu 1500
inet 192.168.230.100  netmask255.255.255.255  broadcast192.168.230.100
ether 00:50:56:9a:62:e8 txqueuelen 1000  (Ethernet)
3,在rs1上配置接口IP如下:
[root@localhost]# ifconfig
ens33:flags=4163<UP,BROADCAST,RUNNING,MULTICAST>  mtu 1500
inet 192.168.230.12  netmask255.255.255.0  broadcast 192.168.230.255
inet6 fe80::250:56ff:fe9a:daa prefixlen 64  scopeid0x20<link>
ether 00:50:56:9a:0d:aa txqueuelen 1000  (Ethernet)
RX packets 162543  bytes 11199233(10.6 MiB)
RX errors 0  dropped 66  overruns 0 frame 0
TX packets 74236  bytes 9216209(8.7 MiB)
TX errors 0  dropped 0 overruns0  carrier 0  collisions 0
lo:0:flags=73<UP,LOOPBACK,RUNNING>  mtu65536
inet 192.168.230.100  netmask255.255.255.255
loop  txqueuelen 0  (Local Loopback)
4,在rs2上配置接口IP如下:
[root@localhost]# ifconfig
ens33:flags=4163<UP,BROADCAST,RUNNING,MULTICAST>  mtu 1500
inet 192.168.230.13  netmask255.255.255.0  broadcast 192.168.230.255
inet6 fe80::250:56ff:fe9a:2be1 prefixlen 64  scopeid0x20<link>
ether 00:50:56:9a:2b:e1 txqueuelen 1000  (Ethernet)
RX packets 161840  bytes 11150452(10.6 MiB)
RX errors 0  dropped 44  overruns 0 frame 0
TX packets 73427  bytes 7893814(7.5 MiB)
TX errors 0  dropped 0 overruns0  carrier 0  collisions 0
lo:0: flags=73<UP,LOOPBACK,RUNNING>  mtu 65536
inet 192.168.230.100  netmask255.255.255.255
loop  txqueuelen 0  (Local Loopback)
5,在Master和Slave上开启转发功能
[root@localhost ~]# echo "1">/proc/sys/net/ipv4/ip_forward6,在rs1和rs2配置接口属性
[root@localhost ~]# echo "1">/proc/sys/net/ipv4/conf/lo/arp_ignore
[root@localhost ~]# echo "2">/proc/sys/net/ipv4/conf/lo/arp_announce
[root@localhost ~]# echo "1">/proc/sys/net/ipv4/conf/all/arp_ignore
[root@localhost ~]# echo "2">/proc/sys/net/ipv4/conf/all/arp_announce
[root@localhost ~]# sysctl -p
net.ipv4.conf.ens33.arp_announce = 2
net.ipv4.conf.ens33.arp_ignore = 1
net.ipv4.conf.lo.arp_announce = 2
net.ipv4.conf.lo.arp_ignore = 1
四、软件安装
1,在Master上安装ipvsadm和keepalived[root@localhost ~]# yum install -ykeepalived ipvsadm
2,同样在Slave上安装ipvsadm和keepalived
[root@localhost ~]# yum install -ykeepalived ipvsadm
3,在rs1和rs2安装测试服务,这里安装httpd服务,具体服务配置请参考官方配置文档。
[root@localhost htdocs]# yum install -yhttpd
访问192.168.230.12服务:
访问192.168.230.13服务:
五、keepalived配置
1,TCP健康检查配置如下:[root@localhost keepalived]# catkeepalived.conf
! Configuration File for keepalived
global_defs {
notification_email {
acassen@test.com
failover@test.com
sysadmin@test.com
}
notification_email_from Alexandre.Cassen@test.com
smtp_server 192.168.200.1
smtp_connect_timeout 30
router_id LVS_DEVEL
}
vrrp_instance VI_1 {
state MASTER
interface ens33
virtual_router_id 55
priority 100
advert_int 1
authentication {
auth_type PASS
auth_pass 1111
}
virtual_ipaddress {
192.168.230.100
}
}
virtual_server 192.168.230.100 80 {
delay_loop 6
lb_algo rr
lb_kind DR
#persistence_timeout 50
protocol TCP
real_server 192.168.230.12 80 {
weight 1
TCP_CHECK { #tcp健康检查
connect_port 80
connect_timeout 3
Nb_get_retry 3 #最大重试次数
delay_before_retry 5 #重试延时
}
}
real_server 192.168.230.13 80 {
weight 1
TCP_CHECK {
connect_port 80
connect_timeout 3
Nb_get_retry 3
delay_before_retry 5
}
}
}2,http健康检查配置
[root@localhost ~]# cat/etc/keepalived/keepalived.conf
! Configuration File for keepalived

global_defs {
notification_email {
acassen@test.com
failover@test.com
sysadmin@test.com
}
notification_email_from Alexandre.Cassen@test.com
smtp_server 192.168.200.1
smtp_connect_timeout 30
router_id LVS_DEVEL
}

vrrp_instance VI_1 {
state MASTER
interface ens33
virtual_router_id 55
priority 100
advert_int 1
authentication {
auth_type PASS
auth_pass 1111
}
virtual_ipaddress {
192.168.230.100
}
}

virtual_server 192.168.230.100 80 {
delay_loop 6
lb_algo rr
lb_kind DR
#persistence_timeout 50
protocol TCP

real_server 192.168.230.12 80 {
weight 1
HTTP_GET {
url {
path /index.html
digest 00f6c72507d2480429e5f32dbf2de638
#digest是根据hash算出来的,算法如下:
# /usr/bin/genhash -s 192.168.230.13 -p 80-u /index.html
#注意!如果不加digest经测试发现,当rs服务down掉后又恢复,lvs不能
#恢复调度到此rs上。即健康检查不能恢复
}
connect_port 80
connect_timeout 3
nb_get_retry 3
delay_before_retry 5
}
}
real_server 192.168.230.13 80 {

weight 1
HTTP_GET {
url {
path /index.html
digest 4b0f20d78e6098eb5c2eed901f5f3b6e
#digest是根据hash算出来的,算法如下:
# /usr/bin/genhash -s 192.168.230.13 -p 80-u /index.html
}
connect_port 80
connect_timeout 3
nb_get_retry 3
delay_before_retry 5
}
}
}3,配置完在Master和Slave上重启keepalived服务[root@localhost keepalived]# servicekeepalived restart
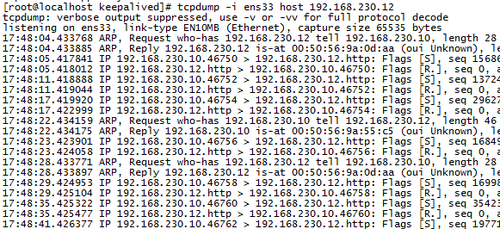
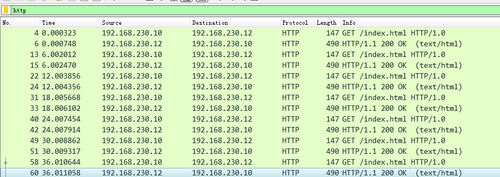
六、测试
1,将rs1的httpd服务关闭,在客户端访问。2,抓包查看,每5s发送一次重传检查报文。
3,http健康检查报文,每6秒发送一次请求。

相关文章推荐
- lvs+keepalived自定义健康检查脚本(MISC_CHECK用法)
- 最近在学习LVS(Linux virtual Server)高可用,Keepalived用于健康检查
- CentOS7 Keepalived+LVS 负载均衡 后台节点健康检查
- keepalived健康检查方式配置笔记
- LVS健康检查
- 运维笔记30 (lvs负载均衡的(nat,tun,dr三种模式,ldirectord健康检测,ldirectord结合heartbeat)keepalived+lvs介绍)
- LVS之五:使用脚本实现RealServer的健康检查
- Keepalived健康检查方式配置
- LVS集群RS健康状态检查
- LVS服务脚本及后端服务健康状态检查
- keepalived健康检查方式
- lvs+keepalived实现实时监控节点健康状态,并根据算法接管资源
- KeepAlived+Redis | 高可用 | 主从复制 | 健康检查 | 故障自动切换
- keepalived http的自定义健康检查
- keepalived健康检查方式
- Keepalived健康检查RST ACK疑问
- keepalived健康检查 HTTP_GET
- LVS均衡负载(三) LVS后端服务健康状态检查
- LVS环境搭建及图形化管理(Pacemaker管理+heartbeat心跳+ipvs(DR)+ldirector健康检查及转发)
- ldirectord与keepalived健康检查-高可用