文件的查找与压缩归档
2016-08-20 12:33
232 查看
文件的查找与压缩归档
locatefind
压缩与归档
locate
主要用途查询系统上预建的文件索引数据库locate - find files by namelocate [OPTION]... PATTERN...locate查询文件时,会去搜索/var/lib/mlocate/mlocage.db, 这个数据库会在系统空闲时自动周期性进行,一般一天一次更新,手动更新命令为updatedb, 索引的构建需要遍历整个根文件系统,比较消耗资源。但locate有如下特性:
1. 模糊查找,速度快 2. 非实时查找,搜索的是文件的全路径,而非文件名 3. 可能只搜索用户具有读取与执行权限的目录常用参数-d: --database, 指定数据库所在的目录
-i: --ignore-case, 搜索时忽略大小写
-n N: 只列举前N个匹配项目
-r: --regexp, 搜索时支持正则表达式
使用示例查找/etc/目录下以sh开头的文件:
[root@centos7 ~#]locate /etc/sh
/etc/shadow
/etc/shadow-
/etc/shells
[root@centos7 ~#]locate -r "/etc/\<sh"  # 正则,锚定词首
/etc/shadow
/etc/shadow-
/etc/shells
[root@centos7 ~#]
更新数据库
[root@centos7 ~#]locate ~/a
/root/anaconda-ks.cfg
[root@centos7 ~#]updatedb
[root@centos7 ~#]locate ~/a
/root/a.sh
/root/anaconda-ks.cfg
[root@centos7 ~#]
忽略字符大小写
[root@centos7 ~#]locate -i ~/d
/root/Desktop/root/Documents/root/Downloads
/root/d1
/root/dd
/var/lib/pcp/pmdas/root/domain.h
[root@centos7 ~#]
find
主要用途实时查找文件find - search for files in a directory hierarchy find [-H] [-L] [-P] [-D debugopts] [-Olevel] [path...] [expression]find命令是一个实时查找工具,通过遍历指定路径而完成对文件的查找;在使用该命令时,如果不选定参数,则在当前目录下查找子目录与文件并显示之;另外,任何位于参数之前的字符串,都将视为欲查找的目录名。由于是实时遍历查找,find有如下特性:
精确实时查找,速度慢
可能只搜索用户具备读取和执行权限的目录
find语法:
find [OPTION]... [查找路径] [查找条件] [处理动作]查找路径:指定具体目标路径,默认为当前目录
查找条件:指定的查找标准,可以是文件名、大小、类型、权限等标准进行;默认为找出指定路径下的所有文件
处理动作:对符合条件的文件做操作,默认输出至屏幕
查找条件
1. 根据文件名和inode查找
2. 根据属主、属组查找
3. 根据文件类型查找
4. 根据逻辑组合条件查找
5. 根据文件大小来查找
6. 根据时间戳来查找
7. 根据权限来查找
处理动作
1. -print: 默认动作,显示至屏幕
2. -ls: 类似于对查找到的文件执行 ls -l 命令
3. -delete: 删除查找到的文件
4. -fls file: 查找到的所有长格式的信息保存至指定文件中
5. -ok COMMMAND {} \;   对查找到的每个文件执行由COMMAND指定的命令,且都会交互式要求用户确认
6. -exec COMMAND {} \;  对查找到的每个文件执行由COMMAND指定的命令;
7. {}: 用于引用查找至的文件名称自身
8. find 传递查找到的文件至后面指定的命令时,查找到所有符号条件的文件一次性传递给后面的命令
9. 有些命令不能接受过多的参数,此时命令执行可能会失败,用 xargs 来规避此问题
find |xargs COMMAND常用参数文件名和inode类:-name "文件名称": 支持使用glob, *, ?, [], [^]-iname "文件名称": 不区分字母大小写
-inum n: 按inode号查找
-somefile name: 相同的inode号文件
-links n: 链接数为n的文件
-regex "PATTERN": 以PATTERN匹配整个文件路径字符串,而不仅仅是文件名称
属主属组类:-user USERNAME: 查找属主为指定用户(UID)的文件
-group GROUPNAME: 查找属组为指定组(GID)的文件
-uid UserID: 查找属主为指定的UID号的文件
-gid GroupID: 查找属组为指定的GID号的文件
-nouser: 查找没有属主的文件
-nogroup: 查找没有属组的文件
文件类型类:
b      block (buffered) special

c      character (unbuffered) special

d      directory

p      named pipe (FIFO)f      regular file

l      symbolic  link

s      socket
逻辑组合条件类:
组合条件:
与:-a
或:-o
非:-not, !

摩根定律:
(非P) 或(非Q) = 非(P且Q)
(非P) 且 (非Q) = 非(P或Q)
示例:
!A -o !B = !(A -a B)
!A -a !B = !(A -o B)
文件大小类:
-size [+|-]#UNIT
常用单位:k,M,G
#UNIT: (#-1,#]
如:5M 表示 (4M,5M]
-#UNIT: [0,#-1]
如:-5M 表示 [0,5M]
+#UNIT: (#,oo)
如:+5M 表示 (6M,oo)
关于文件大小类的解释:为什么-size 5M 还是找精确的5M而是表示(4M,5M], 试想文件的大小指什么?是指文件数据的大小还是包括了元数据后的大小,那你找元数据的大小有意义吗?但文件的大小肯定是包含元数据大小的,而我们一般以文件大小找文件时往往考虑的是文件数据的大小;另外,精确查找一定大小的文件意义不大;所以这里的大小会有1个单位的浮动。时间戳类:
以”天”为单位:
-atime [+|-]#
#: [#,#+1)
+#: [#+1,oo)
-#: [0,#)
-mtime
-ctime

以“分钟”为单位:
-amin
-mmin
-cmin
关于时间戳类的解释:为什么-atime 3 表示的是 [3,4),这个就很好解释了,我们这儿所说的时间是指时间段而非时刻,一“天”与一“分钟”都是指一个时间段,只有[3,4)这个半闭半开的区间才能完整地表示第三天。权限类:
-perm [/|-]MODE MODE: 精确匹配权限 /MODE: 任何一类(u,g,o)对象的权限中只要能一位匹配即可,属于或关系。以前用'+',CentOS 7以'/'替代之 -MODE: 每一类对象都必须同时拥有指定权限,属于与关系 0:表示不关注 示例: find -perm 644 表示要严格匹配644的文件 find -perm +222 表示u,g,o任何一类用户有写权限即匹配 find -perm -222 表示仅严格匹配写权限,即每个用户必须要有写权限 find -perm -002 表示仅严格匹配other用户的写权限使用示例1.将配置文件备份到指定目录下并添加扩展名.org
[root@centos7 ~#]find -name "*.conf" -exec cp -r {} /testdir/{}.org \;
2.提示删除存在时间超过3天以上的liansir的临时文件
[root@centos7 ~#]find /tmp -ctime +3 -user liansir -ok rm {} \;3.在主目录中查找可被其它用户写入的文件[root@centos7 ~#]find ~ -perm -002 -exec chmod o-w {} \;4.查找/var目录下属主为root,且属组为mail的所有文件[root@centos7 ~#]find /var/ -user root -group mail -ls 402656342 4 drwxrwxr-x 2 root mail 4096 Aug 15 22:56 /var/spool/mail 407540491 4 -rw------- 1 root mail 2878 Aug 14 00:25 /var/spool/mail/root [root@centos7 ~#]5.查找/var目录下不属于root、lp、gdm的所有文件
[root@centos7 ~#]find /var/ ! -user root ! -user lp ! -user gdm6.查找/var目录下最近一周内其内容修改过,同时属主不为root,也不是postfix的文件
[root@centos7 ~#]find /var/ -ctime -7 ! -user root ! -user postfix7.查找当前系统上没有属主或属组,且最近一个周内曾被访问过的文件
[root@centos7 ~#]find / -nouser -nogroup -atime -7 | wc -l
find: ‘/proc/7562/task/7562/fd/6’: No such file or directory
find: ‘/proc/7562/task/7562/fdinfo/6’: No such file or directory
find: ‘/proc/7562/fd/6’: No such file or directory
find: ‘/proc/7562/fdinfo/6’: No such file or directory
15
[root@centos7 ~#]
8.查找/etc目录下大于1M且类型为普通文件的所有文件
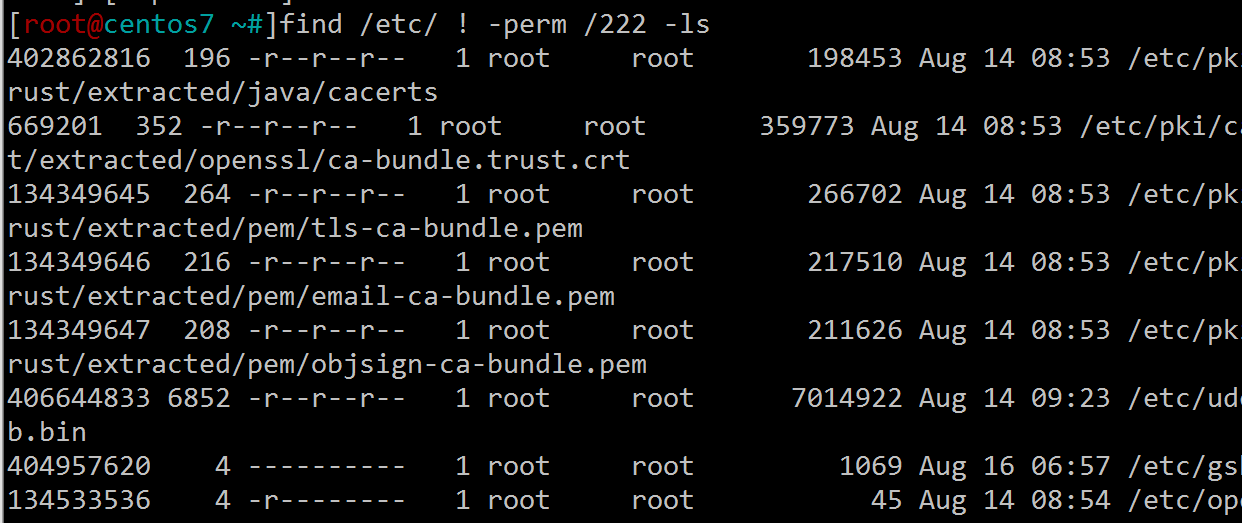
[root@centos7 ~#]find /etc/ -type f -size +1M
/etc/udev/hwdb.bin
/etc/selinux/targeted/policy/policy.29
/etc/brltty/zh-tw.ctb
[root@centos7 ~#]
9.查找/etc目录下所有用户都没有写权限的文件
[root@centos7 ~#]find /etc/ ! -perm /222
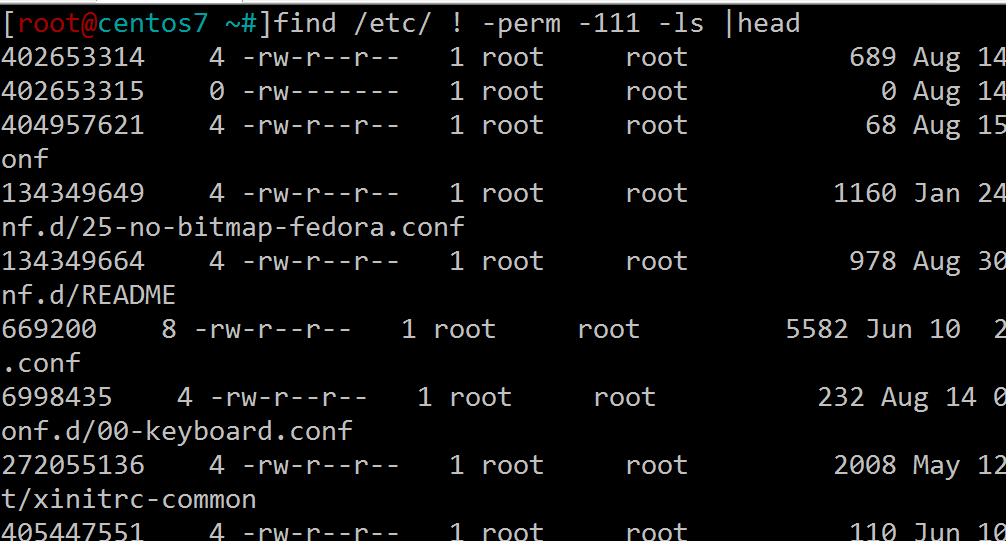
10.查找/etc目录下至少有一类用户没有执行权限的文件
[root@centos7 ~#]find /etc/ ! -perm -111 # 至少有一类用户没用就是所有用户都没有
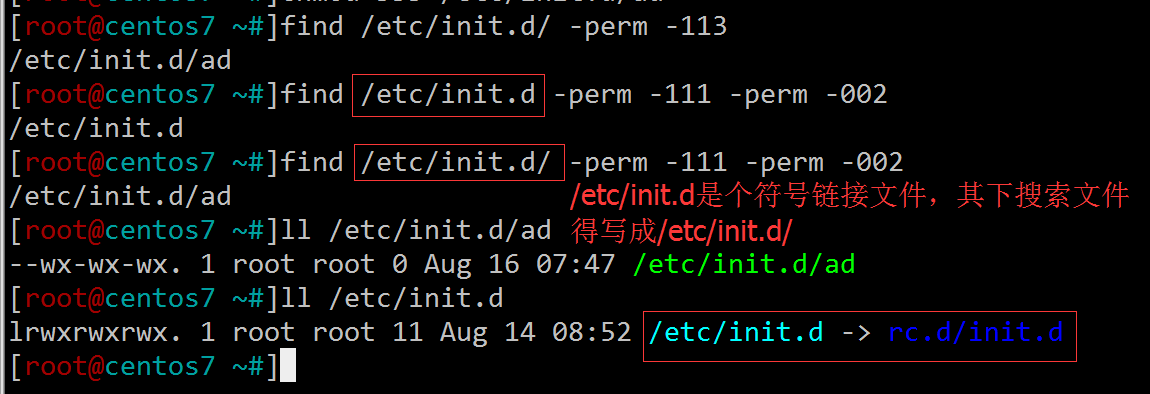
11.查找/etc/init.d目录下,所有用户都有执行权限,且其它用户有写权限的文件
[root@centos7 ~#]find /etc/init.d/ -perm -113
或
[root@centos7 ~#]find /etc/init.d/ -perm -111 -perm -002
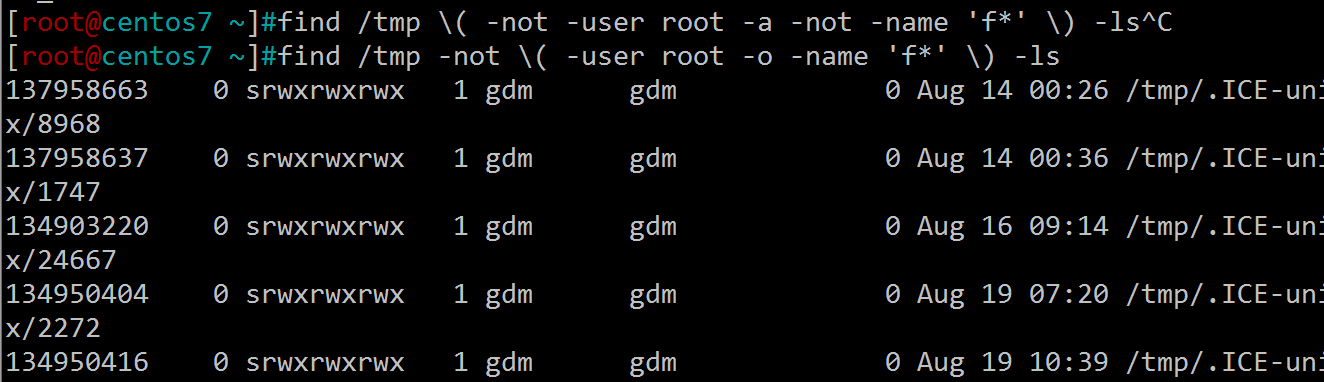
12.摩根定律找出/tmp目录下,属主不是root,且文件名不以f开头的文件
[root@centos7 ~]#find /tmp \( -not -user root -a -not -name 'f*' \) -ls
即
[root@centos7 ~]#find /tmp -not \( -user root -o -name 'f*' \) -ls
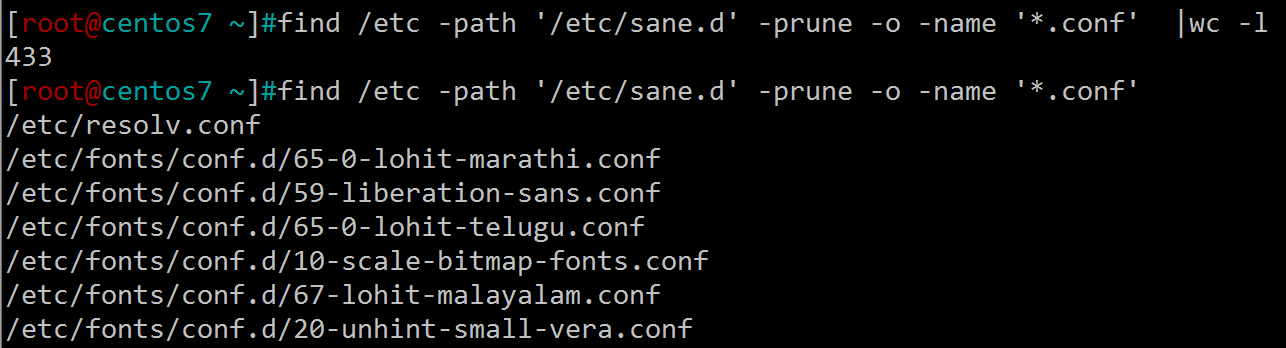
13.排除目录查找/etc/下,除/etc/sane.d目录的其它所有.conf后缀的文件
[root@centos7 ~]#find /etc -path '/etc/sane.d' -prune -o -name '*.conf'
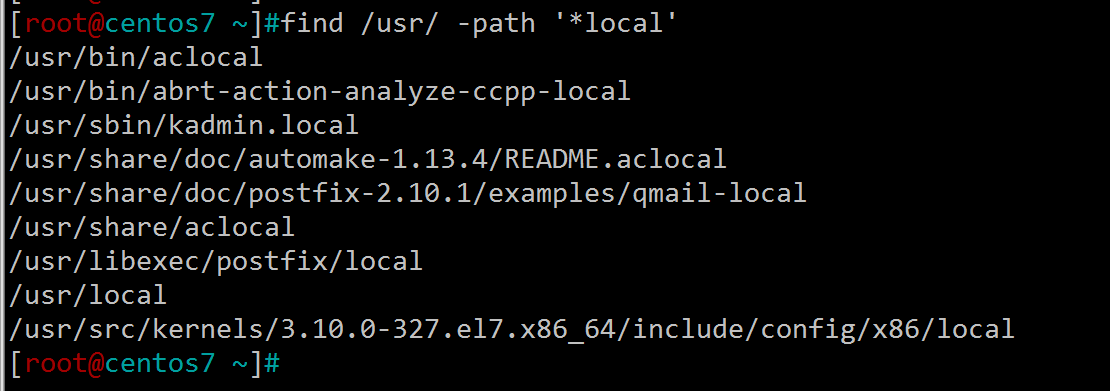
14.匹配文件路径或文件
[root@centos7 ~]#find /usr/ -path '*local'
15.基于正则表达式匹配文件路径
[root@centos7 ~]#find . -regex "\(.*\.txt | \.cfg\)$"
压缩与归档
数据压缩,就是在不丢失数据信息的前提下减少数据量的一种技术。compresscompress是一个古老的压缩工具,其压缩文件后缀为.Z,zcat命令可查看.Z的文件,但并不解压。-d: 解压缩-c: 结果输出至标准输出,不删除原文件-v: 显示详情使用示例
[root@centos7 /testdir]#compress passwd # 压缩 [root@centos7 /testdir]#ls passwd.Z [root@centos7 /testdir]#compress -d passwd # 解压 [root@centos7 /testdir]#ls passwd [root@centos7 /testdir]# [root@centos7 /testdir]#zcat passwd.Z > passwd [root@centos7 /testdir]#lspasswd passwd.Z [root@centos7 /testdir]#gzipgzip压缩后的文件后缀为.gz,如果压缩的是tar备份文件,则扩展名为.tar.gz
gzip, gunzip, zcat - compress or expand files

-d: 解压缩,相当于unzip
-c: 将压缩或解压缩的结果输出至标准输出
-#:1-9,指定压缩比zcat: 不显示解压缩的前提下查看文本文件内容
使用示例
[root@centos7 /testdir]#gzip passwd [root@centos7 /testdir]#ls passwd.gz passwd.Z [root@centos7 /testdir]# [root@centos7 /testdir]#zcat passwd.gz > passwd [root@centos7 /testdir]#ls passwd.gz passwd passwd.Z [root@centos7 /testdir]#bzip2bzipw2压缩的文件的扩展名为.bz2
-k: keep,保留原文件
-d: 解压缩
-#:1-9,压缩比,默认为6bzcat: 不显示解压缩的前提下查看文件文件内容
使用示例
[root@centos7 /testdir]#bzip2 passwd [root@centos7 /testdir]#ls passwd.gz passwd.bz2 passwd.Z[ root@centos7 /testdir]#bzcat passwd.bz2 > passwd [root@centos7 /testdir]#ls passwd.gz passwd passwd.bz2 passwd.Z [root@centos7 /testdir]#xzxz压缩后的文件扩展名为.xz
-k: keep,保留原文件
-d: 解压缩
-#:1-9,压缩比,默认为6xzcat: 不显示解压缩的前提下查看文件文件内容
[root@centos7 /testdir]#xz passwd
[root@centos7 /testdir]#ls
passwd.bz2  passwd.gz  passwd.xz  passwd.Z
[root@centos7 /testdir]#
[root@centos7 /testdir]#xzcat passwd.xz > passwd
[root@centos7 /testdir]#ls
passwd  passwd.bz2  passwd.gz  passwd.xz  passwd.Z
[root@centos7 /testdir]#
zip: 打包压缩文件经zip压缩后会另外生成.zip的文件而不删除原文件。
zip - package and compress (archive) files

-r: 递归处理,将指定目录下的所有文件与子目录一并处理
-q: 不显示执行过程
使用示例
[root@centos7 /testdir]#zip -q passwd ./passwd
[root@centos7 /testdir]#ls
passwd  passwd.bz2  passwd.gz  passwd.xz  passwd.Z  passwd.zip
[root@centos7 /testdir]#
看看大概的压缩情况:
[root@centos7 /testdir]#ll
total 192
-rw-r--r--. 1 root root 164065 Aug 19 09:06 message.zip
-rw-r--r--. 1 root root   4129 Aug 19 08:46 passwd
-rw-r--r--. 1 root root   1526 Aug 19 08:30 passwd.bz2
-rw-r--r--. 1 root root   1539 Aug 19 08:39 passwd.gz
-rw-r--r--. 1 root root   1540 Aug 19 08:45 passwd.xz
-rw-r--r--. 1 root root   2151 Aug 19 08:16 passwd.Z
-rw-r--r--. 1 root root   1676 Aug 19 09:02 passwd.zip
[root@centos7 /testdir]#
tar
tar [OPTION...] [FILE]... EXAMPLES tar -cf archive.tar foo bar # Create archive.tar from files foo and bar. tar -tvf archive.tar # List all files in archive.tar verbosely. tar -xf archive.tar # Extract all files from archive.tar.tar命令可为文件或目录创建档案(备份文件),tar命令可将很多文件打包成一个文件,从而可结合压缩工具实现归档并压缩了。常用参数-c: --creat, 创建新的备份文件
-f: --file=ARCHIVE, 指定备份文件
-x: --extract, --get, 从备份文件中还原文件
-t: --list, 列出备份文件的内容
-v: --verbose
tar用法小结:
(1) 创建归档
tar -c -f /PATH/TO/SOMEFILE.tar FILE...
tar cf/PATH/TO/SOMEFILE.tar FILE...
(2) 查看归档文件中的文件列表
tar -t -f /PATH/TO/SOMEFILE.tar(3) 展开归档
tar -x -f /PATH/TO/SOMEFILE.tar
tar -x -f /PATH/TO/SOMEFILE.tar -C /PATH/
(4) 结合压缩工具实现:归档并压缩
-j: bzip2, -z: gzip, -J: xz

打包成tar包:
tar -cvf passwd.tar passwd   仅打包,不压缩
tar -zcvf passwd.tar.gz passwd  打包并以gzip压缩
tar -jcvf passwd.tar.bz2 passwd   打包并以bzip2压缩
tar -Jcvf passwd.tar.xz passwd    打包并以xz压缩
使用示例
[root@centos7 /testdir]#tar -cf passwd.tar passwd
[root@centos7 /testdir]#ls
passwd  passwd.tar

[root @centos7 /testdir]#tar -zcf passwd.tar.gz passwd
[root@centos7 /testdir]#ls
passwd  passwd.tar  passwd.tar.gz

[root@centos7 /testdir]#tar -jcf passwd.tar.bz2 passwd
[root@centos7 /testdir]#ls
passwd  passwd.tar  passwd.tar.bz2  passwd.tar.gz

[root@centos7 /testdir]#tar -Jcf passwd.tar.xz passwd
[root@centos7 /testdir]#ls
passwd  passwd.tar  passwd.tar.bz2  passwd.tar.gz  passwd.tar.xz
[root@centos7 /testdir]#
[root@centos7 /testdir]#tar -tvf passwd.tar   # 查询
-rw-r--r-- root/root     10240 2016-08-19 09:27 passwd
[root@centos7 /testdir]#tar -tvf passwd.tar.gz
-rw-r--r-- root/root     10240 2016-08-19 09:27 passwd
[root@centos7 /testdir]#
[root@centos7 /testdir]#tar xf passwd.tar  # 解压
[root@centos7 /testdir]#ls
passwd  passwd.tar  passwd.tar.bz2  passwd.tar.gz  passwd.tar.xz
[root@centos7 /testdir]#tar xf passwd.tar.gz
[root@centos7 /testdir]#ls
passwd  passwd.tar  passwd.tar.bz2  passwd.tar.gz  passwd.tar.xz
[root@centos7 /testdir]#
[root@centos7 /testdir]#ll
total 44
-rw-r--r--. 1 root root 10240 Aug 19 09:27 passwd
-rw-r--r--. 1 root root 20480 Aug 19 10:52 passwd.tar
-rw-r--r--. 1 root root   116 Aug 19 10:53 passwd.tar.bz2
-rw-r--r--. 1 root root   120 Aug 19 10:52 passwd.tar.gz
-rw-r--r--. 1 root root   180 Aug 19 10:53 passwd.tar.xz
cpio
cpio命令是通过重定向的方式将文件进行打包备份,还原恢复的工具,它可以解压以.cpio或者.tar结尾的文件;换言之,cpio可以复制文件到归档包中,或者从归档包中复制文件。cpio - copy files to and from archives cpio[选项] > 文件名或者设备名 cpio[选项] < 文件名或者设备名 EXAMPLES % ls | cpio -ov > directory.cpio % find . -print -depth | cpio -ov > tree.cpio % cpio -iv < directory.cpio % cpio -idv < tree.cpio % find . -depth -print0 | cpio --null -pvd new-dir常用参数-o: --create,Run in copy-out mode,将文件拷贝打包成文件或者将文件输出到设备上
-i: --extract,Run in copy-in mode,解包,将打包文件解压或将设备上的备份还原到系统
-t: 预览,查看文件内容或者输出到设备上的文件内容
-v: 显示打包过程中的文件名称。
-d: 解包生成目录,在cpio还原时,自动的建立目录
-c: 一种较新的存储方式
使用示例
[root@centos7 /]#find ./etc |cpio -o > etc.cpio # 备份/etc目录

[root@centos7 /testdir]#find /etc/issue |cpio -o >issue.cpio1 block
[root@centos7 /testdir]#lsissue.cpio
[root@centos7 /testdir]#cpio -tv <issue.cpio # 显示预览
-rw-r--r--   1 root     root           23 Dec  9  2015 /etc/issue1 block
[root@centos7 /testdir]#
cpio在打包备份时用的是绝对路径,且cpio无法直接读取文件,它需要每个文件或目录的完整路径名才能读取识别,故cpio命令一般与find配合使用。本文主要讲解了文件查找与压缩,文件查找命令主要有locate与find; 常见的压缩工具有gzip, bzip2, xz, zip还有tar这个打包压缩归档命令。止战2016.8.19

相关文章推荐
- shell脚本中if与case使用,查找文件locate与find的使用,压缩,解压及归档工具
- linux学习入门23——linux系統常用命令(linuxcast.net)(日期、文件查看(head,tail等)、查看硬件信息、关机重启、归档压缩及查找命令)
- linux文件内容操作 、 归档及压缩 、 程序和文件查找
- linux学习入门23——linux系統常用命令(linuxcast.net)(日期、文件查看(head,tail等)、查看硬件信息、关机重启、归档压缩及查找命令)
- 小鸟chacha初学linux 文件查找、归档、压缩
- linux学习入门5——linux系統常用命令(linuxcast.net)(日期、文件查看(head,tail等)、查看硬件信息、关机重启、归档压缩及查找命令)
- linux文件的编辑、压缩、归档、操作
- Linux下常用的文件归档,压缩和解压缩命令
- Linux基本命令、归档、压缩、查看文件内容
- 压缩与解压缩及文件归档
- Linux命令简介(文件内容操作命令、归档和压缩操作命令)
- 在Linux用tar归档压缩文件时忽略某些文件和目录
- linux下用tar命令将当前目录下文件按子目录压缩归档
- 归档功能:也称作索引功能,通常都是按月份进行BLOG文件的归档(也有按分类归档的),便于大家在一个页面就查找到归档日期内的所有BLOG文章
- Linux文件归档和压缩
- Linux基本功六:文件的查找与压缩
- (十五)软件包的编译和文件的压缩归档
- Redhat Linux下文件查找及压缩解压
- Linux下的文件压缩和归档
- linux下用tar命令将当前目录下文件按子目录压缩归档