创建一个Phone实体,完成多页面的电话簿项目
2016-08-18 15:40
387 查看
添加实体
在类库CORE中添加:[Table("PbPhones")]
public class Phone : CreationAuditedEntity<long>
{
public const int MaxNumberLength = 16;
[ForeignKey("PersonId")]
public virtual Person Person { get; set; }
public virtual int PersonId { get; set; }
[Required]
public virtual PhoneType Type { get; set; }
[Required]
[MaxLength(MaxNumberLength)]
public virtual string Number { get; set; }
}电话号码存在表“PbPhones”中,他的主键是long自增,然后也带审核属性的字段。和person的关系为一对多。
添加phone实体导航属性到person实体中。
[Table("PbPersons")]
public class Person : FullAuditedEntity
{
//...other properties

public virtual ICollection<Phone> Phones { get; set; }
}
再添加一个枚举类型
/// <summary>
/// 电话类型
/// </summary>
public enum PhoneType : byte
{/// <summary>
/// 移动
/// </summary>
Mobile,
/// <summary>
/// 住宅
/// </summary>
Home,
/// <summary>
/// 商业
/// </summary>
Business
}
最后,在 DbContext中我们增加了一个 DbSet 属性的Phone。
再将Phone实体,添加到Person实体中。
添加数据库迁移
我们的模型实体已经发生变更,所以我们需要添加一个新的迁移类:
然后是迁移生成的PbPhones表
public partial class Add_Phones : DbMigration
{
public override void Up()
{
CreateTable(
"dbo.PbPhone",
c => new
{
Id = c.Long(nullable: false, identity: true),
PersonId = c.Int(nullable: false),
Type = c.Byte(nullable: false),
Number = c.String(nullable: false, maxLength: 16),
CreationTime = c.DateTime(nullable: false),
CreatorUserId = c.Long(),
Phone_Id = c.Long(),
})
.PrimaryKey(t => t.Id)
.ForeignKey("Basic.Person", t => t.PersonId, cascadeDelete: true)
.ForeignKey("dbo.PbPhone", t => t.Phone_Id)
.Index(t => t.PersonId)
.Index(t => t.Phone_Id);

}

public override void Down()
{
DropForeignKey("dbo.PbPhone", "Phone_Id", "dbo.PbPhone");
DropForeignKey("dbo.PbPhone", "PersonId", "Basic.Person");
DropIndex("dbo.PbPhone", new[] { "Phone_Id" });
DropIndex("dbo.PbPhone", new[] { "PersonId" });
DropTable("dbo.PbPhone");
}
}
初始化默认数据
在EntityFramewok中添加初始化数据private void CreatePhone()
{
var defaultPhone = _context.Persons.FirstOrDefault(p => p.EmailAddress == "admin@yoyocms.com");
if (defaultPhone==null)
{
_context.Persons.Add(new Person()
{
Name = "张三",
EmailAddress = "admin@yoyocms.com",
Phones = new List<Phone>()
{
new Phone() {Type = PhoneType.Business,Number = "87115555"},
new Phone() {Type = PhoneType.Home,Number = "010-1109"}
}
});
}
var defaultPerson = _context.Persons.FirstOrDefault(p => p.EmailAddress == "lisi@yoyocms.com");
if (defaultPerson==null)
{
_context.Persons.Add(new Person()
{
Name = "李四",
EmailAddress = "lisi@yoyocms.com",
Phones = new List<Phone>()
{
new Phone() {Type = PhoneType.Business,Number = "88452675"},
new Phone() {Type = PhoneType.Home,Number = "010-441109"}
}
});
}
_context.SaveChanges();
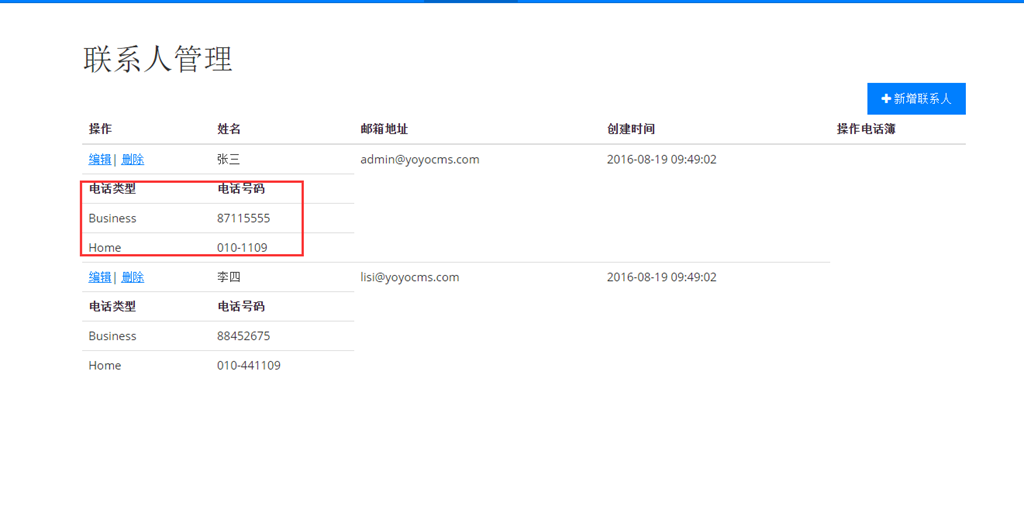
}这样的话,就是张三下面有2机号码。李四也有两个联系号码。
修改分页查询
首先修改PersonListDto,添加PhoneListDto[AutoMapFrom(typeof (Phone))]
public class PhoneListDto : CreationAuditedEntity<long>
{
/// <summary>
/// 电话类型
/// </summary>
public virtual PhoneType Type { get; set; }
/// <summary>
/// 联系号码
/// </summary>
public virtual string Number { get; set; }
}将此Dto添加到PersonListDto中
public class PersonListDto : EntityDto<int>
{
//额外的代码

public Collection<PhoneListDto> phones { get; set; }

}
剩下的就是我们操作视图页面,将电话号码显示在页面上了。
这里我就去考虑页面好不好看的问题了。这个不是本次教程的目的。
<tr>
<th>电话类型</th>
<th>电话号码</th>
</tr>

@foreach (var phone in person.Phones)
{
<tr>
<td>@phone.Type</td>
<td>@phone.Number</td>
</tr>
}
</tr>
将以上信息添加到person视图中,然后运行项目
到目前为止就是ABP最基本的用法了。
有什么不清楚的话,可以加群讨论
-返回目录- ABP打造一个《电话簿项目》
交流QQ群:104390185
相关文章推荐
- Eclipse下创建一个新的Maven项目
- 自己写的一个项目中实现的购物车功能!购物车页面以及实现购物车相应的dao包!
- Android:2分钟创建一个好看的关于页面
- 用struts标签完成一个注册页面
- 安卓入门 使用android创建一个项目 从启动activity中响应按钮事件 启动另一个activity 并传递参数
- 一个App完成入门篇(四)- 完成反馈页面
- IDEA中创建war类型的maven项目中有一个src目录而Eclipse创建的war类型的项目有两个src
- Eclipse 创建 Android项目,会多出一个 appcompat_v7 的问题
- cordova学习笔记_创建一个cordova项目
- ideal中如何添加几个不同的项目在同一个idea的显示页面
- Num57 boss11(boss项目中使用activiti完成一个工作流)
- 创建一个数组 实现函数init()初始化数组 empty()清空数组 reverse()函数完成数组元素的逆置
- 如何将一个项目拆解成多个moudule,并解决页面层的共有问题
- phpredisadmin - 一个web页面操作redis的项目
- 在码云上创建一个项目
- 创建一个可用的简单的SpringMVC项目
- 解决github下创建一个项目版本库遇到的权限问题
- Maven使用-创建一个Web项目
- Cordova之如何用命令行创建一个项目(完整示例)
- 创建一个带有SQLserver数据库模型的MVC项目