Led驱动程序及应用程序编写
2016-08-14 15:20
363 查看
本来打算写一下NAND驱动和网卡驱动及USB驱动的,突然发现好长时间不写驱动,写驱动的套路都忘的差不多了,而且以前写的驱动程序都不够模块化,想复用的话还需要做些修改,所以,还是先写一下LED驱动,熟悉一下套路,顺便把程序模块化了,留着以后备用。
根据以上两张图片内容,可以列出如下表格:
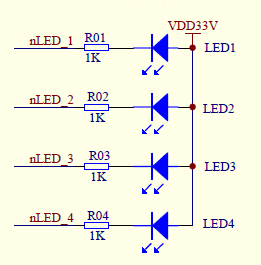
根据电路的基本知识,IO口低电平时,LED亮,IO口高电平时,LED灭.
用下列宏可以获得主设备号和次设备号
MAJOR(dev_t dev)
MANOR(dev_t dev)
用下列宏则可以通过主设备号和次设备号生成dev_t;
MKDEV(int major,int minor)
以上两个函数是动态分配设备号和注销设备号的函数,为了使函数可移植,使用上面两个函数处理设备号。

1.先看一下LED的硬件原理图
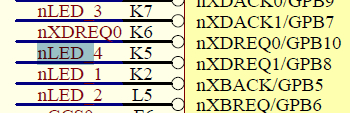
根据以上两张图片内容,可以列出如下表格:
| LED-number | LED-net | GPIO |
|---|---|---|
| LED1 | nLED_1 | GPB5 |
| LED2 | nLED_2 | GPB6 |
| LED3 | nLED_3 | GPB7 |
| LED4 | nLED_4 | GPB8 |
| CMD | STATE | GPIO-LEVEL |
|---|---|---|
| ON | 亮 | 0 |
| OFF | 灭 | 1 |
MAJOR(dev_t dev)
MANOR(dev_t dev)
用下列宏则可以通过主设备号和次设备号生成dev_t;
MKDEV(int major,int minor)
/**
Allocates a range of char device numbers.The major number will be chosen
dynamically ,and retured(along with the first minor number)in @dev.Returns zero or negative error code.
*/
int alloc_chrdev_region(dev_t *dev,unsigned baseminor,unsigned count,const char *name);
/*
This function will unregisters a range of @count device numbers,starting with @from,The
caller should normally be the one who allocated those numbers in the first place...
*/
void unregister_chrdev_region(dev_t from,unsigned count);
以上两个函数是动态分配设备号和注销设备号的函数,为了使函数可移植,使用上面两个函数处理设备号。
建立一个表格,列出成对出现的函数
| Tables | Are | Cool |
|---|---|---|
| ioremap | iounmap | xxx |
led驱动程序-手动创建设备节点版本
#include <linux/module.h>
#include <linux/kernel.h>
#include <linux/fs.h>
#include <linux/init.h>
#include <linux/miscdevice.h>
#include <linux/delay.h>
#include <linux/cdev.h>
#include <asm/irq.h>
#include <asm/uaccess.h>
#include <asm/io.h>
static struct cdev led_cdev;
#define NAME "LED_GPIO_TEST"
#define GPBCON 0x56000010
#define GPBDAT 0x56000014
#define GPBUP 0x56000018
#define LED1 (1<<0) /*GPB5*/
#define LED2 (1<<1) /*GPB6*/
#define LED3 (1<<2) /*GPB7*/
#define LED4 (1<<3) /*GPB8*/
dev_t dev_id;
unsigned int *gpbcon;
unsigned int *gpbdat;
unsigned int *gpbup;
static int led_open(struct inode *inode,struct file *file)
{
return 0;
}
static int led_write(struct file *filp,const char __user *buff,size_t count,loff_t *offp)
{
unsigned char kernel_buf;
unsigned int data;
copy_from_user(&kernel_buf,buff,sizeof(unsigned char));
/*off*/
if ((kernel_buf & (1<<7)) == 0) {
switch (kernel_buf) {
case LED1:
data = readl(gpbdat);
data |= (1<<5);
writel(data,gpbdat);
break;
case LED2:
data = readl(gpbdat);
data |= (1<<6);
writel(data,gpbdat);
break;
case LED3:
data = readl(gpbdat);
data |= (1<<7);
writel(data,gpbdat);
break;
case LED4:
data = readl(gpbdat);
data |= (1<<8);
writel(data,gpbdat);
break;
default:
printk("led_write parameter is wrong!!!\n");
break;
}
} else { /*on*/
kernel_buf &=(unsigned char)(~(1<<7));
switch (kernel_buf) {
case LED1:
data = readl(gpbdat);
data &= ~(1<<5);
writel(data,gpbdat);
break;
case LED2:
data = readl(gpbdat);
data &= ~(1<<6);
writel(data,gpbdat);
break;
case LED3:
data = readl(gpbdat);
data &= ~(1<<7);
writel(data,gpbdat);
break;
case LED4:
data = readl(gpbdat);
data &= ~(1<<8);
writel(data,gpbdat);
break;
default:
printk("on led_write parameter is wrong!!!\n");
break;
}
}
return 0;
}
static const struct file_operations led_fops =
{
.owner = THIS_MODULE,
.write = led_write,
.open = led_open
};
/**
* gpio level
* 0 - ON
* 1 - OFF
* */
static void led_gpio_init(void)
{
unsigned int data;
/*将IO地址空间映射到内核的虚拟地址空间上去,便于访问*/
gpbcon =(unsigned int *) ioremap(GPBCON,4);
gpbdat =(unsigned int *) ioremap(GPBDAT,4);
gpbup =(unsigned int *) ioremap(GPBUP,4);
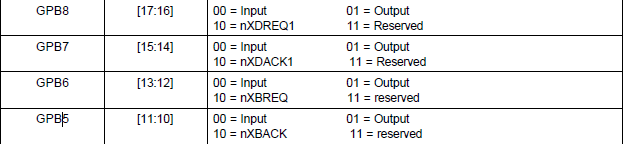
/*
*GPB8 [17:16] 00 = Input 01 = Output
*GPB7 [15:14] 00 = Input 01 = Output
*GPB6 [13:12] 00 = Input 01 = Output
*GPB5 [11:10] 00 = Input 01 = Output
*/
data = readl(gpbcon);
data &= ~(0x3 << 10 | 0x3 << 12 | 0x3 << 14|0x3 << 16);
data |= (1 << 10 | 1 << 12 | 1 << 14 | 1 << 16);
writel(data,gpbcon);
data = readl(gpbdat);
data &= ~((1<<5)| (1<<6)| (1<<7)| (1<<8));
data |= (1<<5)|(1<<6)|(1<<7)|(1<<8);
writel(data,gpbdat);
}
static int __init led_init(void)
{
int rc;
int error;
rc = alloc_chrdev_region(&dev_id,0,1,NAME);
if(rc < 0) {
printk("alloc_chrdev_region failed\n");
goto fail_alloc;
}
cdev_init(&led_cdev,&led_fops);
led_cdev.owner = THIS_MODULE;
error = cdev_add(&led_cdev,dev_id,1);
if (error) {
printk("Could not add cdev\n");
goto fail_with_cdev;
}
led_gpio_init();
return 0;
fail_with_cdev:
unregister_chrdev_region(dev_id,1);
fail_alloc:
return -1;
}
static void __exit led_exit(void)
{
cdev_del(&led_cdev);
unregister_chrdev_region(dev_id,1);
}
MODULE_LICENSE("GPL");
module_init(led_init);
module_exit(led_exit);测试程序
#include <stdio.h>
#include <sys/types.h>
#include <sys/stat.h>
#include <fcntl.h>

#define PATHNAME "dev/LED_GPIO_TEST"

#define LED1 0
#define LED2 1
#define LED3 2
#define LED4 3

#define ON 11
#define OFF 22

static void led_cmd(int fd,int num,int cmd);
/**
*led control command
*@fd - file descrip
*@num - the led numbers
*@cmd - command the led become ON or OFF
*/
static void led_cmd(int fd,int num,int cmd)
{
unsigned char buf=0;
unsigned int ret;
/*the buf's 7th bit is 1 means ON,is 0 means OFF*/
if (cmd == ON)
buf |= (1<<7);
else if (cmd == OFF)
buf = 0;
buf |= (1<<num);
ret = write(fd,&buf,sizeof(buf));
if (ret == -1)
printf("the led_cmd func's write wrong!!!!!\n");
}

void led_poll(int fd)
{
led_cmd(fd,LED1,ON);
sleep(1);
led_cmd(fd,LED2,ON);
sleep(1);
led_cmd(fd,LED3,ON);
sleep(1);
led_cmd(fd,LED4,ON);
sleep(1);
led_cmd(fd,LED1,OFF);
sleep(1);
led_cmd(fd,LED2,OFF);
sleep(1);
led_cmd(fd,LED3,OFF);
sleep(1);
led_cmd(fd,LED4,OFF);
}
int main(void)
{
unsigned int fd;
unsigned char cmd;
fd = open(PATHNAME,O_WRONLY);
if( -1 == fd) {
printf("there is no dev node - %s\n",PATHNAME);
}
led_poll(fd);
close(fd);
return 0;
}
shell脚本
insmod led.ko
cat proc/devices
mknod dev/LED_GPIO_TEST c 252 0
ls dev/LED*

相关文章推荐
- mini2440在linux-2.6.34.2中添加LED驱动,并编写应用程序验证
- 基于sysfs的LED驱动编写以及应用程序的编写(定时器操作)
- IMX6Q学习笔记———编写LED驱动和测试程序以及相关管脚配置
- 基于sysfs的LED驱动编写以及应用程序的编写
- led子系统驱动,以及此类驱动(sysfs访问方式)应用程序编写
- IMX6Q学习笔记——编写LED驱动和测试程序以及相关管脚配置
- 基于TX2440开发板在ADS1.2中编写LED的驱动(GPIO的使用)裸机程序
- 使用Python开发Android应用程序:第三节 在电脑上编写程序在手机上运行
- S3C2440 LED驱动程序学习
- 使用Python开发Android应用程序:第三节 在电脑上编写程序在手机上运行
- 编写C#程序-Windows Application应用程序
- mini2440 led驱动及 应用程序注释
- android led_misc驱动 + 测试应用程序(ndk-build)
- 在桌面红旗6上编写并运行第一个驱动设备程序
- 编写Linux设备驱动程序教程
- S3C2440 LED驱动程序学习
- 基于mini2440的led驱动编写的总结
- FL2440无操作系统应用程序编写测试003——LED
- Linux嵌入式驱动初体验(六)--- LED驱动测试程序
- 通过ADS1.2编写LED点灯程序