Ehcache缓存入门实战(附源码)
2016-08-11 16:49
302 查看
Ehcache缓存入门实战(附源码)
Ehcache是一个强大、成熟的Java缓存框架,可以非常容易与其他库和框架集成。官网声称Ehcache可以作为TB级别的数据缓存,并且具有高扩展性。目前Ehcache的最新版本是3.1。
本文不会深究缓存背后的原理,只是作为一个使用Ehcache的例子,由于最近需要做一个类似二级缓存的功能,特地学习了下Ehcache。发现Ehcache作为一个本地缓存框架使用还是非常合适的,但是如果扩展到分布式缓存就需要考虑使用Redis这样的分布式缓存框架了。
为了快速入门,这里使用配置文件的方式整合Ehcache。
创建Maven工程,添加pom.xml依赖如下:
添加Spring配置:application.xml
还需要Ehcache的配置文件:ehcache.xml
在代码中已经对具体的参数含义做了说明,这里不再赘述。这里要注意的是
编写测试接口:
接口实现类:
注意
最后编写测试代码:
运行该测试类,结果如下:
至此,Ehcache的入门实战就结束了,如果想要更详细了解Ehcache的资料,请访问Ehcache官网。
附:Ehcache入门实战源码
Ehcache是一个强大、成熟的Java缓存框架,可以非常容易与其他库和框架集成。官网声称Ehcache可以作为TB级别的数据缓存,并且具有高扩展性。目前Ehcache的最新版本是3.1。
本文不会深究缓存背后的原理,只是作为一个使用Ehcache的例子,由于最近需要做一个类似二级缓存的功能,特地学习了下Ehcache。发现Ehcache作为一个本地缓存框架使用还是非常合适的,但是如果扩展到分布式缓存就需要考虑使用Redis这样的分布式缓存框架了。
为了快速入门,这里使用配置文件的方式整合Ehcache。
创建Maven工程,添加pom.xml依赖如下:
<project xmlns="http://maven.apache.org/POM/4.0.0" xmlns:xsi="http://www.w3.org/2001/XMLSchema-instance"
xsi:schemaLocation="http://maven.apache.org/POM/4.0.0 http://maven.apache.org/xsd/maven-4.0.0.xsd"> <modelVersion>4.0.0</modelVersion>
<groupId>com.rhwayfun</groupId>
<artifactId>ehcache-demo</artifactId>
<version>0.0.1-SNAPSHOT</version>
<name>ehcache-demo</name>
<description>ehcache-demo</description>

<properties>
<!-- 项目编码 -->
<project.build.sourceEncoding>UTF-8</project.build.sourceEncoding>
<!-- junit版本号 -->
<junit.version>4.12</junit.version>
<!-- spring版本号 -->
<spring.version>3.2.8.RELEASE</spring.version>
</properties>

<dependencies>
<!-- 添加单元测试依赖 -->
<dependency>
<groupId>junit</groupId>
<artifactId>junit</artifactId>
<version>${junit.version}</version>
</dependency>

<!-- 添加Spring依赖 -->
<dependency>
<groupId>org.springframework</groupId>
<artifactId>spring-core</artifactId>
<version>${spring.version}</version>
</dependency>
<dependency>
<groupId>org.springframework</groupId>
<artifactId>spring-webmvc</artifactId>
<version>${spring.version}</version>
</dependency>
<dependency>
<groupId>org.springframework</groupId>
<artifactId>spring-context</artifactId>
<version>${spring.version}</version>
</dependency>
<dependency>
<groupId>org.springframework</groupId>
<artifactId>spring-context-support</artifactId>
<version>${spring.version}</version>
</dependency>
<dependency>
<groupId>org.springframework</groupId>
<artifactId>spring-aop</artifactId>
<version>${spring.version}</version>
</dependency>
<dependency>
<groupId>org.springframework</groupId>
<artifactId>spring-aspects</artifactId>
<version>${spring.version}</version>
</dependency>
<dependency>
<groupId>org.springframework</groupId>
<artifactId>spring-tx</artifactId>
<version>${spring.version}</version>
</dependency>
<dependency>
<groupId>org.springframework</groupId>
<artifactId>spring-jdbc</artifactId>
<version>${spring.version}</version>
</dependency>
<dependency>
<groupId>org.springframework</groupId>
<artifactId>spring-web</artifactId>
<version>${spring.version}</version>
</dependency>

<!--spring单元测试依赖 -->
<dependency>
<groupId>org.springframework</groupId>
<artifactId>spring-test</artifactId>
<version>${spring.version}</version>
<scope>test</scope>
</dependency>

<!-- ehcache 相关依赖 -->
<dependency>
<groupId>net.sf.ehcache</groupId>
<artifactId>ehcache</artifactId>
<version>2.8.2</version>
</dependency>
</dependencies>
</project>
添加Spring配置:application.xml
<?xml version="1.0" encoding="UTF-8"?>
<beans xmlns="http://www.springframework.org/schema/beans"
xmlns:xsi="http://www.w3.org/2001/XMLSchema-instance"
xmlns:cache="http://www.springframework.org/schema/cache"
xmlns:context="http://www.springframework.org/schema/context"
xmlns:aop="http://www.springframework.org/schema/aop"
xsi:schemaLocation=" http://www.springframework.org/schema/beans http://www.springframework.org/schema/beans/spring-beans-3.0.xsd http://www.springframework.org/schema/aop http://www.springframework.org/schema/aop/spring-aop-3.0.xsd http://www.springframework.org/schema/context http://www.springframework.org/schema/context/spring-context-3.0.xsd http://www.springframework.org/schema/cache http://www.springframework.org/schema/cache/spring-cache-3.1.xsd">

<!-- 自动扫描注解的bean -->
<context:component-scan base-package="com.rhwayfun.ehcache.service.impl" />

<cache:annotation-driven cache-manager="cacheManager" />

<bean id="cacheManager" class="org.springframework.cache.ehcache.EhCacheCacheManager">
<property name="cacheManager" ref="ehcache"></property>
</bean>

<bean id="ehcache" class="org.springframework.cache.ehcache.EhCacheManagerFactoryBean">
<property name="configLocation" value="classpath:ehcache.xml"></property>
</bean>
</beans>
还需要Ehcache的配置文件:ehcache.xml
<?xml version="1.0" encoding="UTF-8"?>
<ehcache>
<!-- 指定一个文件目录,当EhCache把数据写到硬盘上时,将把数据写到这个文件目录下 -->
<diskStore path="java.io.tmpdir"/>

<!-- 设定缓存的默认数据过期策略 -->
<!--
参数说明:
name:缓存名称
maxElementsInMemory:内存中最大的缓存对象数
eternal:true表示对象永不过期
overflowToDisk:true表示当内存缓存的对象数达到maxElementsInMemory后,会把溢出的对象写到硬盘缓存中。(ps:如果需要写到磁盘中,则写入的对象必须实现Serializable接口)
timeToIdleSeconds:设定允许对象处于空闲状态的最长时间,以秒为单位。(ps:这个属性只有当eternal属性为false才有效)
timeToLiveSeconds:设定对象允许存在于缓存中的最大生存时间,以秒为单位。(ps:这个属性只有当eternal属性为false才有效)
diskPersistent:是否缓存虚拟机重启期数据,是否持久化磁盘缓存,当这个属性的值为true时,系统在初始化时会在磁盘中查找文件名为cache名称,
后缀名为index的文件,这个文件中存放了已经持久化在磁盘中的cache的index,找到后会把cache加载到内存,要想把cache真正持久化到磁盘,写程
序时注意执行net.sf.ehcache.Cache.put(Element element)后要调用flush()方法。
diskExpiryThreadIntervalSeconds:磁盘失效线程运行时间间隔,默认为120秒
-->
<defaultCache
maxElementsInMemory="10000"
eternal="false"
overflowToDisk="true"
timeToIdleSeconds="10"
timeToLiveSeconds="20"
diskPersistent="false"
diskExpiryThreadIntervalSeconds="120"/>

<cache name="cacheTest"
maxElementsInMemory="1000"
eternal="false"
overflowToDisk="true"
timeToIdleSeconds="10"
timeToLiveSeconds="20"/>

</ehcache>
在代码中已经对具体的参数含义做了说明,这里不再赘述。这里要注意的是
name属性,在后面的测试代码需要使用到它。
编写测试接口:
package com.rhwayfun.ehcache.service;

/**
*
* @ClassName: EhcacheService
* @Description: TODO
* @author ZhongCB
* @date 2016年8月11日 上午11:53:52
*
*/
public interface EhcacheService {

String getTime(String param);
}
接口实现类:
package com.rhwayfun.ehcache.service.impl;

import org.springframework.cache.annotation.Cacheable;
import org.springframework.stereotype.Service;

import com.rhwayfun.ehcache.service.EhcacheService;

@Service
public class EhcacheServiceImpl implements EhcacheService {

@Cacheable(value = "cacheTest", key="#param")
public String getTime(String param) {
return String.valueOf(System.currentTimeMillis());
}

}
注意
@Cacheable注解的
value属性的值就是
ehcache.xml配置文件中的
name属性的值。key表示方法的参数
param代表的就是缓存的key,通过这个key可以获取到value。
最后编写测试代码:
package com.rhwayfun.test;
import org.junit.Test;
import org.junit.runner.RunWith;
import org.springframework.beans.factory.annotation.Autowired;
import org.springframework.test.context.ContextConfiguration;
import org.springframework.test.context.junit4.AbstractJUnit4SpringContextTests;
import org.springframework.test.context.junit4.SpringJUnit4ClassRunner;
import com.rhwayfun.ehcache.service.EhcacheService;
@ContextConfiguration(locations = {"classpath:application.xml"})
@RunWith(SpringJUnit4ClassRunner.class)
public class EhcacheTest extends AbstractJUnit4SpringContextTests{
@Autowired
private EhcacheService ehcacheService;
@Test
public void testEhcache() throws InterruptedException{
System.out.println("第一次调用:" + ehcacheService.getTime("param"));
Thread.sleep(2000);
System.out.println("第二次调用(2秒后):" + ehcacheService.getTime("param"));
Thread.sleep(10000);
System.out.println("第三次调用(10秒后):" + ehcacheService.getTime("param"));
}
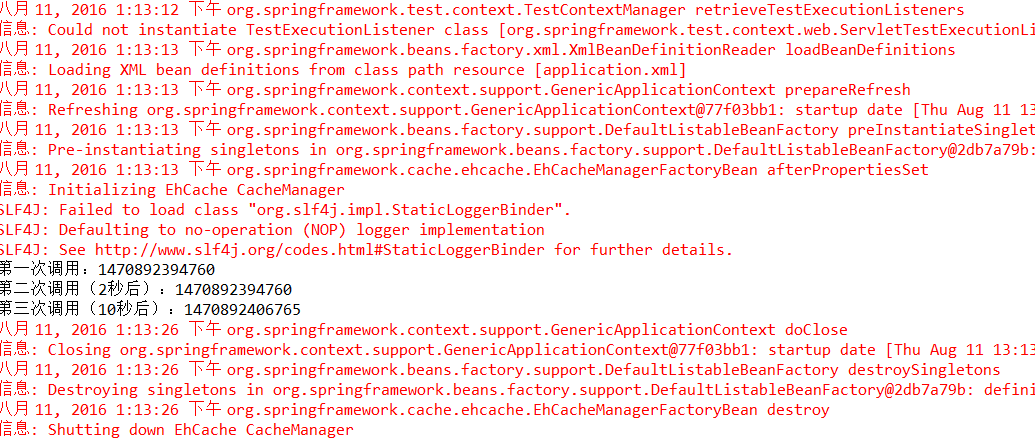
}运行该测试类,结果如下:
至此,Ehcache的入门实战就结束了,如果想要更详细了解Ehcache的资料,请访问Ehcache官网。
附:Ehcache入门实战源码

相关文章推荐
- 学习Spark的入门教程——《Spark核心源码分析与开发实战》
- Redis入门实战(附源码)
- 云星数据---Scala实战系列(精品版)】:Scala入门教程019-Scala实战源码-Scala 伴生类
- 云星数据---Scala实战系列(精品版)】:Scala入门教程024-Scala实战源码-Scala abstract 抽象类01
- 云星数据---Scala实战系列(精品版)】:Scala入门教程023-Scala实战源码-Scala 多态02
- 云星数据---Scala实战系列(精品版)】:Scala入门教程029-Scala实战源码-Scala 的特质 (接口)05
- 云星数据---Scala实战系列(精品版)】:Scala入门教程017-Scala实战源码-Scala 创建对象 以及类的介绍
- 云星数据---Scala实战系列(精品版)】:Scala入门教程016-Scala实战源码-Scala 判断语句 、循环与java的比较
- 云星数据---Scala实战系列(精品版)】:Scala入门教程027-Scala实战源码-Scala 的特质 (接口)03
- Google Protocol Buffer序列化入门实战(附源码)
- 云星数据---Scala实战系列(精品版)】:Scala入门教程009-Scala实战源码-Hello Word
- android从入门到精通-项目实战(心得及源码)
- 云星数据---Scala实战系列(精品版)】:Scala入门教程018-Scala实战源码-Scala内部类
- 云星数据---Scala实战系列(精品版)】:Scala入门教程013-Scala实战源码-Scala表达式与for循环
- Dubbo分布式服务框架入门实战(附源码)
- Spark 2.0从入门到精通:Scala编程、大数据开发、上百个实战案例、内核源码深度剖析(278讲全)
- 云星数据---Scala实战系列(精品版)】:Scala入门教程011-Scala实战源码-变量声明
- 云星数据---Scala实战系列(精品版)】:Scala入门教程021-Scala实战源码-Scala 子类对象
- 云星数据---Scala实战系列(精品版)】:Scala入门教程028-Scala实战源码-Scala 的特质 (接口)04