opencv3.0 函数学习 3——equalizeHist 直方图均衡化
2016-08-09 17:06
447 查看
equalizeHist 直方图均衡化
函数功能:直方图均衡化,该函数能归一化图像亮度和增强对比度
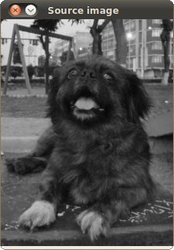
为了更好地观察直方图均衡化的效果, 我们使用一张对比度不强的图片作为源图像输入, 如下图:
它的直方图为:
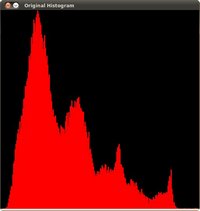
注意到像素大多集中在直方图中间的强度上.
使用例程进行均衡化后, 我们得到下面的结果:
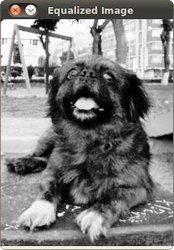
这幅图片显然对比度更强. 再验证一下均衡化后图片的直方图:
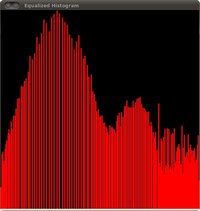
注意到现在像素在整个强度范围内均衡分布.
函数参数
Equalizes the histogram of a grayscale image.
The function equalizes the histogram of the input image using the following algorithm:
Calculate the histogram H
for src .
Normalize the histogram so that the sum of histogram bins is 255.
Compute the integral of the histogram:
H ′ i =∑ 0≤j<i H(j)
Transform the image using H ′
as a look-up table: dst(x,y)=H ′ (src(x,y))
The algorithm normalizes the brightness and increases the contrast of the image.
Parameters
函数功能:直方图均衡化,该函数能归一化图像亮度和增强对比度
为了更好地观察直方图均衡化的效果, 我们使用一张对比度不强的图片作为源图像输入, 如下图:
它的直方图为:
注意到像素大多集中在直方图中间的强度上.
使用例程进行均衡化后, 我们得到下面的结果:
这幅图片显然对比度更强. 再验证一下均衡化后图片的直方图:
注意到现在像素在整个强度范围内均衡分布.
函数参数
| void cv::equalizeHist | ( | InputArray | src, |
| OutputArray | dst | ||
| ) |
The function equalizes the histogram of the input image using the following algorithm:
Calculate the histogram H
for src .
Normalize the histogram so that the sum of histogram bins is 255.
Compute the integral of the histogram:
H ′ i =∑ 0≤j<i H(j)
Transform the image using H ′
as a look-up table: dst(x,y)=H ′ (src(x,y))
The algorithm normalizes the brightness and increases the contrast of the image.
Parameters
| src | Source 8-bit single channel image. 注:需要原图需要灰度图 |
| dst | Destination image of the same size and type as src . |

相关文章推荐
- python中使用OpenCV进行人脸检测的例子
- opencv 做人脸识别 opencv 人脸匹配分析
- 使用opencv拉伸图像扩大分辨率示例
- Android Studio中配置OpenCV库开发环境的教程
- 基于C++实现kinect+opencv 获取深度及彩色数据
- visual studio 2012安装配置方法图文教程 附opencv配置教程
- OpenCV 2.4.3 C++ 平滑处理分析
- Python中使用OpenCV库来进行简单的气象学遥感影像计算
- 利用Python和OpenCV库将URL转换为OpenCV格式的方法
- python结合opencv实现人脸检测与跟踪
- Python环境搭建之OpenCV的步骤方法
- Python+Opencv识别两张相似图片
- Python实现OpenCV的安装与使用示例
- 在树莓派2或树莓派B+上安装Python和OpenCV的教程
- opencv-python学习一--人脸检测
- 在Ubuntu上安装OpenCV3.0和Python-openCV的经历
- 使用 Java 开发 OpenCV 应用
- OpenCV配置,从来没有这么简单!
- ubuntu下opencv和qt的安装配置
- visual studio 2012安装配置方法图文教程 附opencv配置教程