[记录]Python爬虫过程中遇到的简单带干扰线验证码处理方法
2016-08-08 15:13
1221 查看
前言:
这些天,人力资源部有个需求:需要定期检查短信猫平台账号余额,于是乎,我向短信平台提交这个查询需求,对方给我答复是没办法。如此一来,只能看看能否通过用爬虫的方法去爬取后台数据了。
一、观察目标站点
使用开发者模式看了下目标站点,登陆是非常简单的三个选项:用户名,密码,验证码。验证码是由4位纯数字组成,每次通过get请求随机验证码的方法来刷新验证码。好了,观察到这,大致思路有了:get请求验证码图片,保存到本地进行识别,识别到的验证码加上用户名密码提交,去查询短信平台账号余额。到这里又有一个问题,如何识别验证码?通过谷歌查了下,谷歌有个识别库,非常好用:pytesser(见附件,将.rar去除,使用7z解压)
二、使用pytesser
有关于pytesser安装方法:http://blog.csdn.net/lanfan_11/article/details/45558573
以下代码,pytesser的使用方法。
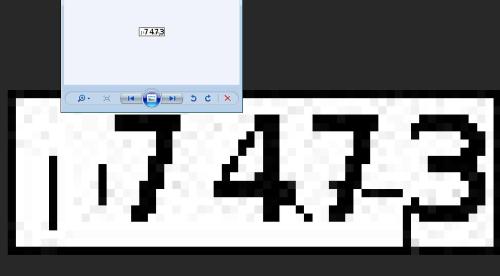
仔细观察验证码图片,发现上面带了一些其他颜色的小斑点,而且还有一些不规则的干扰线:
一看到这个头就大了,能力有限,没有图像处理的经验,于是想到了个笨办法:能不能对每个像素点进行操作?一想到这,立马google起来,发现PIL就是可以处理图片像素点的!!
三、优化图片
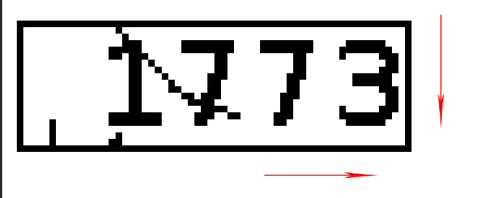
首先对PIL转换成黑白模式,将图片转换成简单的黑白两种颜色:

剩下的是干扰线问题了,通过观察干扰线,发现干扰线有一定规律:
1)横线干扰线是由并排像素点组成的,上下均是空白。
2)竖线干扰线也是由并排像素点组成,左右均是空白。
3)单点及斜线干扰线,上下左右像素点为空白。
因为循环结构是从左到右 从上到下的顺序去循环,所以要匹配的时候不需要匹配左上角位置像素点。
效果:
黑白模式:

去边以及处理线段干扰线:

去除斜线干扰线:

处理完的图片再识别一下,完美!从原来不到10%的识别率,到现在已经能够达到80%!
四、抓取所要的信息
将抓取到的数据用bs4 + 正则去匹配,使用邮箱发送抓取到的信息。
完成这个需求所有代码看起来是这样:
由于我的是在windows下环境写的,遂,直接放到windows下运行,写个bat脚本,在放到任务计划上执行,OK!搞定!
附件:http://down.51cto.com/data/2368032
这些天,人力资源部有个需求:需要定期检查短信猫平台账号余额,于是乎,我向短信平台提交这个查询需求,对方给我答复是没办法。如此一来,只能看看能否通过用爬虫的方法去爬取后台数据了。
一、观察目标站点
使用开发者模式看了下目标站点,登陆是非常简单的三个选项:用户名,密码,验证码。验证码是由4位纯数字组成,每次通过get请求随机验证码的方法来刷新验证码。好了,观察到这,大致思路有了:get请求验证码图片,保存到本地进行识别,识别到的验证码加上用户名密码提交,去查询短信平台账号余额。到这里又有一个问题,如何识别验证码?通过谷歌查了下,谷歌有个识别库,非常好用:pytesser(见附件,将.rar去除,使用7z解压)
二、使用pytesser
有关于pytesser安装方法:http://blog.csdn.net/lanfan_11/article/details/45558573
以下代码,pytesser的使用方法。
import requests
from pytesser import *
myRequests = requests.Session()
headers = {'User-agent': 'Mozilla/5.0 (Windows NT 6.1; WOW64; rv:47.0) Gecko/20100101 Firefox/47.0'}
myRequests.headers.update(headers)

class IMG(object):

def __init__(self):
self.codeImg = 'codes.png'
self.iMg = self._openImg(self.codeImg)
self.Im = self._openImg(self.codeImg.capitalize())
self.w,self.h = self.Im.size
self.cookies =

def _openImg(self,name):
try:
im = Image.open(name)
return im
except:
print '[!] Open %s failed' % name
exit()

def Pytess(self,name):
threshold = 140
table = []

for i in range(256):
if i < threshold:
table.append(0)
else:
table.append(1)

#识别到一些其他字符,进行转换
rep = {'O':'0',
'I':'1',
'L':'1',
'Z':'2',
'S':'8',
'Q':'0',
'}':'7',
'*':'',
'E':'6',
']':'0',
'`':'',
'B':'8',
'\\':'',
' ':''
}

data = self._openImg(name)

try:
text = image_to_string(data)
text = text.strip()
text = text.upper()
except :
text = 0

for r in rep:

text = text.replace(r,rep[r])

return text 上面代码运行后,无法有效正确的识别,识别率非常非常低。那问题出在哪呢?仔细观察验证码图片,发现上面带了一些其他颜色的小斑点,而且还有一些不规则的干扰线:
一看到这个头就大了,能力有限,没有图像处理的经验,于是想到了个笨办法:能不能对每个像素点进行操作?一想到这,立马google起来,发现PIL就是可以处理图片像素点的!!
三、优化图片
首先对PIL转换成黑白模式,将图片转换成简单的黑白两种颜色:
data = self._openImg(name)
imgry = data.convert('L')
out = imgry.point(table,'1') 处理完像是这样:剩下的是干扰线问题了,通过观察干扰线,发现干扰线有一定规律:
1)横线干扰线是由并排像素点组成的,上下均是空白。
2)竖线干扰线也是由并排像素点组成,左右均是空白。
3)单点及斜线干扰线,上下左右像素点为空白。
def pIx(self):
data = self.Im
#图片的长宽
w = self.w
h = self.h

#data.getpixel((x,y))获取目标像素点颜色。
#data.putpixel((x,y),255)更改像素点颜色,255代表颜色。

try:
for x in xrange(1,w-1):
if x > 1 and x != w-2:
#获取目标像素点左右位置
left = x - 1
right = x + 1

for y in xrange(1,h-1):
#获取目标像素点上下位置
up = y - 1
down = y + 1

if x <= 2 or x >= (w - 2):
data.putpixel((x,y),255)

elif y <= 2 or y >= (h - 2):
data.putpixel((x,y),255)

elif data.getpixel((x,y)) == 0:
if y > 1 and y != h-1:

#以目标像素点为中心点,获取周围像素点颜色
#0为黑色,255为白色
up_color = data.getpixel((x,up))
down_color = data.getpixel((x,down))
left_color = data.getpixel((left,y))
left_down_color = data.getpixel((left,down))
right_color = data.getpixel((right,y))
right_up_color = data.getpixel((right,up))
right_down_color = data.getpixel((right,down))

#去除竖线干扰线
if down_color == 0:
if left_color == 255 and left_down_color == 255 and \
right_color == 255 and right_down_color == 255:
data.putpixel((x,y),255)

#去除横线干扰线
elif right_color == 0:
if down_color == 255 and right_down_color == 255 and \
up_color == 255 and right_up_color == 255:
data.putpixel((x,y),255)

#去除斜线干扰线
if left_color == 255 and right_color == 255 \
and up_color == 255 and down_color == 255:
data.putpixel((x,y),255)
else:
pass

#保存去除干扰线后的图片
data.save("test.png","png")
except:
return False
因为循环结构是从左到右 从上到下的顺序去循环,所以要匹配的时候不需要匹配左上角位置像素点。
效果:
黑白模式:
去边以及处理线段干扰线:
去除斜线干扰线:
处理完的图片再识别一下,完美!从原来不到10%的识别率,到现在已经能够达到80%!
四、抓取所要的信息
将抓取到的数据用bs4 + 正则去匹配,使用邮箱发送抓取到的信息。
完成这个需求所有代码看起来是这样:
#-*- coding:utf-8 -*-
import requests,os,re,smtplib,time
from pytesser import *
from bs4 import BeautifulSoup
from email.mime.text import MIMEText
from email.MIMEMultipart import MIMEMultipart

myRequests = requests.Session()
headers = {'User-agent': 'Mozilla/5.0 (Windows NT 6.1; WOW64; rv:47.0) Gecko/20100101 Firefox/47.0'}
myRequests.headers.update(headers)

webSite = ''
webUser = ''
webPass = ''

CodesImg = os.path.join(os.getcwd(), 'codes.png')

def _transcoding(data):
if not data:
return data
result = None
if type(data) == unicode:
result = data
elif type(data) == str:
result = data.decode('utf-8')
return result

sender = _transcoding('电信短信平台余额')
receiver = ['']
#receiver = ['']
subject = '电信短信平台余额'
smtpserver = ''
username = ''
password = ''

def send_mail(balance):
msg = MIMEMultipart('alternative')
msg['Subject'] = subject
html = """
<h4>短信剩余余额:</h4>

<h2><b>%s</b> ¥</h2>
""" % balance
part = MIMEText(html,'html','utf-8')
msg.attach(part)

smtp = smtplib.SMTP()
smtp.connect('smtp.exmail.qq.com')
smtp.login(username,password)
smtp.sendmail(sender,receiver,msg.as_string())
smtp.quit()

class IMG(object):

def __init__(self):
self.codeImg = 'codes.png'
self.iMg = self._openImg(self.codeImg)
self.Im = self._openImg(self.codeImg.capitalize())
self.w,self.h = self.Im.size
self.cookies = ''

def _bs4(self,soup):
list = []
Soup = BeautifulSoup(soup,"html.parser")
for i in Soup.find_all('td'):
list.append(i)
return list

def _openImg(self,name):
try:
im = Image.open(name)
return im
except:
print '[!] Open %s failed' % name
exit()

def _processImg(self,name):
threshold = 140
table = []
for i in range(256):
if i < threshold:
table.append(0)
else:
table.append(1)
img = self._openImg(name)
imgry = img.convert('L')
out = imgry.point(table,'1')
filename = self.codeImg.capitalize()
out.save(filename)

def getCodes(self):
self.Cookies =[]
url = "%s/verifyCode.jsp" % webSite
r = myRequests.get(url=url)
if r.cookies:
self.Cookies = str(r.cookies).split(' ')[1]
f = open(CodesImg,'wb')
f.write(r.content)
f.close()

def pIx(self):
data = self.Im
w = self.w
h = self.h
try:
for x in xrange(1,w-1):
if x > 1 and x != w-2:
left = x - 1
right = x + 1

for y in xrange(1,h-1):
up = y - 1
down = y + 1

if x <= 2 or x >= (w - 2):
data.putpixel((x,y),255)

elif y <= 2 or y >= (h - 2):
data.putpixel((x,y),255)

elif data.getpixel((x,y)) == 0:
if y > 1 and y != h-1:
up_color = data.getpixel((x,up))
down_color = data.getpixel((x,down))
left_color = data.getpixel((left,y))
left_down_color = data.getpixel((left,down))
right_color = data.getpixel((right,y))
right_up_color = data.getpixel((right,up))
right_down_color = data.getpixel((right,down))

if down_color == 0:
if left_color == 255 and left_down_color == 255 and \
right_color == 255 and right_down_color == 255:
data.putpixel((x,y),255)
data.save("text2.png","png")

elif right_color == 0:
if down_color == 255 and right_down_color == 255 and \
up_color == 255 and right_up_color == 255:
data.putpixel((x,y),255)
data.save("text3.png","png")

if left_color == 255 and right_color == 255 \
and up_color == 255 and down_color == 255:
data.putpixel((x,y),255)
else:
pass
data.save("test.png","png")
except:
return False

def Pytess(self,name):
threshold = 140
table = []

for i in range(256):
if i < threshold:
table.append(0)
else:
table.append(1)

rep = {'O':'0',
'I':'1',
'L':'1',
'Z':'2',
'S':'8',
'Q':'0',
'}':'7',
'*':'',
'E':'6',
']':'0',
'`':'',
'B':'8',
'\\':'',
' ':''
}

data = self._openImg(name)
imgry = data.convert('L')
out = imgry.point(table,'1')
try:
text = image_to_string(out)
text = text.strip()
text = text.upper()
except :
text = 0

for r in rep:

text = text.replace(r,rep[r])

return text

def loginSite(self,loginname,passwd,randnum,cookies):
url = ''
params = {
'loginname':loginname,
'password':passwd,
'randnum':randnum,
#  'returnUrl':'/admin/index/index.action'
}
r = myRequests.post(url=url,data=params)
r.encoding = 'utf-8'
loginUrl = ''
r2 = myRequests.get(url=loginUrl)
html = r2.text.encode('utf-8')
return html

if __name__ == '__main__':
i = 0
while True:
time.sleep(5)

i += 1
print ("[!]第%d次尝试发送"%i)

I = IMG()

#获取验证码
I.getCodes()

#验证码图片处理
I._processImg(I.codeImg)

#去除干扰线
I.pIx()

#获取验证码
codes = I.Pytess('test.png')

#cookies
cookies = I.cookies

#登陆
htmlSoup = I.loginSite(webUser,webPass,codes,cookies)

List = I._bs4(htmlSoup)

if List:
st = List[3]
text = re.search("\d{1,}",str(st))
Balance = text.group(0)
print ('[!]短信余额为:%s,正在发送!' % Balance)
send_mail(Balance)
print ('[!]发送成功,正在退出程序...')
time.sleep(2)
exit()
由于我的是在windows下环境写的,遂,直接放到windows下运行,写个bat脚本,在放到任务计划上执行,OK!搞定!
附件:http://down.51cto.com/data/2368032

相关文章推荐
- scrapy+python当你的爬虫遇到验证码处理方式之一
- [项目过程中所遇到的各种问题记录]目录索引以及简单介绍
- C++处理URL的方法,项目有用到,过程记录如下
- Python爬虫(图片)编写过程中遇到的问题
- 编程过程中遇到的python问题与解决方法_来自网络
- Python入门简单的静态网页爬虫2.0 (实现各模块的具体方法)
- python写简单爬虫的五种方法
- python简单文本处理的方法
- nfs服务器的简单搭建过程-记录方法
- 使用pip安装tensorflow 0.80,python 使用tensorflow 0.80遇到的问题及处理方法
- Python简单调用MySQL存储过程并获得返回值的方法
- python写简单爬虫的五种方法 (转)
- python写简单爬虫的五种方法 (转)
- Python 爬虫入门(四)—— 验证码下篇(破解简单的验证码)
- Python简单调用MySQL存储过程并获得返回值的方法
- 第一次用python 写的简单爬虫 记录在自己的博客
- python处理图片之PIL模块简单使用方法
- python处理图片之PIL模块简单使用方法
- [python爬虫]爬取学校教务处以及登录过程验证码的处理
- 学python过程中遇到的一些问题及解决方法