AppWidget的使用及原理分析
2016-08-05 17:11
435 查看
一 AppWidget的使用:
1、首先在res/layout文件夹下定义一个 布局文件
res/layout/app_widget.xml
2、在 res/xml文件夹中新建一个 appwidgetProvider的配置文件
res/xml/appwidget-provider-info.xml
其中initialLayout 代表该AppWidget引用的资源文件
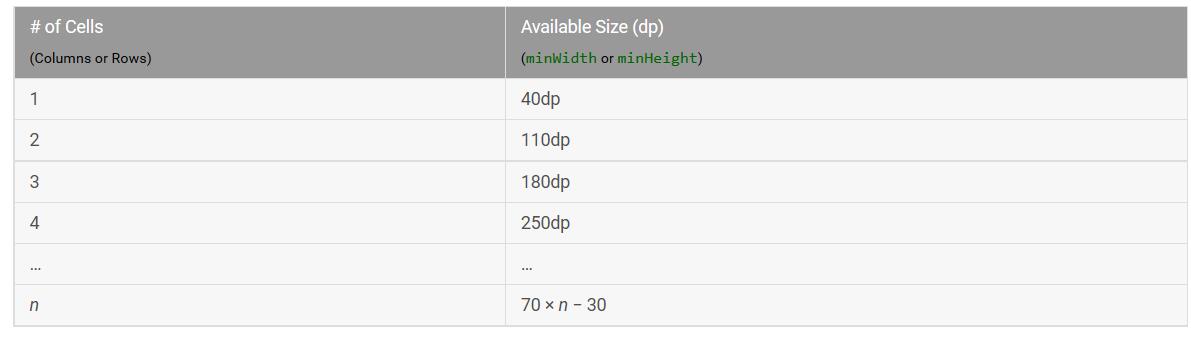
minHeight ,minWidth代表appWidget的大小 这里写110dp代表 站 2x2个方格,
这里有一个公式: n X 70 -30 = ? n代表占多少格。
updatePeriodMillis 代表该appWidget多长时间更新一次,这里单位为毫秒。
3、编写AppWidgetProvider
4、在清单文件中注册
其中com.blueberry.sample.appwidget_CLICK 是我自己定义的一个ACTION.
其实AppWidgetProvider 是一个广播接收器,查看源码可知:
AppWidgetProvider类中在它的onReceiver()方法中,通过判断ACTION,然后执行了几个钩子方法
根据文档可知:
onEnable:当该窗口小部件第一次被添加到桌面时调用该方法,可添加多次但只在第一次调用
onUpdate: 小部件添加时或者每次小部件跟新时都会调用此方法,小部件的跟新时机由updatePeriodMillis来指定,每个周期小部件都会自动更新一次。
onDeleted:每删除一次桌面小部件就会被调用一次。
onDisable: 当最后一个该类型的桌面小部件被删除时调用该方法。
所以在我们自定义小部件时 需要重写public void onUpdate(Context context, AppWidgetManager appWidgetManager, int[] appWidgetIds) 来更新小部件。
这里在更新的时候我们根据布局文件创建出来一个removeViews ,并且我们给我们imageView设置了一个监听事件,点击它然后会发出一个广播,这个广播的action是我们自己定义的。
然后收到这个广播之后,旋转bitmap 然后重新设置给ImageView,并更新小部件。
这里需要注意的是:
1、小部件只支持RemoteView
2、我们使用appWidgetManager 来更新的小部件。
支持RemoteView的控件有:
具体请参考:https://developer.android.com/guide/topics/appwidgets/index.html
二、原理分析
上段我们讲到,appWidget只支持RemoteViews 和他需要使用mAppWidgetManager来更新小部件,这是为什么呢?
原因是,小部件跟我们的应用并非在同一个进程。所以我们要夸进程来更新小部件。而RemoteView支持夸进程,而mAppWidgetManager底层正是Binder。它对应的是AppWidgetServiceImpl。
我们在使用mAppWidgetManger来更新小部件时调用:
它调用了 mService.updateAppWidgetProvider(provider, views);
而mService实现是 AppWidgetServiceImpl
也就是说,它调用了 AppWidgetServiceImpl 的
继续看 updateAppWidgetInstanceLocked(widget, views, false);
这里使用了一个Handler发送了一个消息,它的接收代码:
这里调用了 callbacks.updateAppWidget(appWidgetId, views);
这里的callback实际又是个binder,它的实现是AppWidgetHost.Callbacks
可以看到它的updateAppWidget ,发送了一个消息来更新小部件,它的接收程序为:
之类可以看到 如果 content ==null 的时候他调用 remoteViews.apply(…)方法
如果content!=null 它调用remoteViews.reApply(…)方法
那我们就接着看RemoteViews;
可以看到它实现了Parcelable接口,所以可以序列化在进程间传递。
我们直接看它的apply方法
可以看到它遍历一个 mApcitions结合然后依次 调用他们的 apply方法。
那么这些action是怎么被添加到这个集合中的呢?
我们在给RemoteViews中的TextView、ImageView设置属性的时候都使用remoteViews中类似这样的方法: setImageViewBitmap(int viewId, Bitmap bitmap),这种方法实际就创建出了action来添加到 mAction中
我们就看一下这个方法:
BitmapReflectionAction 实际就是一个Action
这个又new 出了一个ReflectionAction 来调用它的apply(),我们追踪到这个类可以看到:
它使用了反射,最后终执行了setImageView方法。这样就完成了更新view操作。
RemoteViews.reapply() 也是同理,这里不再叙述了。
1、首先在res/layout文件夹下定义一个 布局文件
res/layout/app_widget.xml
<?xml version="1.0" encoding="utf-8"?>
<LinearLayout xmlns:android="http://schemas.android.com/apk/res/android"
android:orientation="vertical" android:layout_width="match_parent"
android:layout_height="match_parent">

<ImageView
android:layout_width="wrap_content"
android:layout_height="wrap_content"
android:id="@+id/iv"
android:src="@mipmap/ic_launcher"
/>
</LinearLayout>
2、在 res/xml文件夹中新建一个 appwidgetProvider的配置文件
res/xml/appwidget-provider-info.xml
<?xml version="1.0" encoding="utf-8"?>
<appwidget-provider xmlns:android="http://schemas.android.com/apk/res/android"
android:initialLayout="@layout/app_widget"
android:minHeight="110dp"
android:minWidth="110dp"
android:updatePeriodMillis="8640000"
>
</appwidget-provider>
其中initialLayout 代表该AppWidget引用的资源文件
minHeight ,minWidth代表appWidget的大小 这里写110dp代表 站 2x2个方格,
这里有一个公式: n X 70 -30 = ? n代表占多少格。
updatePeriodMillis 代表该appWidget多长时间更新一次,这里单位为毫秒。
3、编写AppWidgetProvider
public class MyAppWidget extends AppWidgetProvider {

private static final String TAG = "MyAppWidget";

public static final String CLICK_ACTION = "com.blueberry.sample.appwidget_CLICK";

@Override
public void onReceive(final Context context, final Intent intent) {
super.onReceive(context, intent);

Log.i(TAG, "onReceiver: action = " + intent.getAction());

if (intent.getAction().equals(CLICK_ACTION)) {
Toast.makeText(context, "click it", Toast.LENGTH_SHORT).show();

new Thread(new Runnable() {
@Override
public void run() {
Bitmap srcBitmap = BitmapFactory.decodeResource(context.getResources(),
R.mipmap.ic_launcher);
AppWidgetManager appWidgetManager = AppWidgetManager.getInstance(context);
for (int i = 0; i < 37; i++) {
float degree = (i * 10) % 360;
RemoteViews remoteViews = new RemoteViews(context.getPackageName(),
R.layout.app_widget);
remoteViews.setImageViewBitmap(R.id.iv,
rotateBitmap(srcBitmap, degree));
Intent intentClick = new Intent();
intentClick.setAction(CLICK_ACTION);
PendingIntent pendingIntent = PendingIntent.getBroadcast(context,
0, intent, PendingIntent.FLAG_UPDATE_CURRENT);
remoteViews.setOnClickPendingIntent(R.id.iv, pendingIntent);
appWidgetManager.updateAppWidget(new ComponentName(context,
MyAppWidget.class), remoteViews);
SystemClock.sleep(30);
}
}
}).start();

}
}

@Override
public void onUpdate(Context context, AppWidgetManager appWidgetManager, int[] appWidgetIds) {
super.onUpdate(context, appWidgetManager, appWidgetIds);
Log.i(TAG, "onUpdate.");
final int counter = appWidgetIds.length;
Log.i(TAG, "counter: " + counter);
for (int i = 0; i < counter; i++) {
int appWidgetId = appWidgetIds[i];
onWidgetUpdate(context, appWidgetManager, appWidgetId);
}
}

private void onWidgetUpdate(Context context, AppWidgetManager appWidgetManager, int appWidgetId) {
Log.i(TAG, "appWidgetId= " + appWidgetId);
RemoteViews remoteViews = new RemoteViews(context.getPackageName(), R.layout.app_widget);
Intent intentClick = new Intent();
intentClick.setAction(CLICK_ACTION);
PendingIntent pendingIntent = PendingIntent.getBroadcast(context, 0, intentClick, 0);
remoteViews.setOnClickPendingIntent(R.id.iv, pendingIntent);
appWidgetManager.updateAppWidget(appWidgetId, remoteViews);
}

private static Bitmap rotateBitmap(Bitmap bitmap, float degree) {
Matrix matrix = new Matrix();
matrix.reset();
matrix.setRotate(degree);
return Bitmap.createBitmap(bitmap, 0, 0, bitmap.getWidth(), bitmap.getHeight(), matrix, true);
}

}
4、在清单文件中注册
<receiver android:name=".widgets.MyAppWidget">
<meta-data
android:name="android.appwidget.provider"
android:resource="@xml/appwidget_provider_info"></meta-data>

<intent-filter>
<action android:name="com.blueberry.sample.appwidget_CLICK"></action>
<action android:name="android.appwidget.action.APPWIDGET_UPDATE"></action>
</intent-filter>
</receiver>
其中com.blueberry.sample.appwidget_CLICK 是我自己定义的一个ACTION.
其实AppWidgetProvider 是一个广播接收器,查看源码可知:
AppWidgetProvider类中在它的onReceiver()方法中,通过判断ACTION,然后执行了几个钩子方法
// BEGIN_INCLUDE(onReceive)
public void onReceive(Context context, Intent intent) {
// Protect against rogue update broadcasts (not really a security issue,
// just filter bad broacasts out so subclasses are less likely to crash).
String action = intent.getAction();
if (AppWidgetManager.ACTION_APPWIDGET_UPDATE.equals(action)) {
Bundle extras = intent.getExtras();
if (extras != null) {
int[] appWidgetIds = extras.getIntArray(AppWidgetManager.EXTRA_APPWIDGET_IDS);
if (appWidgetIds != null && appWidgetIds.length > 0) {
this.onUpdate(context, AppWidgetManager.getInstance(context), appWidgetIds);
}
}
} else if (AppWidgetManager.ACTION_APPWIDGET_DELETED.equals(action)) {
Bundle extras = intent.getExtras();
if (extras != null && extras.containsKey(AppWidgetManager.EXTRA_APPWIDGET_ID)) {
final int appWidgetId = extras.getInt(AppWidgetManager.EXTRA_APPWIDGET_ID);
this.onDeleted(context, new int[] { appWidgetId });
}
} else if (AppWidgetManager.ACTION_APPWIDGET_OPTIONS_CHANGED.equals(action)) {
Bundle extras = intent.getExtras();
if (extras != null && extras.containsKey(AppWidgetManager.EXTRA_APPWIDGET_ID)
&& extras.containsKey(AppWidgetManager.EXTRA_APPWIDGET_OPTIONS)) {
int appWidgetId = extras.getInt(AppWidgetManager.EXTRA_APPWIDGET_ID);
Bundle widgetExtras = extras.getBundle(AppWidgetManager.EXTRA_APPWIDGET_OPTIONS);
this.onAppWidgetOptionsChanged(context, AppWidgetManager.getInstance(context),
appWidgetId, widgetExtras);
}
} else if (AppWidgetManager.ACTION_APPWIDGET_ENABLED.equals(action)) {
this.onEnabled(context);
} else if (AppWidgetManager.ACTION_APPWIDGET_DISABLED.equals(action)) {
this.onDisabled(context);
} else if (AppWidgetManager.ACTION_APPWIDGET_RESTORED.equals(action)) {
Bundle extras = intent.getExtras();
if (extras != null) {
int[] oldIds = extras.getIntArray(AppWidgetManager.EXTRA_APPWIDGET_OLD_IDS);
int[] newIds = extras.getIntArray(AppWidgetManager.EXTRA_APPWIDGET_IDS);
if (oldIds != null && oldIds.length > 0) {
this.onRestored(context, oldIds, newIds);
this.onUpdate(context, AppWidgetManager.getInstance(context), newIds);
}
}
}
}
根据文档可知:
onEnable:当该窗口小部件第一次被添加到桌面时调用该方法,可添加多次但只在第一次调用
onUpdate: 小部件添加时或者每次小部件跟新时都会调用此方法,小部件的跟新时机由updatePeriodMillis来指定,每个周期小部件都会自动更新一次。
onDeleted:每删除一次桌面小部件就会被调用一次。
onDisable: 当最后一个该类型的桌面小部件被删除时调用该方法。
所以在我们自定义小部件时 需要重写public void onUpdate(Context context, AppWidgetManager appWidgetManager, int[] appWidgetIds) 来更新小部件。
这里在更新的时候我们根据布局文件创建出来一个removeViews ,并且我们给我们imageView设置了一个监听事件,点击它然后会发出一个广播,这个广播的action是我们自己定义的。
然后收到这个广播之后,旋转bitmap 然后重新设置给ImageView,并更新小部件。
这里需要注意的是:
1、小部件只支持RemoteView
2、我们使用appWidgetManager 来更新的小部件。
支持RemoteView的控件有:
FrameLayout
LinearLayout
RelativeLayout
GridLayout

AnalogClock
Button
Chronometer
ImageButton
ImageView
ProgressBar
TextView
ViewFlipper
ListView
GridView
StackView
AdapterViewFlipper
具体请参考:https://developer.android.com/guide/topics/appwidgets/index.html
二、原理分析
上段我们讲到,appWidget只支持RemoteViews 和他需要使用mAppWidgetManager来更新小部件,这是为什么呢?
原因是,小部件跟我们的应用并非在同一个进程。所以我们要夸进程来更新小部件。而RemoteView支持夸进程,而mAppWidgetManager底层正是Binder。它对应的是AppWidgetServiceImpl。
我们在使用mAppWidgetManger来更新小部件时调用:
public void updateAppWidget(ComponentName provider, RemoteViews views) {
if (mService == null) {
return;
}
try {
mService.updateAppWidgetProvider(provider, views);
}
catch (RemoteException e) {
throw new RuntimeException("system server dead?", e);
}
}
它调用了 mService.updateAppWidgetProvider(provider, views);
而mService实现是 AppWidgetServiceImpl
也就是说,它调用了 AppWidgetServiceImpl 的
public void updateAppWidgetProvider(ComponentName componentName, RemoteViews views) {
final int userId = UserHandle.getCallingUserId();

if (DEBUG) {
Slog.i(TAG, "updateAppWidgetProvider() " + userId);
}

// Make sure the package runs under the caller uid.
mSecurityPolicy.enforceCallFromPackage(componentName.getPackageName());

synchronized (mLock) {
ensureGroupStateLoadedLocked(userId);

// NOTE: The lookup is enforcing security across users by making
// sure the caller can access only its providers.
ProviderId providerId = new ProviderId(Binder.getCallingUid(), componentName);
Provider provider = lookupProviderLocked(providerId);

if (provider == null) {
Slog.w(TAG, "Provider doesn't exist " + providerId);
return;
}

ArrayList<Widget> instances = provider.widgets;
final int N = instances.size();
for (int i = 0; i < N; i++) {
Widget widget = instances.get(i);
updateAppWidgetInstanceLocked(widget, views, false);
}
}
}
继续看 updateAppWidgetInstanceLocked(widget, views, false);
private void updateAppWidgetInstanceLocked(Widget widget, RemoteViews views,
boolean isPartialUpdate) {
if (widget != null && widget.provider != null
&& !widget.provider.zombie && !widget.host.zombie) {

if (isPartialUpdate && widget.views != null) {
// For a partial update, we merge the new RemoteViews with the old.
widget.views.mergeRemoteViews(views);
} else {
// For a full update we replace the RemoteViews completely.
widget.views = views;
}

scheduleNotifyUpdateAppWidgetLocked(widget, views);
}
}
private void scheduleNotifyUpdateAppWidgetLocked(Widget widget, RemoteViews updateViews) {
if (widget == null || widget.provider == null || widget.provider.zombie
|| widget.host.callbacks == null || widget.host.zombie) {
return;
}
SomeArgs args = SomeArgs.obtain();
args.arg1 = widget.host;
args.arg2 = widget.host.callbacks;
args.arg3 = updateViews;
args.argi1 = widget.appWidgetId;
mCallbackHandler.obtainMessage(
CallbackHandler.MSG_NOTIFY_UPDATE_APP_WIDGET,
args).sendToTarget();
}这里使用了一个Handler发送了一个消息,它的接收代码:
@Override
public void handleMessage(Message message) {
switch (message.what) {
case MSG_NOTIFY_UPDATE_APP_WIDGET: {
SomeArgs args = (SomeArgs) message.obj;
Host host = (Host) args.arg1;
IAppWidgetHost callbacks = (IAppWidgetHost) args.arg2;
RemoteViews views = (RemoteViews) args.arg3;
final int appWidgetId = args.argi1;
args.recycle();

handleNotifyUpdateAppWidget(host, callbacks, appWidgetId, views);
} break;
private void handleNotifyUpdateAppWidget(Host host, IAppWidgetHost callbacks,
int appWidgetId, RemoteViews views) {
try {
callbacks.updateAppWidget(appWidgetId, views);
} catch (RemoteException re) {
synchronized (mLock) {
Slog.e(TAG, "Widget host dead: " + host.id, re);
host.callbacks = null;
}
}
}这里调用了 callbacks.updateAppWidget(appWidgetId, views);
这里的callback实际又是个binder,它的实现是AppWidgetHost.Callbacks
public class AppWidgetHost {

class Callbacks extends IAppWidgetHost.Stub {
public void updateAppWidget(int appWidgetId, RemoteViews views) {
if (isLocalBinder() && views != null) {
views = views.clone();
}
Message msg = mHandler.obtainMessage(HANDLE_UPDATE, appWidgetId, 0, views);
msg.sendToTarget();
可以看到它的updateAppWidget ,发送了一个消息来更新小部件,它的接收程序为:
class UpdateHandler extends Handler {
public UpdateHandler(Looper looper) {
super(looper);
}

public void handleMessage(Message msg) {
switch (msg.what) {
case HANDLE_UPDATE: {
updateAppWidgetView(msg.arg1, (RemoteViews)msg.obj);
break;
}
void updateAppWidgetView(int appWidgetId, RemoteViews views) {
AppWidgetHostView v;
synchronized (mViews) {
v = mViews.get(appWidgetId);
}
if (v != null) {
v.updateAppWidget(views);
}
}public void updateAppWidget(RemoteViews remoteViews) {
......
int layoutId = remoteViews.getLayoutId();
if (content == null && layoutId == mLayoutId) {
try {
// 调用这里
remoteViews.reapply(mContext, mView, mOnClickHandler);
content = mView;
recycled = true;
if (LOGD) Log.d(TAG, "was able to recycled existing layout");
} catch (RuntimeException e) {
exception = e;
}
}
if (content == null) {
try {
//调用这里
content = remoteViews.apply(mContext, this, mOnClickHandler);
if (LOGD) Log.d(TAG, "had to inflate new layout");
} catch (RuntimeException e) {
exception = e;
}
}
....
}之类可以看到 如果 content ==null 的时候他调用 remoteViews.apply(…)方法
如果content!=null 它调用remoteViews.reApply(…)方法
那我们就接着看RemoteViews;
public class RemoteViews implements Parcelable, Filter {可以看到它实现了Parcelable接口,所以可以序列化在进程间传递。
我们直接看它的apply方法
public View apply(Context context, ViewGroup parent, OnClickHandler handler) {
RemoteViews rvToApply = getRemoteViewsToApply(context);

View result;

final Context contextForResources = getContextForResources(context);
Context inflationContext = new ContextWrapper(context) {
@Override
public Resources getResources() {
return contextForResources.getResources();
}
@Override
public Resources.Theme getTheme() {
return contextForResources.getTheme();
}
};

LayoutInflater inflater = (LayoutInflater)
context.getSystemService(Context.LAYOUT_INFLATER_SERVICE);

inflater = inflater.cloneInContext(inflationContext);
inflater.setFilter(this);
result = inflater.inflate(rvToApply.getLayoutId(), parent, false);

rvToApply.performApply(result, parent, handler);

return result;
}
private void performApply(View v, ViewGroup parent, OnClickHandler handler) {
if (mActions != null) {
handler = handler == null ? DEFAULT_ON_CLICK_HANDLER : handler;
final int count = mActions.size();
for (int i = 0; i < count; i++) {
Action a = mActions.get(i);
a.apply(v, parent, handler);
}
}
}可以看到它遍历一个 mApcitions结合然后依次 调用他们的 apply方法。
那么这些action是怎么被添加到这个集合中的呢?
我们在给RemoteViews中的TextView、ImageView设置属性的时候都使用remoteViews中类似这样的方法: setImageViewBitmap(int viewId, Bitmap bitmap),这种方法实际就创建出了action来添加到 mAction中
我们就看一下这个方法:
public void setImageViewBitmap(int viewId, Bitmap bitmap) {
setBitmap(viewId, "setImageBitmap", bitmap);
}
public void setBitmap(int viewId, String methodName, Bitmap value) {
addAction(new BitmapReflectionAction(viewId, methodName, value));
}BitmapReflectionAction 实际就是一个Action
private class BitmapReflectionAction extends Action {
....
@Override
public void apply(View root, ViewGroup rootParent,
OnClickHandler handler) throws ActionException {
ReflectionAction ra = new ReflectionAction(viewId, methodName, ReflectionAction.BITMAP,
bitmap);
ra.apply(root, rootParent, handler);
}
.....

}
这个又new 出了一个ReflectionAction 来调用它的apply(),我们追踪到这个类可以看到:
@Override
public void apply(View root, ViewGroup rootParent, OnClickHandler handler) {
final View view = root.findViewById(viewId);
if (view == null) return;

Class<?> param = getParameterType();
if (param == null) {
throw new ActionException("bad type: " + this.type);
}

try {
getMethod(view, this.methodName, param).invoke(view, wrapArg(this.value));
} catch (ActionException e) {
throw e;
} catch (Exception ex) {
throw new ActionException(ex);
}
}
它使用了反射,最后终执行了setImageView方法。这样就完成了更新view操作。
RemoteViews.reapply() 也是同理,这里不再叙述了。

相关文章推荐
- create-react-app的使用及原理分析
- 使用适用于 Win32* 线程的英特尔® 线程性能分析器:原理与理论
- 索引原理及项目中如何使用索引实例分析
- OAuth认证协议原理分析及使用方法(转)
- OAuth认证协议原理分析及使用方法
- Java NIO使用及原理分析 (四)
- DOS中断跟踪,在纯Dos下使用,分析Dos工作原理的最佳工具,原理详看原代码
- Oauth认证协议原理分析及使用方法
- 使用AppFabric 承载WCF和WF服务-实例分析和说明
- 【堆调试工具】pageheap的使用和原理分析&Linux下相似的功能实现
- 堆调试工具——pageheap的使用和原理分析
- OAuth认证协议原理分析及使用方法
- 【华磊随笔】善于使用工具(1)-使用IE8开发人员工具和FireBug分析Jquery FlexiGrid的实现原理
- RBAC原理介绍及kasai使用分析
- 索引原理及项目中如何使用索引实例分析
- OAuth认证协议原理分析及使用方法
- OAuth认证协议原理分析及使用方法
- Java NIO使用及原理分析(二)
- RBAC原理介绍及开源框架kasai使用分析