Spring集成Redis使用注解
2016-08-05 15:00
645 查看
使用Maven项目,添加jar文件依赖:
配置Redis参数
集成到Spring中
使用注解:
UserSaveCache自定义注解:
加载配置文件:
测试:
测试结果:
测试:addUser
@CachePut(value=”“,condition=”“,key=”“,unless=”“)
@Cacheable(value=”“,condition=”“,key=”“,unless=”“)
@Cacheable(value=”“,condition=”“,key=”“,unless=”“)
@Caching(value=”“,condition=”“,key=”“,unless=”“)
例如:
运行流程:
流程中需要注意的就是2/3/4步:
如果有@CachePut操作,即使有@Cacheable也不会从缓存中读取;问题很明显,如果要混合多个注解使用,不能组合使用@CachePut和@Cacheable;官方说应该避免这样使用(解释是如果带条件的注解相互排除的场景);不过个人感觉还是不要考虑这个好,让用户来决定如何使用,否则一会介绍的场景不能满足。
CachePut与Cacheable区别:
@CachePut:这个注释可以确保方法被执行,同时方法的返回值也被记录到缓存中。
@Cacheable:当重复使用相同参数调用方法的时候,方法本身不会被调用执行,即方法本身被略过了,取而代之的是方法的结果直接从缓存中找到并返回了,如果从缓存中没有找到数据,则会执行方法,并且将返回值加入到缓存,当再次执行该方法获取时,会直接从缓存中拿,而不会执行方法体。
@CachePut和@Cacheable这两个标签可以结合使用,当需要根据请求改变值的时候,利用@CachePut将值改变并写入到缓存中,而@Cacheable标签除了第一次之外,一直是取的缓存的值。注意结合使用时需要注意两点:
1、必须是同一个缓存实例。
2、key值必须是相同的。
<project xmlns="http://maven.apache.org/POM/4.0.0" xmlns:xsi="http://www.w3.org/2001/XMLSchema-instance"
xsi:schemaLocation="http://maven.apache.org/POM/4.0.0 http://maven.apache.org/xsd/maven-4.0.0.xsd"> <modelVersion>4.0.0</modelVersion>
<groupId>com.luo</groupId>
<artifactId>redis_project</artifactId>
<version>0.0.1-SNAPSHOT</version>

<properties>
<!-- spring版本号 -->
<spring.version>3.2.8.RELEASE</spring.version>
<!-- junit版本号 -->
<junit.version>4.10</junit.version>
</properties>

<dependencies>
<!-- 添加Spring依赖 -->
<dependency>
<groupId>org.springframework</groupId>
<artifactId>spring-core</artifactId>
<version>${spring.version}</version>
</dependency>
<dependency>
<groupId>org.springframework</groupId>
<artifactId>spring-webmvc</artifactId>
<version>${spring.version}</version>
</dependency>
<dependency>
<groupId>org.springframework</groupId>
<artifactId>spring-context</artifactId>
<version>${spring.version}</version>
</dependency>
<dependency>
<groupId>org.springframework</groupId>
<artifactId>spring-context-support</artifactId>
<version>${spring.version}</version>
</dependency>
<dependency>
<groupId>org.springframework</groupId>
<artifactId>spring-aop</artifactId>
<version>${spring.version}</version>
</dependency>
<dependency>
<groupId>org.springframework</groupId>
<artifactId>spring-aspects</artifactId>
<version>${spring.version}</version>
</dependency>
<dependency>
<groupId>org.springframework</groupId>
<artifactId>spring-tx</artifactId>
<version>${spring.version}</version>
</dependency>
<dependency>
<groupId>org.springframework</groupId>
<artifactId>spring-jdbc</artifactId>
<version>${spring.version}</version>
</dependency>
<dependency>
<groupId>org.springframework</groupId>
<artifactId>spring-web</artifactId>
<version>${spring.version}</version>
</dependency>

<!--单元测试依赖 -->
<dependency>
<groupId>junit</groupId>
<artifactId>junit</artifactId>
<version>${junit.version}</version>
<scope>test</scope>
</dependency>

<!--spring单元测试依赖 -->
<dependency>
<groupId>org.springframework</groupId>
<artifactId>spring-test</artifactId>
<version>${spring.version}</version>
<scope>test</scope>
</dependency>

<!-- Redis 相关依赖 -->
<dependency>
<groupId>org.springframework.data</groupId>
<artifactId>spring-data-redis</artifactId>
<version>1.6.1.RELEASE</version>
</dependency>
<dependency>
<groupId>redis.clients</groupId>
<artifactId>jedis</artifactId>
<version>2.7.3</version>
</dependency>
<!-- enchace -->
<dependency>
<groupId>net.sf.ehcache</groupId>
<artifactId>ehcache-core</artifactId>
<version>2.6.6</version>
</dependency>
</dependencies>
</project>
配置Redis参数
#redis中心
#绑定的主机地址
redis.host=127.0.0.1
#指定Redis监听端口,默认端口为6379
redis.port=6379
#授权密码(本例子没有使用)
redis.password=123456
#最大空闲数:空闲链接数大于maxIdle时,将进行回收
redis.maxIdle=100
#最大连接数:能够同时建立的“最大链接个数”
redis.maxActive=300
#最大等待时间:单位ms
redis.maxWait=1000
#使用连接时,检测连接是否成功
redis.testOnBorrow=true
#当客户端闲置多长时间后关闭连接,如果指定为0,表示关闭该功能
redis.timeout=10000
集成到Spring中
<?xml version="1.0" encoding="UTF-8"?>
<beans xmlns="http://www.springframework.org/schema/beans"
xmlns:xsi="http://www.w3.org/2001/XMLSchema-instance" xmlns:context="http://www.springframework.org/schema/context"
xmlns:c="http://www.springframework.org/schema/c" xmlns:p="http://www.springframework.org/schema/p"
xmlns:cache="http://www.springframework.org/schema/cache" xmlns:aop="http://www.springframework.org/schema/aop"
xsi:schemaLocation=" http://www.springframework.org/schema/beans http://www.springframework.org/schema/beans/spring-beans-3.0.xsd http://www.springframework.org/schema/aop http://www.springframework.org/schema/aop/spring-aop-3.0.xsd http://www.springframework.org/schema/context http://www.springframework.org/schema/context/spring-context-3.0.xsd http://www.springframework.org/schema/cache http://www.springframework.org/schema/cache/spring-cache-4.2.xsd">

<!-- 自动扫描注解的bean -->
<context:component-scan base-package="com.luo" />
<context:annotation-config />
<cache:annotation-driven />

<!-- 引入properties配置文件 -->
<bean id="propertyConfigurer"
class="org.springframework.beans.factory.config.PropertyPlaceholderConfigurer">
<property name="locations">
<list>
<value>classpath:properties/*.properties</value>
<!--要是有多个配置文件,只需在这里继续添加即可 -->
</list>
</property>
</bean>

<!-- jedis 配置 -->
<bean id="poolConfig" class="redis.clients.jedis.JedisPoolConfig">
<property name="maxIdle" value="${redis.maxIdle}" />
<property name="maxWaitMillis" value="${redis.maxWait}" />
<property name="testOnBorrow" value="${redis.testOnBorrow}" />
</bean>

<!-- redis服务器中心 -->
<bean id="connectionFactory"
class="org.springframework.data.redis.connection.jedis.JedisConnectionFactory">
<property name="poolConfig" ref="poolConfig" />
<property name="port" value="${redis.port}" />
<property name="hostName" value="${redis.host}" />
<!-- <property name="password" value="${redis.password}" /> -->
<property name="timeout" value="${redis.timeout}"></property>
</bean>
<bean id="redisTemplate" class="org.springframework.data.redis.core.RedisTemplate">
<property name="connectionFactory" ref="connectionFactory" />
<property name="keySerializer">
<bean
class="org.springframework.data.redis.serializer.StringRedisSerializer" />
</property>
<property name="valueSerializer">
<bean
class="org.springframework.data.redis.serializer.JdkSerializationRedisSerializer" />
</property>
</bean>
<!-- 配置缓存 -->
<bean id="cacheManager" class="org.springframework.data.redis.cache.RedisCacheManager">
<constructor-arg ref="redisTemplate" />
</bean>
<bean id="methodCacheInterceptor" class="com.luo.redis.cache.MethodCacheInterceptor" >
<property name="redisTemplate" ref="redisTemplate" />
</bean >

<bean id="redisTestService" class="com.luo.service.impl.RedisTestServiceImpl">
</bean>

</beans>
使用注解:
/*
* 文件名:UserServiceImpl.java
* 版权:Copyright 2007-2016 517na Tech. Co. Ltd. All Rights Reserved.
* 描述: UserServiceImpl.java
* 修改人:peiyu
* 修改时间:2016年8月5日
* 修改内容:新增
*/
package com.luo.service.impl;

import java.util.ArrayList;
import java.util.List;

import org.springframework.cache.annotation.CachePut;
import org.springframework.cache.annotation.Cacheable;
import org.springframework.cache.annotation.Caching;
import org.springframework.stereotype.Service;

import com.luo.redis.anno.UserSaveCache;
import com.luo.redis.model.User;
import com.luo.service.UserService;

/**
* @author peiyu
*/
@Service
public class UserServiceImpl implements UserService {
//@CachePut(value = "user", key = "'id_'+#user.getId()")
/*@Caching(put = {
@CachePut(value = "user", key = "'user_id_'+#user.id"),
@CachePut(value = "user", key = "'user_username_'+#user.username"),
@CachePut(value = "user", key = "'user_email_'+#user.email")
})*/
@UserSaveCache
public User addUser(User user) {
System.out.println("addUser,@CachePut注解方法被调用啦。。。。。");
return user;
}
@Cacheable(value = "user", key = "'id_'+#id") //,key="'user_id_'+#id"
public User getUserByID(Integer id) {
System.out.println("@Cacheable注解方法被调用啦。。。。。");
User user = new User();
user.setUsername("zhangsan");
user.setPassword("123456");
user.setAge(10);
user.setId(123);
user.setEmail("192554785@163.com");
return user;
}
@CachePut(value = "user", key = "'users_'+#user.getId()")
public List<User> getUsers(User user) {
System.out.println("@CachePut注解方法被调用啦。。。。。");
List<User> users = new ArrayList<User>();
for (int i = 0; i < 10; i++) {
User temp = new User();
temp.setUsername("username" + i);
users.add(temp);
}
return users;
}
}
UserSaveCache自定义注解:
/*
* 文件名:UserSaveCache.java
* 版权:Copyright 2007-2016 517na Tech. Co. Ltd. All Rights Reserved.
* 描述: UserSaveCache.java
* 修改人:peiyu
* 修改时间:2016年8月5日
* 修改内容:新增
*/
package com.luo.redis.anno;

import java.lang.annotation.ElementType;
import java.lang.annotation.Inherited;
import java.lang.annotation.Retention;
import java.lang.annotation.RetentionPolicy;
import java.lang.annotation.Target;

import org.springframework.cache.annotation.CachePut;
import org.springframework.cache.annotation.Caching;

/**
* @author     peiyu
*/
@Caching(put = {
@CachePut(value = "user", key = "'user_id_'+#user.id"),
@CachePut(value = "user", key = "'user_username_'+#user.username"),
@CachePut(value = "user", key = "'user_email_'+#user.email")
})
@Target({ElementType.METHOD, ElementType.TYPE})
@Retention(RetentionPolicy.RUNTIME)
@Inherited
public @interface UserSaveCache {
}
加载配置文件:
package com.luo.baseTest;

import org.junit.runner.RunWith;
import org.springframework.test.context.ContextConfiguration;
import org.springframework.test.context.junit4.AbstractJUnit4SpringContextTests;
import org.springframework.test.context.junit4.SpringJUnit4ClassRunner;

//指定bean注入的配置文件
@ContextConfiguration(locations = { "classpath:application.xml" })
//使用标准的JUnit @RunWith注释来告诉JUnit使用Spring TestRunner
@RunWith(SpringJUnit4ClassRunner.class)
public class SpringTestCase extends AbstractJUnit4SpringContextTests {

}
测试:
package com.luo.service;
import org.junit.Test;
import org.springframework.beans.factory.annotation.Autowired;
import org.springframework.data.redis.core.RedisTemplate;
import org.springframework.data.redis.core.ValueOperations;
import com.luo.baseTest.SpringTestCase;
import com.luo.redis.model.User;
public class RedisTestServiceTest extends SpringTestCase {
@Autowired
private RedisTemplate<String, Object> redisTemplate;
@Autowired
private UserService userService;
@Test
public void redisTest() throws InterruptedException {
User user = new User();
user.setUsername("zhangsan");
user.setPassword("123456");
user.setAge(10);
user.setEmail("192554785@163.com");
user.setId(10);
System.out.println("=======addUser===================");
userService.addUser(user);
// System.out.println("=======第一次getUserByID============");
// System.out.println(userService.getUserByID(11));
// System.out.println("=======第二次getUserByID============");
// System.out.println(userService.getUserByID(11));
// System.out.println("===============================");
// ValueOperations<String, Object> opsForValue = redisTemplate.opsForValue();
// System.out.println("set前:"+opsForValue.get("user"));
// opsForValue.set("user", user);
// System.out.println("set后:"+opsForValue.get("user"));
// redisTemplate.delete("user");
// System.out.println("delete后:"+opsForValue.get("user"));
}
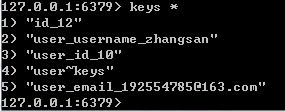
}测试结果:
set前:null
set后:10:zhangsan:123456:10:192554785@163.com
delete后:null

测试:getUserByID
=======第一次getUserByID============
@Cacheable注解方法被调用啦。。。。。
123:zhangsan:123456:10:192554785@163.com
=======第二次getUserByID============
123:zhangsan:123456:10:192554785@163.com
===============================
测试:addUser
@CachePut(value=”“,condition=”“,key=”“,unless=”“)
public @interface CachePut {
String[] value();              //缓存的名字,可以把数据写到多个缓存
String key() default "";       //缓存key,如果不指定将使用默认的KeyGenerator生成,后边介绍
String condition() default ""; //满足缓存条件的数据才会放入缓存,condition在调用方法之前和之后都会判断
String unless() default "";    //用于否决缓存更新的,不像condition,该表达只在方法执行之后判断,此时可以拿到返回值result进行判断了
}
@Cacheable(value=”“,condition=”“,key=”“,unless=”“)
public @interface Cacheable{
String[] value();              //缓存的名字,可以把数据写到多个缓存
String key() default "";       //缓存key,如果不指定将使用默认的KeyGenerator生成,后边介绍
String condition() default ""; //满足缓存条件的数据才会放入缓存,condition在调用方法之前和之后都会判断
String unless() default "";    //用于否决缓存更新的,不像condition,该表达只在方法执行之后判断,此时可以拿到返回值result进行判断了
}
@Cacheable(value=”“,condition=”“,key=”“,unless=”“)
public @interface CacheEvict {
String[] value();              //缓存的名字,可以把数据写到多个缓存
String key() default "";       //缓存key,如果不指定将使用默认的KeyGenerator生成,后边介绍
String condition() default ""; //满足缓存条件的数据才会放入缓存,condition在调用方法之前和之后都会判断
boolean allEntries() default false;      //是否移除所有数据
boolean beforeInvocation() default false;//是调用方法之前移除/还是调用之后移除
@Caching(value=”“,condition=”“,key=”“,unless=”“)
public @interface Caching {

Cacheable[] cacheable() default {}; //从缓存获取多个,如果没有则执行方法体,获取值后加入缓存

CachePut[] put() default {}; //缓存多个

CacheEvict[] evict() default {}; //从缓存移除多个

}
例如:
@Caching(put = {
@CachePut(value = "user", key = "'user_id_'+#user.id"),
@CachePut(value = "user", key = "'user_username_'+#user.username"),
@CachePut(value = "user", key = "'user_email_'+#user.email")
}

@Caching(cacheable = {
@Cacheable(value = "user", key = "'user_id_'+#user.id"),
@Cacheable(value = "user", key = "'user_username_'+#user.username"),
@Cacheable(value = "user", key = "'user_email_'+#user.email")
})

@Caching(evict={
@CacheEvict(value="",key="",condition="",allEntries=false,beforeInvocation=false),
@CacheEvict(value="",key="",condition="",allEntries=false,beforeInvocation=false),
@CacheEvict(value="",key="",condition="",allEntries=false,beforeInvocation=false)
})
运行流程:
1、首先执行@CacheEvict(如果beforeInvocation=true且condition 通过),如果allEntries=true,则清空所有
2、接着收集@Cacheable(如果condition 通过,且key对应的数据不在缓存),放入cachePutRequests(也就是说如果cachePutRequests为空,则数据在缓存中)
3、如果cachePutRequests为空且没有@CachePut操作,那么将查找@Cacheable的缓存,否则result=缓存数据(也就是说只要当没有cache put请求时才会查找缓存)
4、如果没有找到缓存,那么调用实际的API,把结果放入result
5、如果有@CachePut操作(如果condition 通过),那么放入cachePutRequests
6、执行cachePutRequests,将数据写入缓存(unless为空或者unless解析结果为false);
7、执行@CacheEvict(如果beforeInvocation=false 且 condition 通过),如果allEntries=true,则清空所有
流程中需要注意的就是2/3/4步:
如果有@CachePut操作,即使有@Cacheable也不会从缓存中读取;问题很明显,如果要混合多个注解使用,不能组合使用@CachePut和@Cacheable;官方说应该避免这样使用(解释是如果带条件的注解相互排除的场景);不过个人感觉还是不要考虑这个好,让用户来决定如何使用,否则一会介绍的场景不能满足。
CachePut与Cacheable区别:
@CachePut:这个注释可以确保方法被执行,同时方法的返回值也被记录到缓存中。
@Cacheable:当重复使用相同参数调用方法的时候,方法本身不会被调用执行,即方法本身被略过了,取而代之的是方法的结果直接从缓存中找到并返回了,如果从缓存中没有找到数据,则会执行方法,并且将返回值加入到缓存,当再次执行该方法获取时,会直接从缓存中拿,而不会执行方法体。
@CachePut和@Cacheable这两个标签可以结合使用,当需要根据请求改变值的时候,利用@CachePut将值改变并写入到缓存中,而@Cacheable标签除了第一次之外,一直是取的缓存的值。注意结合使用时需要注意两点:
1、必须是同一个缓存实例。
2、key值必须是相同的。

相关文章推荐
- spring 和 redis的集成(使用注解方式)
- spring4集成redis 并使用@cacheable注解
- Spring集成Redis使用注解
- DWR高级主题之DWR与spring集成(不使用springMVC,不使用注解的实例)
- Spring集成Hibernate,使用JPA注解方式,新增数据无法提交
- redis和spring集成(注解实现,方便,快捷)
- 【Redis】spring-data-redis与JedisPool的区别、使用ShardedJedisPool与spring集成的实现及一致性哈希分析
- Spring Boot 基于注解的 Redis 缓存使用详解
- DWR高级主题之DWR与spring集成(不使用springMVC,但使用注解的实例)
- 【Redis】Redis的基本安装及使用、Jedis的基本使用、spring-data-redis的集成、主从模式、哨兵模式
- Spring集成Redis使用RedisTemplate
- redis与spring集成--不使用spring-data-redis
- Spring Boot 基于注解的 Redis 缓存使用
- 5、redis之使用spring集成commons-pool
- redis和spring集成(注解实现,方便,快捷)
- DWR高级主题之DWR与spring集成(使用springMVC,非注解的实例)
- DWR3与spring集成(不使用springMVC,但使用注解的实例)
- spring集成ehcache(注解使用,非hibernate集成,顺便谈谈自己的看法)
- Spring 使用注解集成Log
- spring集成redis及简单使用